在Android平台上,集成了一個嵌入式關系型數據庫—SQLite。以SQLite是一款輕型數據庫:SQLite3支持 NULL、INTEGER、REAL(浮點數字)、TEXT(字符串文本)和BLOB(二進制對象)數據類型,雖然它支持的類型只有五種,但實際上sqlite3也接受varchar(n)、char(n)、decimal(p,s) 等數據類型,只不過在運算或保存時會轉成對應的五種數據類型。
SQLite可以解析大部分標准SQL語句。
一、設計界面
1、布局文件
打開res/layout/activity_main.xml文件。
輸入以下代碼:
[html] view plain copy
- <?xml version="1.0" encoding="utf-8"?>
-
- <LinearLayout xmlns:android="http://schemas.android.com/apk/res/android"
- android:orientation="vertical"
- android:layout_width="match_parent"
- android:layout_height="match_parent"
- android:background="#EFEFEF">
-
- <TextView
- android:layout_width="fill_parent"
- android:layout_height="wrap_content"
- android:text="@string/prompt"
- android:textColor="@drawable/black" />
-
- <EditText
- android:id="@+id/editbook"
- android:layout_width="fill_parent"
- android:layout_height="wrap_content"
- android:textColor="@drawable/black" />
-
- <TextView
- android:layout_width="fill_parent"
- android:layout_height="wrap_content"
- android:text="作者:"
- android:textColor="@drawable/black" />
-
- <EditText
- android:id="@+id/editauthor"
- android:layout_width="fill_parent"
- android:layout_height="wrap_content"
- android:textColor="@drawable/black" />
-
- <TextView
- android:layout_width="fill_parent"
- android:layout_height="wrap_content"
- android:text="出版社:"
- android:textColor="@drawable/black" />
-
- <EditText
- android:id="@+id/editpublisher"
- android:layout_width="fill_parent"
- android:layout_height="wrap_content"
- android:textColor="@drawable/black" />
-
- <ListView
- android:id="@+id/listview"
- android:layout_width="fill_parent"
- android:layout_height="wrap_content"
- android:background="@drawable/black" />
-
-
- </LinearLayout>
2、自定義列表文件
打開res/layout/list.xml文件。
輸入以下代碼:
[html] view plain copy
- <?xml version="1.0" encoding="utf-8"?>
-
- <LinearLayout xmlns:android="http://schemas.android.com/apk/res/android"
- android:layout_width="match_parent"
- android:layout_height="match_parent">
-
- <CheckedTextView android:id="@+id/textbookname"
- android:layout_width="wrap_content"
- android:layout_height="wrap_content" />
-
- <ImageView
- android:id="@+id/imageView1"
- android:layout_width="wrap_content"
- android:layout_height="wrap_content"
- android:src="@drawable/list_driver" />
-
-
- <CheckedTextView android:id="@+id/textauthor"
- android:layout_width="wrap_content"
- android:layout_height="wrap_content"/>
-
- <ImageView
- android:id="@+id/imageView2"
- android:layout_width="wrap_content"
- android:layout_height="wrap_content"
- android:src="@drawable/list_driver" />
-
- <CheckedTextView android:id="@+id/textpublisher"
- android:layout_width="wrap_content"
- android:layout_height="wrap_content" />
-
- </LinearLayout>
3、顏色文件
打開res/values/color.xml文件。
輸入以下代碼:
[html] view plain copy
- <?xml version="1.0" encoding="utf-8"?>
- <resources>
- <drawable name="black">#000000</drawable>
- <drawable name="white">#FFFFFFFF</drawable>
- <drawable name="gray">#EFEFEF</drawable>
- </resources>
4、字符串文件
打開res/values/string.xml文件。
輸入以下代碼:
[html] view plain copy
- <?xml version="1.0" encoding="utf-8"?>
- <resources>
-
- <string name="app_name">SQLite</string>
- <string name="prompt">書名:(請使用菜單:完成新增、修改、查詢、刪除記錄)</string>
- <string name="addrec">新增</string>
- <string name="editrec">修改</string>
- <string name="queryrec">查詢</string>
- <string name="delrec">刪除</string>
-
- </resources>
二、程序文件
1、SQLiteHelper.java文件
打開“src/com.genwoxue.sqlite/SQLiteHelper.java”文件。
然後輸入以下代碼:
[java] view plain copy
- package com.genwoxue.sqlite;
-
- import android.content.ContentValues;
- import android.content.Context;
- import android.database.Cursor;
- import android.database.sqlite.SQLiteDatabase;
- import android.database.sqlite.SQLiteOpenHelper;
-
- public class SQLiteHelper extends SQLiteOpenHelper {
-
- private final static String DATABASE_NAME = "Library";
- private final static int DATABASE_VERSION = 1;
- private final static String TABLE_NAME = "Book";
-
- //構造函數,創建數據庫
- public SQLiteHelper(Context context) {
- super(context, DATABASE_NAME, null, DATABASE_VERSION);
- }
-
- //建表
- public void onCreate(SQLiteDatabase db) {
- String sql = "CREATE TABLE " + TABLE_NAME
- + "(_id INTEGER PRIMARY KEY,"
- + " BookName VARCHAR(30) NOT NULL,"
- + " Author VARCHAR(20),"
- + " Publisher VARCHAR(30))";
- db.execSQL(sql);
- }
-
-
- public void onUpgrade(SQLiteDatabase db, int oldVersion, int newVersion) {
- String sql = "DROP TABLE IF EXISTS " + TABLE_NAME;
- db.execSQL(sql);
- onCreate(db);
- }
-
- //獲取游標
- public Cursor select() {
- SQLiteDatabase db = this.getReadableDatabase();
- Cursor cursor = db.query(TABLE_NAME, null, null, null, null, null, null);
- return cursor;
- }
-
- //插入一條記錄
- public long insert(String bookName,String author,String publisher ) {
- SQLiteDatabase db = this.getWritableDatabase();
- ContentValues cv = new ContentValues();
- cv.put("BookName", bookName);
- cv.put("Author", author);
- cv.put("Publisher", publisher);
- long row = db.insert(TABLE_NAME, null, cv);
- return row;
- }
-
- //根據條件查詢
- public Cursor query(String[] args) {
- SQLiteDatabase db = this.getReadableDatabase();
- Cursor cursor = db.rawQuery("SELECT * FROM "+TABLE_NAME+" WHERE BookName LIKE ?", args);
- return cursor;
- }
-
- //刪除記錄
- public void delete(int id) {
- SQLiteDatabase db = this.getWritableDatabase();
- String where ="_id = ?";
- String[] whereValue = { Integer.toString(id) };
- db.delete(TABLE_NAME, where, whereValue);
- }
-
- //更新記錄
- public void update(int id, String bookName,String author,String publisher) {
- SQLiteDatabase db = this.getWritableDatabase();
- String where = "_id = ?";
- String[] whereValue = { Integer.toString(id) };
- ContentValues cv = new ContentValues();
- cv.put("BookName", bookName);
- cv.put("Author", author);
- cv.put("Publisher", publisher);
- db.update(TABLE_NAME, cv, where, whereValue);
- }
- }
2、MainActivity.java文件
打開“src/com.genwoxue.sqlite/MainActivity.java”文件。
然後輸入以下代碼:
[java] view plain copy
- package com.genwoxue.sqlite;
-
- import android.app.Activity;
- import android.database.Cursor;
- import android.os.Bundle;
- import android.view.Menu;
- import android.view.MenuItem;
- import android.view.View;
- import android.widget.AdapterView;
- import android.widget.EditText;
- import android.widget.ListView;
- import android.widget.SimpleCursorAdapter;
-
- public class MainActivity extends Activity {
- private SQLiteHelper helper;
- private Cursor cursor;
- private ListView lvBook;
- private EditText editBook;
- private EditText editAuthor;
- private EditText editPublisher;
-
- private int id=0;
-
- protected final static int MENU_ADD = Menu.FIRST;
- protected final static int MENU_EDIT = Menu.FIRST + 1;
- protected final static int MENU_QUERY = Menu.FIRST + 2;
- protected final static int MENU_DELETE = Menu.FIRST + 3;
-
- //執行菜單選項
- public boolean onOptionsItemSelected(MenuItem item)
- {
- super.onOptionsItemSelected(item);
- switch (item.getItemId())
- {
- case MENU_ADD:
- this.addRec();
- break;
- case MENU_EDIT:
- this.editRec();
- break;
- case MENU_QUERY:
- this.queryRec();
- break;
- case MENU_DELETE:
- this.deleteRec();
- break;
- }
- return true;
- }
-
- //初始化菜單
- public boolean onCreateOptionsMenu(Menu menu)
- {
- super.onCreateOptionsMenu(menu);
- menu.add(Menu.NONE, MENU_ADD, 0, R.string.addrec).setIcon(android.R.drawable.ic_menu_add);
- menu.add(Menu.NONE, MENU_EDIT, 0, R.string.editrec).setIcon(android.R.drawable.ic_menu_edit);
- menu.add(Menu.NONE,MENU_QUERY,0,R.string.queryrec).setIcon(android.R.drawable.ic_menu_search);
- menu.add(Menu.NONE, MENU_DELETE, 0, R.string.delrec).setIcon(android.R.drawable.ic_menu_delete);
- return true;
- }
-
-
-
- public void onCreate(Bundle savedInstanceState)
- {
- super.onCreate(savedInstanceState);
- setContentView(R.layout.activity_main);
-
- lvBook = (ListView) this.findViewById(R.id.listview);
- editBook = (EditText) this.findViewById(R.id.editbook);
- editAuthor=(EditText) this.findViewById(R.id.editauthor);
- editPublisher=(EditText) this.findViewById(R.id.editpublisher);
-
- //表中內容填充到自定義ListView
- helper = new SQLiteHelper(this);
- cursor = helper.select();
- SimpleCursorAdapter adapter = new SimpleCursorAdapter(
- this,
- R.layout.list,
- cursor,
- new String[] {"BookName","Author","Publisher"},
- new int[] { R.id.textbookname,R.id.textauthor,R.id.textpublisher}
- );
- lvBook.setAdapter(adapter);
-
- // lvBook設置OnItemClickListener監聽事件
- lvBook.setOnItemClickListener(new AdapterView.OnItemClickListener(){
- public void onItemClick(AdapterView<?> arg0, View arg1, int arg2, long arg3){
- cursor.moveToPosition(arg2); // 將cursor移到所點擊的值
- id = cursor.getInt(0); // 取得字段_id的值
- editBook.setText(cursor.getString(1)); // 取得字段Rec_text的值
- editAuthor.setText(cursor.getString(2));
- editPublisher.setText(cursor.getString(3));
- }
- });
-
- }
-
- //添加記錄
- private void addRec()
- {
- if (editBook.getText().toString().equals(""))
- return;
- helper.insert(editBook.getText().toString(),editAuthor.getText().toString(),editPublisher.getText().toString());
- //重新加載數據
- cursor.requery();
- lvBook.invalidateViews();
- editBook.setText("");
- editAuthor.setText("");
- editPublisher.setText("");
- }
-
- // 修改記錄
- private void editRec()
- {
- if (editBook.getText().toString().equals(""))
- return;
- helper.update(id, editBook.getText().toString(),editAuthor.getText().toString(),editPublisher.getText().toString());
-
- //重新加載數據
- cursor.requery();
- lvBook.invalidateViews();
- editBook.setText("");
- editAuthor.setText("");
- editPublisher.setText("");
- }
-
- //根據書名查詢
- private void queryRec()
- {
- String et=editBook.getText().toString();
- String args[]=new String[]{"%"+et+"%"};
- cursor=helper.query(args);
- SimpleCursorAdapter adapter = new SimpleCursorAdapter(
- this,
- R.layout.list,
- cursor,
- new String[] {"BookName","Author","Publisher"},
- new int[] { R.id.textbookname,R.id.textauthor,R.id.textpublisher}
- );
- lvBook.setAdapter(adapter);
- }
-
- //刪除記錄
- private void deleteRec()
- {
- helper.delete(id);
- cursor.requery();
- lvBook.invalidateViews();
- editBook.setText("");
- }
-
- }
三、配置文件
打開“AndroidManifest.xml”文件。
然後輸入以下代碼:
[html] view plain copy
- <?xml version="1.0" encoding="utf-8"?>
- <manifest xmlns:android="http://schemas.android.com/apk/res/android"
- package="com.genwoxue.sqlite"
- android:versionCode="1"
- android:versionName="1.0" >
-
- <uses-sdk
- android:minSdkVersion="8"
- android:targetSdkVersion="15" />
-
- <application
- android:allowBackup="true"
- android:icon="@drawable/ic_launcher"
- android:label="@string/app_name"
- android:theme="@style/AppTheme" >
- <activity
- android:name="com.genwoxue.sqlite.MainActivity"
- android:label="@string/app_name"
- <span style="color:#ff0000;"><strong>android:theme="@android:style/Theme"</strong> </span>>
- <intent-filter>
- <action android:name="android.intent.action.MAIN" />
- <category android:name="android.intent.category.LAUNCHER" />
- </intent-filter>
- </activity>
- </application>
-
- </manifest>
注意:在Android4.0中,如果想顯示2.3版本中樣式的菜單,需要在配置文件中填加以上紅色代碼。
四、運行結果
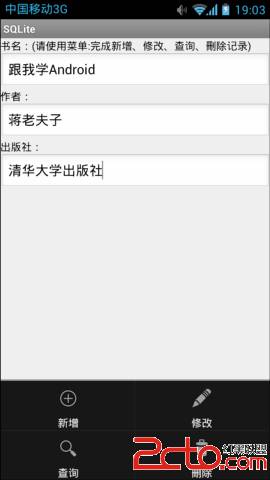
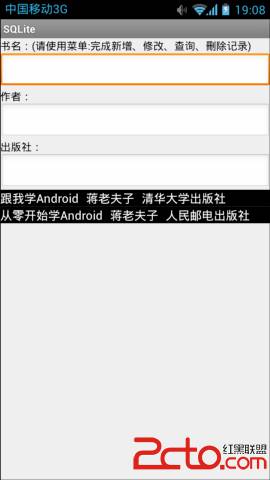
說明:輸入內容,單擊“新增”菜單,則添加一條記錄;也可以根據書名查詢相應書籍;也可以選中某條記錄,然後單擊“修改”或“刪除”菜單。
附:
(一)如何刪除Sqlite數據庫
常有人問:如何刪除自己創建的數據庫?
在Activity中,提供有現成的方法:public boolean deleteDatabase (String name)
(二)SimpleCursorAdapter簡要說明
描述:
SimpleCurosrAdapter 是一個將 Cursor 中的 columns 與在 XML 文件中定義的 TextViews 或 ImageViews 進行匹配的簡易 adapter。你可以指定選擇 Cursor 中的哪些 columns、用哪些 views 來顯示這些 columns 、以及指定定義這些 views 的 xml 文件。
也就是說,SimpleCursorAdapter 允許綁定一個 Cursor 的 columns 到 ListView 上,並使用自定義的 layout 顯示 List中的每個項目。
可以使用 SimpleCursorAdapter 作為中間橋梁,將從 sqlite 數據庫中查詢出來的數據直接顯示到 ListView 中。
原型:
public SimpleCursorAdapter(Context context, int layout, Cursor c, String[] from, int[] to) {
super(context, layout, c);
mTo = to;
mOriginalFrom = from;
findColumns(from);
}
參數:
Context context, 這個與 SimpleListItemFactory 相關的 ListView 所處運行上下文(context)。也就是這個 ListView 所在的 Activity。
int layout, 顯示 list item 的 布局文件。這個 layout 文件中至少要包含在 "to" 參數中命名的 views。
Cursor c,數據庫的光標( Cursor )。如果 cursor 無效,則該參數可以為 null
String[] from, 指定 column 中的哪些列的數據將綁定(顯示)到 UI 中。如果 cursor 無效, 則該參數可為 null。
int[] to, 指定用於顯示 "from" 參數指定的數據列表的 views。 這些 views 必須都是 TextViews。 "from" 參數的前 N 個值(valus)和 "to" 參數的前 N 個 views 是一一對應的關系。如果 cursor 無效,則該參數可為 null。
 8.3.5 Paint API之—— Xfermode與PorterDuff詳解(二)
 第14章、布局Layouts之FrameLayout框架布局(從零開始學Android)
 2.3.8 SeekBar(拖動條)
 2.3.5.RadioButton(單選按鈕)&Checkbox(復選框)