編輯:Android技術基礎
從本節開始我們要講的UI控件都是跟Adapter(適配器)打交道的,了解並學會使用這個Adapter很重要, Adapter是用來幫助填充數據的中間橋梁,簡單點說就是:將各種數據以合適的形式顯示到view上,提供 給用戶看!
在開始學習Adapter之前我們要來了解下這個MVC模式概念: 舉個例子:大型的商業程序通常由多人一同開發完成,比如有人負責操作接口的規劃與設計, 有人負責程序代碼的編寫如果要能夠做到程序項目的分工就必須在程序的結構上做適合的安排 ,如果,接口設計與修改都涉及到程序代碼的改變的話,那麼兩者的分工就會造成執行上的困難 良好的程序架構師將整個程序項目劃分為如圖的三個部分:

關系圖解析:
- Model:通常可以理解為數據,負責執行程序的核心運算與判斷邏輯,,通過view獲得用戶 輸入的數據,然後根據從數據庫查詢相關的信息,最後進行運算和判斷,再將得到的結果交給view來顯示
- view:用戶的操作接口,說白了就是GUI,應該使用哪種接口組件,組件間的排列位置與順序都需要設計
- Controller:控制器,作為model與view之間的樞紐,負責控制程序的執行流程以及對象之間的一個互動
而這個Adapter則是中間的這個Controller的部分: Model(數據) ---> Controller(以什麼方式顯示到)---> View(用戶界面) 這就是簡單MVC組件的簡單理解!
官方文檔:Adapter
首先我們來看看他的繼承結構圖:

上面就是Adapter以及繼承結構圖了,接著我們介紹一下實際開發中還用到的幾個Adapter吧!
- BaseAdapter:抽象類,實際開發中我們會繼承這個類並且重寫相關方法,用得最多的一個Adapter!
- ArrayAdapter
:支持泛型操作,最簡單的一個Adapter,只能展現一行文字~ - SimpleAdapter:同樣具有良好擴展性的一個Adapter,可以自定義多種效果!
- SimpleCursorAdapter:用於顯示簡單文本類型的listView,一般在數據庫那裡會用到,不過有點過時, 不推薦使用!
其實一個BaseAdapter就夠玩的了,至於其他的,實際開發中用得不多,後面用到在講解~
好的,多說無益,寫代碼最實際,接下來我們來用寫幾個簡單的Adapter實例, 幫助我們了解Adapter給我們帶來的便利,另外,因為Adapter需要結合ListView, GridView等等控件講解,一些高級一點的用法我們都放在ListView那裡講! 這裡就簡單演示下效果,另外這裡用到的控件是ListView,下一節就會講解, 現在看不懂也沒關系!
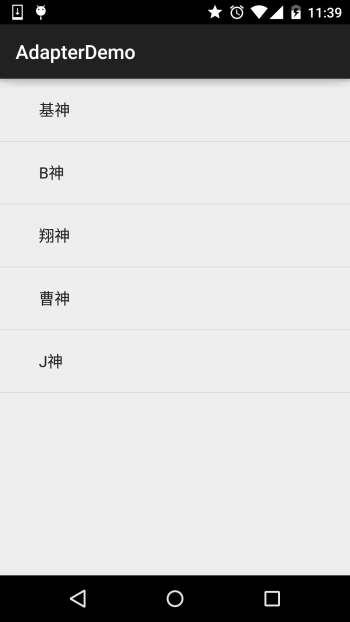
運行效果圖:
代碼實現:
public class MainActivity extends AppCompatActivity {

    @Override
    protected void onCreate(Bundle savedInstanceState) {
        super.onCreate(savedInstanceState);
        setContentView(R.layout.activity_main);
        //要顯示的數據
        String[] strs = {"基神","B神","翔神","曹神","J神"};
        //創建ArrayAdapter
        ArrayAdapter<String> adapter = new ArrayAdapter<String>
                (this,android.R.layout.simple_expandable_list_item_1,strs);
        //獲取ListView對象,通過調用setAdapter方法為ListView設置Adapter設置適配器
        ListView list_test = (ListView) findViewById(R.id.list_test);
        list_test.setAdapter(adapter);
    }
}
一些相關的東西:
1.除了通過數組外,我們還可以寫到一個數組資源文件中:
比如:在res\valuse下創建一個數組資源的xml文件:arrays.xml:
<?xml version="1.0" encoding="utf-8"?>
<resources>
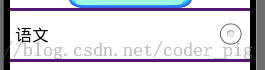
<string-array name="myarray">
<item>語文</item>
<item>數學</item>
<item>英語</item>
</string-array>
</resources>接著布局的listview屬性設置下這個列表項:
<ListView
        android:id="@id/list_test"
        android:layout_height="match_parent"
        android:layout_width="match_parent"
        android:entries="@array/myarray"/>
就可以了~
當然我們也可以在Java代碼中這樣寫:
ArrayAdapter<CharSequence> adapter = ArrayAdapter.createFromResource(this,
        R.array.myarray,android.R.layout.simple_list_item_multiple_choice );
同樣也是可以的!
2.一開始也說了這個ArrayAdapter支持泛型,那麼集合必不可少啦,比如,這樣寫:
List<String> data = new ArrayList<String>();
data.add("基神");
data.add("B神");
ArrayAdapter<String> adapter = new ArrayAdapter<String>
                (this,android.R.layout.simple_expandable_list_item_1,data);
就可以了~
3.我們看到了在實例化ArrayAdapter的第二個參數: android.R.layout.simple_expandable_list_item_1 其實這些是系統給我們提供好的一些ListView模板,有下面幾種:
simple_list_item_1 : 單獨一行的文本框
simple_list_item_2 : 兩個文本框組成
simple_list_item_checked : 每項都是由一個已選中的列表項
simple_list_item_multiple_choice : 都帶有一個復選框
simple_list_item_single_choice : 都帶有一個單選鈕
SimpleAdapter:簡單的Adapter,看似簡單,功能強大,下面我們來寫個稍微復雜一點的列表 布局吧!
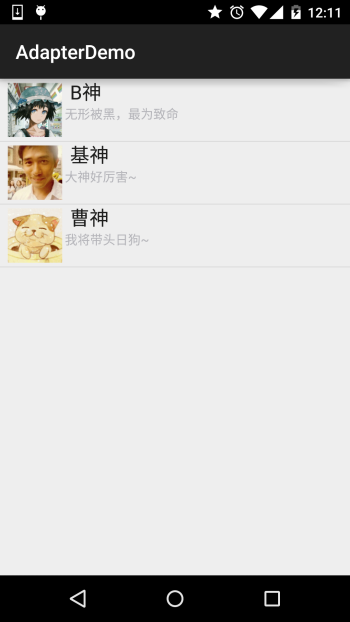
運行效果圖:
代碼實現:
先來編寫一個列表項目每一項的布局:
list_item.xml
<?xml version="1.0" encoding="utf-8"?>
<LinearLayout xmlns:android="http://schemas.android.com/apk/res/android"
    android:layout_width="match_parent"
    android:layout_height="match_parent"
    android:orientation="horizontal">

    <!-- 定義一個用於顯示頭像的ImageView -->
    <ImageView
        android:id="@+id/imgtou"
        android:layout_width="64dp"
        android:layout_height="64dp"
        android:baselineAlignBottom="true"
        android:paddingLeft="8dp" />

    <!-- 定義一個豎直方向的LinearLayout,把QQ呢稱與說說的文本框設置出來 -->
    <LinearLayout
        android:layout_width="match_parent"
        android:layout_height="wrap_content"
        android:orientation="vertical">

        <TextView
            android:id="@+id/name"
            android:layout_width="wrap_content"
            android:layout_height="wrap_content"
            android:paddingLeft="8dp"
            android:textColor="#1D1D1C"
            android:textSize="20sp" />

        <TextView
            android:id="@+id/says"
            android:layout_width="wrap_content"
            android:layout_height="wrap_content"
            android:paddingLeft="8px"
            android:textColor="#B4B4B9"
            android:textSize="14sp" />

    </LinearLayout>

</LinearLayout>
接下來是MainActivity.java:
public class MainActivity extends AppCompatActivity {

    private String[] names = new String[]{"B神", "基神", "曹神"};
    private String[] says = new String[]{"無形被黑,最為致命", "大神好厲害~", "我將帶頭日狗~"};
    private int[] imgIds = new int[]{R.mipmap.head_icon1, R.mipmap.head_icon2, R.mipmap.head_icon3};

    @Override
    protected void onCreate(Bundle savedInstanceState) {
        super.onCreate(savedInstanceState);
        setContentView(R.layout.activity_main);

        List<Map<String, Object>> listitem = new ArrayList<Map<String, Object>>();
        for (int i = 0; i < names.length; i++) {
            Map<String, Object> showitem = new HashMap<String, Object>();
            showitem.put("touxiang", imgIds[i]);
            showitem.put("name", names[i]);
            showitem.put("says", says[i]);
            listitem.add(showitem);
        }

        //創建一個simpleAdapter
        SimpleAdapter myAdapter = new SimpleAdapter(getApplicationContext(), listitem, R.layout.list_item, new String[]{"touxiang", "name", "says"}, new int[]{R.id.imgtou, R.id.name, R.id.says});
        ListView listView = (ListView) findViewById(R.id.list_test);
        listView.setAdapter(myAdapter);
    }
}
好的,上面就是SimpleAdapter的簡單用法了,有點意思~
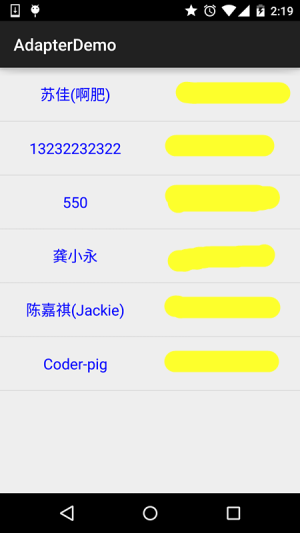
雖然這東西過時了,不過對於不怎麼會SQLite的初學者來說,用起來還是蠻方便的! 記得前面我們學ContentProivder寫過的讀取聯系人的例子麼?之前是通過打印Log的 方式顯示出來,現在我們通過這個SimpleCursorAdapter把它顯示到ListView上!
實現效果圖:
代碼實現:
先寫下listView每個item的布局:
list_item.xml:
<?xml version="1.0" encoding="utf-8"?>
<LinearLayout xmlns:android="http://schemas.android.com/apk/res/android"
    android:layout_width="match_parent"
    android:layout_height="match_parent"
    android:orientation="horizontal">


    <TextView
        android:id="@+id/list_name"
        android:layout_width="0dp"
        android:layout_height="64dp"
        android:layout_weight="1"
        android:gravity="center"
        android:text="小豬"
        android:textColor="#0000FF"
        android:textSize="18sp" />

    <TextView
        android:id="@+id/list_phone"
        android:layout_width="0dp"
        android:layout_height="64dp"
        android:layout_weight="1"
        android:gravity="center"
        android:text="13798989898"
        android:textColor="#EA5C4D"
        android:textSize="18sp" />


</LinearLayout>
接著activity_main布局和前面的一樣,就是簡單的ListView,然後是
MainActivity.java:
public class MainActivity extends AppCompatActivity {

    @Override
    protected void onCreate(Bundle savedInstanceState) {
        super.onCreate(savedInstanceState);
        setContentView(R.layout.activity_main);
        ListView list_test = (ListView) findViewById(R.id.list_test);
        //讀取聯系人
        Cursor cursor = getContentResolver()
                .query(ContactsContract.CommonDataKinds.Phone.CONTENT_URI, null, null, null, null);
        SimpleCursorAdapter spcAdapter = new SimpleCursorAdapter(this,R.layout.list_item,cursor,
                new String[]{ContactsContract.CommonDataKinds.Phone.DISPLAY_NAME,ContactsContract.CommonDataKinds.Phone.NUMBER},
                new int[]{R.id.list_name,R.id.list_phone});
        list_test.setAdapter(spcAdapter);
    }
}
最後AndroidManifest.xml裡加個讀聯系人的權限就可以了!
<uses-permission android:name="android.permission.READ_CONTACTS"/>
一問一答:
問:就這麼簡單?
——答:是的,直接獲取到Cursor,然後綁定就好了,無需你自己再寫什麼SQL語句!
問:你說這東西過時了,那拿什麼來代替?
——答:一般的做法是自己重寫BaseAdapter,獲取到數據集合後跟對應的控件進行綁定!
問:這個SimpleCursorAdapter還有沒有要注意的地方?
——答:有,使用SimpleCursorAdapter的話,綁定的數據庫表中一定要有id這個字段, 或者as id;而且在綁定時取出的數據必須包含這個id項,否則的話會報以下錯誤! java.lang.IllegalArgumentException: column 'id' does not exist**
好的,關於Adapter的基礎講解就到這裡,當然我們這裡講解的三個Adapter,我們實際開發中... 基本上用不到,哈哈,除了SimpleAdapter偶爾可能會用下,一般我們都是重寫BaseAdapter的!
另外,關於BaseAdapter的,有很多東西要講解,就把他丟到ListView那裡一起講,畢竟Adapter 總是和View沾邊,而且ListView是我們用得最多的一個空間~嗯,本節就到這裡,謝謝~
 第13章、布局Layouts之RelativeLayout相對布局(從零開始學Android)
RelativeLayout相對布局RelativeLayout是一種相對布局,控件的位置是按照相對位置來計算的,後一個控件在什麼位置依賴於前一個控件的基本位置,是布局最
 7.1.2 Android Http請求頭與響應頭的學習
本節引言:上節中我們對Android涉及的網絡編程進行了了解,也學習了下Http的基本概念,而本節我們要學習的是Http的請求頭與響應頭,當然,可以
 8.3.6 Paint API之—— Xfermode與PorterDuff詳解(三)
本節引言:上一節,我們學習了Xfermode中的三兒子:PorterDuffXfermode構造方法中的為一個參數:PorterDuff.Mode,
 第52章、Bitmap圖像處理(從零開始學Android)
在android中顯示圖像也有好多種方法,本例中使用BitmapFactory.decodeResource獲得資源圖像文件,然後用Canvas畫布顯示位圖。由於通過自定