android中的Service(服務)是一個什麼樣的東東呢?如果你對Windows系統中的服務理解,可以認為他們同理。如果你不了解也沒有關系,你只管把Service當成一個沒有界面的Activity就可以了。
Service是運行在後台,是不可見的、沒有界面的東西。你可以啟動一個服務Service來播放音樂,或者記錄你地理信息位置的改變,或者啟動一個服務來運行並一直監聽電話、短信等操作。
既然我們把Service當成一個無界的Activity來看待,那麼它也是運行在主線程,因而不能用它來做耗時的請求或者動作。如果有耗時的操作,那麼同樣需要在服務中開一個線程,在線程中做耗時操作。
1、服務一般分為兩種:
(1)本地服務, Local Service 用於應用程序內部。在Service可以調用Context.startService()啟動,調用Context.stopService()結束。在內部可以調用Service.stopSelf() 或 Service.stopSelfResult()來自己停止。無論調用了多少次startService(),都只需調用一次stopService()來停止。
(2)遠程服務, Remote Service 用於android系統內部的應用程序之間。可以定義接口並把接口暴露出來,以便其他應用進行操作。客戶端建立到服務對象的連接,並通過那個連接來調用服務。調用Context.bindService()方法建立連接,並啟動,以調用 Context.unbindService()關閉連接。多個客戶端可以綁定至同一個服務。如果服務此時還沒有加載,bindService()會先加載它。
提供給可被其他應用復用,比如定義一個天氣預報服務,提供與其他應用調用即可。
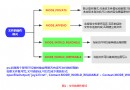
2、Service生命周期:
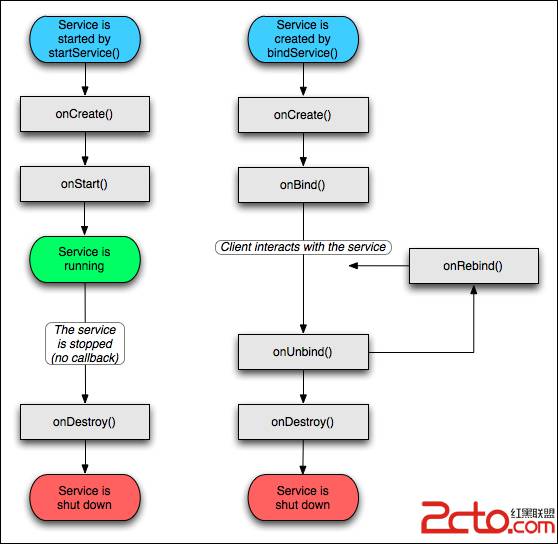
Service的生命周期比Activity要簡單一些,僅繼承了onCreate()、onStart()、onDestroy()三個方法。
當我們第一次啟動Service時,先後調用了onCreate()、onStart()這兩個方法;當停止Service時,則執行onDestroy()方法。
如果Service已經啟動了,當我們再次啟動Service時,不會在執行onCreate()方法,而是直接執行onStart()方法。它可以通過Service.stopSelf()方法或者Service.stopSelfResult()方法來停止自己,只要調用一次stopService()方法便可以停止服務,無論調用了多少次的啟動服務方法。
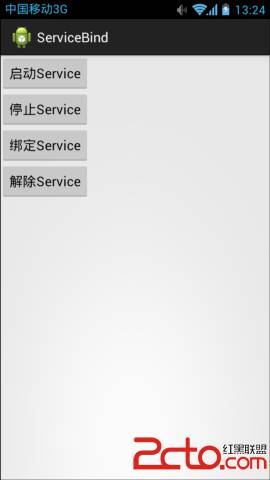
本章案例為Activity與Service綁定用法。
一、設計界面
1、布局文件
打開res/layout/activity_main.xml文件。
輸入以下代碼:
[html] view plain copy
- <?xml version="1.0" encoding="utf-8"?>
- <LinearLayout
- xmlns:android="http://schemas.android.com/apk/res/android"
- android:layout_width="match_parent"
- android:layout_height="match_parent"
- android:orientation="vertical" >
-
- <Button
- android:id="@+id/startservice"
- android:layout_width="wrap_content"
- android:layout_height="wrap_content"
- android:text="啟動Service" />
-
- <Button
- android:id="@+id/stopservice"
- android:layout_width="wrap_content"
- android:layout_height="wrap_content"
- android:text="停止Service" />
-
- <Button
- android:id="@+id/bindservice"
- android:layout_width="wrap_content"
- android:layout_height="wrap_content"
- android:text="綁定Service" />
-
- <Button
- android:id="@+id/unbindservice"
- android:layout_width="wrap_content"
- android:layout_height="wrap_content"
- android:text="解除Service" />
-
- </LinearLayout>
二、程序文件
1、打開“src/com.genwoxue.service/ServiceUtil.java”文件。
然後輸入以下代碼:
[java] view plain copy
- package com.genwoxue.servicebind;
-
- import android.app.Service;
- import android.content.Intent;
- import android.os.Binder;
- import android.os.IBinder;
- import android.util.Log;
-
- public class ServiceUtil extends Service {
-
- private String TAG="Service:";
-
- private IBinder binder=new Binder(){
- @Override
- public String getInterfaceDescriptor(){
- return "Service class";
- }
- };
-
-
- @Override
- public IBinder onBind(Intent intent){
- Log.i(TAG, "服務開始綁定:onBind() Intent="+intent);
- return binder;
- }
-
- @Override
- public void onRebind(Intent intent){
- Log.i(TAG, "服務重新綁定:onRebind() Intent="+intent);
- super.onRebind(intent);
- }
-
- @Override
- public boolean onUnbind(Intent intent){
- Log.i(TAG, "服務解除綁定:onUnbind() Intent="+intent);
- return super.onUnbind(intent);
- }
-
- @Override
- public void onCreate(){
- Log.i(TAG, "服務開始創建:onCreate()!");
- }
-
- @Override
- public void onDestroy(){
- Log.i(TAG, "服務銷毀:onDestroy()!");
- }
-
- @Override
- public int onStartCommand(Intent intent,int flags,int startId){
- Log.i(TAG, "服務啟動:onStart()=>Intent"+intent+",startID="+startId);
- return Service.START_CONTINUATION_MASK;
- }
-
2、打開“src/com.genwoxue.service/MainActivity.java”文件。
輸入以下代碼:
[java] view plain copy
- package com.genwoxue.servicebind;
-
-
- import android.os.Bundle;
- import android.os.IBinder;
- import android.os.RemoteException;
- import android.util.Log;
- import android.view.View;
- import android.view.View.OnClickListener;
- import android.widget.Button;
- import android.app.Activity;
- import android.content.Context;
- import android.content.Intent;
- import android.content.ServiceConnection;
-
- import android.content.ComponentName;
-
- public class MainActivity extends Activity {
-
-
- private Button btnStart=null;
- private Button btnStop=null;
- private Button btnBind=null;
- private Button btnUnBind=null;
-
- private String TAG="Service:";
-
- private ServiceConnection serviceConn=new ServiceConnection(){
- @Override
- public void onServiceConnected(ComponentName name,IBinder service){
- try{
-
- Log.i(TAG,"服務連接成功:service="+service.getInterfaceDescriptor());
- }catch(RemoteException e){
- e.printStackTrace();
- }
- }
-
- @Override
- public void onServiceDisconnected(ComponentName name){
- Log.i(TAG,"服務斷開連接!");
- }
- };
-
-
- @Override
- protected void onCreate(Bundle savedInstanceState) {
- super.onCreate(savedInstanceState);
- setContentView(R.layout.activity_main);
-
- System.out.print("hello");
- btnStart=(Button)super.findViewById(R.id.startservice);
- btnStop=(Button)super.findViewById(R.id.stopservice);
- btnBind=(Button)super.findViewById(R.id.bindservice);
- btnUnBind=(Button)super.findViewById(R.id.unbindservice);
-
- btnStart.setOnClickListener(new OnClickListener(){
- public void onClick(View v)
- {
- Intent intent=new Intent(MainActivity.this,ServiceUtil.class);
- MainActivity.this.startService(intent);
- }
- });
-
- btnStop.setOnClickListener(new OnClickListener(){
- public void onClick(View v)
- {
- Intent intent=new Intent(MainActivity.this,ServiceUtil.class);
- MainActivity.this.stopService(intent);
- }
- });
-
-
- btnBind.setOnClickListener(new OnClickListener(){
- public void onClick(View v)
- {
- Intent service=new Intent(MainActivity.this,ServiceUtil.class);
- MainActivity.this.bindService(service,MainActivity.this.serviceConn,Context.BIND_AUTO_CREATE);
- }
- });
-
- btnUnBind.setOnClickListener(new OnClickListener(){
- public void onClick(View v)
- {
- MainActivity.this.unbindService(MainActivity.this.serviceConn);
- }
- });
-
- }
-
- }
三、配置文件
打開“AndroidManifest.xml”文件。
然後輸入以下代碼:
[html] view plain copy
- <?xml version="1.0" encoding="utf-8"?>
- <manifest xmlns:android="http://schemas.android.com/apk/res/android"
- package="com.genwoxue.servicebind"
- android:versionCode="1"
- android:versionName="1.0" >
-
- <uses-sdk
- android:minSdkVersion="8"
- android:targetSdkVersion="15" />
-
- <application
- android:allowBackup="true"
- android:icon="@drawable/ic_launcher"
- android:label="@string/app_name"
- android:theme="@style/AppTheme" >
- <activity
- android:name="com.genwoxue.servicebind.MainActivity"
- android:label="@string/app_name" >
- <intent-filter>
- <action android:name="android.intent.action.MAIN" />
- <category android:name="android.intent.category.LAUNCHER" />
- </intent-filter>
- </activity>
- <service android:name="com.genwoxue.servicebind.ServiceUtil" />
- </application>
-
- </manifest>
注意:由於我們要啟用服務,需要在AndroidManifest.xml文件中添加以下內容:
<service android:name="com.genwoxue.servicebind.ServiceUtil" />
四、運行結果
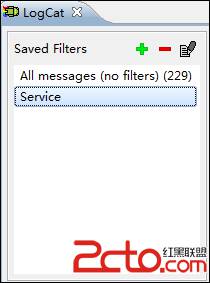
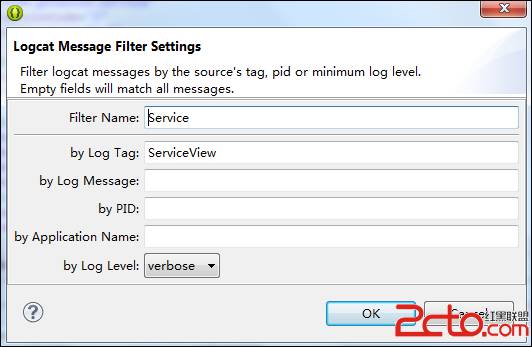
1、第一步、在LogCat中創建“Service”過濾器
2、運行Service App
 第104章、Android訪問WebService(從零開始學Android)
 第80章、Handle-Message-Looper消息機制之一(從零開始學Android)
 1.1 背景相關與系統架構分析
 2.6.3 ViewPager的簡單使用