編輯:Android技術基礎
上一節的概念課枯燥無味是吧,不過總有點收獲是吧,本節開始我們來研究基於TCP協議的Socket 通信,先來了解下Socket的概念,以及Socket通信的模型,實現Socket的步驟,以及作為Socket服務 端與客戶端的兩位各做要做什麼事情!好的,我們由淺入深來扣這個Socket吧!


Socket通信實現步驟解析:
Step 1:創建ServerSocket和Socket
Step 2:打開連接到的Socket的輸入/輸出流
Step 3:按照協議對Socket進行讀/寫操作
Step 4:關閉輸入輸出流,以及Socket
好的,我們接下來寫一個簡單的例子,開啟服務端後,客戶端點擊按鈕然後鏈接服務端, 並向服務端發送一串字符串,表示通過Socket鏈接上服務器~
服務端要做的事有這些:
Step 1:創建ServerSocket對象,綁定監聽的端口
Step 2:調用accept()方法監聽客戶端的請求
Step 3:連接建立後,通過輸入流讀取客戶端發送的請求信息
Step 4:通過輸出流向客戶端發送響應信息
Step 5:關閉相關資源
代碼實現:
直接在Eclipse下創建一個Java項目,然後把Java代碼貼進去即可!
public class SocketServer {
	public static void main(String[] args) throws IOException {
		//1.創建一個服務器端Socket,即ServerSocket,指定綁定的端口,並監聽此端口
		ServerSocket serverSocket = new ServerSocket(12345);
		InetAddress address = InetAddress.getLocalHost();
		String ip = address.getHostAddress();
		Socket socket = null;
		//2.調用accept()等待客戶端連接
		System.out.println("~~~服務端已就緒,等待客戶端接入~,服務端ip地址: " + ip);
		socket = serverSocket.accept();
		//3.連接後獲取輸入流,讀取客戶端信息
		InputStream is=null;
		InputStreamReader isr=null;
		BufferedReader br=null;
		OutputStream os=null;
		PrintWriter pw=null;
		is = socket.getInputStream();     //獲取輸入流
		isr = new InputStreamReader(is,"UTF-8");
		br = new BufferedReader(isr);
		String info = null;
		while((info=br.readLine())!=null){//循環讀取客戶端的信息
			System.out.println("客戶端發送過來的信息" + info);
		}
		socket.shutdownInput();//關閉輸入流
		socket.close();
	}
}
然後我們把代碼run起來,控制台會打印:

好的,接下來到Android客戶端了!
客戶端要做的事有這些:
Step 1:創建Socket對象,指明需要鏈接的服務器的地址和端號
Step 2:鏈接建立後,通過輸出流向服務器發送請求信息
Step 3:通過輸出流獲取服務器響應的信息
Step 4:關閉相關資源
代碼實現:
MainActivity.java:
public class MainActivity extends AppCompatActivity implements View.OnClickListener {

    @Override
    protected void onCreate(Bundle savedInstanceState) {
        super.onCreate(savedInstanceState);
        setContentView(R.layout.activity_main);
        Button btn_accept = (Button) findViewById(R.id.btn_accept);
        btn_accept.setOnClickListener(this);
    }

    @Override
    public void onClick(View v) {
        new Thread() {
            @Override
            public void run() {
                try {
                    acceptServer();
                } catch (IOException e) {
                    e.printStackTrace();
                }
            }
        }.start();
    }

    private void acceptServer() throws IOException {
        //1.創建客戶端Socket,指定服務器地址和端口
        Socket socket = new Socket("172.16.2.54", 12345);
        //2.獲取輸出流,向服務器端發送信息
        OutputStream os = socket.getOutputStream();//字節輸出流
        PrintWriter pw = new PrintWriter(os);//將輸出流包裝為打印流
        //獲取客戶端的IP地址
        InetAddress address = InetAddress.getLocalHost();
        String ip = address.getHostAddress();
        pw.write("客戶端:~" + ip + "~ 接入服務器!!");
        pw.flush();
        socket.shutdownOutput();//關閉輸出流
        socket.close();
    }
}
因為Android不允許在主線程(UI線程)中做網絡操作,所以這裡需要我們自己 另開一個線程來連接Socket!
運行結果:
點擊按鈕後,服務端控制台打印:

只是點擊個按鈕,然後服務器返回一串信息,肯定是很無趣的是吧,接下來我們來 搭建一個超簡單的聊天室,我們需要用到線程池,存儲Socket鏈接的集合,我們還需要 字節寫一個線程,具體的我們在代碼中來體會!
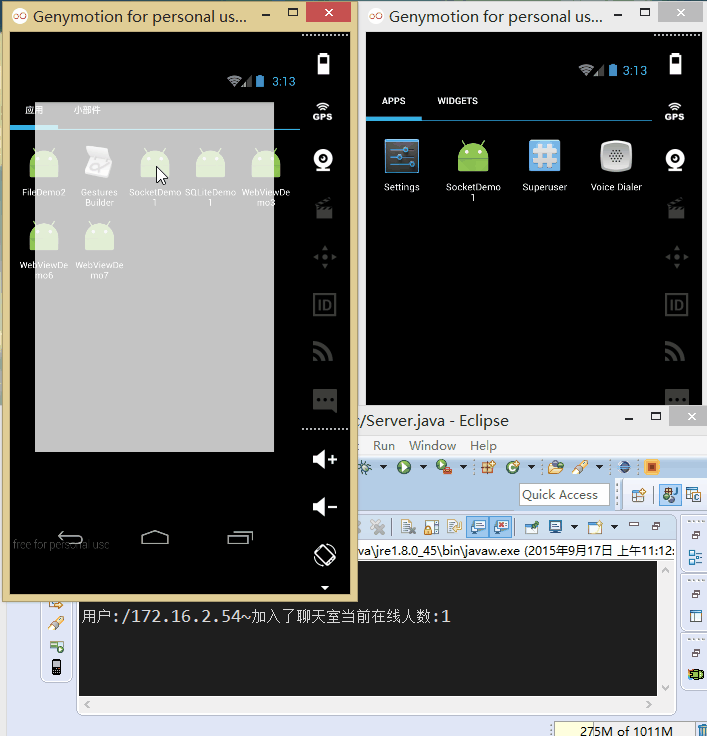
實現的效果圖:
先把我們的服務端跑起來:

接著把我們的程序分別跑到兩台模擬器上:
接下來我們來寫代碼:
首先是服務端,就是將讀寫socket的操作放到自定義線程當中,創建ServerSocket後,循環 調用accept方法,當有新客戶端接入,將socket加入集合當中,同時在線程池新建一個線程!
另外,在讀取信息的方法中,對輸入字符串進行判斷,如果為bye字符串,將socket從集合中 移除,然後close掉!
Server.java:
public class Server {
	//定義相關的參數,端口,存儲Socket連接的集合,ServerSocket對象
	//以及線程池
	private static final int PORT = 12345;
	private List<Socket> mList = new ArrayList<Socket>();
	private ServerSocket server = null;
	private ExecutorService myExecutorService = null;


	public static void main(String[] args) {
		new Server();
	}

	public Server()
	{
		try
		{
			server = new ServerSocket(PORT);
			//創建線程池
			myExecutorService = Executors.newCachedThreadPool();
			System.out.println("服務端運行中...\n");
			Socket client = null;
			while(true)
			{
				client = server.accept();
				mList.add(client);
				myExecutorService.execute(new Service(client));
			}

		}catch(Exception e){e.printStackTrace();}
	}

	class Service implements Runnable
	{
		private Socket socket;
		private BufferedReader in = null;
		private String msg = "";

		public Service(Socket socket) {
			this.socket = socket;
			try
			{
				in = new BufferedReader(new InputStreamReader(socket.getInputStream()));
				 msg = "用戶:" +this.socket.getInetAddress() + "~加入了聊天室"
	                        +"當前在線人數:" +mList.size();
				this.sendmsg();
			}catch(IOException e){e.printStackTrace();}
		}


		@Override
		public void run() {
			try{
				while(true)
				{
					if((msg = in.readLine()) != null)
					{
						if(msg.equals("bye"))
						{
							System.out.println("~~~~~~~~~~~~~");
							mList.remove(socket);
                            in.close();
                            msg = "用戶:" + socket.getInetAddress()
                                    + "退出:" +"當前在線人數:"+mList.size();
                            socket.close();
                            this.sendmsg();
                            break;
						}else{
							msg = socket.getInetAddress() + "   說: " + msg;
                            this.sendmsg();
						}
					}
				}
			}catch(Exception e){e.printStackTrace();}
		}

		//為連接上服務端的每個客戶端發送信息
		public void sendmsg()
		{
			System.out.println(msg);
			int num = mList.size();
			for(int index = 0;index < num;index++)
			{
				Socket mSocket = mList.get(index);
                PrintWriter pout = null;
                try {
                    pout = new PrintWriter(new BufferedWriter(
                            new OutputStreamWriter(mSocket.getOutputStream(),"UTF-8")),true);
                    pout.println(msg);
                }catch (IOException e) {e.printStackTrace();}
			}
		}

	}
}
接著到客戶端,客戶端的難點在於要另外開辟線程的問題,因為Android不允許直接在 主線程中做網絡操作,而且不允許在主線程外的線程操作UI,這裡的做法是自己新建 一個線程,以及通過Hanlder來更新UI,實際開發不建議直接這樣做!!!
布局文件:activity_main.xml:
<LinearLayout xmlns:android="http://schemas.android.com/apk/res/android"
    android:layout_width="match_parent"
    android:layout_height="match_parent"
    android:orientation="vertical" >

    <TextView
        android:layout_width="wrap_content"
        android:layout_height="wrap_content"
        android:text="小豬簡易聊天室" />
    <TextView
        android:id="@+id/txtshow"
        android:layout_width="match_parent"
        android:layout_height="wrap_content"
        />
    <EditText
        android:id="@+id/editsend"
        android:layout_width="match_parent"
        android:layout_height="wrap_content"
        />
    <Button
        android:id="@+id/btnsend"
        android:layout_width="match_parent"
        android:layout_height="wrap_content"
        android:text="發送"
        />
</LinearLayout>
MainActivity.java:
public class MainActivity extends AppCompatActivity implements Runnable {

    //定義相關變量,完成初始化
    private TextView txtshow;
    private EditText editsend;
    private Button btnsend;
    private static final String HOST = "172.16.2.54";
    private static final int PORT = 12345;
    private Socket socket = null;
    private BufferedReader in = null;
    private PrintWriter out = null;
    private String content = "";
    private StringBuilder sb = null;

    //定義一個handler對象,用來刷新界面
    public Handler handler = new Handler() {
        public void handleMessage(Message msg) {
            if (msg.what == 0x123) {
                sb.append(content);
                txtshow.setText(sb.toString());
            }
        }

        ;
    };


    @Override
    protected void onCreate(Bundle savedInstanceState) {
        super.onCreate(savedInstanceState);
        setContentView(R.layout.activity_main);
        sb = new StringBuilder();
        txtshow = (TextView) findViewById(R.id.txtshow);
        editsend = (EditText) findViewById(R.id.editsend);
        btnsend = (Button) findViewById(R.id.btnsend);

        //當程序一開始運行的時候就實例化Socket對象,與服務端進行連接,獲取輸入輸出流
        //因為4.0以後不能再主線程中進行網絡操作,所以需要另外開辟一個線程
        new Thread() {

            public void run() {
                try {
                    socket = new Socket(HOST, PORT);
                    in = new BufferedReader(new InputStreamReader(socket.getInputStream(), "UTF-8"));
                    out = new PrintWriter(new BufferedWriter(new OutputStreamWriter(
                            socket.getOutputStream())), true);
                } catch (IOException e) {
                    e.printStackTrace();
                }
            }
        }.start();

        //為發送按鈕設置點擊事件
        btnsend.setOnClickListener(new View.OnClickListener() {

            @Override
            public void onClick(View v) {
                String msg = editsend.getText().toString();
                if (socket.isConnected()) {
                    if (!socket.isOutputShutdown()) {
                        out.println(msg);
                    }
                }
            }
        });
        new Thread(MainActivity.this).start();
    }

    //重寫run方法,在該方法中輸入流的讀取
    @Override
    public void run() {
        try {
            while (true) {
                if (socket.isConnected()) {
                    if (!socket.isInputShutdown()) {
                        if ((content = in.readLine()) != null) {
                            content += "\n";
                            handler.sendEmptyMessage(0x123);
                        }
                    }
                }
            }
        } catch (Exception e) {
            e.printStackTrace();
        }
    }
}
好的,本節給大家講解了基於TCP的Socket通信,文中介紹了Socket通信的模型,實現了 一個簡單的Socket通信例子,以及寫了一個增強版的實例:小豬聊天室,相信會對剛涉及 Socket編程的你帶來便利~,謝謝~
 2.5.8 Notification(狀態欄通知)詳解
本節引言: 本節帶來的是Android中用於在狀態欄顯示通知信息的控件:Notification,相信大部分 學Android都對他都很熟悉,而網上很多關於Notif
 10.14 Android GPS初涉
本節引言:說到GPS這個名詞,相信大家都不陌生,GPS全球定位技術嘛,嗯,Android中定位的方式一般有這四種:GPS定位,WIFI定准,基站定位
 7.5.3 Android 4.4後WebView的一些注意事項
本節引言:本節參考原文:Android 4.4 中 WebView 使用注意事項.md從Android 4.4開始,Android中的WebView
 第25章、OnTouchListener觸摸事件(從零開始學Android)
在Android App應用中,OnTouch事件表示觸摸事件,本章我們通過滑過圖像獲取當前位置理解其具體用法。 知識點:OnTouch 一、設計界面