編輯:Android技術基礎
學完上一節,相信你已經知道如何去使用系統提供的ContentProvider或者自定義ContentProvider了, 已經基本滿足日常開發的需求了,有趣的是,我在官方文檔上看到了另外這幾個Provider:
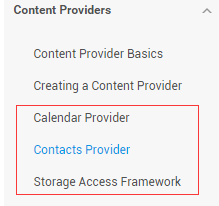
Calendar Provider:日歷提供者,就是針對針對日歷相關事件的一個資源庫,通過他提供的API,我們 可以對日歷,時間,會議,提醒等內容做一些增刪改查!
Contacts Provider:聯系人提供者,這個就不用說了,這個用得最多~後面有時間再回頭翻譯下這篇文章吧!
Storage Access Framework(SAF):存儲訪問框架,4.4以後引入的一個新玩意,為用戶浏覽手機中的 存儲內容提供了便利,可供訪問的內容不僅包括:文檔,圖片,視頻,音頻,下載,而且包含所有由 由特定ContentProvider(須具有約定的API)提供的內容。不管這些內容來自於哪裡,不管是哪個應 用調用浏覽系統文件內容的命令,系統都會用一個統一的界面讓你去浏覽。
其實就是一個內置的應用程序,叫做DocumentsUI,因為它的IntentFilter不帶有LAUNCHER,所以我們並沒有 在桌面上找到這個東東!嘿嘿,試下下面的代碼,這裡我們選了兩個手機來對比: 分別是4.2的Lenovo S898T 和 5.0.1的Nexus 5做對比,執行下述代碼:
 Intent intent = new Intent(Intent.ACTION_OPEN_DOCUMENT);
        intent.addCategory(Intent.CATEGORY_OPENABLE);
        intent.setType("image/*");
        startActivity(intent);
下面是運行結果:
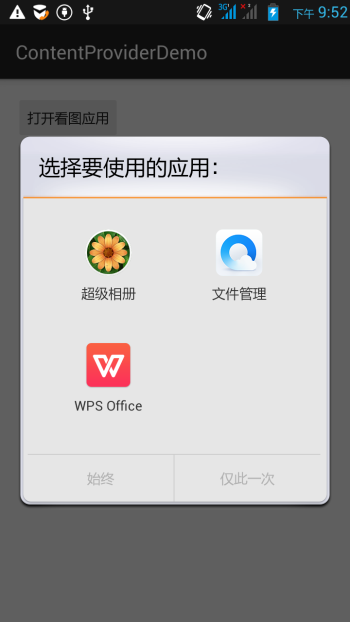
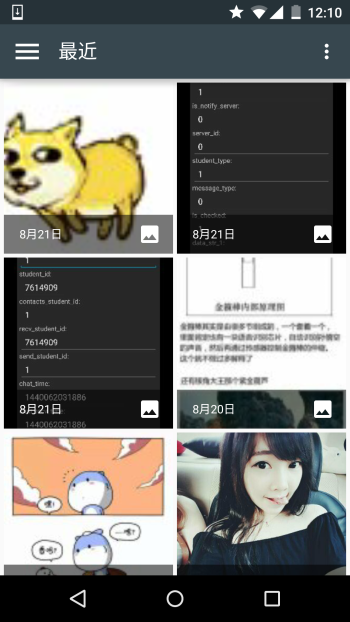
右面這個就是4.4給我們帶來的新玩意了,一般我們獲取文件Url的時候就可以用到它~ 接下來簡單的走下文檔吧~
- Document provider:一個特殊的ContentProvider,讓一個存儲服務(比如Google Drive)可以 對外展示自己所管理的文件。它是DocumentsProvider的子類,另外,document-provider的存儲格式 和傳統的文件存儲格式一致,至於你的內容如何存儲,則完全決定於你自己,Android系統已經內置了幾個 這樣的Document provider,比如關於下載,圖片以及視頻的Document provider!
- Client app:一個普通的客戶端軟件,通過觸發ACTION_OPEN_DOCUMENT 和/或 ACTION_CREATE_DOCUMENT就可以接收到來自於Document provider返回的內容,比如選擇一個圖片, 然後返回一個Uri。
- Picker:類似於文件管理器的界面,而且是系統級的界面,提供額訪問客戶端過濾條件的 Document provider內容的通道,就是起說的那個DocumentsUI程序!
一些特性:
- 用戶可以浏覽所有document provider提供的內容,而不僅僅是單一的應用程序
- 提供了長期、持續的訪問document provider中文件的能力以及數據的持久化, 用戶可以實現添加、刪除、編輯、保存document provider所維護的內容
- 支持多用戶以及臨時性的內容服務,比如USB storage providers只有當驅動安裝成功才會出現
SAF的核心是實現了DocumentsProvider的子類,還是一個ContentProvider。在一個document provider 中是以傳統的文件目錄樹組織起來的:

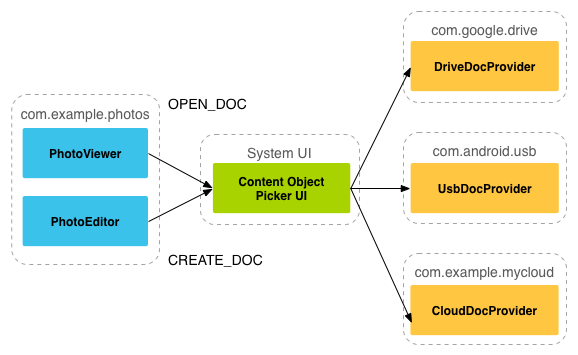
如上面所述,document provider data是基於傳統的文件層次結構的,不過那只是對外的表現形式, 如何存儲你的數據,取決於你自己,只要你對海外的接口能夠通過DocumentsProvider的api訪問就可以。 下面的流程圖展示了一個photo應用使用SAF可能的結構:
分析:
從上圖,我們可以看出Picker是鏈接調用者和內容提供者的一個橋梁!他提供並告訴調用者,可以選擇 哪些內容提供者,比如這裡的DriveDocProvider,UsbDocProvider,CloundDocProvider。
當客戶端觸發了ACTION_OPEN_DOCUMENT或ACTION_CREATE_DOCUMENT的Intent,就會發生上述交互。 當然我們還可以在Intent中增加過濾條件,比如限制MIME type的類型為"image"!
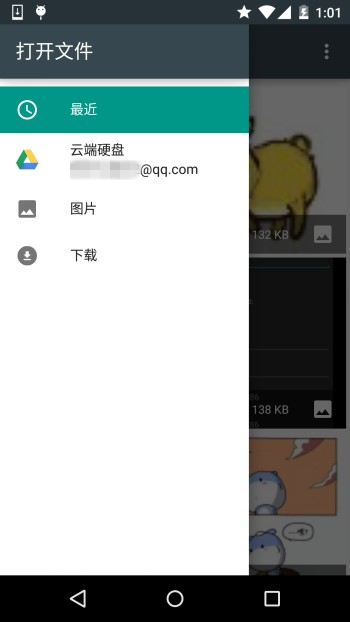
就是上面這些東西,如果你還安裝了其他看圖的軟件的話,也會在這裡看到! 簡單點說就是:客戶端發送了上面兩種Action的Intent後,會打開Picker UI,在這裡會顯示相關可用的 Document Provider,供用戶選擇,用戶選擇後可以獲得文件的相關信息!
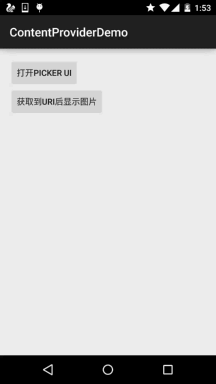
實現代碼如下:
public class MainActivity extends AppCompatActivity implements View.OnClickListener {
    private static final int READ_REQUEST_CODE = 42;

    @Override
    protected void onCreate(Bundle savedInstanceState) {
        super.onCreate(savedInstanceState);
        setContentView(R.layout.activity_main);
        Button btn_show = (Button) findViewById(R.id.btn_show);
        btn_show.setOnClickListener(this);
    }

    @Override
    public void onClick(View v) {
        Intent intent = new Intent(Intent.ACTION_OPEN_DOCUMENT);
        intent.addCategory(Intent.CATEGORY_OPENABLE);
        intent.setType("image/*");
        startActivityForResult(intent, READ_REQUEST_CODE);
    }

    @Override
    protected void onActivityResult(int requestCode, int resultCode, Intent data) {
        if (requestCode == READ_REQUEST_CODE && resultCode == Activity.RESULT_OK) {
            Uri uri;
            if (data != null) {
                uri = data.getData();
                Log.e("HeHe", "Uri: " + uri.toString());
            }
        }
    }
}
運行結果: 比如我們選中那只狗,然後Picker UI自己會關掉,然後Logcat上可以看到這樣一個uri:

核心代碼如下:
public void dumpImageMetaData(Uri uri) {
    Cursor cursor = getContentResolver()
            .query(uri, null, null, null, null, null);
    try {
        if (cursor != null && cursor.moveToFirst()) {
            String displayName = cursor.getString(
                    cursor.getColumnIndex(OpenableColumns.DISPLAY_NAME));
            Log.e("HeHe", "Display Name: " + displayName);
            int sizeIndex = cursor.getColumnIndex(OpenableColumns.SIZE);
            String size = null;
            if (!cursor.isNull(sizeIndex)) {
                size = cursor.getString(sizeIndex);
            }else {
                size = "Unknown";
            }
            Log.e("HeHe", "Size: " + size);
        }
    }finally {
        cursor.close();
    }
}
運行結果: 還是那只狗,調用方法後會輸入文件名以及文件大小,以byte為單位

核心代碼如下:
private Bitmap getBitmapFromUri(Uri uri) throws IOException {
        ParcelFileDescriptor parcelFileDescriptor =
        getContentResolver().openFileDescriptor(uri, "r");
        FileDescriptor fileDescriptor = parcelFileDescriptor.getFileDescriptor();
        Bitmap image = BitmapFactory.decodeFileDescriptor(fileDescriptor);
        parcelFileDescriptor.close();
        return image;
}
運行結果:
核心代碼如下:
private String readTextFromUri(Uri uri) throws IOException {
    InputStream inputStream = getContentResolver().openInputStream(uri);
    BufferedReader reader = new BufferedReader(new InputStreamReader(
            inputStream));
    StringBuilder stringBuilder = new StringBuilder();
    String line;
    while ((line = reader.readLine()) != null) {
        stringBuilder.append(line);
    }
    fileInputStream.close();
    parcelFileDescriptor.close();
    return stringBuilder.toString();
}
上述的內容只告訴你通過一個Uri你可以知道什麼,而Uri的獲取則是通過SAF得到的!
創建文件:
private void createFile(String mimeType, String fileName) {
    Intent intent = new Intent(Intent.ACTION_CREATE_DOCUMENT);
    intent.addCategory(Intent.CATEGORY_OPENABLE);
    intent.setType(mimeType);
    intent.putExtra(Intent.EXTRA_TITLE, fileName);
    startActivityForResult(intent, WRITE_REQUEST_CODE);
}
可在onActivityResult()中獲取被創建文件的uri
刪除文件:
前提是Document.COLUMN_FLAGS包含SUPPORTS_DELETE
DocumentsContract.deleteDocument(getContentResolver(), uri);
如果你希望自己應用的數據也能在documentsui中打開,你就需要寫一個自己的document provider。 下面介紹自定義DocumentsProvider的步驟:
- API版本為19或者更高
- 在manifest.xml中注冊該Provider
- Provider的name為類名加包名,比如: com.example.android.storageprovider.MyCloudProvider
- Authority為包名+provider的類型名,如: com.example.android.storageprovider.documents
- android:exported屬性的值為ture
下面是Provider的例子寫法:
<manifest... >
    ...
    <uses-sdk
        android:minSdkVersion="19"
        android:targetSdkVersion="19" />
        ....
        <provider
            android:name="com.example.android.storageprovider.MyCloudProvider"
            android:authorities="com.example.android.storageprovider.documents"
            android:grantUriPermissions="true"
            android:exported="true"
            android:permission="android.permission.MANAGE_DOCUMENTS"
            android:enabled="@bool/atLeastKitKat">
            <intent-filter>
                <action android:name="android.content.action.DOCUMENTS_PROVIDER" />
            </intent-filter>
        </provider>
    </application>

</manifest>
至少實現如下幾個方法:
- queryRoots()
- queryChildDocuments()
- queryDocument()
- openDocument()
還有些其他的方法,但並不是必須的。下面演示一個實現訪問文件(file)系統的 DocumentsProvider的大致寫法。
Implement queryRoots
@Override
public Cursor queryRoots(String[] projection) throws FileNotFoundException {

    // Create a cursor with either the requested fields, or the default
    // projection if "projection" is null.
    final MatrixCursor result =
            new MatrixCursor(resolveRootProjection(projection));

    // If user is not logged in, return an empty root cursor.  This removes our
    // provider from the list entirely.
    if (!isUserLoggedIn()) {
        return result;
    }

    // It's possible to have multiple roots (e.g. for multiple accounts in the
    // same app) -- just add multiple cursor rows.
    // Construct one row for a root called "MyCloud".
    final MatrixCursor.RowBuilder row = result.newRow();
    row.add(Root.COLUMN_ROOT_ID, ROOT);
    row.add(Root.COLUMN_SUMMARY, getContext().getString(R.string.root_summary));

    // FLAG_SUPPORTS_CREATE means at least one directory under the root supports
    // creating documents. FLAG_SUPPORTS_RECENTS means your application's most
    // recently used documents will show up in the "Recents" category.
    // FLAG_SUPPORTS_SEARCH allows users to search all documents the application
    // shares.
    row.add(Root.COLUMN_FLAGS, Root.FLAG_SUPPORTS_CREATE |
            Root.FLAG_SUPPORTS_RECENTS |
            Root.FLAG_SUPPORTS_SEARCH);

    // COLUMN_TITLE is the root title (e.g. Gallery, Drive).
    row.add(Root.COLUMN_TITLE, getContext().getString(R.string.title));

    // This document id cannot change once it's shared.
    row.add(Root.COLUMN_DOCUMENT_ID, getDocIdForFile(mBaseDir));

    // The child MIME types are used to filter the roots and only present to the
    //  user roots that contain the desired type somewhere in their file hierarchy.
    row.add(Root.COLUMN_MIME_TYPES, getChildMimeTypes(mBaseDir));
    row.add(Root.COLUMN_AVAILABLE_BYTES, mBaseDir.getFreeSpace());
    row.add(Root.COLUMN_ICON, R.drawable.ic_launcher);

    return result;
}
Implement queryChildDocuments
public Cursor queryChildDocuments(String parentDocumentId, String[] projection,
                              String sortOrder) throws FileNotFoundException {

    final MatrixCursor result = new
            MatrixCursor(resolveDocumentProjection(projection));
    final File parent = getFileForDocId(parentDocumentId);
    for (File file : parent.listFiles()) {
        // Adds the file's display name, MIME type, size, and so on.
        includeFile(result, null, file);
    }
    return result;
}
Implement queryDocument
@Override
public Cursor queryDocument(String documentId, String[] projection) throws
        FileNotFoundException {

    // Create a cursor with the requested projection, or the default projection.
    final MatrixCursor result = new
            MatrixCursor(resolveDocumentProjection(projection));
    includeFile(result, documentId, null);
    return result;
}
好吧,文檔中的內容大概就是這些了: 一開始是想自己翻譯的,後來在泡在網上的日子上找到了這一篇文檔的中文翻譯,就偷下懶了~
中文翻譯鏈接:android存儲訪問框架Storage Access Framework
其實這個SAF我們用得較多的地方無非是獲取圖片的Uri而已,而從上面的例子我們也發現了: 我們這樣獲取的鏈接是這樣的:
content://com.android.providers.media.documents/document/image%3A69983
這樣的鏈接,我們直接通過上面的方法獲得uri即可!
當然,這個是4.4 或者以上版本的~!
如果是以前的版本:uri可能是這樣的:
content://media/external/images/media/image%3A69983
這裡貼下在別的地方看到的一個全面的方案,原文鏈接:Android4.4中獲取資源路徑問題
public static String getPath(final Context context, final Uri uri) {
    final boolean isKitKat = Build.VERSION.SDK_INT >= Build.VERSION_CODES.KITKAT;
    // DocumentProvider
    if (isKitKat && DocumentsContract.isDocumentUri(context, uri)) {
        // ExternalStorageProvider
        if (isExternalStorageDocument(uri)) {
            final String docId = DocumentsContract.getDocumentId(uri);
            final String[] split = docId.split(":");
            final String type = split[0];

            if ("primary".equalsIgnoreCase(type)) {
                return Environment.getExternalStorageDirectory() + "/" + split[1];
            }

            // TODO handle non-primary volumes
        }
        // DownloadsProvider
        else if (isDownloadsDocument(uri)) {

            final String id = DocumentsContract.getDocumentId(uri);
            final Uri contentUri = ContentUris.withAppendedId(
                    Uri.parse("content://downloads/public_downloads"), Long.valueOf(id));

            return getDataColumn(context, contentUri, null, null);
        }
        // MediaProvider
        else if (isMediaDocument(uri)) {
            final String docId = DocumentsContract.getDocumentId(uri);
            final String[] split = docId.split(":");
            final String type = split[0];
            Uri contentUri = null;
            if ("image".equals(type)) {
                contentUri = MediaStore.Images.Media.EXTERNAL_CONTENT_URI;
            } else if ("video".equals(type)) {
                contentUri = MediaStore.Video.Media.EXTERNAL_CONTENT_URI;
            } else if ("audio".equals(type)) {
                contentUri = MediaStore.Audio.Media.EXTERNAL_CONTENT_URI;
            }
            final String selection = "_id=?";
            final String[] selectionArgs = new String[] {
                    split[1]
            };
            return getDataColumn(context, contentUri, selection, selectionArgs);
        }
    }
    // MediaStore (and general)
    else if ("content".equalsIgnoreCase(uri.getScheme())) {
        return getDataColumn(context, uri, null, null);
    }
    // File
    else if ("file".equalsIgnoreCase(uri.getScheme())) {
        return uri.getPath();
    }
    return null;
}

/**
 * Get the value of the data column for this Uri. This is useful for
 * MediaStore Uris, and other file-based ContentProviders.
 *
 * @param context The context.
 * @param uri The Uri to query.
 * @param selection (Optional) Filter used in the query.
 * @param selectionArgs (Optional) Selection arguments used in the query.
 * @return The value of the _data column, which is typically a file path.
 */
public static String getDataColumn(Context context, Uri uri, String selection,
                                   String[] selectionArgs) {

    Cursor cursor = null;
    final String column = "_data";
    final String[] projection = {
            column
    };

    try {
        cursor = context.getContentResolver().query(uri, projection, selection, selectionArgs,
                null);
        if (cursor != null && cursor.moveToFirst()) {
            final int column_index = cursor.getColumnIndexOrThrow(column);
            return cursor.getString(column_index);
        }
    } finally {
        if (cursor != null)
            cursor.close();
    }
    return null;
}


/**
 * @param uri The Uri to check.
 * @return Whether the Uri authority is ExternalStorageProvider.
 */
public static boolean isExternalStorageDocument(Uri uri) {
    return "com.android.externalstorage.documents".equals(uri.getAuthority());
}

/**
 * @param uri The Uri to check.
 * @return Whether the Uri authority is DownloadsProvider.
 */
public static boolean isDownloadsDocument(Uri uri) {
    return "com.android.providers.downloads.documents".equals(uri.getAuthority());
}

/**
 * @param uri The Uri to check.
 * @return Whether the Uri authority is MediaProvider.
 */
public static boolean isMediaDocument(Uri uri) {
    return "com.android.providers.media.documents".equals(uri.getAuthority());
}
好的,關於本節android存儲訪問框架SAF就到這裡吧,沒什麼例子,後面用到再深入研究吧, 知道下就好,4.4後獲取文件路徑就簡單多了~
 8.1.3 Android中的13種Drawable小結 Part 3
本節引言:本節我們來把剩下的四種Drawable也學完,他們分別是:LayerDrawable,TransitionDrawable,LevelLi
 8.3.12 Paint API之—— PathEffect(路徑效果)
本節引言:本節繼續來學習Paint的API——PathEffect(路徑效果),我們把畫筆的sytle設置為Stroke,可以繪制一個個由線構成的圖
 第71章、再識Intent-打開網頁(從零開始學Android)
調用android內置安裝的浏覽器來打開網頁。一、設計界面1、MainActivity布局文件打開res/layout/activity_main.xml文件。輸入以下代
 第24章、OnLongClickListener長按事件(從零開始學Android)
在Android App應用中,OnLongClick事件表示長按2秒以上觸發的事件,本章我們通過長按圖像設置為牆紙來理解其具體用法。 知識點:OnLongClickL