編輯:Android技術基礎
本節帶來的是Android三種動畫中的第二種——補間動畫(Tween),和前面學的幀動畫不同,幀動畫 是通過連續播放圖片來模擬動畫效果,而補間動畫開發者只需指定動畫開始,以及動畫結束"關鍵幀", 而動畫變化的"中間幀"則由系統計算並補齊!好了,開始本節學習~
Andoird所支持的補間動畫效果有如下這五種,或者說四種吧,第五種是前面幾種的組合而已~
- AlphaAnimation:透明度漸變效果,創建時許指定開始以及結束透明度,還有動畫的持續 時間,透明度的變化范圍(0,1),0是完全透明,1是完全不透明;對應<alpha/>標簽!
- ScaleAnimation:縮放漸變效果,創建時需指定開始以及結束的縮放比,以及縮放參考點, 還有動畫的持續時間;對應<scale/>標簽!
- TranslateAnimation:位移漸變效果,創建時指定起始以及結束位置,並指定動畫的持續 時間即可;對應<translate/>標簽!
- RotateAnimation:旋轉漸變效果,創建時指定動畫起始以及結束的旋轉角度,以及動畫 持續時間和旋轉的軸心;對應<rotate/>標簽
- AnimationSet:組合漸變,就是前面多種漸變的組合,對應<set/>標簽
在開始講解各種動畫的用法之前,我們先要來講解一個東西:Interpolator
用來控制動畫的變化速度,可以理解成動畫渲染器,當然我們也可以自己實現Interpolator 接口,自行來控制動畫的變化速度,而Android中已經為我們提供了五個可供選擇的實現類:
- LinearInterpolator:動畫以均勻的速度改變
- AccelerateInterpolator:在動畫開始的地方改變速度較慢,然後開始加速
- AccelerateDecelerateInterpolator:在動畫開始、結束的地方改變速度較慢,中間時加速
- CycleInterpolator:動畫循環播放特定次數,變化速度按正弦曲線改變: Math.sin(2 * mCycles * Math.PI * input)
- DecelerateInterpolator:在動畫開始的地方改變速度較快,然後開始減速
- AnticipateInterpolator:反向,先向相反方向改變一段再加速播放
- AnticipateOvershootInterpolator:開始的時候向後然後向前甩一定值後返回最後的值
- BounceInterpolator: 跳躍,快到目的值時值會跳躍,如目的值100,後面的值可能依次為85,77,70,80,90,100
- OvershottInterpolator:回彈,最後超出目的值然後緩慢改變到目的值
而這個東東,我們一般是在寫動畫xml文件時會用到,屬性是:android:interpolator, 而上面對應的值是:@android:anim/linear_interpolator,其實就是駝峰命名法變下劃線而已 AccelerateDecelerateInterpolator對應:@android:anim/accelerate_decelerate_interpolator!
這裡的android:duration都是動畫的持續時間,單位是毫秒~
anim_alpha.xml:
<alpha xmlns:android="http://schemas.android.com/apk/res/android"
    android:interpolator="@android:anim/accelerate_decelerate_interpolator"
    android:fromAlpha="1.0"
    android:toAlpha="0.1"
    android:duration="2000"/>
屬性解釋:
fromAlpha :起始透明度
toAlpha:結束透明度
透明度的范圍為:0-1,完全透明-完全不透明
anim_scale.xml:
<scale xmlns:android="http://schemas.android.com/apk/res/android"
    android:interpolator="@android:anim/accelerate_interpolator"
    android:fromXScale="0.2"
    android:toXScale="1.5"
    android:fromYScale="0.2"
    android:toYScale="1.5"
    android:pivotX="50%"
    android:pivotY="50%"
    android:duration="2000"/>
屬性解釋:
- fromXScale/fromYScale:沿著X軸/Y軸縮放的起始比例
- toXScale/toYScale:沿著X軸/Y軸縮放的結束比例
- pivotX/pivotY:縮放的中軸點X/Y坐標,即距離自身左邊緣的位置,比如50%就是以圖像的 中心為中軸點
anim_translate.xml:
<translate xmlns:android="http://schemas.android.com/apk/res/android"
    android:interpolator="@android:anim/accelerate_decelerate_interpolator"
    android:fromXDelta="0"
    android:toXDelta="320"
    android:fromYDelta="0"
    android:toYDelta="0"
    android:duration="2000"/>
屬性解釋:
- fromXDelta/fromYDelta:動畫起始位置的X/Y坐標
- toXDelta/toYDelta:動畫結束位置的X/Y坐標
anim_rotate.xml:
<rotate xmlns:android="http://schemas.android.com/apk/res/android"
    android:interpolator="@android:anim/accelerate_decelerate_interpolator"
    android:fromDegrees="0"
    android:toDegrees="360"
    android:duration="1000"
    android:repeatCount="1"
    android:repeatMode="reverse"/>
屬性解釋:
- fromDegrees/toDegrees:旋轉的起始/結束角度
- repeatCount:旋轉的次數,默認值為0,代表一次,假如是其他值,比如3,則旋轉4次 另外,值為-1或者infinite時,表示動畫永不停止
- repeatMode:設置重復模式,默認restart,但只有當repeatCount大於0或者infinite或-1時 才有效。還可以設置成reverse,表示偶數次顯示動畫時會做方向相反的運動!
非常簡單,就是前面幾個動畫組合到一起而已~
anim_set.xml:
<set xmlns:android="http://schemas.android.com/apk/res/android"
    android:interpolator="@android:anim/decelerate_interpolator"
    android:shareInterpolator="true" >

    <scale
        android:duration="2000"
        android:fromXScale="0.2"
        android:fromYScale="0.2"
        android:pivotX="50%"
        android:pivotY="50%"
        android:toXScale="1.5"
        android:toYScale="1.5" />

    <rotate
        android:duration="1000"
        android:fromDegrees="0"
        android:repeatCount="1"
        android:repeatMode="reverse"
        android:toDegrees="360" />

    <translate
        android:duration="2000"
        android:fromXDelta="0"
        android:fromYDelta="0"
        android:toXDelta="320"
        android:toYDelta="0" />

    <alpha
        android:duration="2000"
        android:fromAlpha="1.0"
        android:toAlpha="0.1" />

</set>
好的,下面我們就用上面寫的動畫來寫一個例子,讓我們體會體會何為補間動畫: 首先來個簡單的布局:activity_main.xml:
<LinearLayout xmlns:android="http://schemas.android.com/apk/res/android"
    android:layout_width="match_parent"
    android:layout_height="match_parent"
    android:orientation="vertical">

    <Button
        android:id="@+id/btn_alpha"
        android:layout_width="wrap_content"
        android:layout_height="wrap_content"
        android:text="透明度漸變" />

    <Button
        android:id="@+id/btn_scale"
        android:layout_width="wrap_content"
        android:layout_height="wrap_content"
        android:text="縮放漸變" />

    <Button
        android:id="@+id/btn_tran"
        android:layout_width="wrap_content"
        android:layout_height="wrap_content"
        android:text="位移漸變" />

    <Button
        android:id="@+id/btn_rotate"
        android:layout_width="wrap_content"
        android:layout_height="wrap_content"
        android:text="旋轉漸變" />

    <Button
        android:id="@+id/btn_set"
        android:layout_width="wrap_content"
        android:layout_height="wrap_content"
        android:text="組合漸變" />

    <ImageView
        android:id="@+id/img_show"
        android:layout_width="wrap_content"
        android:layout_height="wrap_content"
        android:layout_gravity="center"
        android:layout_marginTop="48dp"
        android:src="@mipmap/img_face" />

</LinearLayout>
好哒,接著到我們的MainActivity.java,同樣非常簡單,只需調用AnimationUtils.loadAnimation() 加載動畫,然後我們的View控件調用startAnimation開啟動畫即可~
public class MainActivity extends AppCompatActivity implements View.OnClickListener{

    private Button btn_alpha;
    private Button btn_scale;
    private Button btn_tran;
    private Button btn_rotate;
    private Button btn_set;
    private ImageView img_show;
    private Animation animation = null;

    @Override
    protected void onCreate(Bundle savedInstanceState) {
        super.onCreate(savedInstanceState);
        setContentView(R.layout.activity_main);
        bindViews();
    }

    private void bindViews() {
        btn_alpha = (Button) findViewById(R.id.btn_alpha);
        btn_scale = (Button) findViewById(R.id.btn_scale);
        btn_tran = (Button) findViewById(R.id.btn_tran);
        btn_rotate = (Button) findViewById(R.id.btn_rotate);
        btn_set = (Button) findViewById(R.id.btn_set);
        img_show = (ImageView) findViewById(R.id.img_show);

        btn_alpha.setOnClickListener(this);
        btn_scale.setOnClickListener(this);
        btn_tran.setOnClickListener(this);
        btn_rotate.setOnClickListener(this);
        btn_set.setOnClickListener(this);

    }

    @Override
    public void onClick(View v) {
        switch (v.getId()){
            case R.id.btn_alpha:
                animation = AnimationUtils.loadAnimation(this,
                        R.anim.anim_alpha);
                img_show.startAnimation(animation);
                break;
            case R.id.btn_scale:
                animation = AnimationUtils.loadAnimation(this,
                        R.anim.anim_scale);
                img_show.startAnimation(animation);
                break;
            case R.id.btn_tran:
                animation = AnimationUtils.loadAnimation(this,
                        R.anim.anim_translate);
                img_show.startAnimation(animation);
                break;
            case R.id.btn_rotate:
                animation = AnimationUtils.loadAnimation(this,
                        R.anim.anim_rotate);
                img_show.startAnimation(animation);
                break;
            case R.id.btn_set:
                animation = AnimationUtils.loadAnimation(this,
                        R.anim.anim_set);
                img_show.startAnimation(animation);
                break;
        }
    }
}
運行效果圖:
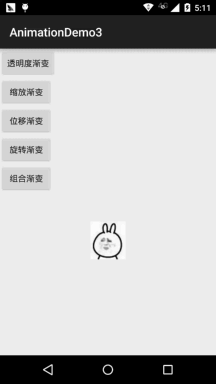
嘿嘿,有點意思是吧,還不動手試試,改點東西,或者自由組合動畫,做出酷炫的效果吧~
我們可以對動畫的執行狀態進行監聽,調用動畫對象的:
即可完成動畫執行狀態的監聽~
先調用AnimationUtils.loadAnimation(動畫xml文件),然後View控件調用startAnimation(anim) 開始動畫~這是靜態加載的方式,當然你也可以直接創建一個動畫對象,用Java代碼完成設置,再調用 startAnimation開啟動畫~
這裡要注意一點,就是Fragment是使用的v4包還是app包下的Fragment! 我們可以調用FragmentTransaction對象的setTransition(int transit) 為Fragment指定標准的過場動畫,transit的可選值如下:
上面的標准過程動畫是兩個都可以調用的,而不同的地方則在於自定義轉場動畫
setCustomAnimations()方法!
app包下的Fragment: setCustomAnimations(int enter, int exit, int popEnter, int popExit) 分別是添加,移除,入棧,以及出棧時的動畫! 另外要注意一點的是,對應的動畫類型是:屬性動畫(Property),就是動畫文件 的根標簽要是:<objectAnimator>,<valueAnimator>或者是前面兩者放到一個<set>裡;
v4包下的Fragment: v4包下的則支持兩種setCustomAnimations()

另外要注意一點的是,對應的動畫類型是:補間動畫(Tween),和上面的View一樣~
可能你會有疑惑,你怎麼知道對應的動畫類型,其實只要你到Fragment源碼那裡找下:
onCreateAnimation()方法的一個返回值就知道了:
v4包:

app包:

Activty設置過場動畫非常簡單,調用的方法是:overridePendingTransition(int enterAnim, int exitAnim)
用法很簡單:在startActivity(intent)或者finish()後添加
參數依次是:新Activity進場時的動畫,以及舊Activity退場時的動畫
下面提供幾種比較簡單而且常用的過場動畫供大家使用~
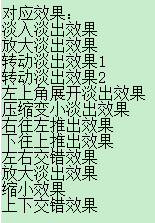
下載傳送門:Activity常用過渡動畫.zip
運行效果圖:
代碼實現:
首先是我們的布局文件:activity_main.xml:
<RelativeLayout xmlns:android="http://schemas.android.com/apk/res/android"
    xmlns:tools="http://schemas.android.com/tools"
    android:layout_width="match_parent"
    android:layout_height="match_parent"
    android:background="#DDE2E3"
    tools:context=".MainActivity">

    <LinearLayout
        android:id="@+id/start_ctrl"
        android:layout_width="match_parent"
        android:layout_height="wrap_content"
        android:layout_alignParentBottom="true"
        android:orientation="vertical"
        android:visibility="gone">

        <Button
            android:id="@+id/start_login"
            android:layout_width="match_parent"
            android:layout_height="wrap_content"
            android:background="#F26968"
            android:gravity="center"
            android:paddingBottom="15dp"
            android:paddingTop="15dp"
            android:text="登陸"
            android:textColor="#FFFFFF"
            android:textSize="18sp" />

        <Button
            android:id="@+id/start_register"
            android:layout_width="match_parent"
            android:layout_height="wrap_content"
            android:background="#323339"
            android:gravity="center"
            android:paddingBottom="15dp"
            android:paddingTop="15dp"
            android:text="注冊"
            android:textColor="#FFFFFF"
            android:textSize="18sp" />
    </LinearLayout>

</RelativeLayout>
接著是MainActivity.java:
public class MainActivity extends AppCompatActivity {
    private LinearLayout start_ctrl;
    @Override
    protected void onCreate(Bundle savedInstanceState) {
        super.onCreate(savedInstanceState);
        setContentView(R.layout.activity_main);
        start_ctrl = (LinearLayout) findViewById(R.id.start_ctrl);
        //設置動畫,從自身位置的最下端向上滑動了自身的高度,持續時間為500ms
        final TranslateAnimation ctrlAnimation = new TranslateAnimation(
                TranslateAnimation.RELATIVE_TO_SELF, 0, TranslateAnimation.RELATIVE_TO_SELF, 0,
                TranslateAnimation.RELATIVE_TO_SELF, 1, TranslateAnimation.RELATIVE_TO_SELF, 0);
        ctrlAnimation.setDuration(500l);     //設置動畫的過渡時間
        start_ctrl.postDelayed(new Runnable() {
            @Override
            public void run() {
                start_ctrl.setVisibility(View.VISIBLE);
                start_ctrl.startAnimation(ctrlAnimation);
            }
        }, 2000);
    }
}
注釋寫得很清楚了,這裡就不BB解釋了,如果你對TranslateAnimation.RELATIVE_TO_SELF這個有疑惑, 請自己谷歌或者百度,限於篇幅(我懶),這裡就不寫了,蠻簡單的~

AnimationDemo3.zip
AnimationDemo4.zip
本節給大家細細地講解了下Android中的第二種動畫(漸變動畫),四種動畫的詳解,以及 設置動畫監聽器,還有如何為View,Fragment和Activity設置動畫,最後還寫了一個進入後 從APP底部彈出登陸按鈕和注冊按鈕的例子,篇幅可能有點長,不過都非常容易理解,相信 大家看完都能夠收獲滿滿~!好的,本節就到這裡,謝謝~
 7.5.4 WebView文件下載
本節引言本節給大家介紹的是WebView下載文件的知識點,當我們在使用普通浏覽器的時候,比如UC,當我們點擊到一個可供下載鏈接的時候,就會進行下載,
 9.2 MediaPlayer播放音頻與視頻
本節引言:本節帶來的是Android多媒體中的——MediaPlayer,我們可以通過這個API來播放音頻和視頻該類是Androd多媒體框架中的一個
 10.3 AudioManager(音頻管理器)
本節引言:在多媒體的第一節,我們用SoundPool寫了個Duang的示例,小豬點擊一個按鈕後,突然發出Duang的一聲,而且當時的聲音很大,嚇死寶
 7.5.2 WebView和JavaScrip交互基礎
本節引言:在上一節中我們對Android的WebView(網頁視圖)進行了學習,相信已經了解了WebView的基本用法;而本節我們要學習的就是通過: