編輯:Android技術基礎
在上一節結束後意味著Android的四大組件我們都已經學習完畢了~,而本節我們要學習的是四大組件間的 樞紐——Intent(意圖),Android通信的橋梁,比如我們可以通過:
- startActivity(Intent)/startActivityForResult(Intent):來啟動一個Activity
- startService(Intent)/bindService(Intent):來啟動一個Service
- sendBroadcast:發送廣播到指定BroadcastReceiver
- 另外別忘了我們在注冊四大組件時,寫得很多的Intent-Filter哦~
好吧,話不多說,開始本節內容!另外前面我們已經用過Intent了,就不在講述概念性的東西了~ 老規矩,官方API:Intent
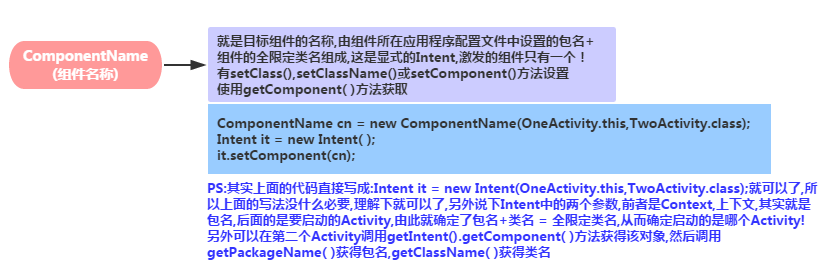
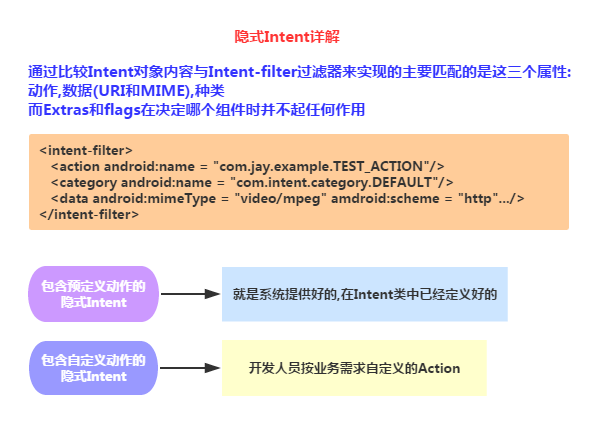
- 顯式Intent:通過組件名指定啟動的目標組件,比如startActivity(new Intent(A.this,B.class)); 每次啟動的組件只有一個~
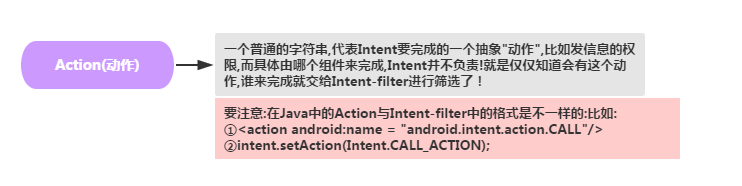
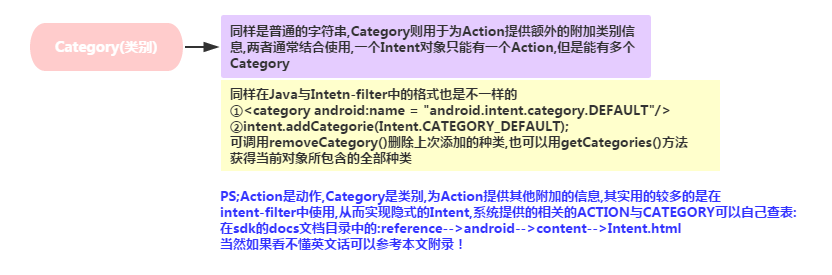
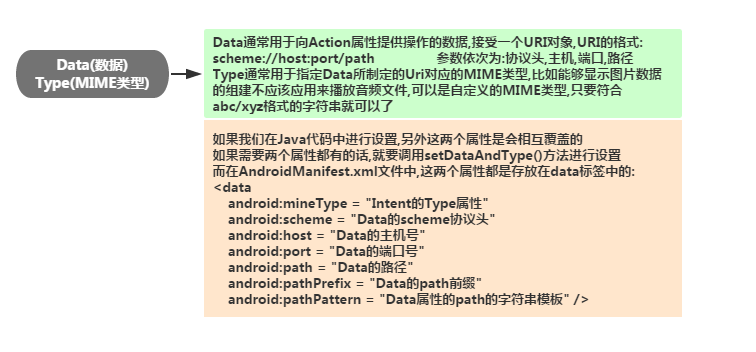
- 隱式Intent:不指定組件名,而指定Intent的Action,Data,或Category,當我們啟動組件時, 會去匹配AndroidManifest.xml相關組件的Intent-filter,逐一匹配出滿足屬性的組件,當不止一個滿足時, 會彈出一個讓我們選擇啟動哪個的對話框~
這個用得很多,直接就上例子了:
例子1:點擊按鈕返回Home界面: 運行效果圖:
核心代碼:
Intent it = new Intent();
it.setAction(Intent.ACTION_MAIN);
it.addCategory(Intent.CATEGORY_HOME);
startActivity(it);
例子2:點擊按鈕打開百度頁面: 運行效果圖:
核心代碼:
Intent it = new Intent();
it.setAction(Intent.ACTION_VIEW);
it.setData(Uri.parse("http://www.baidu.com"));
startActivity(it);
代碼示例:點擊按鈕後,所有Action為VIEW的Activity被篩選出來,由用戶進一步選擇:
核心代碼:
建立第二個Activity的布局,與對應的Activity,在第一個Activity的按鈕點擊事件中添加一下代碼:
Intent it = new Intent();
it.setAction(Intent.ACTION_VIEW);
startActivity(it);
最後在第二個Activity的Intent中添加以下代碼:
<activity android:name=".SecondActivity"
            android:label="第二個Activity">
    <intent-filter>
        <action android:name="android.intent.action.VIEW"/>
        <category android:name="android.intent.category.DEFAULT"/>
    </intent-filter>
 </activity>
運行效果圖:
代碼示例:使用自定義的Action與category來激活另一個Activity
核心代碼: 建立第二個Activity的布局,與對應的Activity,在第一個Activity的按鈕點擊事件中添加一下代碼:
Intent it = new Intent();
it.setAction("my_action");
it.addCategory("my_category");
startActivity(it);
最後在第二個Activity的Intent中添加以下代碼:
<activity android:name=".SecondActivity"
        android:label="第二個Activity">
    <intent-filter>
        <action android:name="my_action"/>
        <category android:name="my_category"/>
        <category android:name="android.intent.category.DEFAULT"/>
    </intent-filter>
</activity>
注意雖然我們自定義了一個category,但是還是要把這個默認的加上,不然會報錯的:
<category android:name="android.intent.category.DEFAULT"/>
大家貼下常用的系統Intent的合集吧,上面沒有的歡迎提出~
//===============================================================
//1.撥打電話
// 給移動客服10086撥打電話
Uri uri = Uri.parse("tel:10086");
Intent intent = new Intent(Intent.ACTION_DIAL, uri);
startActivity(intent);

//===============================================================

//2.發送短信
// 給10086發送內容為“Hello”的短信
Uri uri = Uri.parse("smsto:10086");
Intent intent = new Intent(Intent.ACTION_SENDTO, uri);
intent.putExtra("sms_body", "Hello");
startActivity(intent);

//3.發送彩信(相當於發送帶附件的短信)
Intent intent = new Intent(Intent.ACTION_SEND);
intent.putExtra("sms_body", "Hello");
Uri uri = Uri.parse("content://media/external/images/media/23");
intent.putExtra(Intent.EXTRA_STREAM, uri);
intent.setType("image/png");
startActivity(intent);

//===============================================================

//4.打開浏覽器:
// 打開百度主頁
Uri uri = Uri.parse("http://www.baidu.com");
Intent intent  = new Intent(Intent.ACTION_VIEW, uri);
startActivity(intent);

//===============================================================

//5.發送電子郵件:(閹割了Google服務的沒戲!!!!)
// 給[email protected]發郵件
Uri uri = Uri.parse("mailto:[email protected]");
Intent intent = new Intent(Intent.ACTION_SENDTO, uri);
startActivity(intent);
// 給[email protected]發郵件發送內容為“Hello”的郵件
Intent intent = new Intent(Intent.ACTION_SEND);
intent.putExtra(Intent.EXTRA_EMAIL, "[email protected]");
intent.putExtra(Intent.EXTRA_SUBJECT, "Subject");
intent.putExtra(Intent.EXTRA_TEXT, "Hello");
intent.setType("text/plain");
startActivity(intent);
// 給多人發郵件
Intent intent=new Intent(Intent.ACTION_SEND);
String[] tos = {"[email protected]", "[email protected]"}; // 收件人
String[] ccs = {"[email protected]", "[email protected]"}; // 抄送
String[] bccs = {"[email protected]", "[email protected]"}; // 密送
intent.putExtra(Intent.EXTRA_EMAIL, tos);
intent.putExtra(Intent.EXTRA_CC, ccs);
intent.putExtra(Intent.EXTRA_BCC, bccs);
intent.putExtra(Intent.EXTRA_SUBJECT, "Subject");
intent.putExtra(Intent.EXTRA_TEXT, "Hello");
intent.setType("message/rfc822");
startActivity(intent);

//===============================================================

//6.顯示地圖:
// 打開Google地圖中國北京位置(北緯39.9,東經116.3)
Uri uri = Uri.parse("geo:39.9,116.3");
Intent intent = new Intent(Intent.ACTION_VIEW, uri);
startActivity(intent);

//===============================================================

//7.路徑規劃
// 路徑規劃:從北京某地(北緯39.9,東經116.3)到上海某地(北緯31.2,東經121.4)
Uri uri = Uri.parse("http://maps.google.com/maps?f=d&saddr=39.9 116.3&daddr=31.2 121.4");
Intent intent = new Intent(Intent.ACTION_VIEW, uri);
startActivity(intent);

//===============================================================

//8.多媒體播放:
Intent intent = new Intent(Intent.ACTION_VIEW);
Uri uri = Uri.parse("file:///sdcard/foo.mp3");
intent.setDataAndType(uri, "audio/mp3");
startActivity(intent);

//獲取SD卡下所有音頻文件,然後播放第一首=-=
Uri uri = Uri.withAppendedPath(MediaStore.Audio.Media.INTERNAL_CONTENT_URI, "1");
Intent intent = new Intent(Intent.ACTION_VIEW, uri);
startActivity(intent);

//===============================================================

//9.打開攝像頭拍照:
// 打開拍照程序
Intent intent = new Intent(MediaStore.ACTION_IMAGE_CAPTURE);
startActivityForResult(intent, 0);
// 取出照片數據
Bundle extras = intent.getExtras();
Bitmap bitmap = (Bitmap) extras.get("data");

//另一種:
//調用系統相機應用程序,並存儲拍下來的照片
Intent intent = new Intent(MediaStore.ACTION_IMAGE_CAPTURE);
time = Calendar.getInstance().getTimeInMillis();
intent.putExtra(MediaStore.EXTRA_OUTPUT, Uri.fromFile(new File(Environment
.getExternalStorageDirectory().getAbsolutePath()+"/tucue", time + ".jpg")));
startActivityForResult(intent, ACTIVITY_GET_CAMERA_IMAGE);

//===============================================================

//10.獲取並剪切圖片
// 獲取並剪切圖片
Intent intent = new Intent(Intent.ACTION_GET_CONTENT);
intent.setType("image/*");
intent.putExtra("crop", "true"); // 開啟剪切
intent.putExtra("aspectX", 1); // 剪切的寬高比為1:2
intent.putExtra("aspectY", 2);
intent.putExtra("outputX", 20); // 保存圖片的寬和高
intent.putExtra("outputY", 40);
intent.putExtra("output", Uri.fromFile(new File("/mnt/sdcard/temp"))); // 保存路徑
intent.putExtra("outputFormat", "JPEG");// 返回格式
startActivityForResult(intent, 0);
// 剪切特定圖片
Intent intent = new Intent("com.android.camera.action.CROP");
intent.setClassName("com.android.camera", "com.android.camera.CropImage");
intent.setData(Uri.fromFile(new File("/mnt/sdcard/temp")));
intent.putExtra("outputX", 1); // 剪切的寬高比為1:2
intent.putExtra("outputY", 2);
intent.putExtra("aspectX", 20); // 保存圖片的寬和高
intent.putExtra("aspectY", 40);
intent.putExtra("scale", true);
intent.putExtra("noFaceDetection", true);
intent.putExtra("output", Uri.parse("file:///mnt/sdcard/temp"));
startActivityForResult(intent, 0);

//===============================================================

//11.打開Google Market
// 打開Google Market直接進入該程序的詳細頁面
Uri uri = Uri.parse("market://details?id=" + "com.demo.app");
Intent intent = new Intent(Intent.ACTION_VIEW, uri);
startActivity(intent);

//===============================================================

//12.進入手機設置界面:
// 進入無線網絡設置界面(其它可以舉一反三)
Intent intent = new Intent(android.provider.Settings.ACTION_WIRELESS_SETTINGS);
startActivityForResult(intent, 0);

//===============================================================

//13.安裝apk:
Uri installUri = Uri.fromParts("package", "xxx", null);
returnIt = new Intent(Intent.ACTION_PACKAGE_ADDED, installUri);

//===============================================================

//14.卸載apk:
Uri uri = Uri.fromParts("package", strPackageName, null);
Intent it = new Intent(Intent.ACTION_DELETE, uri);
startActivity(it);

//===============================================================

//15.發送附件:
Intent it = new Intent(Intent.ACTION_SEND);
it.putExtra(Intent.EXTRA_SUBJECT, "The email subject text");
it.putExtra(Intent.EXTRA_STREAM, "file:///sdcard/eoe.mp3");
sendIntent.setType("audio/mp3");
startActivity(Intent.createChooser(it, "Choose Email Client"));

//===============================================================

//16.進入聯系人頁面:
Intent intent = new Intent();
intent.setAction(Intent.ACTION_VIEW);
intent.setData(People.CONTENT_URI);
startActivity(intent);

//===============================================================


//17.查看指定聯系人:
Uri personUri = ContentUris.withAppendedId(People.CONTENT_URI, info.id);//info.id聯系人ID
Intent intent = new Intent();
intent.setAction(Intent.ACTION_VIEW);
intent.setData(personUri);
startActivity(intent);

//===============================================================

//18.調用系統編輯添加聯系人(高版本SDK有效):
Intent it = newIntent(Intent.ACTION_INSERT_OR_EDIT);
it.setType("vnd.android.cursor.item/contact");
//it.setType(Contacts.CONTENT_ITEM_TYPE);
it.putExtra("name","myName");
it.putExtra(android.provider.Contacts.Intents.Insert.COMPANY, "organization");
it.putExtra(android.provider.Contacts.Intents.Insert.EMAIL,"email");
it.putExtra(android.provider.Contacts.Intents.Insert.PHONE,"homePhone");
it.putExtra(android.provider.Contacts.Intents.Insert.SECONDARY_PHONE,"mobilePhone");
it.putExtra( android.provider.Contacts.Intents.Insert.TERTIARY_PHONE,"workPhone");
it.putExtra(android.provider.Contacts.Intents.Insert.JOB_TITLE,"title");
startActivity(it);

//===============================================================

//19.調用系統編輯添加聯系人(全有效):
Intent intent = newIntent(Intent.ACTION_INSERT_OR_EDIT);
intent.setType(People.CONTENT_ITEM_TYPE);
intent.putExtra(Contacts.Intents.Insert.NAME, "My Name");
intent.putExtra(Contacts.Intents.Insert.PHONE, "+1234567890");
intent.putExtra(Contacts.Intents.Insert.PHONE_TYPE,Contacts.PhonesColumns.TYPE_MOBILE);
intent.putExtra(Contacts.Intents.Insert.EMAIL, "[email protected]");
intent.putExtra(Contacts.Intents.Insert.EMAIL_TYPE, Contacts.ContactMethodsColumns.TYPE_WORK);
startActivity(intent);

//===============================================================

//20.打開另一程序
Intent i = new Intent();
ComponentName cn = new ComponentName("com.example.jay.test",
"com.example.jay.test.MainActivity");
i.setComponent(cn);
i.setAction("android.intent.action.MAIN");
startActivityForResult(i, RESULT_OK);

//===============================================================

//21.打開錄音機
Intent mi = new Intent(Media.RECORD_SOUND_ACTION);
startActivity(mi);

//===============================================================

//22.從google搜索內容
Intent intent = new Intent();
intent.setAction(Intent.ACTION_WEB_SEARCH);
intent.putExtra(SearchManager.QUERY,"searchString")
startActivity(intent);

//===============================================================
本來想直接貼以前收集到的Intent Action的,後來想想還是算了,授之以魚,還不如授之以漁, 如果你下載了Android的文檔的話,可以在下述路徑:
sdk-->docs-->reference-->android--->content--->Intent.html
找到這個玩意,然後從這個Constants開始就是了:

遇到陌生的自己來這裡查即可~
好的,關於Intent的基本使用就到這裡,下一節我們會來繼續學習在日常開發中使用Intent可能會遇到 的一些問題或者說需求吧,敬請期待,謝謝~
 2.2.5 GridLayout(網格布局)
本節引言今天要介紹的布局是Android 4.0以後引入的一個新的布局,和前面所學的TableLayout(表格布局)有點類似,不過他有很多前者沒有
 2.6.0 其他幾種常用對話框基本使用
本節引言:上節我們對Dialog的父類:AlertDialog進行了學習,而本節我們來學習下幾個常用的Dialog的基本使用,他們分別是:Progr
 第55章、播放視頻(從零開始學Android)
在Android中,我們有三種方式來實現視頻的播放:1、使用其自帶的播放器。指定Action為ACTION_VIEW,Data為Uri,Type為其MIME類型。2、使用
 第89章、系統服務之SMS服務(從零開始學Android)
每逢佳節,中國移動、電信、聯通都是偷偷笑的日子,又不知道多少短信費用納入囊中,盡管微信、QQ、飛信漫天飛,但仍然阻擋不了節日祝福短信的火爆,但群發實在沒有意義,你是不是想