編輯:Android技術基礎
上一節中我們使用LinearLayout + TextView實現了底部導航欄的效果,每次點擊我們都要重置 所有TextView的狀態,然後選中點擊的TextView,有點麻煩是吧,接下來我們用另一種方法: RadioGroup + RadioButton來實現我們上一節的效果!
本節用到的是實現單選效果的RadioButton,如果你不熟悉,或者沒用過,可先移步到:RadioButton
簡單點說就是我們就是一個RadioGroup包著四個RadioButton,和前面一樣用比例來劃分:1:1:1:1;
另外我們只需重寫RadioGroup的onCheckedChange,判斷checkid即可知道點擊的是哪個RadioButton!
好的,下面開始堆碼!
PS:這裡的素材什麼的,直接使用的是上一節中的素材!另外drawable類的資源都是將selected 狀態修改成checked!
圖片Drawable資源:tab_menu_channel.xml
<?xml version="1.0" encoding="utf-8"?>
<selector xmlns:android="http://schemas.android.com/apk/res/android">
    <item android:drawable="@mipmap/tab_channel_pressed" android:state_checked="true" />
    <item android:drawable="@mipmap/tab_channel_normal" />
</selector>
其他三個照葫蘆畫瓢!
文字資源:tab_menu_text.xml
<?xml version="1.0" encoding="utf-8"?>
<selector xmlns:android="http://schemas.android.com/apk/res/android">
    <item android:color="@color/text_yellow" android:state_checked="true" />
    <item android:color="@color/text_gray" />
</selector>
背景資源:tab_menu_bg.xml
<?xml version="1.0" encoding="utf-8"?>
<selector xmlns:android="http://schemas.android.com/apk/res/android">
    <item android:state_selected="true">
        <shape>
            <solid android:color="#FFC4C4C4" />
        </shape>
    </item>
    <item>
        <shape>
            <solid android:color="@color/transparent" />
        </shape>
    </item>
</selector>
在前面用TextView實現底部導航欄我們就發現了一個問題,每個TextView的屬性都幾乎是差不多 的,而在建議那裡我們也說讓大家把相同的屬性抽取出來寫到Style中,可能部分朋友懶或者不知道 如何抽取出來,以及用,這裡就給大家示范下:
首先我們取出其中一個RadioGroup的標簽:
<RadioButton
            android:id="@+id/rb_channel"
            android:layout_width="0dp"
            android:layout_height="match_parent"
            android:layout_weight="1"
            android:background="@drawable/tab_menu_bg"
            android:button="@null"
            android:drawableTop="@drawable/tab_menu_channel"
            android:gravity="center"
            android:paddingTop="3dp"
            android:text="@string/tab_menu_alert"
            android:textColor="@drawable/tab_menu_text"
            android:textSize="18sp" />
我們可以把每個RadioButton都相同的屬性抽取出來,寫到style.xml文件中:
<style name="tab_menu_item">
    <item name="android:layout_width">0dp</item>
    <item name="android:layout_weight">1</item>
    <item name="android:layout_height">match_parent</item>
    <item name="android:background">@drawable/tab_menu_bg</item>
    <item name="android:button">@null</item>
    <item name="android:gravity">center</item>
    <item name="android:paddingTop">3dp</item>
    <item name="android:textColor">@drawable/tab_menu_text</item>
    <item name="android:textSize">18sp</item>
</style>
然後我們的activity_main.xml中的RadioButton就用不著次次都寫相同的代碼了, 只需讓RadioButton的就可以了!
activity_main.xml:
<RelativeLayout xmlns:android="http://schemas.android.com/apk/res/android"
    xmlns:tools="http://schemas.android.com/tools"
    android:layout_width="match_parent"
    android:layout_height="match_parent"
    android:background="@color/bg_gray"
    tools:context=".MainActivity">


    <RelativeLayout
        android:id="@+id/ly_top_bar"
        android:layout_width="match_parent"
        android:layout_height="48dp"
        android:background="@color/bg_topbar">

        <TextView
            android:id="@+id/txt_topbar"
            android:layout_width="match_parent"
            android:layout_height="match_parent"
            android:layout_centerInParent="true"
            android:gravity="center"
            android:text="信息"
            android:textColor="@color/text_topbar"
            android:textSize="18sp" />

        <View
            android:layout_width="match_parent"
            android:layout_height="2px"
            android:layout_alignParentBottom="true"
            android:background="@color/div_white" />

    </RelativeLayout>

    <RadioGroup
        android:id="@+id/rg_tab_bar"
        android:layout_width="match_parent"
        android:layout_height="56dp"
        android:layout_alignParentBottom="true"
        android:background="@color/bg_white"
        android:orientation="horizontal">

        <RadioButton
            android:id="@+id/rb_channel"

            android:drawableTop="@drawable/tab_menu_channel"
            android:text="@string/tab_menu_alert" />

        <RadioButton
            android:id="@+id/rb_message"

            android:drawableTop="@drawable/tab_menu_message"
            android:text="@string/tab_menu_profile" />

        <RadioButton
            android:id="@+id/rb_better"

            android:drawableTop="@drawable/tab_menu_better"
            android:text="@string/tab_menu_pay" />

        <RadioButton
            android:id="@+id/rb_setting"

            android:drawableTop="@drawable/tab_menu_setting"
            android:text="@string/tab_menu_setting"/>

    </RadioGroup>

    <View
        android:id="@+id/div_tab_bar"
        android:layout_width="match_parent"
        android:layout_height="2px"
        android:layout_above="@id/rg_tab_bar"
        android:background="@color/div_white" />

    <FrameLayout
        android:id="@+id/ly_content"
        android:layout_width="match_parent"
        android:layout_height="match_parent"
        android:layout_above="@id/div_tab_bar"
        android:layout_below="@id/ly_top_bar"></FrameLayout>

</RelativeLayout>
AndroidManifest.xml設置下theme屬性
android:theme="@style/Theme.AppCompat.NoActionBar"
直接照搬上一節的布局跟Fragment:
fg_content.xml:
<?xml version="1.0" encoding="utf-8"?>
<LinearLayout xmlns:android="http://schemas.android.com/apk/res/android"
    android:orientation="vertical" android:layout_width="match_parent"
    android:layout_height="match_parent"
    android:background="@color/bg_white">

    <TextView
        android:id="@+id/txt_content"
        android:layout_width="match_parent"
        android:layout_height="match_parent"
        android:gravity="center"
        android:text="呵呵"
        android:textColor="@color/text_yellow"
        android:textSize="20sp"/>

</LinearLayout>
MyFragment.java:
/**
 * Created by Coder-pig on 2015/8/29 0028.
 */
public class MyFragment extends Fragment {

    private String content;
    public MyFragment(String content) {
        this.content = content;
    }

    @Override
    public View onCreateView(LayoutInflater inflater, ViewGroup container, Bundle savedInstanceState) {
        View view = inflater.inflate(R.layout.fg_content,container,false);
        TextView txt_content = (TextView) view.findViewById(R.id.txt_content);
        txt_content.setText(content);
        return view;
    }
}
這個比起TextView實現簡單多了,就不詳細講解了,很簡單,直接上代碼:
MainActivity.java
/**
* Created by Coder-pig on 2015/8/29 0028.
*/
public class MainActivity extends AppCompatActivity implements RadioGroup.OnCheckedChangeListener{
private RadioGroup rg_tab_bar;
private RadioButton rb_channel;
//Fragment Object
private MyFragment fg1,fg2,fg3,fg4;
private FragmentManager fManager;
@Override
protected void onCreate(Bundle savedInstanceState) {
super.onCreate(savedInstanceState);
setContentView(R.layout.activity_main);
fManager = getFragmentManager();
rg_tab_bar = (RadioGroup) findViewById(R.id.rg_tab_bar);
rg_tab_bar.setOnCheckedChangeListener(this);
//獲取第一個單選按鈕,並設置其為選中狀態
rb_channel = (RadioButton) findViewById(R.id.rb_channel);
rb_channel.setChecked(true);
}
@Override
public void onCheckedChanged(RadioGroup group, int checkedId) {
FragmentTransaction fTransaction = fManager.beginTransaction();
hideAllFragment(fTransaction);
switch (checkedId){
case R.id.rb_channel:
if(fg1 == null){
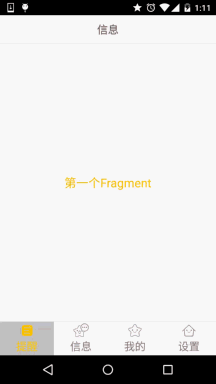
fg1 = new MyFragment("第一個Fragment");
fTransaction.add(R.id.ly_content,fg1);
}else{
fTransaction.show(fg1);
}
break;
case R.id.rb_message:
if(fg2 == null){
fg2 = new MyFragment("第二個Fragment");
fTransaction.add(R.id.ly_content,fg2);
}else{
fTransaction.show(fg2);
}
break;
case R.id.rb_better:
if(fg3 == null){
fg3 = new MyFragment("第三個Fragment");
fTransaction.add(R.id.ly_content,fg3);
}else{
fTransaction.show(fg3);
}
break;
case R.id.rb_setting:
if(fg4 == null){
fg4 = new MyFragment("第四個Fragment");
fTransaction.add(R.id.ly_content,fg4);
}else{
fTransaction.show(fg4);
}
break;
}
fTransaction.commit();
}
//隱藏所有Fragment
private void hideAllFragment(FragmentTransaction fragmentTransaction){
if(fg1 != null)fragmentTransaction.hide(fg1);
if(fg2 != null)fragmentTransaction.hide(fg2);
if(fg3 != null)fragmentTransaction.hide(fg3);
if(fg4 != null)fragmentTransaction.hide(fg4);
}
}
PS:在上一節忘記講一點了,FragmentTransaction只能使用一次,每次使用都要調用FragmentManager 的beginTransaction()方法獲得FragmentTransaction事務對象哦!
其實和上一節實現的效果是一樣的:
FragmentDemo2.zip:FragmentDemo2.zip 下載
本節講解的是實現底部導航欄的第二種方法:RadioGroup + RadioButton,有了單選,我們 就不用像TextView一樣,每次點擊後先重置所有TextView的Selected狀態,再讓點擊的TextView 的Selected為true,這樣就可以寫少一點代碼了~本節就到這裡~謝謝
 第73章、再識Intent-調用發送短信程序(從零開始學Android)
通過Intent完成短信發送,其本質也是調用Android系統自帶發送短信程序,不是真正的自定義發送。如果想實現真正意義的自定義發送,則要采用Service的方式。一、設
 7.6.2 基於TCP協議的Socket通信(1)
本節引言:上一節的概念課枯燥無味是吧,不過總有點收獲是吧,本節開始我們來研究基於TCP協議的Socket通信,先來了解下Socket的概念,以及So
 2.6.2 菜單(Menu)
本節引言:本章給大家帶來的是Android中的Menu(菜單),而在Android中的菜單有如下幾種:OptionMenu:選項菜單,android
 4.3.1 BroadcastReceiver牛刀小試
本節引言 App Components也沒發現有BroadcastReceiver的蹤跡,恩呢,那就直接搜BroadcastReceiver,對應文