Content Provider屬於Android應用程序的組件之一,作為應用程序之間唯一的共享數據的途徑,Content Provider主要的功能就是存儲並檢索數據以及向其他應用程序提供訪問數據的接口。其他程序可以通過此URI訪問指定的數據,進行數據的增、刪、改、查。
本章案例通過讀取聯系人信息為例。
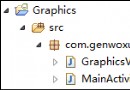
一、程序文件
打開“src/com.genwoxue.intentcontprov/MainActivity.java”文件。
然後輸入以下代碼:
[java] view plain copy
- package com.genwoxue.intentcontprov;
-
- import android.net.Uri;
- import android.os.Bundle;
- import android.provider.ContactsContract;
- import android.app.Activity;
- import android.content.ContentUris;
- import android.content.Intent;
- import android.database.Cursor;
- import android.view.View;
- import android.view.View.OnClickListener;
- import android.widget.Button;
- import android.widget.TextView;
- import android.widget.Toast;
-
- public class MainActivity extends Activity {
-
- private static final int CONTACT_PICK=1;
- @Override
- protected void onCreate(Bundle savedInstanceState) {
- super.onCreate(savedInstanceState);
- setContentView(R.layout.activity_main);
-
- Uri uri=Uri.parse("content://contacts/people");
- Intent intent=new Intent(Intent.ACTION_PICK,uri);
- super.startActivityForResult(intent,1);
-
- }
-
- @Override
- protected void onActivityResult(int requestCode,int resultCode,Intent data){
- switch(requestCode){
- case CONTACT_PICK:
- Uri uri=data.getData();
- String mobileselect=ContactsContract.CommonDataKinds.Phone.CONTACT_ID+"=?";
- String[] mobileselectargs={String.valueOf(ContentUris.parseId(uri))};
- Cursor cursor=super.managedQuery(
- ContactsContract.CommonDataKinds.Phone.CONTENT_URI,
- null,
- mobileselect,
- mobileselectargs,
- null);
- StringBuffer buff=new StringBuffer();
- buff.append("手機號碼:");
- for(cursor.moveToFirst();!cursor.isAfterLast();cursor.moveToNext()){
- buff.append(cursor.getString(cursor.getColumnIndex(ContactsContract.CommonDataKinds.Phone.NUMBER)));
-
- Toast.makeText(getApplicationContext(), buff, Toast.LENGTH_LONG).show();
-
- }
- }
- }
-
- }
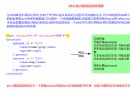
三、配置文件
打開“AndroidManifest.xml”文件。
然後輸入以下代碼:
[html] view plain copy
- <?xml version="1.0" encoding="utf-8"?>
- <manifest xmlns:android="http://schemas.android.com/apk/res/android"
- package="com.genwoxue.intentcontprov"
- android:versionCode="1"
- android:versionName="1.0" >
-
- <uses-sdk
- android:minSdkVersion="10"
- android:targetSdkVersion="15" />
-
- <uses-permission android:name="android.permission.READ_CONTACTS"/>
- <application
- android:allowBackup="true"
- android:icon="@drawable/ic_launcher"
- android:label="@string/app_name"
- android:theme="@style/AppTheme" >
- <activity
- android:name="com.genwoxue.intentcontprov.MainActivity"
- android:label="@string/app_name" >
- <intent-filter>
- <action android:name="android.intent.action.MAIN" />
- <category android:name="android.intent.category.LAUNCHER" />
- </intent-filter>
- </activity>
- </application>
-
- </manifest>
注意:需要在AndroidManifest.xml文件中添加權限:
<uses-permission android:name="android.permission.READ_CONTACTS"/>
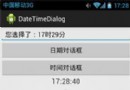
四、運行結果
我們選擇“喬內蒙”,顯示其電話號碼。


 7.2.1 Android XML數據解析
 第51章、繪制簡單圖形(從零開始學Android)
 第42章、標簽組件Tabhost(從零開始學Android)
 第32章、日期對話框DatePickerDialog(從零開始學Android)