編輯:Android資訊
當我開始接觸Tint這個詞的時候,其實是蠻不理解它的意思的,以及並不清楚Google發明它的目的,它一般搭配Background配合使用,但是現在已經有了Background,為什麼還需要Tint呢?
Tint 翻譯為著色。
著色,著什麼色呢?和背景有關,當然是著背景的色。當我開發客戶端,使用了appcompat-v7包的時候,為了實現Material Design的效果,我們會去設置主題裡的幾個顏色,重要的比如primaryColor,colorControlNormal,colorControlActived等等,而我們使用的一些組件,比如EditText就會自動變成我們想要的背景顏色,在背景圖只有一張的情況下,這樣的做法極大的減少了我們apk包的大小。
實現的方式就是用一個顏色為我們的背景圖片設置tint(著色)。
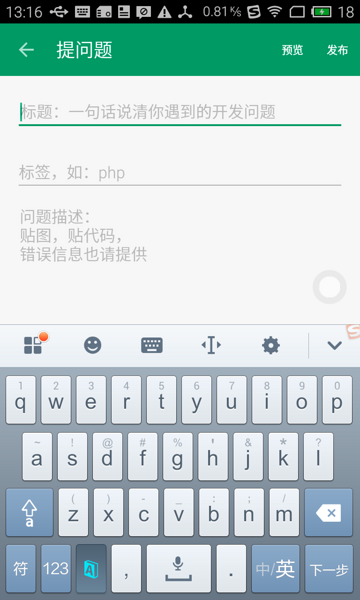
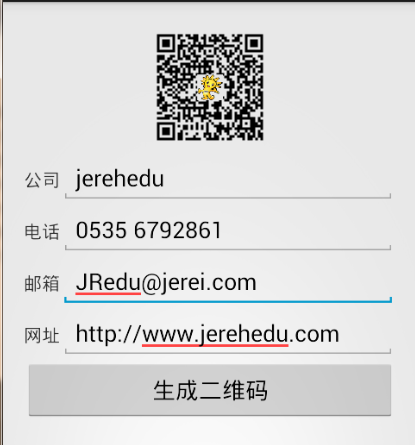
看看即將發布的SegmentFault for Android 2.7中,發布問題功能,這個EditText的顏色和我們的主要顏色相同。它利用了TintManager這個類,為自己的背景進行著色(綠色)。
那麼這個原始圖是什麼樣子呢?我們從appcompat-v7包中找到了這個圖,是一個.9圖,樣子如下:
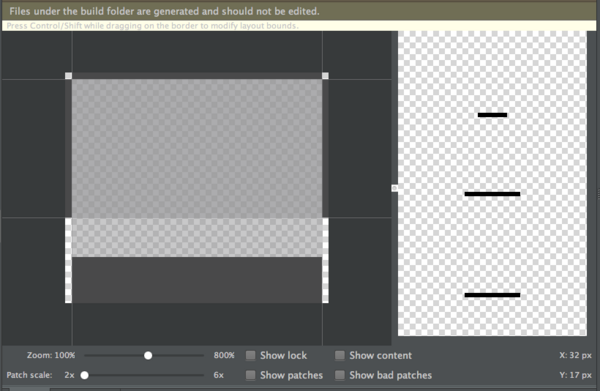
其實它只是一個黑色的條,通過綠色的著色,變成了一個綠色的條。 就是這樣的設計方式,使得我們在Material Design中省了多少資源文件呀!
好了,既然理解了tint的含義,我們趕緊看下這一切是如何實現的吧。
其實底層特別簡單,了解過渲染的同學應該知道PorterDuffColorFilter這個東西,我們使用SRC_IN的方式,對這個Drawable進行顏色方面的渲染,就是在這個Drawable中有像素點的地方,再用我們的過濾器著色一次。
實際上如果要我們自己實現,只用獲取View的backgroundDrawable之後,設置下colorFilter即可。
看下最核心的代碼就這麼幾行
javaif (filter == null) {
	// Cache miss, so create a color filter and add it to the cache
	filter = new PorterDuffColorFilter(color, mode);
}
d.setColorFilter(filter);
通常情況下,我們的mode一般都是SRC_IN,如果想了解這個屬性相關的資料,這裡是傳送門: http://blog.csdn.net/t12x3456/article/details/10432935 (中文)
由於API Level 21以前不支持background tint在xml中設置,於是提供了ViewCompat.setBackgroundTintList方法和ViewCompat.setBackgroundTintMode用來手動更改需要著色的顏色,但要求相關的View繼承TintableBackgroundView接口。
看下源碼是如何實現的吧,我們以AppCompatEditText為例:
看下構造函數(省略無關代碼)
javapublic AppCompatEditText(Context context, AttributeSet attrs, int defStyleAttr) {
	super(TintContextWrapper.wrap(context), attrs, defStyleAttr);
	...
	ColorStateList tint = a.getTintManager().getTintList(a.getResourceId(0, -1)); //根據背景的resource id獲取內置的著色顏色。
	if (tint != null) {
		setInternalBackgroundTint(tint); //設置著色
	}
	...
}
private void setInternalBackgroundTint(ColorStateList tint) {
	if (tint != null) {
		if (mInternalBackgroundTint == null) {
			mInternalBackgroundTint = new TintInfo();
		}
		mInternalBackgroundTint.mTintList = tint;
		mInternalBackgroundTint.mHasTintList = true;
	} else {
		mInternalBackgroundTint = null;
	}
	//上面的代碼是記錄tint相關的信息。
	applySupportBackgroundTint();  //對背景應用tint
}
 private void applySupportBackgroundTint() {
	if (getBackground() != null) {
		if (mBackgroundTint != null) {
			TintManager.tintViewBackground(this, mBackgroundTint);
		} else if (mInternalBackgroundTint != null) {
			TintManager.tintViewBackground(this, mInternalBackgroundTint); //最重要的,對tint進行應用
		}
	}
}
然後我們進入tintViewBackground看下TintManager裡面的源碼
javapublic static void tintViewBackground(View view, TintInfo tint) {
	final Drawable background = view.getBackground();
	if (tint.mHasTintList) {
		//如果設置了tint的話,對背景設置PorterDuffColorFilter
		setPorterDuffColorFilter(
				background,
				tint.mTintList.getColorForState(view.getDrawableState(),
						tint.mTintList.getDefaultColor()),
				tint.mHasTintMode ? tint.mTintMode : null);
	} else {
		background.clearColorFilter();
	}
	if (Build.VERSION.SDK_INT <= 10) {
		// On Gingerbread, GradientDrawable does not invalidate itself when it's ColorFilter
		// has changed, so we need to force an invalidation
		view.invalidate();
	}
}
private static void setPorterDuffColorFilter(Drawable d, int color, PorterDuff.Mode mode) {
	if (mode == null) {
		// If we don't have a blending mode specified, use our default
		mode = DEFAULT_MODE;
	}
	// First, lets see if the cache already contains the color filter
	PorterDuffColorFilter filter = COLOR_FILTER_CACHE.get(color, mode);
	if (filter == null) {
		// Cache miss, so create a color filter and add it to the cache
		filter = new PorterDuffColorFilter(color, mode);
		COLOR_FILTER_CACHE.put(color, mode, filter);
	}
	// 最最重要,原來是對background drawable設置了colorFilter 完成了我們要的功能。
	d.setColorFilter(filter);
}
以上是對API21以下的兼容。
如果我們要實現自己的AppCompat組件實現tint的一些特性的話,我們就可以指定好ColorStateList,利用TintManager對自己的背景進行著色,當然需要對外開放設置的接口的話,我們還要實現TintableBackgroundView接口,然後用ViewCompat.setBackgroundTintList進行設置,這樣能完成對v7以上所有版本的兼容。
比如我現在要對一個自定義組件實現對Tint的支持,其實只用繼承下,加一些代碼就好了,代碼如下(幾乎通用):
public class AppCompatFlowLayout extends FlowLayout implements TintableBackgroundView {
	private static final int[] TINT_ATTRS = {
			android.R.attr.background
	};
	private TintInfo mInternalBackgroundTint;
	private TintInfo mBackgroundTint;
	private TintManager mTintManager;
	public AppCompatFlowLayout(Context context) {
		this(context, null);
	}
	public AppCompatFlowLayout(Context context, AttributeSet attributeSet) {
		this(context, attributeSet, 0);
	}
	public AppCompatFlowLayout(Context context, AttributeSet attributeSet, int defStyle) {
		super(context, attributeSet, defStyle);
		if (TintManager.SHOULD_BE_USED) {
			TintTypedArray a = TintTypedArray.obtainStyledAttributes(getContext(), attributeSet,
					TINT_ATTRS, defStyle, 0);
			if (a.hasValue(0)) {
				ColorStateList tint = a.getTintManager().getTintList(a.getResourceId(0, -1));
				if (tint != null) {
					setInternalBackgroundTint(tint);
				}
			}
			mTintManager = a.getTintManager();
			a.recycle();
		}
	}
	private void applySupportBackgroundTint() {
		if (getBackground() != null) {
			if (mBackgroundTint != null) {
				TintManager.tintViewBackground(this, mBackgroundTint);
			} else if (mInternalBackgroundTint != null) {
				TintManager.tintViewBackground(this, mInternalBackgroundTint);
			}
		}
	}
	@Override
	protected void drawableStateChanged() {
		super.drawableStateChanged();
		applySupportBackgroundTint();
	}
	private void setInternalBackgroundTint(ColorStateList tint) {
		if (tint != null) {
			if (mInternalBackgroundTint == null) {
				mInternalBackgroundTint = new TintInfo();
			}
			mInternalBackgroundTint.mTintList = tint;
			mInternalBackgroundTint.mHasTintList = true;
		} else {
			mInternalBackgroundTint = null;
		}
		applySupportBackgroundTint();
	}
	@Override
	public void setSupportBackgroundTintList(ColorStateList tint) {
		if (mBackgroundTint == null) {
			mBackgroundTint = new TintInfo();
		}
		mBackgroundTint.mTintList = tint;
		mBackgroundTint.mHasTintList = true;
		applySupportBackgroundTint();
	}
	@Nullable
	@Override
	public ColorStateList getSupportBackgroundTintList() {
		return mBackgroundTint != null ? mBackgroundTint.mTintList : null;
	}
	@Override
	public void setSupportBackgroundTintMode(PorterDuff.Mode tintMode) {
		if (mBackgroundTint == null) {
			mBackgroundTint = new TintInfo();
		}
		mBackgroundTint.mTintMode = tintMode;
		mBackgroundTint.mHasTintMode = true;
		applySupportBackgroundTint();
	}
	@Nullable
	@Override
	public PorterDuff.Mode getSupportBackgroundTintMode() {
		return mBackgroundTint != null ? mBackgroundTint.mTintMode : null;
	}
}
趕快去試試吧~
 自己封裝雙緩存管理框架 Android 庫
一、概述 Android開發中,網絡請求是很重要的一部分,而緩存網絡請求來的圖片或者響應結果字符串或者結果流,既可以省流量,同時也可以幫助我們解決無網或弱網情況
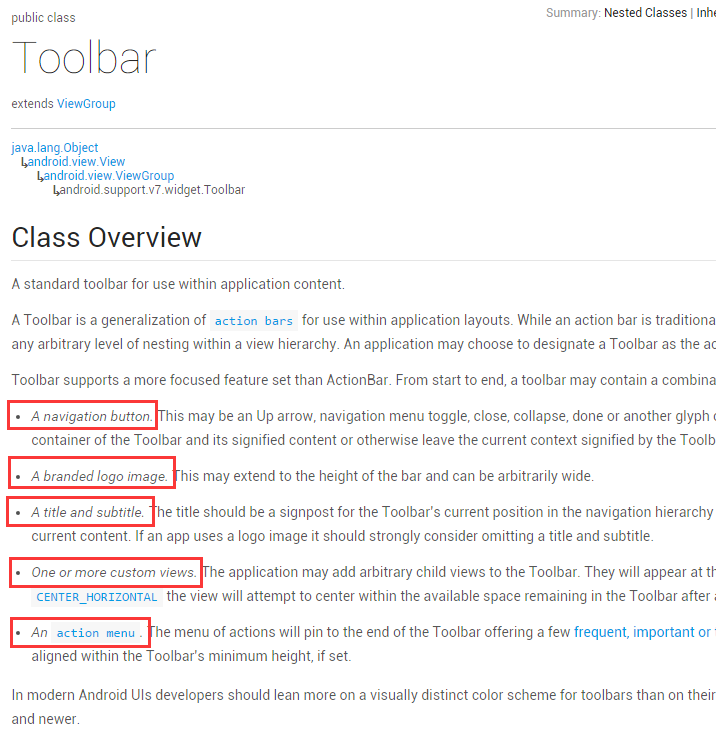 最詳細的 Android Toolbar 開發實踐總結
過年前發了一篇介紹 Translucent System Bar 特性的文章 Translucent System Bar 的最佳實踐 ,收到很多開發者的關注和反
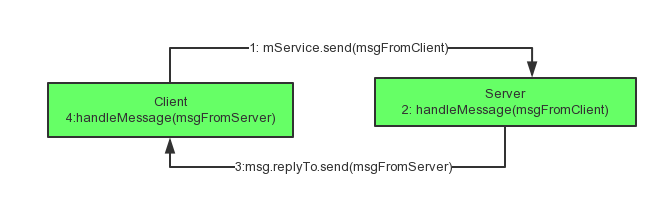 Android Messenger完全解析 實現進程間通信
一、概述 說到Android進程間通信,大家肯定能想到的是編寫aidl文件,然後通過aapt生成的類方便的完成服務端,以及客戶端代碼的編寫。如果你對這個過程不熟悉
 Android IntentService使用全面介紹及源碼解析
一 IntentService介紹 IntentService定義的三個基本點:是什麼?怎麼用?如何work? 官方解釋如下: //IntentService定義