編輯:Android資訊
Android開發中,網絡請求是很重要的一部分,而緩存網絡請求來的圖片或者響應結果字符串或者結果流,既可以省流量,同時也可以幫助我們解決無網或弱網情況下加載情況,當然也可以提升程序性能效率。縱所周知,緩存管理中肯定需要用到內存緩存,這裡我們采用LruCache來管理內存的緩存。
LruCahce雖然速度快,但是只是內存級別的緩存,為了實現持久化的緩存,我們還需要文件級別的緩存,也就是說我們要把緩存保存到文件,而文件則是保存到手機存儲或者SD卡存儲中,即實現Disk級別的緩存,這裡我們借助DiskLruCache這個輔助工具類來實現。顧名思義,這個工具類的作用就是使用Lru算法來存儲信息到Disk上。
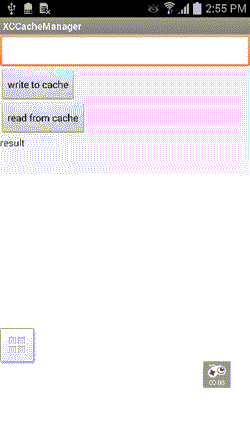
下面是個簡單的實例演示效果圖
1、內存緩存類的實現
該類主要實現內存級別的緩存管理類MemoryCache,使用LruCache來實現,因為無論是內存緩存還是Disk緩存,都需要讀寫操作,所以我們先抽象出一個緩存接口類:Cache接口:
public interface Cache {
    String get(final String key);
    void put(final String key, final String value);
    boolean remove(final String key);
}
然後,我們的內存緩存類MemoryCache需要實現Cache這個接口:
/**
 * 內存緩存類
 * Created by caizhiming on 2015/12/4.
 */
public class MemoryCache implements Cache {
    private LruCache<String, String> mMemoryLruCache;
    private EvictedListener mEvictedListener;

    public MemoryCache() {
        init();
    }

    public MemoryCache(EvictedListener listener) {
        init();
        this.mEvictedListener = listener;
    }

    public void setEvictedListener(EvictedListener listener) {
        this.mEvictedListener = listener;
    }

    public boolean hasEvictedListener() {
        return mEvictedListener != null;
    }

    private void init() {
        // 計算可使用的最大內存
        final int maxMemory = (int) (Runtime.getRuntime().maxMemory() / 1024);
        // 取可用內存空間的1/4作為緩存
        final int cacheSize = maxMemory / 4;
        mMemoryLruCache = new LruCache<String, String>(cacheSize) {
            @Override
            protected int sizeOf(String key, String value) {
                return value.getBytes().length;
            }

            @Override
            protected void entryRemoved(boolean evicted, String key, String oldValue, String newValue) {
                if (evicted) {
                    if (mEvictedListener != null) {
                        mEvictedListener.handleEvictEntry(key, oldValue);
                    }
                }
            }
        };
    }

    @Override
    public String get(String key) {
        return mMemoryLruCache.get(key);
    }

    @Override
    public void put(String key, String value) {
        mMemoryLruCache.put(key, value);
    }

    @Override
    public boolean remove(String key) {
        return Boolean.parseBoolean(mMemoryLruCache.remove(key));
    }

    /**
     * called when mMemoryLruCache evict entrys,
     * <p/>
     * using by CacheManager.Strategy.MEMORY_FIRST
     */
    public interface EvictedListener {
        void handleEvictEntry(String evictKey, String evictValue);
    }
2、文件級別的Disk緩存類實現
接下來我們需要寫一個用於Disk緩存管理的類:DiskCache類,該類我們也實現Cache接口,該類的主要功能也是提供Disk緩存的讀取和寫入操作管理。
/**
 * Disk磁盤緩存類
 * Created by caizhiming on 2015/12/4.
 */
public class DiskCache implements Cache{

    private DiskLruCache mDiskLruCache = null;
    public DiskCache(Context context){
        init(context);
    }
    /**
     * 初始化 DiskLruCache
     */
    public void init(Context context){
        try {
            File cacheDir = getDiskCacheDir(context, "http_cache");
            if (!cacheDir.exists()) {
                cacheDir.mkdirs();
            }
            Log.v("czm", "cache file=" + cacheDir.getAbsolutePath());
            mDiskLruCache = DiskLruCache.open(cacheDir, getAppVersion(context), 1, 10 * 1024 * 1024);
        } catch (IOException e) {
            e.printStackTrace();
        }
    }
    @Override
    public String get(String key) {
        String result = null;
        try {
            DiskLruCache.Snapshot snapShot = mDiskLruCache.get(hashKeyForDisk(key));
            if (snapShot != null) {
                result = snapShot.getString(0);
                return result;
            }
        } catch (IOException e) {
            e.printStackTrace();
            return null;
        }
        return result;
    }

    @Override
    public void put(String key, String value) {
        DiskLruCache.Editor editor = null;
        try {
            editor = mDiskLruCache.edit(hashKeyForDisk(key));
            if (editor != null) {
                editor.set(0, value);
                editor.commit();
            }
            mDiskLruCache.flush();
        } catch (IOException e) {
            e.printStackTrace();
        }
    }

    @Override
    public boolean remove(String key) {
        try {
            return mDiskLruCache.remove(hashKeyForDisk(key));
        } catch (IOException e) {
            e.printStackTrace();
        }
        return false;
    }

    public Bitmap getImageCache(String key){
        Bitmap bitmap = null;
        try {
            DiskLruCache.Snapshot snapShot = mDiskLruCache.get(hashKeyForDisk(key));
            if (snapShot != null) {
                InputStream is = snapShot.getInputStream(0);
                bitmap = BitmapFactory.decodeStream(is);
                return bitmap;
            }
        } catch (IOException e) {
            e.printStackTrace();
        }
        return bitmap;
    }
    public void putImageCache(final String key){
        new Thread(new Runnable() {
            @Override
            public void run() {
                try {
                    DiskLruCache.Editor editor = mDiskLruCache.edit(hashKeyForDisk(key));
                    if (editor != null) {
                        OutputStream outputStream = editor.newOutputStream(0);
                        if (downloadUrlToStream(key, outputStream)) {
                            editor.commit();
                        } else {
                            editor.abort();
                        }
                    }
                    mDiskLruCache.flush();
                } catch (IOException e) {
                    e.printStackTrace();
                }
            }
        }).start();
    }
    private boolean downloadUrlToStream(String urlString, OutputStream outputStream) {
        HttpURLConnection urlConnection = null;
        BufferedOutputStream out = null;
        BufferedInputStream in = null;
        try {
            final URL url = new URL(urlString);
            urlConnection = (HttpURLConnection) url.openConnection();
            in = new BufferedInputStream(urlConnection.getInputStream(), 8 * 1024);
            out = new BufferedOutputStream(outputStream, 8 * 1024);
            int b;
            while ((b = in.read()) != -1) {
                out.write(b);
            }
            return true;
        } catch (final IOException e) {
            e.printStackTrace();
        } finally {
            if (urlConnection != null) {
                urlConnection.disconnect();
            }
            CloseUtils.closeCloseable(out);
            CloseUtils.closeCloseable(in);
        }
        return false;
    }

    public String hashKeyForDisk(String key) {
        String cacheKey;
        try {
            final MessageDigest mDigest = MessageDigest.getInstance("MD5");
            mDigest.update(key.getBytes());
            cacheKey = bytesToHexString(mDigest.digest());
        } catch (NoSuchAlgorithmException e) {
            cacheKey = String.valueOf(key.hashCode());
        }
        return cacheKey;
    }

    private String bytesToHexString(byte[] bytes) {
        StringBuilder sb = new StringBuilder();
        for (int i = 0; i < bytes.length; i++) {
            String hex = Integer.toHexString(0xFF & bytes[i]);
            if (hex.length() == 1) {
                sb.append('0');
            }
            sb.append(hex);
        }
        return sb.toString();
    }
    public File getDiskCacheDir(Context context, String uniqueName) {
        String cachePath;
        if (Environment.MEDIA_MOUNTED.equals(Environment.getExternalStorageState())
                || !Environment.isExternalStorageRemovable()) {
            cachePath = context.getExternalCacheDir().getPath();
        } else {
            cachePath = context.getCacheDir().getPath();
        }
        return new File(cachePath + File.separator + uniqueName);
    }

    public int getAppVersion(Context context) {
        try {
            PackageInfo info = context.getPackageManager().getPackageInfo(context.getPackageName(), 0);
            return info.versionCode;
        } catch (PackageManager.NameNotFoundException e) {
            e.printStackTrace();
        }
        return 1;
    }

}
3、搭建封裝雙緩存管理框架類XCCacheManager
有了上面的內存緩存類MemoryCache和Disk緩存類DiskCache,我們就可以搭建封裝真正的緩存管理類XCCacheManager了。
(1) 首先我們采用線程池技術來實現多線程緩存的讀寫操作
這樣可以提高程序的性能,同時能處理任務量比較大的並發讀寫操作。
private static XCCacheManager mInstance = null;

private Strategy mStrategy = Strategy.MEMORY_FIRST;
//線程池
private ExecutorService mExecutor = null;
//內存緩存
private MemoryCache mMemoryCache;
//Disk緩存
private DiskCache mDiskCache;

/**
     * 初始化 DiskLruCache
     */
    private void init(Context context) {
        mExecutor = Executors.newFixedThreadPool(Runtime.getRuntime().availableProcessors());
        mDiskCache = new DiskCache(context);
        mMemoryCache = new MemoryCache();
    }
(2)其次XCCacheManager管理類采用單例實現
public static XCCacheManager getInstance(Context context, Strategy strategy) {
    if (mInstance == null) {
        synchronized (XCCacheManager.class) {
            if (mInstance == null) {
                mInstance = new XCCacheManager(context.getApplicationContext(), strategy);
            }
        }
    } else {
        mInstance.setStrategy(strategy);
    }
    return mInstance;
}
(3)緩存策略
這裡我們定義了緩存策略,便於適應各種不同業務需求,可以靈活使用不同的策略
enum Strategy {
        MEMORY_ONLY(0), MEMORY_FIRST(1), DISK_ONLY(3);
        int id;

        Strategy(int id) {
            this.id = id;
        }
    }
默認采用內存優先MEMORY_FIRST這種策略
(4)根據對應的策略從緩存中讀取內容
/**
     * 從緩存中讀取value
     */
    public String readCache(final String key) {
        Future<String> ret = mExecutor.submit(new Callable<String>() {
            @Override
            public String call() throws Exception {
                String result = null;
                switch (mStrategy) {
                    case MEMORY_ONLY:
                        result = mMemoryCache.get(key);
                        break;
                    case MEMORY_FIRST:
                        result = mMemoryCache.get(key);
                        if (result == null) {
                            result = mDiskCache.get(key);
                        }
                        break;
                    case DISK_ONLY:
                        result = mDiskCache.get(key);
                        break;
                }
                return result;
            }
        });
        try {
            return ret.get();
        } catch (InterruptedException e) {
            e.printStackTrace();
        } catch (ExecutionException e) {
            e.printStackTrace();
        }
        return null;
    }
(5)將內容寫入到緩存中
/**
     * 將value 寫入到緩存中
     */
    public void writeCache(final String key, final String value) {
        mExecutor.submit(new Runnable() {
            @Override
            public void run() {
                switch (mStrategy) {
                    case MEMORY_FIRST:
                        if (!mMemoryCache.hasEvictedListener()) {
                            mMemoryCache.setEvictedListener(new MemoryCache.EvictedListener() {
                                @Override
                                public void handleEvictEntry(String evictKey, String evictValue) {
                                    mDiskCache.put(evictKey, evictValue);
                                }
                            });
                        }
                        mMemoryCache.put(key, value);
                        break;
                    case MEMORY_ONLY:
                        if (mMemoryCache.hasEvictedListener())
                            mMemoryCache.setEvictedListener(null);
                        mMemoryCache.put(key, value);
                        break;
                    case DISK_ONLY:
                        mDiskCache.put(key, value);
                        break;
                }
            }
        });
    }
到此為止,框架的開發到此完成。希望對有需要的人有所幫助。
源碼下載 : http://download.csdn.net/detail/jczmdeveloper/9348031
GitHub地址:https://github.com/jczmdeveloper/XCCacheManager
 在 Linux 上將 BQ Aquaris Ubuntu 手機刷成 Android 系統
如果你正好擁有全球第一支運行 Ubuntu 的手機並且希望將 BQ Aquaris E4.5 自帶的 Ubuntu 系統換成 Android,那這篇文章能幫你點小
 Android 存儲系統之架構篇
基於Android 6.0的源碼,剖析存儲架構的設計 Android 存儲系統之源碼篇 Android 存儲系統之架構篇 一、概述 本文講述Android存儲系統
 Android中全局變量與局部變量的使用總結
全局變量顧名思義就是在整個的類中或者可在多個函數中調用的變量。也稱為外部變量。局部變量則是特定過程或函數中可以訪問的變量。聲明一個變量是很 容易的,但是講到使用的
 Android中的ANR用法詳解
有過Android開發經歷的人都不會對ANR陌生,它和崩潰一樣是程序設計的問題。本文將以較為深入的視角來介紹什麼是ANR,出現場景,如何避免以及如何定位分析ANR