上一講中介紹了Spinner、AutoCompleteTextView、DatePicker、TimePicker,本節主要講解ProgressBar、SeekBar和RatingBar。
一、ProgressBar進度條
在某項延續性工作的進展過程中為了不讓用戶覺得程序死掉了,需要有個活動的進度條,表示此過程正在進行中。Android中使用ProgressBar來實現這一功能:
1、簡單的進度條
在xml中添加:
XML/HTML代碼
- <ProgressBar android:id=”@+id/ProgressBar01″
- android:layout_width=”wrap_content”
- android:layout_height=”wrap_content”>
- </ProgressBar>
就可以看到下面,圓形的、大大的圈圈:
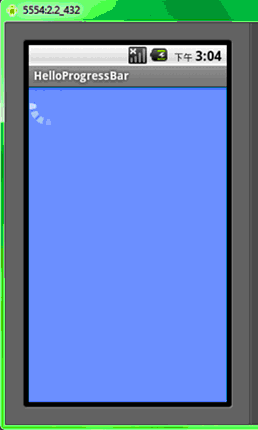
2、各種各樣的圓圈:

注意標題欄上也有一個進度條,下面是代碼:
Java代碼
- package android.basic.lesson11;
-
- import android.app.Activity;
- import android.os.Bundle;
- import android.view.Window;
-
- public class MainHelloProgressBar extends Activity {
- /** Called when the activity is first created. */
- @Override
- public void onCreate(Bundle savedInstanceState) {
- super.onCreate(savedInstanceState);
- //在標題條裡放置進度條。請求窗口特色風格,這裡設置成不明確的進度風格
- requestWindowFeature(Window.FEATURE_INDETERMINATE_PROGRESS);
- setContentView(R.layout.main);
- //設置標題欄中的不明確的進度條是否可以顯示,當你需要表示處理中的時候設置為True,處理完畢後設置為false
- setProgressBarIndeterminateVisibility(true);
- }
- }
下面試main.xml中的代碼,大家注意黑體字部分的內容,看看不同樣式的不同的表現:
XML/HTML代碼
- <?xml version=”1.0″ encoding=”utf-8″?>
- <LinearLayout xmlns:android=”http://schemas.android.com/apk/res/android”
- android:orientation=”vertical”
- android:background=”#003399″
- android:layout_width=”fill_parent”
- android:layout_height=”fill_parent”
- >
- <ProgressBar android:id=”@+id/ProgressBar01″
- android:layout_width=”wrap_content”
- android:layout_height=”wrap_content”>
- </ProgressBar>
- <ProgressBar android:id=”@+id/ProgressBar02″
- style=”?android:attr/progressBarStyleLarge” 大圓圈
- android:layout_width=”wrap_content”
- android:layout_height=”wrap_content”>
- </ProgressBar>
- <ProgressBar android:id=”@+id/ProgressBar03″
- style=”?android:attr/progressBarStyleSmall” 小圓圈
- android:layout_width=”wrap_content”
- android:layout_height=”wrap_content”>
- </ProgressBar>
- <ProgressBar android:id=”@+id/ProgressBar03″
- style=”?android:attr/progressBarStyleSmallTitle” 標題條的樣式
- android:layout_width=”wrap_content”
- android:layout_height=”wrap_content”>
- </ProgressBar>
- </LinearLayout>
3、長條狀的進度條
xml代碼:
XML/HTML代碼
- <ProgressBar android:id=”@+id/ProgressBar04″
- style=”?android:attr/progressBarStyleHorizontal”
- android:layout_marginLeft=”10dp”
- android:layout_marginRight=”10dp”
- android:max=”100″ 最大刻度按100算
- android:progress=”30″ 第一進度是30
- android:secondaryProgress=”80″ 第二進度是80
- android:layout_width=”fill_parent” 進度條的顯示長度是鋪滿父窗口
- android:layout_height=”wrap_content”>
- </ProgressBar>
- <?xml version=”1.0″ encoding=”utf-8″?>
- <LinearLayout xmlns:android=”http://schemas.android.com/apk/res/android”
- android:orientation=”vertical”
- android:background=”#003399″
- android:layout_width=”fill_parent”
- android:layout_height=”fill_parent”
- >
- <ProgressBar android:id=”@+id/ProgressBar04″
- style=”?android:attr/progressBarStyleHorizontal”
- android:layout_marginTop=”10dp”
- android:layout_marginLeft=”10dp”
- android:layout_marginRight=”10dp”
- android:max=”100″
- android:progress=”30″
- android:secondaryProgress=”80″
- android:layout_width=”fill_parent”
- android:layout_height=”wrap_content”>
- </ProgressBar>
- </LinearLayout>
Java代碼
-
-
- package android.basic.lesson11;
-
- import android.app.Activity;
-
- import android.os.Bundle;
-
- import android.view.Window;
-
- public class MainHelloProgressBar extends Activity {
-
- /** Called when the activity is first created. */
-
- @Override
-
- public void onCreate(Bundle savedInstanceState) {
-
- super.onCreate(savedInstanceState);
-
- //設置窗口進度條特性風格
-
- requestWindowFeature(Window.FEATURE_PROGRESS);
-
- setContentView(R.layout.main);
-
- //設置進度條可見性
-
- setProgressBarVisibility(true);
-
- //設置進度條進度值,要乘以100的
-
- setProgress(60*100);
-
- setSecondaryProgress(80*100);
- }
-
- }
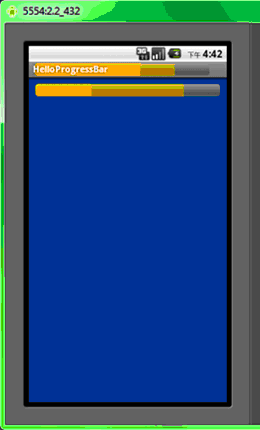
運行效果:
同學們可以使用下面的代碼對,進度條進行一些操作練習:
private ProgressBar pb; //定義ProgressBar
pb = (ProgressBar) findViewById(R.id.ProgressBar01);
pb.incrementProgressBy(5); //ProgressBar進度值增加5
pb.incrementProgressBy(-5); //ProgressBar進度值減少5
pb.incrementSecondaryProgressBy(5); //ProgressBar第二個進度條 進度值增加5
pb.incrementSecondaryProgressBy(-5); //ProgressBar第二個進度條 進度值減少5
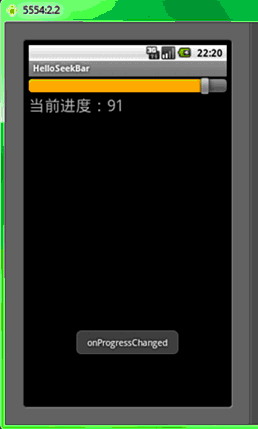
二、SeekBar拖動條(滑動條)
SeekBar可以作為音樂播放器的進度指示和調整工具,音量調整工具等,SeekBar是ProgressBar的一個子類,下面我們用一個可以改變並顯示當前進度的拖動條例子來演示一下它的使用:
1、main.xml
< ?xml version="1.0" encoding="utf-8"?>
2、java:
Java代碼
- package android.basic.lesson11;
-
- import android.app.Activity;
- import android.os.Bundle;
- import android.widget.SeekBar;
- import android.widget.SeekBar.OnSeekBarChangeListener;
- import android.widget.TextView;
- import android.widget.Toast;
-
- public class MainHelloSeekBar extends Activity {
- /** Called when the activity is first created. */
- @Override
- public void onCreate(Bundle savedInstanceState) {
- super.onCreate(savedInstanceState);
- setContentView(R.layout.main);
-
- //找到拖動條和文本框
- final SeekBar sb = (SeekBar) findViewById(R.id.SeekBar01);
- final TextView tv1 = (TextView) findViewById(R.id.TextView01);
-
- //設置拖動條的初始值和文本框的初始值
- sb.setMax(100);
- sb.setProgress(30);
- tv1.setText("當前進度:" + sb.getProgress());
-
- //設置拖動條改變監聽器
- OnSeekBarChangeListener osbcl = new OnSeekBarChangeListener() {
-
- @Override
- public void onProgressChanged(SeekBar seekBar, int progress,
- boolean fromUser) {
- tv1.setText("當前進度:" + sb.getProgress());
- Toast.makeText(getApplicationContext(), "onProgressChanged",
- Toast.LENGTH_SHORT).show();
- }
-
- @Override
- public void onStartTrackingTouch(SeekBar seekBar) {
- Toast.makeText(getApplicationContext(), "onStartTrackingTouch",
- Toast.LENGTH_SHORT).show();
- }
-
- @Override
- public void onStopTrackingTouch(SeekBar seekBar) {
- Toast.makeText(getApplicationContext(), "onStopTrackingTouch",
- Toast.LENGTH_SHORT).show();
- }
-
- };
-
- //為拖動條綁定監聽器
- sb.setOnSeekBarChangeListener(osbcl);
-
- }
- }
3、運行程序:

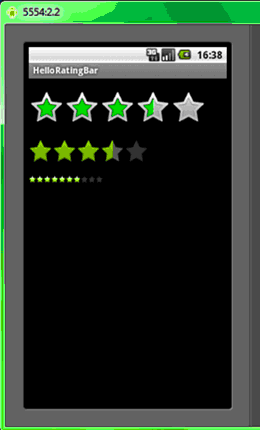
三、RatingBar評分條
RatingBar評分條是SeekBar拖動條的子類。現階段系統自帶了3種樣式,我們同樣用例子來演示他的使用方法和屬性設置:
1、main.xml的代碼:
XML/HTML代碼
- <?xml version=”1.0″ encoding=”utf-8″?>
- <LinearLayout xmlns:android=”http://schemas.android.com/apk/res/android”
- android:orientation=”vertical”
- android:layout_width=”fill_parent”
- android:layout_height=”fill_parent”
- >
-
- <RatingBar
- android:id=”@+id/RatingBar01″
- android:layout_width=”wrap_content”
- android:rating=”3″ 默認分值設為3
- android:layout_marginTop=”20dp”
- android:layout_height=”wrap_content”>
- </RatingBar>
-
- <RatingBar
- android:id=”@+id/RatingBar03″
- android:layout_width=”wrap_content”
- android:numStars=”5″ 星星數量設為5
- android:rating=”4″ 默認分值設為4
- android:isIndicator=”false” 在ratingBarStyleIndicator樣式中此項默認值是TRUE,會導致不可操作
- style=”?android:attr/ratingBarStyleIndicator” 指示器(Indicator)樣式
- android:layout_marginTop=”20dp”
- android:layout_height=”wrap_content”>
- </RatingBar>
- <RatingBar
- android:id=”@+id/RatingBar02″
- android:layout_width=”wrap_content”
- android:isIndicator=”false” 同上
- android:numStars=”10″
- android:rating=”8″
- style=”?android:attr/ratingBarStyleSmall” 小星星樣式
- android:layout_marginTop=”20dp”
- android:layout_height=”wrap_content”>
- </RatingBar>
- </LinearLayout>
2、在HelloRatingBar.java的代碼裡我們實現了3個評分條聯動的功能:
Java代碼
- package android.basic.lesson11;
-
- import android.app.Activity;
- import android.os.Bundle;
- import android.widget.RatingBar;
- import android.widget.RatingBar.OnRatingBarChangeListener;
-
- public class MainHelloRatingBar extends Activity {
- /** Called when the activity is first created. */
- @Override
- public void onCreate(Bundle savedInstanceState) {
- super.onCreate(savedInstanceState);
- setContentView(R.layout.main);
-
- //定義組件對象
- final RatingBar rb1 = (RatingBar)findViewById(R.id.RatingBar01);
- final RatingBar rb2 = (RatingBar)findViewById(R.id.RatingBar02);
- final RatingBar rb3 = (RatingBar)findViewById(R.id.RatingBar03);
-
- //定義評分監聽器
- OnRatingBarChangeListener orbcl= new OnRatingBarChangeListener(){
-
- @Override
- public void onRatingChanged(RatingBar ratingBar, float rating,
- boolean fromUser) {
- switch(ratingBar.getId()){
- case R.id.RatingBar01:
- //把第一個評分條的值取出來設置給其他評分條
- rb2.setRating(rb1.getRating());
- rb3.setRating(rb1.getRating()*2);//十顆星所以乘以2
- break;
- case R.id.RatingBar02:
- rb1.setRating(rb2.getRating());
- rb3.setRating(rb2.getRating()*2);
- break;
- case R.id.RatingBar03:
- rb1.setRating(rb3.getRating()/2);
- rb2.setRating(rb3.getRating()/2);
- break;
- }
- }
- } ;
-
- //綁定監聽器
- rb1.setOnRatingBarChangeListener(orbcl);
- rb2.setOnRatingBarChangeListener(orbcl);
- rb3.setOnRatingBarChangeListener(orbcl);
- }
- }
3、運行程序,點擊評分條看看效果,使用左右鍵再試試
有興趣的同學可以研究一下,如何更換評分條中的圖片,譬如罷星星換成花朵什麼的。
 學習Android從0開始之開發工具篇-Android studio詳解
 安卓 自定義AlertDialog對話框(加載提示框),安卓alertdialog
 Android 手機衛士--home界面布局,android--home
 神馬視頻應用安卓項目源碼,神馬安卓項目源碼