編輯:關於android開發
用戶從Launcher程序點擊應用圖標可啟動應用的入口Activity,Activity啟動時需要多個進程之間的交互,Android系統中有一個zygote進程專用於孵化Android框架層和應用層程序的進程。還有一個system_server進程,該進程裡運行了很多binder service,例如ActivityManagerService,PackageManagerService,WindowManagerService,這些binder service分別運行在不同的線程中,其中ActivityManagerService負責管理Activity棧,應用進程,task。
Activity啟動時的概要交互流程如下圖如下所示
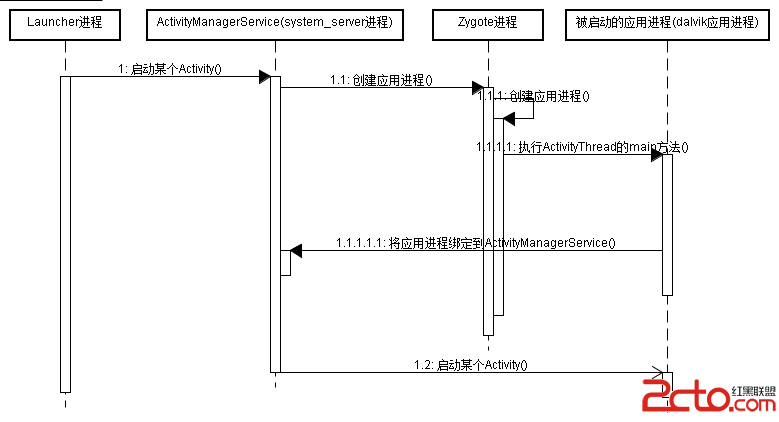
用戶在Launcher程序裡點擊應用圖標時,會通知ActivityManagerService啟動應用的入口Activity,ActivityManagerService發現這個應用還未啟動,則會通知Zygote進程孵化出應用進程,然後在這個dalvik應用進程裡執行ActivityThread的main方法。應用進程接下來通知ActivityManagerService應用進程已啟動,ActivityManagerService保存應用進程的一個代理對象,這樣ActivityManagerService可以通過這個代理對象控制應用進程,然後ActivityManagerService通知應用進程創建入口Activity的實例,並執行它的生命周期方法。
後續博客將介紹Activity的詳細啟動流程。
在介紹Activity的詳細啟動流程之前,先為大家介紹Activity啟動時涉及到的類,這樣大家可以有大概的了解,不至於在細節中迷失。
Activity啟動時涉及到的類有IActivityManager相關類, IApplicationThread相關類,ActivityManagerService相關類。
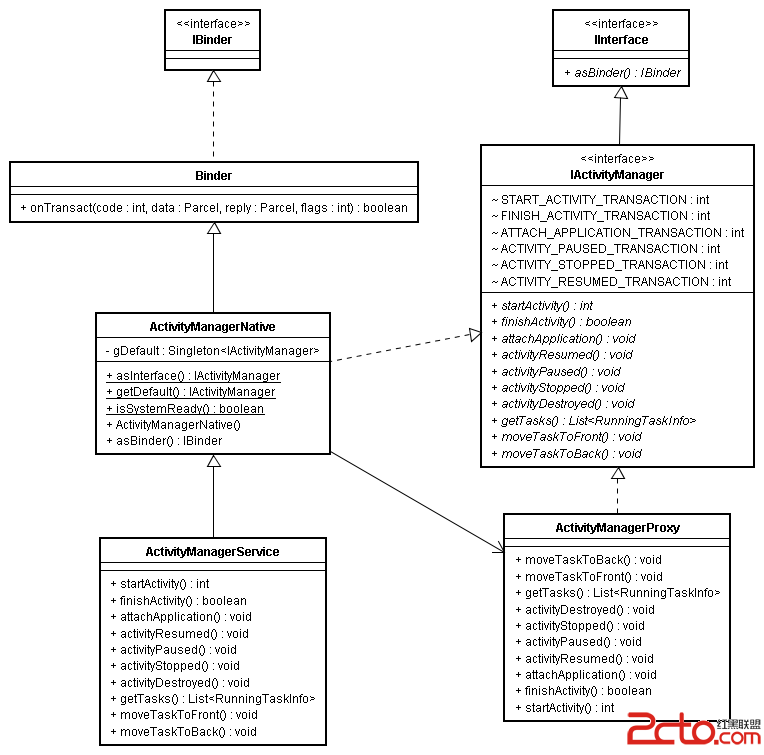
Activity的管理采用binder機制,管理Activity的接口是IActivityManager. ActivityManagerService實現了Activity管理功能,位於system_server進程,ActivityManagerProxy對象是ActivityManagerService在普通應用進程的一個代理對象,應用進程通過ActivityManagerProxy對象調用ActivityManagerService提供的功能。應用進程並不會直接創建ActivityManagerProxy對象,而是通過調用ActiviyManagerNative類的工具方法getDefault方法得到ActivityManagerProxy對象。所以在應用進程裡通常這樣啟動Activty:
ActivityManagerNative.getDefault().startActivity()
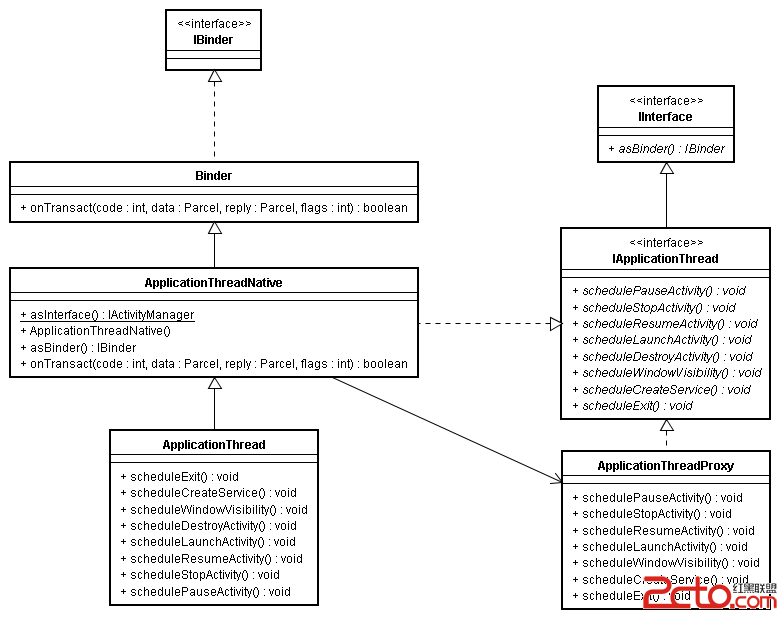
應用進程需要調用ActivityManagerService提供的功能,而ActivityManagerService也需要主動調用應用進程以控制應用進程並完成指定操作。這樣ActivityManagerService也需要應用進程的一個Binder代理對象,而這個代理對象就是ApplicationThreadProxy對象。
ActivityManagerService通過IApplicationThread接口管理應用進程,ApplicationThread類實現了IApplicationThread接口,實現了管理應用的操作,ApplicationThread對象運行在應用進程裡。ApplicationThreadProxy對象是ApplicationThread對象在ActivityManagerService線程 (ActivityManagerService線程運行在system_server進程)內的代理對象,ActivityManagerService通過ApplicationThreadProxy對象調用ApplicationThread提供的功能,比如讓應用進程啟動某個Activity。
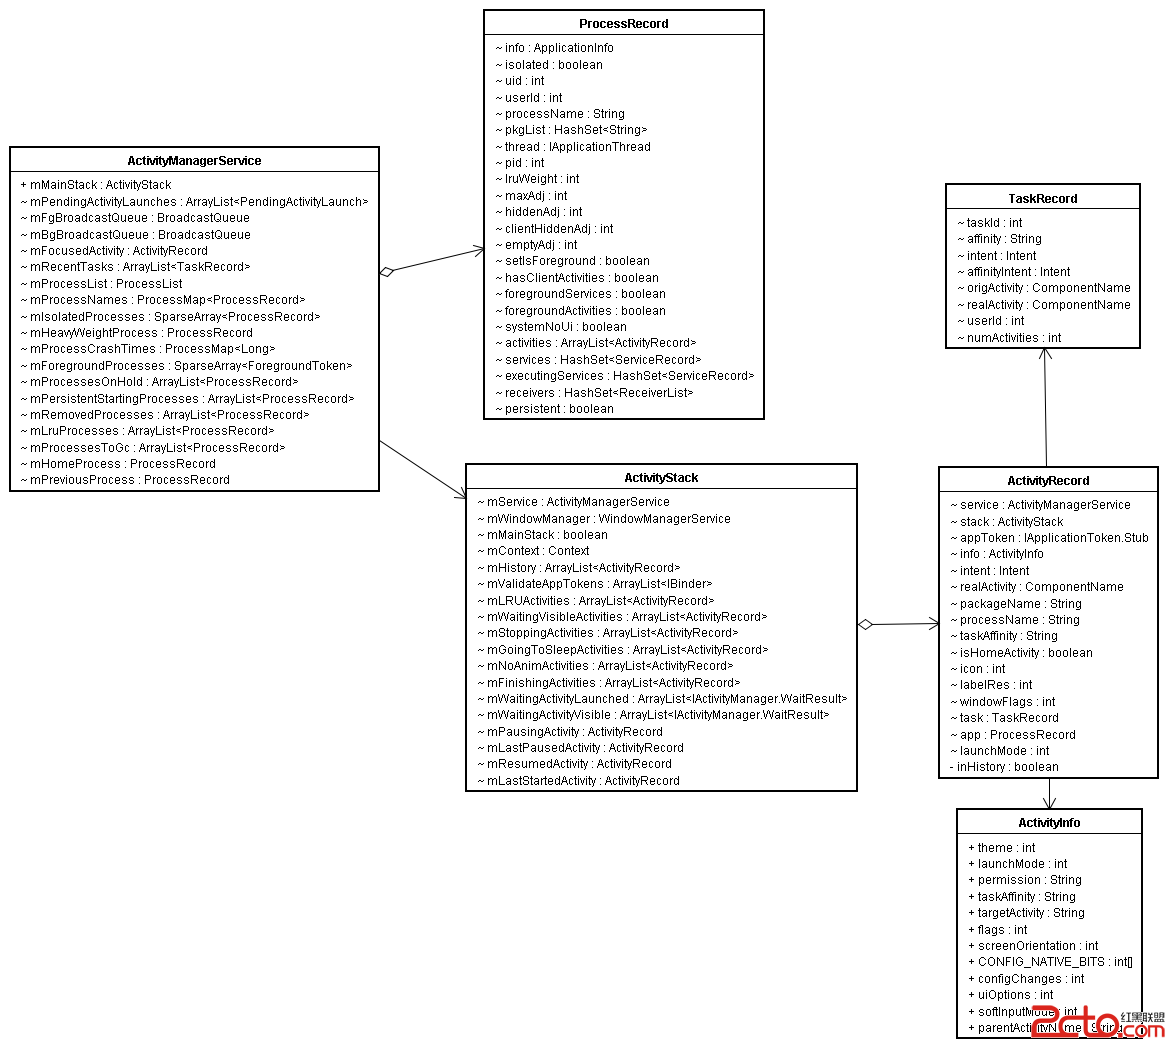
ActivityManagerService管理Activity時,主要涉及以下幾個類:
注意:
ActivityManagerService裡只有一個ActivityStack對象,並不會像Android官方文檔描述的一樣,每個Task都有一個activity stack對象。ActivityStack管理ActivityRecord時,不是下面這樣組織ActivityRecord的:
List taskList; //ActivityStack類
List recordList;// TaskRecord類
而是像下面這樣組織ActivityRecord:
ArrayList mHistory = new ArrayList(); //ActivityStack類裡
TaskRecord task; // ActivityRecord類裡
也就是說ActivityManagerService組織回退棧時以ActivityRecord為基本單位,所有的ActivityRecord放在同一個ArrayList裡,可以將mHistory看作一個棧對象,索引0所指的對象位於棧底,索引mHistory.size()-1所指的對象位於棧頂。
但是ActivityManagerService調度ActivityRecord時以task為基本單位,每個ActivityRecord對象都屬於某個TaskRecord,一個TaskRecord可能有多個ActivityRecord。
ActivityStack沒有TaskRecord列表的入口,只有在ActivityManagerService才有TaskRecord列表的入口:
final ArrayList mRecentTasks
ActivityStack管理ActivityRecord時,將屬於同一個task的ActivityRecord放在一起,如下所示:
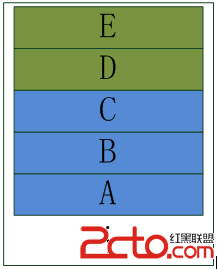
回退棧裡可看到兩個task,假設上面的task為task1,下面的task為task2,task1包含D,E兩個Activity Record,task2包含3個ActivityRecord。task1位於回退棧的棧頂,task2位於task1下面,task1中E位於棧頂,task2中C位於棧頂。需注意兩個task的Activity不會混在一起,也就是說task2的B不能放在task1的D和E中間。
因為回退棧是棧結構,所以此時不斷按返回鍵,顯示的Activity的順序為E–>D–>C–>B–>A。
下一篇博客為大家講述Activity的詳細啟動流程。
本篇博客將開始介紹Activity啟動的詳細流程,由於詳細啟動流程非常復雜,故此分成兩篇來介紹。
本篇主要介紹前半部分的啟動流程:
下篇介紹後半部分的啟動流程:
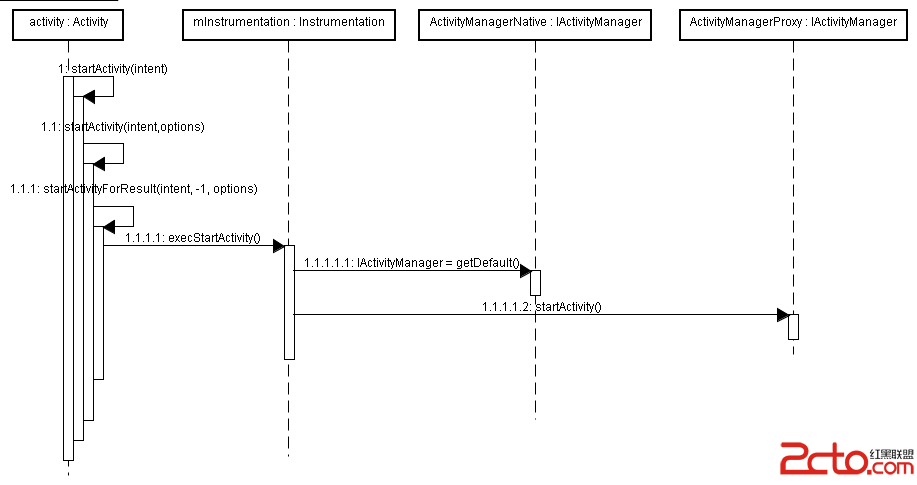
在launcher應用程序裡啟動應用時,點擊應用圖標後,launcher程序會調用startActivity啟動應用,傳遞的intent參數:
intent = new Intent(Intent.ACTION_MAIN);
   intent.addCategory(Intent.CATEGORY_LAUNCHER);
   intent.setComponent(className);
activity最終調用Instrumentation的execStartActivity來啟動應用:
//Activity類
public void startActivityForResult(Intent intent, int requestCode, Bundle options) {
 if (mParent == null) {
	Instrumentation.ActivityResult ar =
	                mInstrumentation.execStartActivity(
	                    this, mMainThread.getApplicationThread(), mToken, this,
	                    intent, requestCode, options);
	   if (ar != null) {
	                mMainThread.sendActivityResult(
	                    mToken, mEmbeddedID, requestCode, ar.getResultCode(),
	                    ar.getResultData());
	   }
	//...
 }else{
  //...
 }
Instrumentation調用ActivityManagerProxy對象的startActivity方法啟動Activity,而ActivityManagerProxy只是ActivityManagerService對象在應用進程的一個代理對象,ActivityManagerProxy最終調用ActivityManagerService的startActvity方法啟動Activity。
//Instrumentation類
public ActivityResult execStartActivity(
          Context who, IBinder contextThread, IBinder token, Activity target,
          Intent intent, int requestCode, Bundle options) {
//...
 try{
   //...
   int result = ActivityManagerNative.getDefault()
                .startActivity(whoThread, intent,
                        intent.resolveTypeIfNeeded(who.getContentResolver()),
                        token, target != null ? target.mEmbeddedID : null,
                        requestCode, 0, null, null, options);
   } catch (RemoteException e) {
   }
//...
}
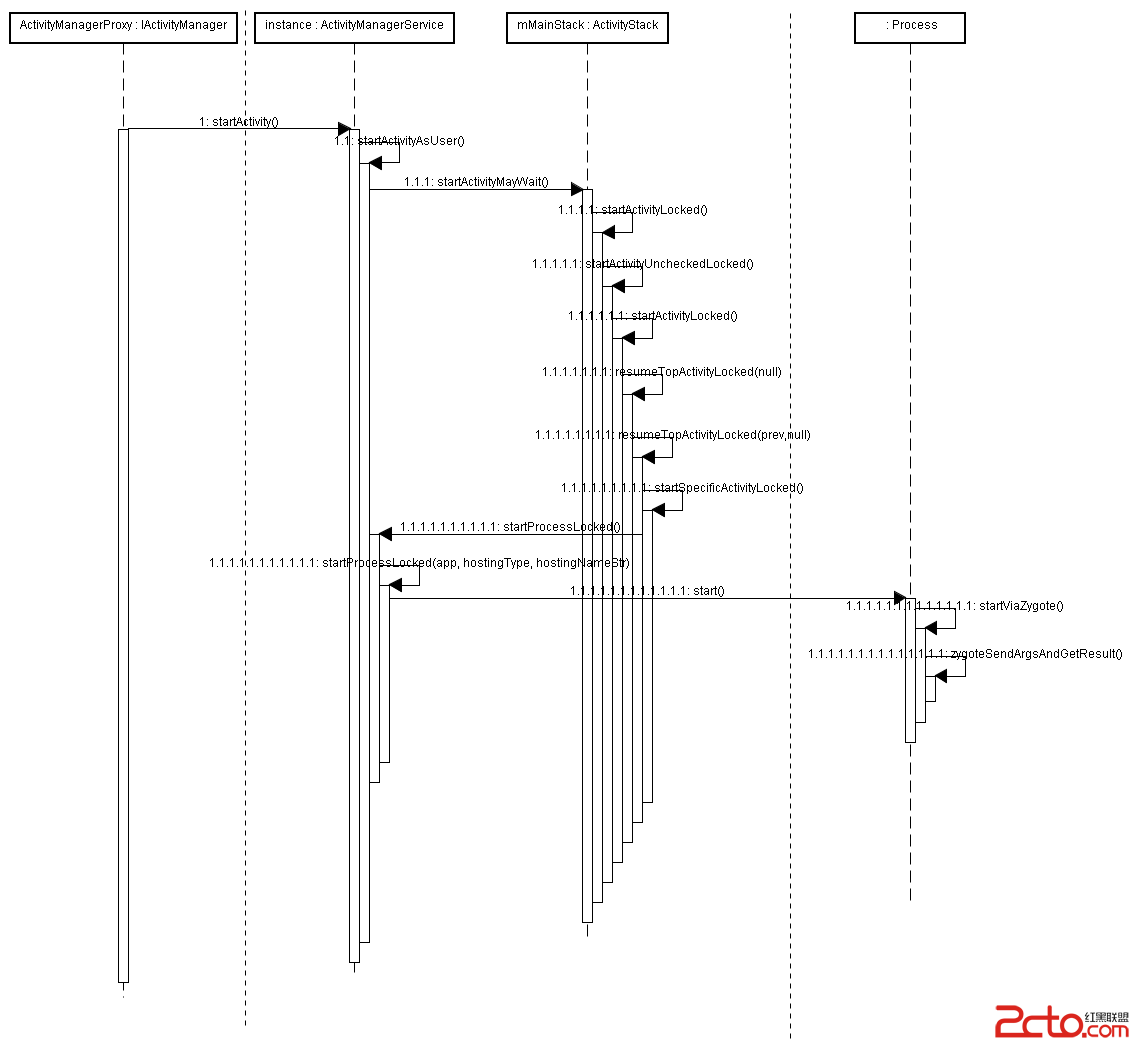
ActivityManagerProxy對象調用ActivityManagerService對象(運行在system_server進程)的startActivity方法以啟動應用,startActivity方法接下來調用startActivityAsUser方法以啟動應用。在startActivityAsUser方法裡會調用ActivityStack的startActivityMayWait方法以啟動應用,startActivityMayWait方法裡啟動應用時,需先根據intent在系統中找到合適的應用的activity,如果有多個activity可選擇,則會彈出ResolverActivity讓用戶選擇合適的應用。
//ActivityStack類
final int startActivityMayWait(IApplicationThread caller, int callingUid,
            Intent intent, String resolvedType, IBinder resultTo,
            String resultWho, int requestCode, int startFlags, String profileFile,
            ParcelFileDescriptor profileFd, WaitResult outResult, Configuration config,
            Bundle options, int userId) {
//…
//根據intent在系統中找到合適的應用的activity,如果有多個activity可選擇,
//則會彈出ResolverActivity讓用戶選擇合適的應用。
  ActivityInfo aInfo = resolveActivity(intent, resolvedType, startFlags,
                profileFile, profileFd, userId);
//…
int res = startActivityLocked(caller, intent, resolvedType,
                    aInfo, resultTo, resultWho, requestCode, callingPid, callingUid,
                    startFlags, options, componentSpecified, null);
//…
}
在startActivityLocked方法裡,對傳過來的參數做一些校驗,然後創建ActivityRecord對象,再調用startActivityUncheckedLocked方法啟動Activity。
startActivityUncheckedLocked方法負責調度ActivityRecord和Task,理解該方法是理解Actvity啟動模式的關鍵。
startActivityUncheckedLocked方法調度task的算法非常復雜,和當前回退棧,要啟動的acitivity的啟動模式以及taskAffinity屬性,啟動activity時設置的intent的flag等諸多要素相關,intent的flag就有很多種情況,故此算法非常復雜,需要閱讀源碼並結合特定啟動情況才能理解。
後續會介紹startActivityUncheckedLocked方法的實現,並結合特定場景分析調度算法。
接下來調用startActivityLocked將ActivityRecord加入到回退棧裡:
//ActivityStack類
final int startActivityUncheckedLocked(ActivityRecord r,
          ActivityRecord sourceRecord, int startFlags, boolean doResume,
          Bundle options) {
//...
startActivityLocked(r, newTask, doResume, keepCurTransition, options);
//...
}
在startActivityLocked裡調用resumeTopActivityLocked顯示棧頂Activity:
//ActivityStack類
private final void startActivityLocked(ActivityRecord r, boolean newTask,
        boolean doResume, boolean keepCurTransition, Bundle options) {
 //...
 if (doResume) {
   resumeTopActivityLocked(null);
 }
}
resumeTopActivityLocked(null)會調用另一個resumeTopActivityLocked方法顯示棧頂的acitivity:
//ActivityStack類
final boolean resumeTopActivityLocked(ActivityRecord prev) {
    return resumeTopActivityLocked(prev, null);
}
因為應用還未啟動過,所以調用startSpecificActivityLocked啟動應用,執行邏輯如下:
//ActivityStack類
final boolean resumeTopActivityLocked(ActivityRecord prev, Bundle options) {
  //...
  if (next.app != null && next.app.thread != null) {
    //…
  }else{
    //…
   startSpecificActivityLocked(next, true, true);
  }
 //...
}
在startSpecificActivityLocked裡調用mService.startProcessLocked啟動應用:
//ActivityStack類
private final void startSpecificActivityLocked(ActivityRecord r,
            boolean andResume, boolean checkConfig) {
   ProcessRecord app = mService.getProcessRecordLocked(r.processName,
              r.info.applicationInfo.uid);
   //...
   mService.startProcessLocked(r.processName, r.info.applicationInfo, true, 0,
        "activity", r.intent.getComponent(), false, false);
}
在ActivityManagerService的startProcessLocked方法裡:
//ActivityManagerService類
final ProcessRecord startProcessLocked(String processName,
          ApplicationInfo info, boolean knownToBeDead, int intentFlags,
          String hostingType, ComponentName hostingName, boolean allowWhileBooting,
          boolean isolated) {
 ProcessRecord app;
 if (!isolated) {
     app = getProcessRecordLocked(processName, info.uid);
 } else {
     //...
 }
 //...
 if (app == null) {
    app = newProcessRecordLocked(null, info, processName, isolated);
    if (app == null) {
        Slog.w(TAG, "Failed making new process record for "
                + processName + "/" + info.uid + " isolated=" + isolated);
        return null;
    }
    mProcessNames.put(processName, app.uid, app);
    if (isolated) {
        mIsolatedProcesses.put(app.uid, app);
    }
  } else {
   //..
 }
 //...
 startProcessLocked(app, hostingType, hostingNameStr);
 //...
}
在startProcessLocked方法裡:
//ActivityManagerService類
private final void startProcessLocked(ProcessRecord app,
        String hostingType, String hostingNameStr) {
  //...
  try {
      //...
      // Start the process.  It will either succeed and return a result containing
  // the PID of the new process, or else throw a RuntimeException.
  //Zygote孵化dalvik應用進程後,會執行android.app.ActivityThread類的main方法
      Process.ProcessStartResult startResult = Process.start("android.app.ActivityThread",
              app.processName, uid, uid, gids, debugFlags, mountExternal,
              app.info.targetSdkVersion, app.info.seinfo, null);
      //...
  } catch (RuntimeException e) {
      //...
  }
}
在Process類的start方法裡:
//Process類
public static final ProcessStartResult start(final String processClass,
                              final String niceName,
                              int uid, int gid, int[] gids,
                              int debugFlags, int mountExternal,
                              int targetSdkVersion,
                              String seInfo,
                              String[] zygoteArgs) {
 try{
  startViaZygote(processClass, niceName, uid, gid, gids,
                    debugFlags, mountExternal, targetSdkVersion, seInfo, zygoteArgs);
  }catch (ZygoteStartFailedEx ex) {
    //...
  }
}
在Process類的startViaZygote方法裡,會計算啟動應用進程用的各個參數,然後再調用zygoteSendArgsAndGetResult方法將這些參數通過socket發送給zygote進程,zygote進程會孵化出新的dalvik應用進程,然後告訴ActivityManagerService新啟動的進程的pid。
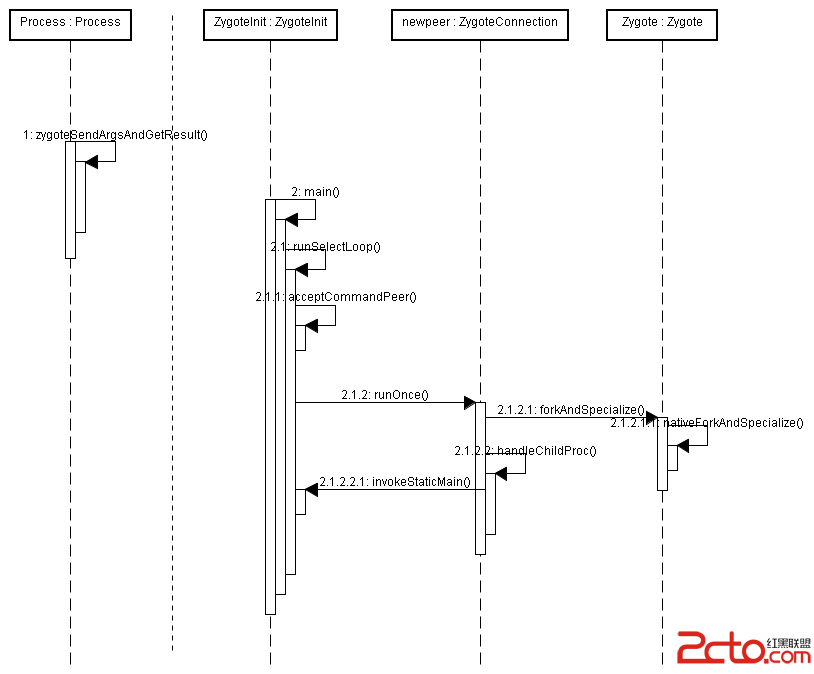
zygote進程將ZygoteInit作為啟動類,會執行它的main方法,先注冊ZygoteSocket,然後調用runSelectLoop方法,runSelectLoop方法會調用方法在ZygoteSocket上監聽請求,如果別的進程通過ZygoteSocket請求孵化進程,則孵化進程。
runSelectLoop方法的主要代碼:
//ZygoteInit類
private static void runSelectLoopMode() throws MethodAndArgsCaller {
  //...
  while (true) {
     //...
      try {
          fdArray = fds.toArray(fdArray);
          index = selectReadable(fdArray);
      } catch (IOException ex) {
          throw new RuntimeException("Error in select()", ex);
      }
      if (index < 0) {
          throw new RuntimeException("Error in select()");
      } else if (index == 0) {
          //監聽客戶連接請求
          ZygoteConnection newPeer = acceptCommandPeer();
          peers.add(newPeer);
          fds.add(newPeer.getFileDesciptor());
      } else {
         //若客戶發送孵化進程的請求過來,
         //此時便需要調用ZygoteConnection的runOnce方法孵化進程
          boolean done;
          done = peers.get(index).runOnce();
          if (done) {
              peers.remove(index);
              fds.remove(index);
          }
      }
  }
}
在runOnce方法裡調用Zygote.forkAndSpecialize方法孵化進程,如果返回值為0表示是在孵化出來的應用進程裡,此時會調用handleChildProc進行一些處理,並使用異常機制進行逃逸,會直接逃逸至ZygoteInit的main方法。
//ZygoteConnection類
boolean runOnce() throws ZygoteInit.MethodAndArgsCaller {
  //...
  try {
  //...
      pid = Zygote.forkAndSpecialize(parsedArgs.uid, parsedArgs.gid, parsedArgs.gids,
              parsedArgs.debugFlags, rlimits, parsedArgs.mountExternal, parsedArgs.seInfo,
              parsedArgs.niceName);
  }
  //...
  try {
      if (pid == 0) {
          // in child
          IoUtils.closeQuietly(serverPipeFd);
          serverPipeFd = null;
          //handleChildProc是一個很重要的函數,在該函數裡使用了異常進行逃逸
          handleChildProc(parsedArgs, descriptors, childPipeFd, newStderr);
          //...
      } else {
         //...
      }
  } finally {
       //...
  }
}
Zygote的forkAndSpecialize方法會調用nativeForkAndSpecialize方法孵化進程,nativeForkAndSpecialize是一個本地方法,它的實現在dalvik/vm/native/dalvik_system_Zygote.cpp裡,在該cpp文件裡與nativeForkAndSpecialize對應的C++方法是Dalvik_dalvik_system_Zygote_forkAndSpecialize,在該方法裡會調用forkAndSpecializeCommon孵化進程,在forkAndSpecializeCommon方法裡會調用fork系統調用創建進程,因為使用的是fork機制所以創建進程的效率比較高。
handleChildProc方法主要代碼:
//ZygoteConnection類
private void handleChildProc(Arguments parsedArgs,
            FileDescriptor[] descriptors, FileDescriptor pipeFd, PrintStream newStderr)
            throws ZygoteInit.MethodAndArgsCaller {
  //...
  if (parsedArgs.runtimeInit) {
  //...
  } else {
      String className;
      try {
          //這裡得到的classname實際是android.app.ActivityThread
          className = parsedArgs.remainingArgs[0];
      } catch (ArrayIndexOutOfBoundsException ex) {
          logAndPrintError(newStderr,
                  "Missing required class name argument", null);
          return;
      }
      //...
      if (parsedArgs.invokeWith != null) {
      //...
      } else {
          ClassLoader cloader;
          if (parsedArgs.classpath != null) {
              cloader = new PathClassLoader(parsedArgs.classpath,
                      ClassLoader.getSystemClassLoader());
          } else {
              cloader = ClassLoader.getSystemClassLoader();
          }
          //調用ZygoteInit.invokeStaticMain執行android.app.ActivityThread的main方法
          try {
              ZygoteInit.invokeStaticMain(cloader, className, mainArgs);
          } catch (RuntimeException ex) {
              logAndPrintError(newStderr, "Error starting.", ex);
          }
      }
  }
}
ZygoteInit的invokeStaticMain方法並不會直接執行className的main方法,而是會構造一個 ZygoteInit.MethodAndArgsCaller異常,然後拋出來,通過異常機制會直接跳轉到ZygoteInit的main方法, ZygoteInit.MethodAndArgsCaller類實現了Runnable方法,在run方法裡會執行要求執行的main方法,故此跳轉到ZygoteInit的main方法後,異常會被捕獲,然後執行方法caller.run(),這樣便會執行android.app.ActivityThread的main方法。
ZygoteInit的invokeStaticMain方法主要代碼:
//ZygoteInit類
static void invokeStaticMain(ClassLoader loader,
        String className, String[] argv)
        throws ZygoteInit.MethodAndArgsCaller {
  //...
  Method m;
  try {
      m = cl.getMethod("main", new Class[] { String[].class });
  } catch(//...){
  }
  //...
  throw new ZygoteInit.MethodAndArgsCaller(m, argv);
}
ZygoteInit.MethodAndArgsCaller主要代碼:
public static class MethodAndArgsCaller extends Exception
        implements Runnable {
    //...
    public void run() {
        try {
            mMethod.invoke(null, new Object[] { mArgs });
        }//...
    }
}
ZygoteInit的main方法相關代碼:
//ZygoteInit類
public static void main(String argv[]) {
  try {
      //...
  } catch (MethodAndArgsCaller caller) {
      caller.run();
  } catch (RuntimeException ex) {
      //...
  }
}
下面博客將介紹Activity詳細啟動流程的後半部分。
上篇博客介紹了Activity詳細啟動流程的前半部分:
本篇博客主要介紹Activity詳細啟動流程的後半部分:
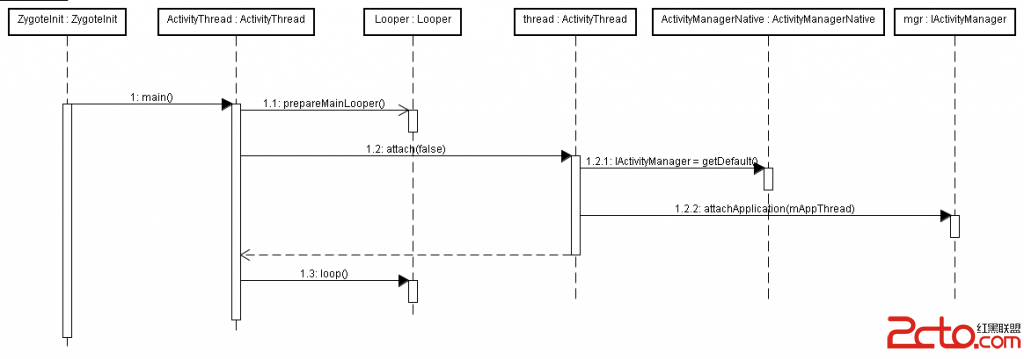
Zygote進程孵化出新的應用進程後,會執行ActivityThread類的main方法。在該方法裡會先准備好Looper和消息隊列,然後調用attach方法將應用進程綁定到ActivityManagerService,然後進入loop循環,不斷地讀取消息隊列裡的消息,並分發消息。
//ActivityThread類
public static void main(String[] args) {
    //...
    Looper.prepareMainLooper();
    ActivityThread thread = new ActivityThread();
    thread.attach(false);

    if (sMainThreadHandler == null) {
        sMainThreadHandler = thread.getHandler();
    }
    AsyncTask.init();
    //...
    Looper.loop();

    //...
}
在ActivityThread的main方法裡調用thread.attach(false);attach方法的主要代碼如下所示:
//ActivityThread類
private void attach(boolean system) {
    sThreadLocal.set(this);
    mSystemThread = system;
    if (!system) {
        //...
        IActivityManager mgr = ActivityManagerNative.getDefault();
        try {
        //調用ActivityManagerService的attachApplication方法
        //將ApplicationThread對象綁定至ActivityManagerService,
        //這樣ActivityManagerService就可以
        //通過ApplicationThread代理對象控制應用進程
            mgr.attachApplication(mAppThread);
        } catch (RemoteException ex) {
            // Ignore
        }
    } else {
        //...
    }
    //...
}
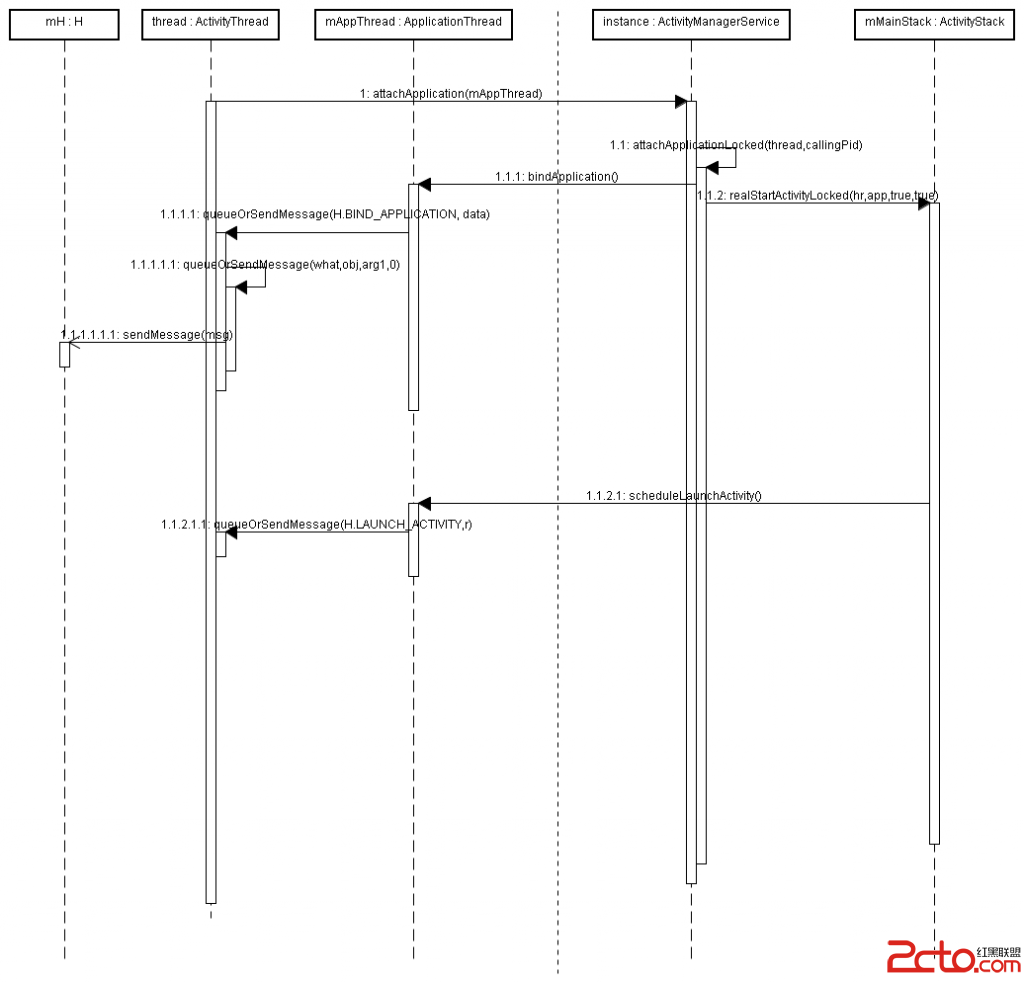
ActivityManagerService的attachApplication方法執行attachApplicationLocked(thread, callingPid)進行綁定。
//ActivityManagerService類
private final boolean attachApplicationLocked(IApplicationThread thread,
        int pid) {
    ProcessRecord app;
    //...
    app.thread = thread;
    //...
    try {
        //...
        thread.bindApplication(processName, appInfo, providers,
                app.instrumentationClass, profileFile, profileFd, profileAutoStop,
                app.instrumentationArguments, app.instrumentationWatcher, testMode,
                enableOpenGlTrace, isRestrictedBackupMode || !normalMode, app.persistent,
                new Configuration(mConfiguration), app.compat, getCommonServicesLocked(),
                mCoreSettingsObserver.getCoreSettingsLocked());
        //...
    } catch (Exception e) {
       //...
    }
    //...
    ActivityRecord hr = mMainStack.topRunningActivityLocked(null);
    if (hr != null && normalMode) {
        if (hr.app == null && app.uid == hr.info.applicationInfo.uid
                && processName.equals(hr.processName)) {
            try {
                if (mHeadless) {
                    Slog.e(TAG, "Starting activities not supported on headless device: " + hr);
                } else if (mMainStack.realStartActivityLocked(hr, app, true, true)) {
                //mMainStack.realStartActivityLocked真正啟動activity
                    didSomething = true;
                }
            } catch (Exception e) {
                //...
            }
        } else {
            //...
        }
    }
    //...
    return true;
}
attachApplicationLocked方法有兩個重要的函數調用thread.bindApplication和mMainStack.realStartActivityLocked。thread.bindApplication將應用進程的ApplicationThread對象綁定到ActivityManagerService,也就是說獲得ApplicationThread對象的代理對象。mMainStack.realStartActivityLocked通知應用進程啟動Activity。
thread對象其實是ActivityThread裡ApplicationThread對象在ActivityManagerService的代理對象,故此執行thread.bindApplication,最終會調用ApplicationThread的bindApplication方法,該方法的主要代碼如下所示:
//ActivityThread類
public final void bindApplication(String processName,
        ApplicationInfo appInfo, List providers,
        ComponentName instrumentationName, String profileFile,
        ParcelFileDescriptor profileFd, boolean autoStopProfiler,
        Bundle instrumentationArgs, IInstrumentationWatcher instrumentationWatcher,
        int debugMode, boolean enableOpenGlTrace, boolean isRestrictedBackupMode,
        boolean persistent, Configuration config, CompatibilityInfo compatInfo,
        Map services, Bundle coreSettings) {
    //...
    AppBindData data = new AppBindData();
    data.processName = processName;
    data.appInfo = appInfo;
    data.providers = providers;
    data.instrumentationName = instrumentationName;
    data.instrumentationArgs = instrumentationArgs;
    data.instrumentationWatcher = instrumentationWatcher;
    data.debugMode = debugMode;
    data.enableOpenGlTrace = enableOpenGlTrace;
    data.restrictedBackupMode = isRestrictedBackupMode;
    data.persistent = persistent;
    data.config = config;
    data.compatInfo = compatInfo;
    data.initProfileFile = profileFile;
    data.initProfileFd = profileFd;
    data.initAutoStopProfiler = false;
    queueOrSendMessage(H.BIND_APPLICATION, data);
}
這樣調用queueOrSendMessage會往ActivityThread的消息隊列發送消息,消息的用途是BIND_APPLICATION。
這樣會在handler裡處理BIND_APPLICATION消息,接著調用handleBindApplication方法處理綁定消息。
//ActivityThread類
private void handleBindApplication(AppBindData data) {
  //...
  ApplicationInfo instrApp = new ApplicationInfo();
  instrApp.packageName = ii.packageName;
  instrApp.sourceDir = ii.sourceDir;
  instrApp.publicSourceDir = ii.publicSourceDir;
  instrApp.dataDir = ii.dataDir;
  instrApp.nativeLibraryDir = ii.nativeLibraryDir;
  LoadedApk pi = getPackageInfo(instrApp, data.compatInfo,
        appContext.getClassLoader(), false, true);
  ContextImpl instrContext = new ContextImpl();
  instrContext.init(pi, null, this);
    //...


  if (data.instrumentationName != null) {
       //...
  } else {
       //注意Activity的所有生命周期方法都會被Instrumentation對象所監控,
       //也就說執行Activity的生命周期方法前後一定會調用Instrumentation對象的相關方法
       //並不是說只有跑單測用例才會建立Instrumentation對象,
       //即使不跑單測也會建立Instrumentation對象
       mInstrumentation = new Instrumentation();
  }
  //...
  try {
     //...
     Application app = data.info.makeApplication(data.restrictedBackupMode, null);
     mInitialApplication = app;
     //...
     try {
          mInstrumentation.onCreate(data.instrumentationArgs);
      }catch (Exception e) {
             //...
      }
      try {
           //這裡會調用Application的onCreate方法
           //故此Applcation對象的onCreate方法會比ActivityThread的main方法後調用
           //但是會比這個應用的所有activity先調用
            mInstrumentation.callApplicationOnCreate(app);
        } catch (Exception e) {
           //...
        }
    } finally {
        StrictMode.setThreadPolicy(savedPolicy);
    }
}
realStartActivity會調用scheduleLaunchActivity啟動activity,主要代碼:
//ActivityStack類
final boolean realStartActivityLocked(ActivityRecord r,
        ProcessRecord app, boolean andResume, boolean checkConfig)
        throws RemoteException {

    //...
    try {
        //...
        app.thread.scheduleLaunchActivity(new Intent(r.intent), r.appToken,
                System.identityHashCode(r), r.info,
                new Configuration(mService.mConfiguration),
                r.compat, r.icicle, results, newIntents, !andResume,
                mService.isNextTransitionForward(), profileFile, profileFd,
                profileAutoStop);

        //...

    } catch (RemoteException e) {
        //...
    }
    //...
    return true;
}
同樣app.thread也只是ApplicationThread對象在ActivityManagerService的一個代理對象而已,最終會調用ApplicationThread的scheduleLaunchActivity方法。
//ActivityThread類
public final void scheduleLaunchActivity(Intent intent, IBinder token, int ident,
        ActivityInfo info, Configuration curConfig, CompatibilityInfo compatInfo,
        Bundle state, List pendingResults,
        List pendingNewIntents, boolean notResumed, boolean isForward,
        String profileName, ParcelFileDescriptor profileFd, boolean autoStopProfiler) {
    ActivityClientRecord r = new ActivityClientRecord();
    r.token = token;
    r.ident = ident;
    r.intent = intent;
    r.activityInfo = info;
    r.compatInfo = compatInfo;
    r.state = state;
    r.pendingResults = pendingResults;
    r.pendingIntents = pendingNewIntents;
    r.startsNotResumed = notResumed;
    r.isForward = isForward;
    r.profileFile = profileName;
    r.profileFd = profileFd;
    r.autoStopProfiler = autoStopProfiler;
    updatePendingConfiguration(curConfig);
    queueOrSendMessage(H.LAUNCH_ACTIVITY, r);
}
這裡調用了queueOrSendMessage往ActivityThread的消息隊列發送了消息,消息的用途是啟動Activity,接下來ActivityThread的handler便會處理該消息。
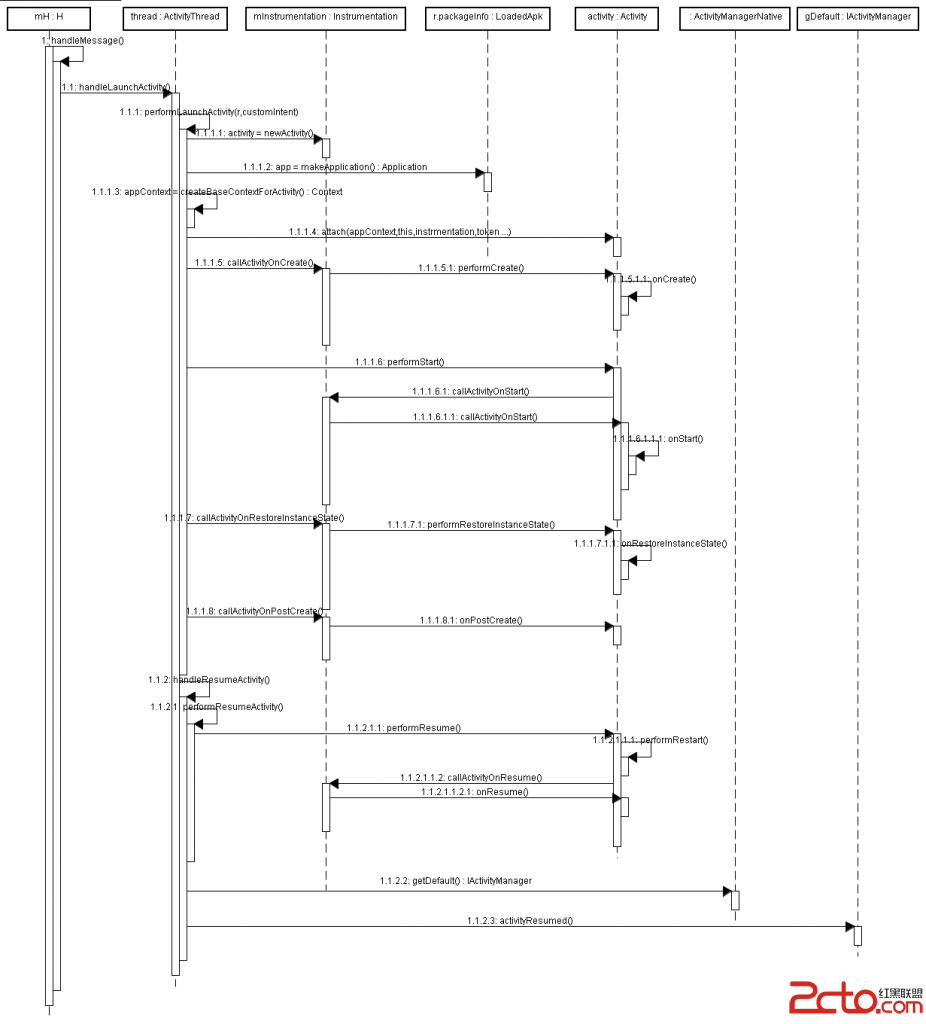
ActivityThread的handler調用handleLaunchActivity處理啟動Activity的消息,handleLaunchActivity的主要代碼如下所示:
//ActivityThread類
private void handleLaunchActivity(ActivityClientRecord r, Intent customIntent) {
    //...
    Activity a = performLaunchActivity(r, customIntent);
    if (a != null) {
        //...
        handleResumeActivity(r.token, false, r.isForward,
                !r.activity.mFinished && !r.startsNotResumed);
        //...
    } else {
        //...
    }
}
handleLaunchActivity方法裡有有兩個重要的函數調用,performLaunchActivity和handleResumeActivity,performLaunchActivity會調用Activity的onCreate,onStart,onResotreInstanceState方法,handleResumeActivity會調用Activity的onResume方法.
performLaunchActivity的主要代碼如下所示:
//ActivityThread類
private Activity performLaunchActivity(ActivityClientRecord r, Intent customIntent) {
    //...
    Activity activity = null;
    try {
        java.lang.ClassLoader cl = r.packageInfo.getClassLoader();
        activity = mInstrumentation.newActivity(
                cl, component.getClassName(), r.intent);
        //...
    } catch (Exception e) {
        //...
    }
    try {
        //r.packageInfo.makeApplication實際並未創建Application對象,
        //因為bindApplication過程已經創建了Application對象,
        //makeApplication方法會返回已創建的Application對象
        Application app = r.packageInfo.makeApplication(false, mInstrumentation);
        //...
        if (activity != null) {
            //...
            //將application對象,appContext對象綁定到新建的activity對象
            activity.attach(appContext, this, getInstrumentation(), r.token,
                    r.ident, app, r.intent, r.activityInfo, title, r.parent,
                    r.embeddedID, r.lastNonConfigurationInstances, config);
            //...
            //會調用Activity的onCreate方法
            mInstrumentation.callActivityOnCreate(activity, r.state);
            //...
            //...
            //調用Activity的onStart方法
            if (!r.activity.mFinished) {
                activity.performStart();
                r.stopped = false;
            }
            if (!r.activity.mFinished) {
                if (r.state != null) {
                    //會調用Activity的onRestoreInstanceState方法
                    mInstrumentation.callActivityOnRestoreInstanceState(activity, r.state);
                }
            }
            if (!r.activity.mFinished) {
                activity.mCalled = false;
                mInstrumentation.callActivityOnPostCreate(activity, r.state);
                //...
            }
        }
        //...
    } catch (SuperNotCalledException e) {
        throw e;

    } catch (Exception e) {
        //...
    }
    return activity;
}
handleResumeActivity的主要代碼如下所示:
//ActivityThread類
final void handleResumeActivity(IBinder token, boolean clearHide, boolean isForward,
        boolean reallyResume) {
    //...
    //performResumeActivity最終會調用Activity的onResume方法
    ActivityClientRecord r = performResumeActivity(token, clearHide);
    if (r != null) {
        final Activity a = r.activity;
        //...
        //顯示界面
        if (r.window == null && !a.mFinished && willBeVisible) {
            r.window = r.activity.getWindow();
            View decor = r.window.getDecorView();
            decor.setVisibility(View.INVISIBLE);
            ViewManager wm = a.getWindowManager();
            WindowManager.LayoutParams l = r.window.getAttributes();
            a.mDecor = decor;
            l.type = WindowManager.LayoutParams.TYPE_BASE_APPLICATION;
            l.softInputMode |= forwardBit;
            if (a.mVisibleFromClient) {
                a.mWindowAdded = true;
                wm.addView(decor, l);
            }
           //...
        } else if (!willBeVisible) {
             //...
        }
        // Tell the activity manager we have resumed.
        if (reallyResume) {
            try {
                ActivityManagerNative.getDefault().activityResumed(token);
            } catch (RemoteException ex) {
            }
        }

    } else {
         //...
    }
}
performResumeActivity的主要代碼如下所示:
//ActivityThread類
public final ActivityClientRecord performResumeActivity(IBinder token,
        boolean clearHide) {
    ActivityClientRecord r = mActivities.get(token);
    //...
    if (r != null && !r.activity.mFinished) {
         //...
        try {
            //...
            //會調用Activity的onResume方法
            r.activity.performResume();
            //...
        } catch (Exception e) {
            //...
        }
    }
    return r;
}
Activity的概要啟動流程:
用戶在Launcher程序裡點擊應用圖標時,會通知ActivityManagerService啟動應用的入口Activity,ActivityManagerService發現這個應用還未啟動,則會通知Zygote進程孵化出應用進程,然後在這個dalvik應用進程裡執行ActivityThread的main方法。應用進程接下來通知ActivityManagerService應用進程已啟動,ActivityManagerService保存應用進程的一個代理對象,這樣ActivityManagerService可以通過這個代理對象控制應用進程,然後ActivityManagerService通知應用進程創建入口Activity的實例,並執行它的生命周期方法
現在也可以理解:
如果應用的組件(包括所有組件Activity,Service,ContentProvider,Receiver) 被啟動,肯定會先啟動以應用包名為進程名的進程,這些組件都會運行在應用包名為進程名的進程裡,並且是在主線程裡。應用進程啟動時會先創建Application對象,並執行Application對象的生命周期方法,然後才啟動應用的組件。
有一種情況比較特殊,那就是為組件設置了特殊的進程名,也就是說通過android:process設置進程名的情況,此時組件運行在單獨的進程內。
前面兩篇博客介紹了Activity的詳細啟動流程,提到ActivityStack類的startActivityUncheckedLocked方法負責調度ActivityRecord和Task,並且調度算法非常復雜,需結合實際場景分析調度算法。本篇博客將介紹startActivityUncheckedLocked方法的具體實現,本結合實際場景分析調度算法。
final int startActivityUncheckedLocked(ActivityRecord r,
ActivityRecord sourceRecord, int startFlags, boolean doResume,
Bundle options) {
//...
//如果從Launcher程序啟動應用,launchFlags為
//FLAG_ACTIVITY_NEW_TASK|FLAG_ACTIVITY_RESET_TASK_IF_NEEDED
//否則一般情況下launcheFlags為0,除非啟動Activity時設置了特殊的flag
int launchFlags = intent.getFlags();
//啟動Activity時默認不會設置FLAG_ACTIVITY_PREVIOUS_IS_TOP
//故此notTop默認情況下會是null
ActivityRecord notTop = (launchFlags&Intent.FLAG_ACTIVITY_PREVIOUS_IS_TOP)
!= 0 ? r : null;
//默認情況下startFlags不會設置START_FLAG_ONLY_IF_NEEDED
// If the onlyIfNeeded flag is set, then we can do this if the activity
// being launched is the same as the one making the call... or, as
// a special case, if we do not know the caller then we count the
// current top activity as the caller.
if ((startFlags&ActivityManager.START_FLAG_ONLY_IF_NEEDED) != 0) {
//...默認情況下這裡的代碼不會執行
}
//根據被啟動的Activity和sourceRecord設置標志
//launchFlags |= Intent.FLAG_ACTIVITY_NEW_TASK
//如果從通知欄啟動應用 sourceRecord == null
if (sourceRecord == null) {
// This activity is not being started from another... in this
// case we -always- start a new task.
if ((launchFlags&Intent.FLAG_ACTIVITY_NEW_TASK) == 0) {
Slog.w(TAG, "startActivity called from non-Activity context;"
+"forcing Intent.FLAG_ACTIVITY_NEW_TASK for: "
+ intent);
launchFlags |= Intent.FLAG_ACTIVITY_NEW_TASK;
}
} else if (sourceRecord.launchMode == ActivityInfo.LAUNCH_SINGLE_INSTANCE) {
// The original activity who is starting us is running as a single
// instance... this new activity it is starting must go on its
// own task.
launchFlags |= Intent.FLAG_ACTIVITY_NEW_TASK;
} else if (r.launchMode == ActivityInfo.LAUNCH_SINGLE_INSTANCE
|| r.launchMode == ActivityInfo.LAUNCH_SINGLE_TASK) {
// The activity being started is a single instance... it always
// gets launched into its own task.
launchFlags |= Intent.FLAG_ACTIVITY_NEW_TASK;
}
//一般情況下r.resultTo 不為null,它是啟動該Activity的Activity,
//如果從通知欄啟動Activity 則r.result為null
if (r.resultTo != null && (launchFlags&Intent.FLAG_ACTIVITY_NEW_TASK) != 0) {
//...
r.resultTo = null;
}
//addingToTask 如果為true表示正在添加至某個task,
// 後續需要將r添加至sourceRecord所在的task
boolean addingToTask = false;
//movedHome表示是否移動home task
boolean movedHome = false;
//reuseTask 如果不為null,則表示已存在task,會重用這個task,
// 但是這個Task裡的所有Activity會被清除掉,
// 需要將r加入這個task
TaskRecord reuseTask = null;
if (((launchFlags&Intent.FLAG_ACTIVITY_NEW_TASK) != 0 &&
(launchFlags&Intent.FLAG_ACTIVITY_MULTIPLE_TASK) == 0)
|| r.launchMode == ActivityInfo.LAUNCH_SINGLE_TASK
|| r.launchMode == ActivityInfo.LAUNCH_SINGLE_INSTANCE) {
//從通知欄啟動時r.resultTo == null
//如果launchFlags設置了FLAG_ACTIVITY_NEW_TASK,r.resultTo也會為null
if (r.resultTo == null) {
//查找ActivityRecord棧,看要啟動的activity是否已有相關task,
//如果已經有相關task,則不需要創建新的task,可以使用已有的task
//如果要啟動的activity的啟動模式是LAUNCH_SINGLE_INSTANCE,
//則使用快速查找方法findTaskLocked,否則使用慢速查找方法findActivityLocked
//因為如果啟動模式是LAUNCH_SINGLE_INSTANCE,則這個activity只會在一個單獨的Task裡
//故此查找時,可以以task為單位進行查找和比較,這樣比較快
//查找得到的結果taskTop是相關task的棧頂的ActivityRecord
// See if there is a task to bring to the front. If this is
// a SINGLE_INSTANCE activity, there can be one and only one
// instance of it in the history, and it is always in its own
// unique task, so we do a special search.
ActivityRecord taskTop = r.launchMode != ActivityInfo.LAUNCH_SINGLE_INSTANCE
? findTaskLocked(intent, r.info)
: findActivityLocked(intent, r.info);
//找到了相關task
if (taskTop != null) {
//重設task的intent
if (taskTop.task.intent == null) {
// This task was started because of movement of
// the activity based on affinity... now that we
// are actually launching it, we can assign the
// base intent.
taskTop.task.setIntent(intent, r.info);
}
//如果目標task不在棧頂,
//則先將Home task移動到棧頂(實際上只有當啟動Activity設置的Flag同時設置了
//FLAG_ACTIVITY_TASK_ON_HOME和FLAG_ACTIVITY_NEW_TASK才會移動home task,
//否則不會移動home task),
//然後再將目標task移動到棧頂
// If the target task is not in the front, then we need
// to bring it to the front... except... well, with
// SINGLE_TASK_LAUNCH it's not entirely clear. We'd like
// to have the same behavior as if a new instance was
// being started, which means not bringing it to the front
// if the caller is not itself in the front.
ActivityRecord curTop = topRunningNonDelayedActivityLocked(notTop);
if (curTop != null && curTop.task != taskTop.task) {
r.intent.addFlags(Intent.FLAG_ACTIVITY_BROUGHT_TO_FRONT);
boolean callerAtFront = sourceRecord == null
|| curTop.task == sourceRecord.task;
if (callerAtFront) {
// We really do want to push this one into the
// user's face, right now.
movedHome = true;
moveHomeToFrontFromLaunchLocked(launchFlags);
moveTaskToFrontLocked(taskTop.task, r, options);
options = null;
}
}
//如果launchFlags設置了FLAG_ACTIVITY_RESET_TASK_IF_NEEDED,則會重置task
//從Launcher應用程序啟動應用會設置FLAG_ACTIVITY_RESET_TASK_IF_NEEDED
// If the caller has requested that the target task be
// reset, then do so.
if ((launchFlags&Intent.FLAG_ACTIVITY_RESET_TASK_IF_NEEDED) != 0) {
taskTop = resetTaskIfNeededLocked(taskTop, r);
}
//... 一般情況下startFlags 不會設置 START_FLAG_ONLY_IF_NEEDED
if ((startFlags&ActivityManager.START_FLAG_ONLY_IF_NEEDED) != 0) {
//...
}
// ==================================
//默認情況下不會設置 Intent.FLAG_ACTIVITY_CLEAR_TASK
if ((launchFlags &
(Intent.FLAG_ACTIVITY_NEW_TASK|Intent.FLAG_ACTIVITY_CLEAR_TASK))
== (Intent.FLAG_ACTIVITY_NEW_TASK|Intent.FLAG_ACTIVITY_CLEAR_TASK)) {
// The caller has requested to completely replace any
// existing task with its new activity. Well that should
// not be too hard...
reuseTask = taskTop.task;
performClearTaskLocked(taskTop.task.taskId);
reuseTask.setIntent(r.intent, r.info);
} else if ((launchFlags&Intent.FLAG_ACTIVITY_CLEAR_TOP) != 0
|| r.launchMode == ActivityInfo.LAUNCH_SINGLE_TASK
|| r.launchMode == ActivityInfo.LAUNCH_SINGLE_INSTANCE) {
//默認情況下launchFlags不會設置FLAG_ACTIVITY_CLEAR_TOP
//但是如果被啟動的activity的啟動模式是singleTask或者singleInstance,
//也會進入該分支
// In this situation we want to remove all activities
// from the task up to the one being started. In most
// cases this means we are resetting the task to its
// initial state.
//清除r所在的task 在r之上的所有activity,
//該task裡r和在r下的activity不會被清除
ActivityRecord top = performClearTaskLocked(
taskTop.task.taskId, r, launchFlags);
if (top != null) {
if (top.frontOfTask) {
// Activity aliases may mean we use different
// intents for the top activity, so make sure
// the task now has the identity of the new
// intent.
top.task.setIntent(r.intent, r.info);
}
logStartActivity(EventLogTags.AM_NEW_INTENT, r, top.task);
top.deliverNewIntentLocked(callingUid, r.intent);
} else {
// A special case: we need to
// start the activity because it is not currently
// running, and the caller has asked to clear the
// current task to have this activity at the top.
addingToTask = true;
// Now pretend like this activity is being started
// by the top of its task, so it is put in the
// right place.
sourceRecord = taskTop;
}
} else if (r.realActivity.equals(taskTop.task.realActivity)) {
// In this case the top activity on the task is the
// same as the one being launched, so we take that
// as a request to bring the task to the foreground.
// If the top activity in the task is the root
// activity, deliver this new intent to it if it
// desires.
if (((launchFlags&Intent.FLAG_ACTIVITY_SINGLE_TOP) != 0
|| r.launchMode == ActivityInfo.LAUNCH_SINGLE_TOP)
&& taskTop.realActivity.equals(r.realActivity)) {
logStartActivity(EventLogTags.AM_NEW_INTENT, r, taskTop.task);
if (taskTop.frontOfTask) {
taskTop.task.setIntent(r.intent, r.info);
}
taskTop.deliverNewIntentLocked(callingUid, r.intent);
} else if (!r.intent.filterEquals(taskTop.task.intent)) {
// In this case we are launching the root activity
// of the task, but with a different intent. We
// should start a new instance on top.
addingToTask = true;
sourceRecord = taskTop;
}
} else if ((launchFlags&Intent.FLAG_ACTIVITY_RESET_TASK_IF_NEEDED) == 0) {
// In this case an activity is being launched in to an
// existing task, without resetting that task. This
// is typically the situation of launching an activity
// from a notification or shortcut. We want to place
// the new activity on top of the current task.
addingToTask = true;
sourceRecord = taskTop;
} else if (!taskTop.task.rootWasReset) {
//進入該分支的情況比較少
// In this case we are launching in to an existing task
// that has not yet been started from its front door.
// The current task has been brought to the front.
// Ideally, we'd probably like to place this new task
// at the bottom of its stack, but that's a little hard
// to do with the current organization of the code so
// for now we'll just drop it.
taskTop.task.setIntent(r.intent, r.info);
}
// ================================== end
//如果沒有正在添加至某個Task, 並且不用加入一個已清除所有Activity的Task
//此時只需要顯示棧頂Activity即可
if (!addingToTask && reuseTask == null) {
// We didn't do anything... but it was needed (a.k.a., client
// don't use that intent!) And for paranoia, make
// sure we have correctly resumed the top activity.
if (doResume) {
resumeTopActivityLocked(null, options);
} else {
ActivityOptions.abort(options);
}
return ActivityManager.START_TASK_TO_FRONT;
}
}
}
}
//...
if (r.packageName != null) {
// If the activity being launched is the same as the one currently
// at the top, then we need to check if it should only be launched
// once.
ActivityRecord top = topRunningNonDelayedActivityLocked(notTop);
if (top != null && r.resultTo == null) {
if (top.realActivity.equals(r.realActivity) && top.userId == r.userId) {
if (top.app != null && top.app.thread != null) {
if ((launchFlags&Intent.FLAG_ACTIVITY_SINGLE_TOP) != 0
|| r.launchMode == ActivityInfo.LAUNCH_SINGLE_TOP
|| r.launchMode == ActivityInfo.LAUNCH_SINGLE_TASK) {
//singleTop啟動模式或者singleTask啟動模式,
//並且task棧頂的activity是要啟動的activity,則先顯示Activity
//然後調用該Activity的onNewIntent方法
logStartActivity(EventLogTags.AM_NEW_INTENT, top, top.task);
// For paranoia, make sure we have correctly
// resumed the top activity.
//先顯示Activity
if (doResume) {
resumeTopActivityLocked(null);
}
ActivityOptions.abort(options);
if ((startFlags&ActivityManager.START_FLAG_ONLY_IF_NEEDED) != 0) {
// We don't need to start a new activity, and
// the client said not to do anything if that
// is the case, so this is it!
return ActivityManager.START_RETURN_INTENT_TO_CALLER;
}
//然後調用已顯示activity的onNewIntent方法
top.deliverNewIntentLocked(callingUid, r.intent);
return ActivityManager.START_DELIVERED_TO_TOP;
}
}
}
}
} else {
if (r.resultTo != null) {
sendActivityResultLocked(-1,
r.resultTo, r.resultWho, r.requestCode,
Activity.RESULT_CANCELED, null);
}
ActivityOptions.abort(options);
return ActivityManager.START_CLASS_NOT_FOUND;
}
boolean newTask = false;
boolean keepCurTransition = false;
// Should this be considered a new task?
if (r.resultTo == null && !addingToTask
&& (launchFlags&Intent.FLAG_ACTIVITY_NEW_TASK) != 0) {
if (reuseTask == null) {
//創建新的task
// todo: should do better management of integers.
mService.mCurTask++;
if (mService.mCurTask <= 0) {
mService.mCurTask = 1;
}
r.setTask(new TaskRecord(mService.mCurTask, r.info, intent), null, true);
if (DEBUG_TASKS) Slog.v(TAG, "Starting new activity " + r
+ " in new task " + r.task);
} else {
//重復利用先前的task,該task裡的所有acitivity已經被清空
r.setTask(reuseTask, reuseTask, true);
}
newTask = true;
if (!movedHome) {
moveHomeToFrontFromLaunchLocked(launchFlags);
}
} else if (sourceRecord != null) {
if (!addingToTask &&
(launchFlags&Intent.FLAG_ACTIVITY_CLEAR_TOP) != 0) {
// In this case, we are adding the activity to an existing
// task, but the caller has asked to clear that task if the
// activity is already running.
//清除r所在task在r之上的所有task,如果r不在task裡,則返回的top為null
ActivityRecord top = performClearTaskLocked(
sourceRecord.task.taskId, r, launchFlags);
keepCurTransition = true;
if (top != null) {
logStartActivity(EventLogTags.AM_NEW_INTENT, r, top.task);
//先調用onNewIntent方法 然後再顯示
top.deliverNewIntentLocked(callingUid, r.intent);
// For paranoia, make sure we have correctly
// resumed the top activity.
if (doResume) {
resumeTopActivityLocked(null);
}
ActivityOptions.abort(options);
return ActivityManager.START_DELIVERED_TO_TOP;
}
} else if (!addingToTask &&
(launchFlags&Intent.FLAG_ACTIVITY_REORDER_TO_FRONT) != 0) {
//將棧裡已有的activity移到棧頂
// In this case, we are launching an activity in our own task
// that may already be running somewhere in the history, and
// we want to shuffle it to the front of the stack if so.
int where = findActivityInHistoryLocked(r, sourceRecord.task.taskId);
if (where >= 0) {
ActivityRecord top = moveActivityToFrontLocked(where);
logStartActivity(EventLogTags.AM_NEW_INTENT, r, top.task);
top.updateOptionsLocked(options);
top.deliverNewIntentLocked(callingUid, r.intent);
if (doResume) {
resumeTopActivityLocked(null);
}
return ActivityManager.START_DELIVERED_TO_TOP;
}
}
// An existing activity is starting this new activity, so we want
// to keep the new one in the same task as the one that is starting
// it.
//同一個應用程序裡的Activity A和Activity B,A可跳轉至B,沒有設置taskAffinity
//B的啟動模式為singleTask,從A跳轉至B時,B和A會在同一個task裡
//該情況下會執行到這裡的代碼,將B的task設置為和A一樣的task
r.setTask(sourceRecord.task, sourceRecord.thumbHolder, false);
if (DEBUG_TASKS) Slog.v(TAG, "Starting new activity " + r
+ " in existing task " + r.task);
} else {
// This not being started from an existing activity, and not part
// of a new task... just put it in the top task, though these days
// this case should never happen.
final int N = mHistory.size();
ActivityRecord prev =
N > 0 ? mHistory.get(N-1) : null;
r.setTask(prev != null
? prev.task
: new TaskRecord(mService.mCurTask, r.info, intent), null, true);
if (DEBUG_TASKS) Slog.v(TAG, "Starting new activity " + r
+ " in new guessed " + r.task);
}
mService.grantUriPermissionFromIntentLocked(callingUid, r.packageName,
intent, r.getUriPermissionsLocked());
if (newTask) {
EventLog.writeEvent(EventLogTags.AM_CREATE_TASK, r.userId, r.task.taskId);
}
logStartActivity(EventLogTags.AM_CREATE_ACTIVITY, r, r.task);
startActivityLocked(r, newTask, doResume, keepCurTransition, options);
return ActivityManager.START_SUCCESS;
}
實際場景1:
應用內有兩個Activity,A和B,A為第應用入口Activity,從A可跳轉至B,A和B的啟動模式都為standard
1)從Launcher程序第1次啟動應用時的任務調度情況:
任務調度時會創建新task並將新的ActivityRecord加入這個新的task
2)然後跳轉至應用內Activity時的任務調度情況:
任務調度時會將新的ActivityRecord加入已有的task
3)然後按Home鍵,再打開應用程序時的調度情況:
任務調度時會先找到已有的相關task,並顯示棧頂的Activity
1)從Launcher程序第1次啟動應用時
會創建新task並將新的ActivityRecord加入這個新的task,任務調度執行如下所示:
final int startActivityUncheckedLocked(ActivityRecord r,
        ActivityRecord sourceRecord, int startFlags, boolean doResume,
        Bundle options) {
    //...
    //launchFlags為FLAG_ACTIVITY_NEW_TASK|FLAG_ACTIVITY_RESET_TASK_IF_NEEDED
    int launchFlags = intent.getFlags();
   //...
   //沒設置FLAG_ACTIVITY_PREVIOUS_IS_TOP,故此notTop為null
    ActivityRecord notTop = (launchFlags&Intent.FLAG_ACTIVITY_PREVIOUS_IS_TOP)
            != 0 ? r : null;
   //startFlags未設置ActivityManager.START_FLAG_ONLY_IF_NEEDED
   //...
   //sourceRecord為Launcher應用的Activity  launcher應用activity的啟動模式為singleTask
   // 故此下面的3個條件分支的內容都不會執行
    if (sourceRecord == null) {
        //...
    } else if (sourceRecord.launchMode == ActivityInfo.LAUNCH_SINGLE_INSTANCE) {
         //...
    } else if (r.launchMode == ActivityInfo.LAUNCH_SINGLE_INSTANCE
            || r.launchMode == ActivityInfo.LAUNCH_SINGLE_TASK) {
        //...
    }
    //...
    //r.resultTo不為null, launchFlags設置了FLAG_ACTIVITY_NEW_TASK,需要將r.resultTo置為null
    if (r.resultTo != null && (launchFlags&Intent.FLAG_ACTIVITY_NEW_TASK) != 0) {
        //...
        r.resultTo = null;
    }
    boolean addingToTask = false;
    boolean movedHome = false;
    TaskRecord reuseTask = null;
    //因為launchFlags為FLAG_ACTIVITY_NEW_TASK|FLAG_ACTIVITY_RESET_TASK_IF_NEEDED
    //故此下面的條件會滿足, 也就是說只要從Launcher程序啟動應用,下面這個條件肯定會滿足
    if (((launchFlags&Intent.FLAG_ACTIVITY_NEW_TASK) != 0 &&
            (launchFlags&Intent.FLAG_ACTIVITY_MULTIPLE_TASK) == 0)
            || r.launchMode == ActivityInfo.LAUNCH_SINGLE_TASK
            || r.launchMode == ActivityInfo.LAUNCH_SINGLE_INSTANCE) {
        //...
        if (r.resultTo == null) {
            //因為應用被第一次啟動,故此找不到相關task,taskTop則為null
            ActivityRecord taskTop = r.launchMode != ActivityInfo.LAUNCH_SINGLE_INSTANCE
                    ? findTaskLocked(intent, r.info)
                    : findActivityLocked(intent, r.info);
            if (taskTop != null) {
              //... 這裡面的內容不會執行
            }
        }
    }
   //...
   //r.packageName != null
    if (r.packageName != null) {
        //如果被啟動的Activity正好是棧頂的Activity,
        //並且被啟動的Activity啟動模式是singleTop或者singleTask,
        //則不用將新的ActivityRecord加入到棧裡
        //top Activity為Launcher應用的Activity
        ActivityRecord top = topRunningNonDelayedActivityLocked(notTop);
        if (top != null && r.resultTo == null) {
            //top.realActivity.equals(r.realActivity)不滿足
            if (top.realActivity.equals(r.realActivity) && top.userId == r.userId) {
                //... 這裡的代碼不會被執行
            }
        }

    } else {
        //...
    }
    boolean newTask = false;
    boolean keepCurTransition = false;
    // 此時 r.resultTo為null addingToTask為false  launchFlags設置了FLAG_ACTIVITY_NEW_TASK
    if (r.resultTo == null && !addingToTask
            && (launchFlags&Intent.FLAG_ACTIVITY_NEW_TASK) != 0) {
        if (reuseTask == null) {
            // todo: should do better management of integers.
            mService.mCurTask++;
            if (mService.mCurTask <= 0) {
                mService.mCurTask = 1;
            }
            //創建新task
            r.setTask(new TaskRecord(mService.mCurTask, r.info, intent), null, true);
            if (DEBUG_TASKS) Slog.v(TAG, "Starting new activity " + r
                    + " in new task " + r.task);
        } else {
           //...這裡的代碼會執行
        }
        newTask = true;
        if (!movedHome) {
            moveHomeToFrontFromLaunchLocked(launchFlags);
        }

    } else if (sourceRecord != null) {
         //... 這裡的代碼不會被執行
    } else {
       //...這裡的代碼不會被執行
    }
    //...
    startActivityLocked(r, newTask, doResume, keepCurTransition, options);
    return ActivityManager.START_SUCCESS;
}
2)跳轉至應用內Activity時
會將新的ActivityRecord加入已有的task,任務調度執行如下所示:
final int startActivityUncheckedLocked(ActivityRecord r,
        ActivityRecord sourceRecord, int startFlags, boolean doResume,
        Bundle options) {
    //此時launchFlags為0
    int launchFlags = intent.getFlags();
    //notTop為null
    ActivityRecord notTop = (launchFlags&Intent.FLAG_ACTIVITY_PREVIOUS_IS_TOP)
            != 0 ? r : null;
    //startFlags未設置ActivityManager.START_FLAG_ONLY_IF_NEEDED
    //...
    if (sourceRecord == null) {
       //...這裡的代碼不會被執行
    } else if (sourceRecord.launchMode == ActivityInfo.LAUNCH_SINGLE_INSTANCE) {
      //...這裡的代碼不會被執行
    } else if (r.launchMode == ActivityInfo.LAUNCH_SINGLE_INSTANCE
            || r.launchMode == ActivityInfo.LAUNCH_SINGLE_TASK) {
      //...這裡的代碼不會被執行
    }
    //r.resultTo != null 但是launchFlags未設置FLAG_ACTIVITY_NEW_TASK
    if (r.resultTo != null && (launchFlags&Intent.FLAG_ACTIVITY_NEW_TASK) != 0) {
       //... 這裡的代碼不執行
    }
    boolean addingToTask = false;
    boolean movedHome = false;
    TaskRecord reuseTask = null;
    //launchFlags為0 r的啟動模式為standard 故此下面的邏輯都不會執行
    if (((launchFlags&Intent.FLAG_ACTIVITY_NEW_TASK) != 0 &&
            (launchFlags&Intent.FLAG_ACTIVITY_MULTIPLE_TASK) == 0)
            || r.launchMode == ActivityInfo.LAUNCH_SINGLE_TASK
            || r.launchMode == ActivityInfo.LAUNCH_SINGLE_INSTANCE) {
        //... 這裡的代碼不執行
    }
   //...
    if (r.packageName != null) {
        //top 是ActivityA 的ActivityRecord,
        //但是被啟動的Activity和top不是同一個Activity
        ActivityRecord top = topRunningNonDelayedActivityLocked(notTop);
        if (top != null && r.resultTo == null) {
            if (top.realActivity.equals(r.realActivity) && top.userId == r.userId) {
                 //...這裡的代碼不執行
            }
        }

    } else {
        //...這裡的代碼不執行
    }
    boolean newTask = false;
    boolean keepCurTransition = false;
    //此時 r.resultTo !=null  sourceRecord != null addingToTask=false
    if (r.resultTo == null && !addingToTask
            && (launchFlags&Intent.FLAG_ACTIVITY_NEW_TASK) != 0) {
        //...這裡的代碼不執行
    } else if (sourceRecord != null) {
        if (!addingToTask &&
                (launchFlags&Intent.FLAG_ACTIVITY_CLEAR_TOP) != 0) {
             //... 這裡的代碼不執行
        } else if (!addingToTask &&
                (launchFlags&Intent.FLAG_ACTIVITY_REORDER_TO_FRONT) != 0) {
             //... 這裡的代碼不執行
        }
        //添加到現有的task
        r.setTask(sourceRecord.task, sourceRecord.thumbHolder, false);
        //...
    } else {
        //... 這裡的代碼不執行
    }
    //...
    return ActivityManager.START_SUCCESS;
}
3)然後按Home鍵,再打開應用程序
此時會先找到已有的相關task,並顯示棧頂的Activity,任務調度執行如下所示:
final int startActivityUncheckedLocked(ActivityRecord r,
        ActivityRecord sourceRecord, int startFlags, boolean doResume,
        Bundle options) {
    //...
    //launchFlags為FLAG_ACTIVITY_NEW_TASK|FLAG_ACTIVITY_RESET_TASK_IF_NEEDED
    int launchFlags = intent.getFlags();
    //notTop為null
    ActivityRecord notTop = (launchFlags&Intent.FLAG_ACTIVITY_PREVIOUS_IS_TOP)
            != 0 ? r : null;
    //startFlags未設置ActivityManager.START_FLAG_ONLY_IF_NEEDED
    //...
    if (sourceRecord == null) {
       //...這裡的代碼不會被執行
    } else if (sourceRecord.launchMode == ActivityInfo.LAUNCH_SINGLE_INSTANCE) {
        //...這裡的代碼不會被執行
    } else if (r.launchMode == ActivityInfo.LAUNCH_SINGLE_INSTANCE
            || r.launchMode == ActivityInfo.LAUNCH_SINGLE_TASK) {
       //...這裡的代碼不會被執行
    }
    //此時 r.resultTo != null launchFlags設置了FLAG_ACTIVITY_NEW_TASK
    if (r.resultTo != null && (launchFlags&Intent.FLAG_ACTIVITY_NEW_TASK) != 0) {
        //...
        r.resultTo = null;
    }
    boolean addingToTask = false;
    boolean movedHome = false;
    TaskRecord reuseTask = null;
    //此時launchFlags設置了FLAG_ACTIVITY_NEW_TASK|FLAG_ACTIVITY_RESET_TASK_IF_NEEDED
    if (((launchFlags&Intent.FLAG_ACTIVITY_NEW_TASK) != 0 &&
            (launchFlags&Intent.FLAG_ACTIVITY_MULTIPLE_TASK) == 0)
            || r.launchMode == ActivityInfo.LAUNCH_SINGLE_TASK
            || r.launchMode == ActivityInfo.LAUNCH_SINGLE_INSTANCE) {
        //此時 r.resultTo == null
        if (r.resultTo == null) {
            //此時已有相關task,並且task 棧的棧頂是Activity B的ActivityRecord
            //故此taskTop為Activity B的ActivityRecord
            ActivityRecord taskTop = r.launchMode != ActivityInfo.LAUNCH_SINGLE_INSTANCE
                    ? findTaskLocked(intent, r.info)
                    : findActivityLocked(intent, r.info);
            if (taskTop != null) {
                //...
                // 此時curTop是Launcher應用的Activity的ActivityRecord
                ActivityRecord curTop = topRunningNonDelayedActivityLocked(notTop);
                if (curTop != null && curTop.task != taskTop.task) {
                    r.intent.addFlags(Intent.FLAG_ACTIVITY_BROUGHT_TO_FRONT);
                    //此時Launcher應用的task在棧頂,故此callerAtFront為true,
                    //此時會把被啟動的應用的task移至棧頂
                    boolean callerAtFront = sourceRecord == null
                            || curTop.task == sourceRecord.task;
                    if (callerAtFront) {
                        // We really do want to push this one into the
                        // user's face, right now.
                        movedHome = true;
                        moveHomeToFrontFromLaunchLocked(launchFlags);
                        moveTaskToFrontLocked(taskTop.task, r, options);
                        options = null;
                    }
                }
                //此時launchFlags設置了FLAG_ACTIVITY_NEW_TASK|FLAG_ACTIVITY_RESET_TASK_IF_NEEDED
                //此時需要重置task 重置完後 taskTop為ActivityB的ActivityRecord
                if ((launchFlags&Intent.FLAG_ACTIVITY_RESET_TASK_IF_NEEDED) != 0) {
                    taskTop = resetTaskIfNeededLocked(taskTop, r);
                }
                //startFlags為0
                if ((startFlags&ActivityManager.START_FLAG_ONLY_IF_NEEDED)  != 0) {
                    //... 這些代碼都不會被執行
                }
                //根據launchFlags和被啟動的activity的信息 設置resueTask addingTask變量的值
                //沒設置 Intent.FLAG_ACTIVITY_CLEAR_TASK
                if ((launchFlags &
                          (Intent.FLAG_ACTIVITY_NEW_TASK|Intent.FLAG_ACTIVITY_CLEAR_TASK))
                          == (Intent.FLAG_ACTIVITY_NEW_TASK|Intent.FLAG_ACTIVITY_CLEAR_TASK)) {
                      //... 這些代碼都不會被執行
                 } else if ((launchFlags&Intent.FLAG_ACTIVITY_CLEAR_TOP) != 0
                          || r.launchMode == ActivityInfo.LAUNCH_SINGLE_TASK
                          || r.launchMode == ActivityInfo.LAUNCH_SINGLE_INSTANCE) {
                      //... 這些代碼都不會被執行
                 } else if (r.realActivity.equals(taskTop.task.realActivity)) {
                      //... 這些代碼都不會被執行
                 } else if ((launchFlags&Intent.FLAG_ACTIVITY_RESET_TASK_IF_NEEDED) == 0) {
                       //因為從Launcher程序啟動時launchFlags設置了FLAG_ACTIVITY_RESET_TASK_IF_NEEDED
                       //所以不會進入該分支
                       //... 這些代碼都不會被執行
                  } else if (!taskTop.task.rootWasReset) {
                       //... 這些代碼都不會被執行
                  }
                  //此時addingToTask為false,reuseTask為null,故此顯示棧頂Actvity即可
                  if (!addingToTask && reuseTask == null) {
                      // We didn't do anything...  but it was needed (a.k.a., client
                      // don't use that intent!)  And for paranoia, make
                      // sure we have correctly resumed the top activity.
                      if (doResume) {
                          resumeTopActivityLocked(null, options);
                      } else {
                          ActivityOptions.abort(options);
                      }
                      return ActivityManager.START_TASK_TO_FRONT;
                  }
            }
        }
    }
   //... 以下代碼都不會被執行
}
實際場景2:
應用內有兩個Activity,A和B,A為第應用入口Activity,從A可跳轉至B,A的啟動模式都為standard,B的啟動模式為singleTop
此時已從Launchenr程序打開應用,啟動了Actvity A,再從A跳轉至B,此時的任務調度情況:
此時不會創建新的Task,而是將B的ActivityRecord加入到A所在的task裡
任務調度執行如下所示:
final int startActivityUncheckedLocked(ActivityRecord r,
        ActivityRecord sourceRecord, int startFlags, boolean doResume,
        Bundle options) {
    //...
    //此時launcheFlags為0
    int launchFlags = intent.getFlags();
    //notTop為null
    ActivityRecord notTop = (launchFlags&Intent.FLAG_ACTIVITY_PREVIOUS_IS_TOP)
            != 0 ? r : null;
    //默認情況下startFlags不會設置START_FLAG_ONLY_IF_NEEDED
    if ((startFlags&ActivityManager.START_FLAG_ONLY_IF_NEEDED) != 0) {
        //...這裡的代碼不會執行
    }
    //r.launchMode = ActivityInfo.LAUNCH_SINGLE_TASK
    if (sourceRecord == null) {
       //這裡的代碼不會執行
    } else if (sourceRecord.launchMode == ActivityInfo.LAUNCH_SINGLE_INSTANCE) {
        //這裡的代碼不會執行
    } else if (r.launchMode == ActivityInfo.LAUNCH_SINGLE_INSTANCE
            || r.launchMode == ActivityInfo.LAUNCH_SINGLE_TASK) {
        launchFlags |= Intent.FLAG_ACTIVITY_NEW_TASK;
    }

    //此時r.resultTo!=null launchFlags設置了Intent.FLAG_ACTIVITY_NEW_TASK
    if (r.resultTo != null && (launchFlags&Intent.FLAG_ACTIVITY_NEW_TASK) != 0) {
       //...
        r.resultTo = null;
    }
    //addingToTask如果為true表示正在添加至某個task,後續需要將r添加至sourceRecord所在的task
    boolean addingToTask = false;
    //movedHome表示是否移動home task
    boolean movedHome = false;
    TaskRecord reuseTask = null;
    if (((launchFlags&Intent.FLAG_ACTIVITY_NEW_TASK) != 0 &&
            (launchFlags&Intent.FLAG_ACTIVITY_MULTIPLE_TASK) == 0)
            || r.launchMode == ActivityInfo.LAUNCH_SINGLE_TASK
            || r.launchMode == ActivityInfo.LAUNCH_SINGLE_INSTANCE) {
        //此時 r.resultTo = null
        if (r.resultTo == null) {
            //此時找到的taskTop是Activity A的ActivityRecord,
            //因為Actvity B和A的ActivityRecord所在的Task是相關的
            ActivityRecord taskTop = r.launchMode != ActivityInfo.LAUNCH_SINGLE_INSTANCE
                    ? findTaskLocked(intent, r.info)
                    : findActivityLocked(intent, r.info);
            //找到了相關task
            if (taskTop != null) {
                //重設task的intent
                if (taskTop.task.intent == null) {
                     //...
                }
                //此時找到的task已在棧頂
                ActivityRecord curTop = topRunningNonDelayedActivityLocked(notTop);
                if (curTop != null && curTop.task != taskTop.task) {
                    //... 這裡的代碼不會執行
                }
                //launchFlags為0
                if ((launchFlags&Intent.FLAG_ACTIVITY_RESET_TASK_IF_NEEDED) != 0) {
                    taskTop = resetTaskIfNeededLocked(taskTop, r);
                }
                //... 一般情況下startFlags 不會設置 START_FLAG_ONLY_IF_NEEDED
                if ((startFlags&ActivityManager.START_FLAG_ONLY_IF_NEEDED)  != 0) {
                    //...
                }

                // ==================== begin
                // launchFlags此時為0
                if ((launchFlags &
                        (Intent.FLAG_ACTIVITY_NEW_TASK|Intent.FLAG_ACTIVITY_CLEAR_TASK))
                        == (Intent.FLAG_ACTIVITY_NEW_TASK|Intent.FLAG_ACTIVITY_CLEAR_TASK)) {
                     //...這裡的代碼不執行
                } else if ((launchFlags&Intent.FLAG_ACTIVITY_CLEAR_TOP) != 0
                        || r.launchMode == ActivityInfo.LAUNCH_SINGLE_TASK
                        || r.launchMode == ActivityInfo.LAUNCH_SINGLE_INSTANCE) {
                    // r.launchMode == ActivityInfo.LAUNCH_SINGLE_TASK
                    // 故此會進入該分支
                    //因為B還從未啟動,故此得到的top為null
                    ActivityRecord top = performClearTaskLocked(
                            taskTop.task.taskId, r, launchFlags);
                    if (top != null) {
                        //...這裡的代碼不執行
                    } else {
                        addingToTask = true;
                        sourceRecord = taskTop;
                    }
                } else if (r.realActivity.equals(taskTop.task.realActivity)) {
                     //...這裡的代碼不執行
                } else if ((launchFlags&Intent.FLAG_ACTIVITY_RESET_TASK_IF_NEEDED) == 0) {
                     //...這裡的代碼不執行
                } else if (!taskTop.task.rootWasReset) {
                     //...這裡的代碼不執行
                }
                // ==================== end

                // 此時 addingToTask為true
                if (!addingToTask && reuseTask == null) {
                     //...這裡的代碼不執行
                }
            }
        }
    }
    //...

    if (r.packageName != null) {
        ActivityRecord top = topRunningNonDelayedActivityLocked(notTop);
        if (top != null && r.resultTo == null) {
            //此時task還沒有B的ActivityRecord,故此不會進入下述分支
            if (top.realActivity.equals(r.realActivity) && top.userId == r.userId) {
                 //...這裡的代碼不執行
            }
        }

    } else {
           //...這裡的代碼不執行
    }

    boolean newTask = false;
    boolean keepCurTransition = false;

    // 此時 r.resultTo == null addingToTask為true sourceRecord != null
    if (r.resultTo == null && !addingToTask
            && (launchFlags&Intent.FLAG_ACTIVITY_NEW_TASK) != 0) {
         //...這裡的代碼不執行
    } else if (sourceRecord != null) {
        if (!addingToTask &&
                (launchFlags&Intent.FLAG_ACTIVITY_CLEAR_TOP) != 0) {
               //...這裡的代碼不執行
        } else if (!addingToTask &&
                (launchFlags&Intent.FLAG_ACTIVITY_REORDER_TO_FRONT) != 0) {
               //...這裡的代碼不執行
        }
        //將B的ActivityRecord加入A的ActivityRecord所在的Task裡
        r.setTask(sourceRecord.task, sourceRecord.thumbHolder, false);
        //...
    } else {
         //...這裡的代碼不執行
    }
    //...
    startActivityLocked(r, newTask, doResume, keepCurTransition, options);
    return ActivityManager.START_SUCCESS;
}
從上面的分析可以看出來,Activity和Task的調度算法非常復雜,需結合實際場景才好分析,只有這樣才知道是否需要新建Task,還是將新的ActivityRecord加入到已有的Task裡,不過我們如果能理解啟動模式的一些特點,對理解調度算法會有很大幫助。
大家可以結合下述場景分析調度算法:
1.從通知欄啟動Activity:
假設應用有Activity A ,Activity A已啟動,
此時發了一個通知,該通知用於啟動Activity A,啟動Activity A時不加任何特殊flag
點擊通知,針對以下情況對任務調度情況進行分析:
1) Activity A的啟動模式為standard
2) Activity A的啟動模式為singleTop
3) Activity A的啟動模式為singleTask
4) Activity A的啟動模式為singleInstance
2.跨應用跳轉Activity
假設應用app1有一個Activity A,另一個應用app2有一個Activity B
Activity A可跳轉至Activity B
因為Activity A和Actiivty B在不同應用,所以Activity的taskffinity必然不同
現在Activity A已啟動,跳轉至Activity B,
針對以下4種情況分析跳轉之後的Activity Task情況
1) Activity B的啟動模式為standard
2) Activity B的啟動模式為singleTop
3) Activity B的啟動模式為singleTask
4) Activity B的啟動模式為singleInstance
 安卓圖片滑動,實現帶小點的導航頁面效果,安卓小點
安卓圖片滑動,實現帶小點的導航頁面效果,安卓小點今天給大家說說安卓中類似這樣的引導頁面怎麼實現,我自己簡單的添加了個跳過按鈕方便跳轉到主界面,圖片跟小點圖片資源大家自己去
 我的android學習經歷13,android學習經歷13
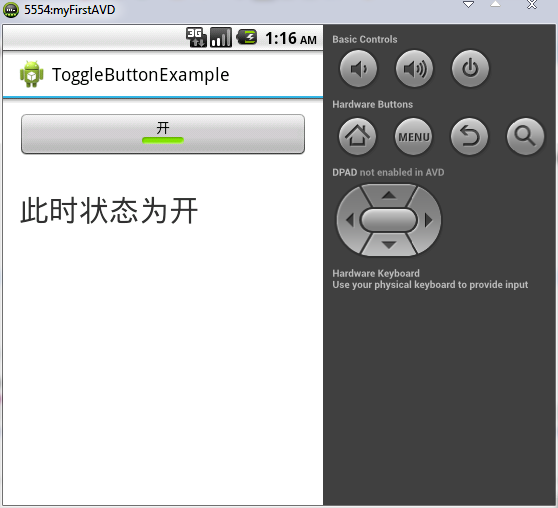
我的android學習經歷13,android學習經歷13ToggleButton控件的使用 ToggleButton控件看名字就可以知道它是一個 “開關&r
 Android應用開發教程之六:ListView詳解
ListView是Android軟件開發中非常重要組件之一,基本上是個軟件基本都會使用ListView ,今天我通過一個demo來教大家怎麼樣使用L
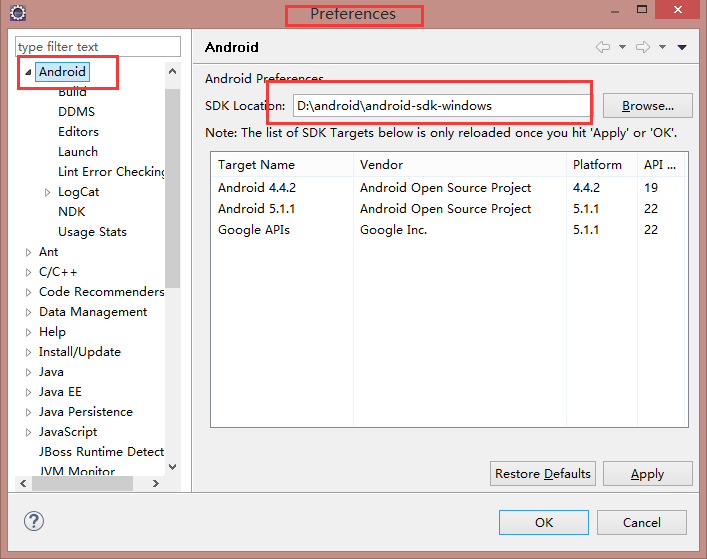 location of the android sdk has not been setup in the preferences,androidpreferences
location of the android sdk has not been setup in the preferences,androidpreferences打
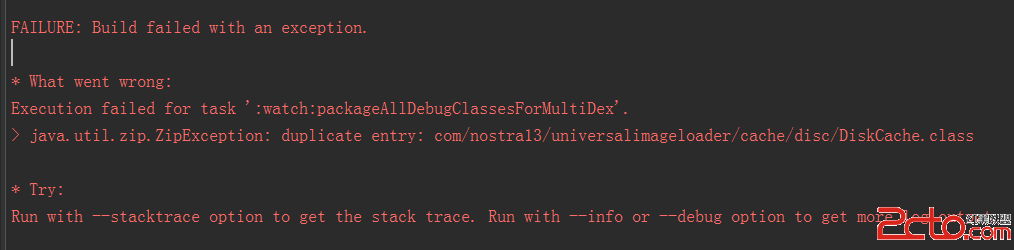 我的Android進階之旅------)Android編譯錯誤java.util.zip.ZipException: duplicate entry的解決方法
我的Android進階之旅------)Android編譯錯誤java.