編輯:關於android開發
隨著谷歌的Gradle插件版本的不斷升級,Gradle插件現在最新的已經到了2.1.0-beta1,對應的依賴為com.android.tools.build:gradle:2.0.0-beta6,而Nuwa當時出來的時候,Gradle插件還只是1.2.3版本,對應的依賴為com.android.tools.build:gradle:1.2.3,當時的Nuwa是根據有無preDex這個Task進行hook做不同的邏輯處理,而隨著Gradle插件版本的不斷增加,谷歌增加了一個新的接口可以用於處理我們的字節碼注入的需求。這個接口最早出現在1.5.0-beta1中,官方的描述如下,不想看英文的直接略過看翻譯。
Starting with 1.5.0-beta1, the Gradle plugin includes a Transform API allowing 3rd party plugins to manipulate compiled class files before they are converted to dex files.
(The API existed in 1.4.0-beta2 but it's been completely revamped in 1.5.0-beta1)

The goal of this API is to simplify injecting custom class manipulations without having to deal with tasks, and to offer more flexibility on what is manipulated. The internal code processing (jacoco, progard, multi-dex) have all moved to this new mechanism already in 1.5.0-beta1.
Note: this applies only to the javac/dx code path. Jack does not use this API at the moment.

The API doc is here.

To insert a transform into a build, you simply create a new class implementing one of the Transform interfaces, and register it with android.registerTransform(theTransform) or android.registerTransform(theTransform, dependencies).

Important notes:
The Dex class is gone. You cannot access it anymore through the variant API (the getter is still there for now but will throw an exception)
Transform can only be registered globally which applies them to all the variants. We'll improve this shortly.
There's no way to control ordering of the transforms.
We're looking for feedback on the API. Please file bugs or email us on our adt-dev mailing list.
從1.5開始,gradle插件包含了一個叫Transform的API,這個API允許第三方插件在class文件轉為為dex文件前操作編譯好的class文件,這個API的目標就是簡化class文件的自定義的操作而不用對Task進行處理,並且可以更加靈活地進行操作。我們如何注入一個Transform呢,很簡單,實現Transform抽象類中的方法,使用下面的兩個方法之一進行注入即可。
android.registerTransform(theTransform)

android.registerTransform(theTransform, dependencies)
那麼我們就可以在這個函數中操作之前1.2.3版本中的Nuwa Gradle做的一切事情。在這之前,你最好通讀下面三篇文章
如何使用Android Studio開發Gradle插件 Android 熱修復Nuwa的原理及Gradle插件源碼解析 深入理解Android之Gradle現在,新建一個gradle插件項目,如何新建請閱讀上面的第一篇文章,這個插件項目中有兩個module,一個為app,用於測試插件,一個是插件module,姑且叫hotpatch,用於編寫插件。
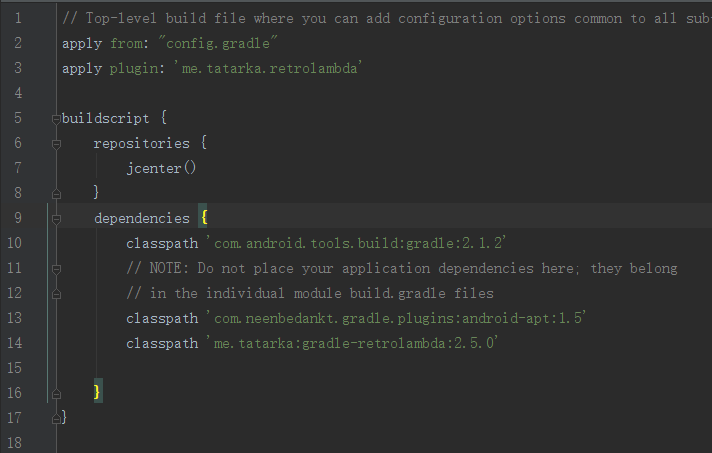
將你的gradle plugin版本切到1.5
classpath 'com.android.tools.build:gradle:1.5.0'
然後將gralde wrapper版本改為2.10
distributionUrl=https\://services.gradle.org/distributions/gradle-2.10-all.zip
現在編譯運行一下項目下的app module,看下gradle控制台輸出的是什麼。

可以看到,的確沒有preDex這個Task,反倒是多了很多transform開頭的Task,那麼這些Task是怎麼來的呢。在gradle plugin的源碼中有一個叫TransformManager的類,這個類管理著所有的Transform的子類,裡面有一個方法叫getTaskNamePrefix,在這個方法中就是獲得Task的前綴,以transform開頭,之後拼接ContentType,這個ContentType代表著這個Transform的輸入文件的類型,類型主要有兩種,一種是Classes,另一種是Resources,ContentType之間使用And連接,拼接完成後加上With,之後緊跟的就是這個Transform的Name,name在getName()方法中重寫返回即可。代碼如下:
@NonNull
    private static String getTaskNamePrefix(@NonNull Transform transform) {
        StringBuilder sb = new StringBuilder(100);
        sb.append("transform");

        Iterator iterator = transform.getInputTypes().iterator();
        // there's always at least one
        sb.append(capitalize(iterator.next().name().toLowerCase(Locale.getDefault())));
        while (iterator.hasNext()) {
            sb.append("And").append(capitalize(
                    iterator.next().name().toLowerCase(Locale.getDefault())));
        }

        sb.append("With").append(capitalize(transform.getName())).append("For");

        return sb.toString();
    }
ContentType是一個接口,有一個默認的枚舉類的實現類,裡面定義了兩種文件,一種是class文件,另一種就是資源文件。
interface ContentType {
        /**
         * Content type name, readable by humans.
         * @return the string content type name
         */
        String name();

        /**
         * A unique value for a content type.
         */
        int getValue();
    }

    /**
     * The type of of the content.
     */
    enum DefaultContentType implements ContentType {
        /**
         * The content is compiled Java code. This can be in a Jar file or in a folder. If
         * in a folder, it is expected to in sub-folders matching package names.
         */
        CLASSES(0x01),

        /**
         * The content is standard Java resources.
         */
        RESOURCES(0x02);

        private final int value;

        DefaultContentType(int value) {
            this.value = value;
        }

        @Override
        public int getValue() {
            return value;
        }
    }
說到ContentType,順便把另一個枚舉類帶掉,叫Scope,翻譯過來就是作用域,關於詳細的內容,請看下面的注釋。
enum Scope {
        /** Only the project content */
        PROJECT(0x01),
        /** Only the project's local dependencies (local jars) */
        PROJECT_LOCAL_DEPS(0x02),
        /** Only the sub-projects. */
        SUB_PROJECTS(0x04),
        /** Only the sub-projects's local dependencies (local jars). */
        SUB_PROJECTS_LOCAL_DEPS(0x08),
        /** Only the external libraries */
        EXTERNAL_LIBRARIES(0x10),
        /** Code that is being tested by the current variant, including dependencies */
        TESTED_CODE(0x20),
        /** Local or remote dependencies that are provided-only */
        PROVIDED_ONLY(0x40);

        private final int value;

        Scope(int value) {
            this.value = value;
        }

        public int getValue() {
            return value;
        }
    }
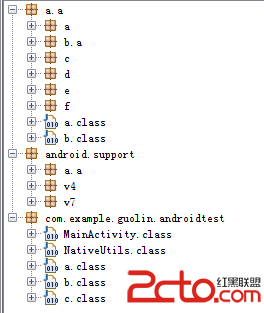
ContentType和Scope,一起組成輸出產物的目錄結構。可以看到下圖transforms下有很多莫名其妙的目錄,比如1000,1f,main,3,等等,這些目錄可不是隨機產生的,而是根據上面的兩個值產生的。

舉個例子,上面的文件夾中有個proguard的目錄,這個目錄是ProGuardTransform產生的,在源碼中可以找到其實現了getName方法,返回了proguard。這個getName()方法返回的值就創建了proguard這個目錄。
public String getName() {
  return "proguard";
}
然後再看這個Transform的輸入文件類型
public Set getInputTypes() {
  return TransformManager.CONTENT_JARS;
}
TransformManager.CONTENT_JARS是什麼鬼呢,跟進去一目了然
public static final Set CONTENT_JARS = ImmutableSet.of(CLASSES, RESOURCES);
因此Proguard這個Transform有兩種輸入文件,一種是class文件(含jar),另一種是資源文件,這個Task是做混淆用的,class文件就是ProGuardTransform依賴的上一個Transform的輸出產物,而資源文件可以是混淆時使用的配置文件。
因此根據上面的規則,這個Transform最終在控制台顯示的名字就是
transformClassesAndResourcesWithProguardForDebug
For後面跟的是buildType+productFlavor,比如QihooDebug,XiaomiRelease,Debug,Release。
那麼上面輸出產物的目錄/proguard/release/jars/3/1f/main.jar是怎麼來的呢?proguard上面說了,是getName()方法返回的,而release則是buildType的名字,注意這裡不一定是只有buildType,如果你的項目中指定了productFlavor,那麼可能release的上一個節點還有productFlaovor,就像這樣/proguard/qihoo/release/。可以看到ProGuardTransform中重寫了getScopes方法,我們先忽略isLibrary的情況,因為我們的app module不是library,是一個app。可以看到最終返回的是TransformManager.SCOPE_FULL_PROJECT
public Set getScopes() {
  if (isLibrary) {
      return Sets.immutableEnumSet(Scope.PROJECT, Scope.PROJECT_LOCAL_DEPS);
  }

  return TransformManager.SCOPE_FULL_PROJECT;
}
TransformManager.SCOPE_FULL_PROJECT的值為多少呢?跟進去看看。
public static final Set SCOPE_FULL_PROJECT = Sets.immutableEnumSet(
            Scope.PROJECT,
            Scope.PROJECT_LOCAL_DEPS,
            Scope.SUB_PROJECTS,
            Scope.SUB_PROJECTS_LOCAL_DEPS,
            Scope.EXTERNAL_LIBRARIES);
然後你把這5個Scope的值加起來算一算,剛剛好是1f,於是目錄中的1f就產生了。那麼3是什麼呢,還記得上面提到的Proguard的輸入文件嗎,既有class文件又有資源文件,這兩個值加起來就是3。接著在源碼中查找。找到了這樣一段代碼
File outFile = output.getContentLocation("main", outputTypes, scopes,asJar ? Format.JAR : Format.DIRECTORY);
上面的代碼中使用到了一個變量asJar,這個變量在構造函數中賦值為true,因此這段代碼可以簡化為
File outFile = output.getContentLocation("main", outputTypes, scopes,Format.JAR)
Format.JAR是什麼意思呢,它代表的輸出文件有一個後綴jar,如果是Format.DIRECTORY則代表輸出文件是目錄結構的。而從上面這段代碼還可以看到輸出文件的文件名為main,於是最終輸出文件是main.jar,並且是在jars目錄下面的子目錄中,當然如果是Format.DIRECTORY,就是在folders目錄下的子目錄中。
這時候你把這段代碼裡的值都連接起來,文件目錄=》jars,outputTypes=》3,scopes=》1f,文件名=》main.jar,見證奇跡的時候到了,jars/3/1f/main.jar,怎麼樣,這就是圖中的目錄結構,即ProGuardTransform的產物。上面也提到過,這個文件路徑中可能還會包含buildType和productFlavor,當然是這兩個被定義的情況下,比如下面的幾個組合。
/proguard/qihoo/release/jars/3/1f/main.jar
/proguard/qihoo/debug/jars/3/1f/main.jar
/proguard/xiaomi/release/jars/3/1f/main.jar
/proguard/xiaomi/debug/jars/3/1f/main.jar
這個Transform的輸出產物,會作為下一個依賴它的Transform的輸入產物。當然,輸入產物是根據getInputTypes方法中返回的文件類型去對應的目錄拿文件的,同時如果你定義了輸入文件為class文件,那麼資源文件就會被過濾然後傳遞到下一個Transform中去(個人的猜測觀點,不一定正確)。
在沒有開啟混淆的情況下,ProguardTransform的下一個Transform是DexTransform,我們現在來看看ProguardTransform的輸入文件和輸出文件,以及DexTransform的輸入文件和輸出文件。記得開啟混淆。
minifyEnabled true
project.afterEvaluate {
    project.android.applicationVariants.each { variant ->
        def proguardTask = project.tasks.findByName("transformClassesAndResourcesWithProguardFor${variant.name.capitalize()}")
        if (proguardTask) {
            project.logger.error "proguard=>${variant.name.capitalize()}"

            proguardTask.inputs.files.files.each { File file->
                project.logger.error "file inputs=>${file.absolutePath}"
            }

            proguardTask.outputs.files.files.each { File file->
                project.logger.error "file outputs=>${file.absolutePath}"
            }
        }

        def dexTask = project.tasks.findByName("transformClassesWithDexFor${variant.name.capitalize()}")
        if (dexTask) {
            project.logger.error "dex=>${variant.name.capitalize()}"

            dexTask.inputs.files.files.each { File file->
                project.logger.error "file inputs=>${file.absolutePath}"
            }

            dexTask.outputs.files.files.each { File file->
                project.logger.error "file outputs=>${file.absolutePath}"
            }
        }
    }
}

可以看到proguard的產物transform/proguard/qihoo/release目錄變成了dex的輸入文件了。
因此,我們自己向gradle plugin注冊一個Transform,這個Transform注冊進去後,編譯成字節碼後就會被執行,之後接著執行混淆的ProguardTransform,於是原來ProguardTransform的輸入文件就變成了我定義的Transform的輸入文件,我定義的Transform的輸出文件就變成了ProguardTransform的輸入文件了,就像一個鏈表一樣,我插入了一個節點。當然,這個結果是我在測試之後得出的結論,而且這是在開啟了混淆的情況下,沒有開啟混淆也是同樣的道理,把ProguardTransform換成了DexTransform而已,我的輸出產物變成了DexTransform的輸入文件罷了。
現在我們注冊一個Transform,在插件的apply方法最前面注冊
/**
* 注冊transform接口
*/
def isApp = project.plugins.hasPlugin(AppPlugin)
if (isApp) {
      def android = project.extensions.getByType(AppExtension)
      def transform = new TransformImpl(project)
      android.registerTransform(transform)
}
TransformImpl的實現暫時為空,這時候可能會報錯誤,姑且不去理會。
class TransformImpl extends Transform {
    Project project
    public TransformTest(Project project) {
        this.project = project
    }

    @Override
    String getName() {
        return "TransformImpl"
    }

    @Override
    Set getInputTypes() {
        return TransformManager.CONTENT_CLASS;
    }


    @Override
    Set getScopes() {
        return TransformManager.SCOPE_FULL_PROJECT;
    }


    @Override
    boolean isIncremental() {
        return false;
    }


    @Override
    void transform(Context context, Collection inputs, Collection referencedInputs, TransformOutputProvider outputProvider, boolean isIncremental) throws IOException, TransformException, InterruptedException {


    }

}
這時候再看看Proguard的輸入文件,很顯然的看到我們的輸出產物變成了Proguard的輸入產物了。

那麼我們的輸入文件變成了什麼呢。編碼看看TransformImpl的輸入文件變成了什麼。
def testTask = project.tasks.findByName("transformClassesWithTransformImplFor${variant.name.capitalize()}")

if (testTask) {

  Set testTaskInputFiles = testTask.inputs.files.files
  Set testTaskOutputFiles = testTask.inputs.files.files

  project.logger.error "Name:transformClassesWithTransformImpl=====>${testTask.name} input"
  testTaskInputFiles.each { inputFile ->
      def path = inputFile.absolutePath
      project.logger.error path
  }

  project.logger.error "Name:transformClassesWithTransformImpl=====>${testTask.name} output"
  testTaskOutputFiles.each { inputFile ->
      def path = inputFile.absolutePath
      project.logger.error path
  }
}

這不就是ProguardTransform的輸入文件嗎,現在變成了我們的,真是偷天換柱啊。知道了這些後,我們就可以在系統的Transform之前插入我們的Transform做字節碼修改,然後之後我們修改後的產物會被繼續處理,最終打包成apk。
將插件的實現改為下面的代碼
public class PluginImpl implements Plugin {
    public void apply(Project project) {
        /**
         * 注冊transform接口
         */
        def isApp = project.plugins.hasPlugin(AppPlugin)
        if (isApp) {
            def android = project.extensions.getByType(AppExtension)
            def transform = new TransformImpl(project)
            android.registerTransform(transform)
        }
    }
}
TransformImpl的實現改成如下
class TransformImpl extends Transform {
    private final Project project
    public TransformImpl(Project project) {
        this.project = project
    }

    @Override
    String getName() {
        return "Hotpatch"
    }

    @Override
    Set getInputTypes() {
        return TransformManager.CONTENT_CLASS;
    }


    @Override
    Set getScopes() {
        return TransformManager.SCOPE_FULL_PROJECT;
    }


    @Override
    boolean isIncremental() {
        return false;
    }


    @Override
    void transform(Context context, Collection inputs, Collection referencedInputs, TransformOutputProvider outputProvider, boolean isIncremental) throws IOException, TransformException, InterruptedException {
        /**
         * 遍歷輸入文件
         */
        inputs.each { TransformInput input ->
            /**
             * 遍歷目錄
             */
            input.directoryInputs.each { DirectoryInput directoryInput ->
                /**
                 * 獲得產物的目錄
                 */
                File dest = outputProvider.getContentLocation(directoryInput.name, directoryInput.contentTypes, directoryInput.scopes, Format.DIRECTORY);
                String buildTypes = directoryInput.file.name
                String productFlavors = directoryInput.file.parentFile.name
                //這裡進行我們的處理 TODO
                project.logger.error "Copying ${directoryInput.name} to ${dest.absolutePath}"
                /**
                 * 處理完後拷到目標文件
                 */
             FileUtils.copyDirectory(directoryInput.file, dest);
            }

            /**
             * 遍歷jar
             */
            input.jarInputs.each { JarInput jarInput ->
                String destName = jarInput.name;
                /**
                 * 重名名輸出文件,因為可能同名,會覆蓋
                 */
                def hexName = DigestUtils.md5Hex(jarInput.file.absolutePath);
                if (destName.endsWith(".jar")) {
                    destName = destName.substring(0, destName.length() - 4);
                }
                /**
                 * 獲得輸出文件
                 */
                File dest = outputProvider.getContentLocation(destName + "_" + hexName, jarInput.contentTypes, jarInput.scopes, Format.JAR);

                //處理jar進行字節碼注入處理TODO

                FileUtils.copyFile(jarInput.file, dest);
                project.logger.error "Copying ${jarInput.file.absolutePath} to ${dest.absolutePath}"
                }
            }
        }
    }
}
之後,你只需要在上面的代碼的兩個TODO的地方進行擴展即可,必要時在對應的地方進行初始化變量。
跟Nuwa一樣,需要定義一些擴展參數
public class PluginExtension {
    HashSet includePackage = []
    HashSet excludeClass = []
    String oldNuwaDir

    PluginExtension(Project project) {
    }
}
之後你可以這樣使用
hotpatch {
    includePackage = []
    excludeClass = []
    oldNuwaDir = "/Users/lizhangqu/AndroidStudioProjects/Hotpatch/bak/nuwa"
}
includePackage和excludeClass的定義和Nuwa是一樣的,可以看到我刪了一個debugOn,然後加了一個oldNuwaDir目錄,其實這個oldNuwaDir在Nuwa中是通過命令行輸入的,我這裡直接定義在gradle中了而已,之後如果需要打補丁,加上這個變量,不需要的情況下注釋掉即可。然後在PluginImpl中創建擴展
project.extensions.create("hotpatch", PluginExtension, project)
接著在TransformImpl的transform中就可以拿到這些擴展的值
def extension = project.extensions.findByName("hotpatch") as PluginExtension
includePackage = extension.includePackage
excludeClass = extension.excludeClass
oldNuwaDir = extension.oldNuwaDir
和Nuwa一樣,需要定義一系列的變量及初始化一些文件夾
    private final Project project
    static HashSet includePackage
    static HashSet excludeClass
    static String oldNuwaDir
    private static final String NUWA_PATCHES = "nuwaPatches"
    private static final String MAPPING_TXT = "mapping.txt"
    private static final String HASH_TXT = "hash.txt"
    private static final String PATCH_FILE_NAME = "patch.jar"
變量的初始化
/**
 * 一些列變量定義
 */
String buildAndFlavor = context.path.split("transformClassesWithHotpatchFor")[1];
File nuwaDir = new File("${project.buildDir}/outputs/nuwa")
def outputDir = new File("${nuwaDir}/${buildAndFlavor}")
def destHashFile = new File(outputDir, "${HASH_TXT}")
def destMapFile = new File("${nuwaDir}/${buildAndFlavor}/${MAPPING_TXT}");
def destPatchJarFile = new File("${nuwaDir}/${buildAndFlavor}/patch/${PATCH_FILE_NAME}");
def patchDir = new File("${context.temporaryDir.getParent()}/patch/")
Map hashMap

/**
 * 創建文件
 */
NuwaFileUtils.touchFile(destHashFile.getParentFile(), destHashFile.name)
NuwaFileUtils.touchFile(destMapFile.getParentFile(), destMapFile.name)
NuwaFileUtils.touchFile(destPatchJarFile.getParentFile(), destPatchJarFile.name)
不要忘記了Nuwa中Application的子類是不能進行字節碼注入的,否則一運行就會報錯ClassNotFound,我們也要將Application的子類加入excludeClass
/**
 * 找到manifest文件中的application加入 excludeClass
 */
def processManifestTask = project.tasks.findByName("process${buildAndFlavor}Manifest")
def manifestFile = processManifestTask.outputs.files.files[0]
def applicationName = NuwaAndroidUtils.getApplication(manifestFile)
if (applicationName != null) {
    excludeClass.add(applicationName)
}
打補丁的時候需要進行hash校驗,我們需要把上一次發版的hash文件解析出來
/**
 * 將上一次發版時的mapping文件解析成map
 */
if (oldNuwaDir) {
    def hashFile = NuwaFileUtils.getVariantFile(new File("${oldNuwaDir}"), buildAndFlavor, HASH_TXT)
    hashMap = NuwaMapUtils.parseMap(hashFile)
}
這之後,就是字節碼注入,hash校驗,打補丁,拷貝mapping和hash文件的事了。我們先以目錄為例。
/**
 * 遍歷目錄
 */
input.directoryInputs.each { DirectoryInput directoryInput ->
    /**
     * 獲得產物的目錄
     */
    File dest = outputProvider.getContentLocation(directoryInput.name, directoryInput.contentTypes, directoryInput.scopes, Format.DIRECTORY);
    String buildTypes = directoryInput.file.name
    String productFlavors = directoryInput.file.parentFile.name
    /**
     * 遍歷文件夾,進行字節碼注入
     */
    traverseFolder(project, directoryInput.file, destHashFile, hashMap, buildTypes, productFlavors, patchDir)
    project.logger.error "Copying ${directoryInput.name} to ${dest.absolutePath}"
    /**
     * 處理完後拷到目標文件
     */
    FileUtils.copyDirectory(directoryInput.file, dest);
}
這裡面一個關鍵的方法就是遍歷文件夾traverseFolder()方法,下面請忽略我這種遍歷方法,因為完全是用java的方式遍歷的,後來發現在groovy中遍歷文件夾是一件極其簡單的事。。。。。知道真相的我真是無言以對。那麼現在就姑且以java的方式來遍歷吧。。。
/**
 * 遍歷文件夾進行字節碼注入
 * @param project
 * @param rootFile
 * @param destHashFile
 * @param hashMap
 * @param buildType
 * @param productFlavors
 * @param patchDir
 */
public
static void traverseFolder(Project project, File rootFile, File destHashFile, Map hashMap, String buildType, String productFlavors, File patchDir) {

    if (rootFile != null && rootFile.exists()) {
        File[] files = rootFile.listFiles();
        if (files == null || files.length == 0) {
            project.logger.warn "文件夾是空的!"
            return;
        } else {
            for (File innerFile : files) {
                if (innerFile.isDirectory()) {
                    project.logger.warn "不需要處理文件夾:${innerFile.absolutePath},進行遞歸"
                    traverseFolder(project, innerFile, destHashFile, hashMap, buildType, productFlavors, patchDir);

                } else {
                    if (NuwaProcessor.shouldProcessClass(innerFile.absolutePath)) {
                        if (NuwaSetUtils.isIncluded(innerFile.absolutePath, includePackage) && !NuwaSetUtils.isExcluded(innerFile.absolutePath, excludeClass)) {
                            def bytes = NuwaProcessor.processClass(innerFile);
                            def hash = DigestUtils.shaHex(bytes)
                            def classFile = innerFile.absolutePath.split("${productFlavors}/${buildType}/")[1]
                            destHashFile.append(NuwaMapUtils.format(classFile, hash))

                            if (NuwaMapUtils.notSame(hashMap, classFile, hash)) {
                                project.logger.warn "Hash值不一樣,做為patch:${classFile}"
                                NuwaFileUtils.copyBytesToFile(innerFile.bytes, NuwaFileUtils.touchFile(patchDir, classFile))
                            }
                            project.logger.warn "需要處理文件:${innerFile.absolutePath}"

                        }
                    } else {
                        project.logger.warn "不需要處理文件:${innerFile.absolutePath}"
                    }
                }
            }
        }
    } else {
        project.logger.warn "文件不存在!"
    }
}
這裡面的操作和Nuwa是基本一致的,只不過Nuwa hook了task,把task的輸入文件拿來進行處理,這些輸入文件直接是class文件的絕對路徑和jar文件的絕對路徑,但是這裡不同,這裡是一個文件夾,文件夾下面是包名,包名裡面才是class文件,因此這裡需要遍歷文件夾拿到class文件,對class文件單獨進行字節碼注入,注入的過程還是一樣,先判斷是否需要注入,是否在includePackage並且不在excludeClass中,滿足了這些條件後才會進行字節碼注入操作,之後就是hash校驗,將hash值寫入新的文件,並且與上一次發版時的hash值進行校驗,如果不一樣,則復制到patch目錄,後面再進行打補丁操作。
文件夾處理完了,之後就是一系列的jar了。jar的處理流程就完全和Nuwa一樣了。因為輸入的也是jar文件,唯一需要注意的是,jar文件輸入的名字可能都是classes.jar,拷貝到目標目錄的時候需要重命名一下,可以加上文件路徑的md5以區分,不然拷到目標文件同名文件會被覆蓋。
/**
 * 遍歷jar
 */
input.jarInputs.each { JarInput jarInput ->

    proguardLibfiles.add(jarInput.file)

    String destName = jarInput.name;
    /**
     * 重名名輸出文件,因為可能同名,會覆蓋
     */
    def hexName = DigestUtils.md5Hex(jarInput.file.absolutePath);
    if (destName.endsWith(".jar")) {
        destName = destName.substring(0, destName.length() - 4);
    }
    /**
     * 獲得輸出文件
     */
    File dest = outputProvider.getContentLocation(destName + "_" + hexName, jarInput.contentTypes, jarInput.scopes, Format.JAR);

    /**
     * 處理jar進行字節碼注入
     */
    if (NuwaProcessor.shouldProcessJar(jarInput.file.absolutePath)) {
        NuwaProcessor.processJar(project, destHashFile, jarInput.file, patchDir, hashMap, includePackage, excludeClass, dest)
    } else {
        FileUtils.copyFile(jarInput.file, dest);
        project.logger.error "Copying ${jarInput.file.absolutePath} to ${dest.absolutePath}"
    }
}
到了這裡,還沒有結束,我們需要將產物mapping文件和hash文件拷到我們的目標目錄/build/outputs/nuwa下,hash文件可以不用拷貝了,因為創建的時候就是建在這個目錄下的,而mapping文件是需要拷貝的,mapping文件的產生是混淆完成後輸出的,因此我們需要hook混淆的task,在task完成的時候拷貝它輸出的文件,這個操作我們在PluginImpl中完成。
project.extensions.create("hotpatch", PluginExtension, project)
project.afterEvaluate {
    project.android.applicationVariants.each { variant ->
        def extension = project.extensions.findByName("hotpatch") as PluginExtension
        def oldNuwaDir = new File("${extension.oldNuwaDir}")
        String variantName = variant.name
        variantName = variantName.replaceFirst(variantName.substring(0, 1), variantName.substring(0, 1).toUpperCase())

        def proguardTask = project.tasks.findByName("transformClassesAndResourcesWithProguardFor${variant.name.capitalize()}")

        Closure copyMappingClosure = {
            if (proguardTask) {
                def mapFile = new File("${project.buildDir}/outputs/mapping/${variant.dirName}/mapping.txt")
                def newMapFile = new File("${project.buildDir}/outputs/nuwa/${variantName}/mapping.txt")
                FileUtils.copyFile(mapFile, newMapFile)
            }
        }

        if (proguardTask) {
            proguardTask.doLast(copyMappingClosure)
        }
    }
}
說到混淆,我們打補丁的時候還需要應用上一次發版的mapping文件,這一步也在PluginImpl中完成,加入一個公共靜態變量,這個變量在TransformImpl中會用到。
/**
 * 存對應的構建的混淆配置文件
 */
public static Map> proguardConfigFile = new HashMap>()
然後在doLast之後加入一段代碼,用於記錄這些混淆的配置文件
if (proguardTask) {

    proguardTask.doLast(copyMappingClosure)

    if (oldNuwaDir) {
        def mappingFile = NuwaFileUtils.getVariantFile(oldNuwaDir, variantName, "mapping.txt")

        ProGuardTransform transform = proguardTask.getTransform();//哈哈,這裡有坑

        NuwaAndroidUtils.applymapping(transform, mappingFile)//後來想了想,這一步是不用的,為什麼呢?因為我們產生的字節碼後面我做了單獨的混淆處理,沒必要對後面系統自帶的混淆應用mapping文件,但是應用了也不影響,就先留著了,但是這個方法不是Nuwa原來的方法,我做了一層修改,就是applymapping的入參是ProGuardTransform

        def files = transform.getAllConfigurationFiles()
        //獲得transform的配置文件,為什麼是這麼獲取的下面再說嘛
        proguardConfigFile.put(variantName, files)
        //記錄這些混淆文件後面再使用
    }
}
上面的那個修改過的applymapping方法如下
/**
     * 混淆時使用上次發版的mapping文件
     * @param proguardTask
     * @param mappingFile
     * @return
     */
    public static applymapping(ProGuardTransform proguardTask, File mappingFile) {
        if (proguardTask) {
            if (mappingFile.exists()) {
                proguardTask.applyTestedMapping(mappingFile)
                //這裡不一樣的喲
            } else {
                println "$mappingFile does not exist"
            }
        }
    }
下面我們講講混淆的配置文件的獲取。首先你肯定要先拿到這個task對不對
def proguardTask = project.tasks.findByName("transformClassesAndResourcesWithProguardFor${variant.name.capitalize()}")
但是這個proguardTask拿到之後,並不是Transform的實現類,你打印它的類型後會發現它是一個TransformTask類,裡面包裝了Transform,真是神坑啊,當時為了拿到這個Transform真是煞費苦心,
public class TransformTask extends StreamBasedTask implements Context {

    private Transform transform;

    public Transform getTransform() {
        return transform;
    }

}
transform拿到了之後,就可以調用ProGuardTransform的父類的父類中的一個方法getAllConfigurationFiles()拿到所有的配置文件了,這些配置文件包含了你在build.gradle中定義的混淆配置以及aapt的混淆配置.
proguardFiles getDefaultProguardFile('proguard-android.txt'), 'proguard-rules.pro'
之後就是暫時存起來,後面TransformImple中再用。
這時候,如果需要打補丁的話,我將需要打補丁的一些class文件拷貝到臨時目錄中去,我們對這個目錄進行dex操作即可。
/**
 * 沒有混淆的步驟直接執行dex操作
 */
NuwaAndroidUtils.dex(project, patchDir)
File patchFile = new File("${patchDir.getParent()}/${PATCH_FILE_NAME}")
if (patchFile.exists()) {
    FileUtils.copyFile(patchFile, destPatchJarFile)
    FileUtils.deleteDirectory(patchDir)
    FileUtils.forceDelete(patchFile)
}
前方有坑,當然如果你的項目沒有開啟混淆,到這一步是完全沒有什麼問題的,但是一旦你開啟了混淆,那麼就是神坑了,為什麼這麼說呢,因為我們定義的Transform是在混淆的Transform之前執行的,我們拷貝出來的class是沒有經過混淆的,這時候你打補丁,肯定是熱修復失敗的。因此我們需要判斷是不是存在混淆的task,如果存在的話,我們需要手動進行混淆。混淆的時候應用我們上面記錄下來的配置文件,並且還需要應用上次發版時的mapping文件來保持類與類的對應。好了,坑我都給你踩過了,直接看代碼吧。。。。
/**
 * 如果需要打patch
 */
if (patchDir.exists() && patchDir.listFiles() != null && patchDir.listFiles().size() != 0) {
    /**
     * 是否混淆
     */
    def proguardTask = project.tasks.findByName("transformClassesAndResourcesWithProguardFor${buildAndFlavor}")
    if (proguardTask) {

        /**
         * 進行混淆
         */
        def mappingFile = NuwaFileUtils.getVariantFile(new File("${oldNuwaDir}"), buildAndFlavor, "mapping.txt")
        Configuration configuration = new Configuration()

        configuration.useMixedCaseClassNames = false
        configuration.programJars = new ClassPath()
        configuration.libraryJars = new ClassPath()
        /**
         * 應用mapping文件
         */
        configuration.applyMapping = mappingFile;
        configuration.verbose = true
        /**
         * 輸出配置文件
         */
        configuration.printConfiguration = new File("${patchDir.getParent()}/dump.txt")

        /**
         * 不過濾沒有引用的文件,這裡一定要不過濾,不然有問題
         */
        configuration.shrink = false
        /**
         * android 和 apache 包的依賴
         */

        /**
         * 獲得sdk目錄
         */
        def sdkDir
        Properties properties = new Properties()
        File localProps = project.rootProject.file("local.properties")
        if (localProps.exists()) {
            properties.load(localProps.newDataInputStream())
            sdkDir = properties.getProperty("sdk.dir")
        } else {
            sdkDir = System.getenv("ANDROID_HOME")
        }
        /**
         * 將android.jar和apache的庫加入依賴
         */
        if (sdkDir) {
            def compileSdkVersion = project.android.compileSdkVersion
            ClassPathEntry androidEntry = new ClassPathEntry(new File("${sdkDir}/platforms/${compileSdkVersion}/android.jar"), false);
            configuration.libraryJars.add(androidEntry)

            File apacheFile = new File("${sdkDir}/${compileSdkVersion}/platforms/optional/org.apache.http.legacy.jar")
            //android-23下才存在apache的包
            if (apacheFile.exists()) {
                ClassPathEntry apacheEntry = new ClassPathEntry(apacheFile, false);
                configuration.libraryJars.add(apacheEntry)
            }
        }

        /**
         * 將這個task的輸入文件全都加入到混淆依賴的jar
         */
        if (proguardLibfiles != null) {
            ClassPathEntry jarFile = null
            for (File file : proguardLibfiles) {
                jarFile = new ClassPathEntry(file, false);
                configuration.libraryJars.add(jarFile)
            }
        }

        /**
         * 待dex未混淆的patch目錄
         */
        ClassPathEntry classPathEntry = new ClassPathEntry(patchDir, false);
        configuration.programJars.add(classPathEntry)

        /**
         * 定義混淆輸出文件
         */
        File proguardOutput = new File("${patchDir.getParent()}/proguard/")
        ClassPathEntry classPathEntryOut = new ClassPathEntry(proguardOutput, true);//第二個參數true代表是輸出文件
        configuration.programJars.add(classPathEntryOut)

        /**
         * 外部定義的混淆文件的獲取並應用
         */
        project.logger.error buildAndFlavor

        def file = PluginImpl.proguardConfigFile.get(buildAndFlavor);
        //這裡就用到了上面一步記錄下來的配置文件
        //遍歷並應用
        file.each {
            project.logger.error "proguard配置文件應用==>${it.absolutePath}"
            ConfigurationParser proguardConfig = new ConfigurationParser(it, System.getProperties());
            try {
                proguardConfig.parse(configuration);
            } finally {
                proguardConfig.close();
            }
        }

        /**
         * 執行混淆
         */
        ProGuard proguard = new ProGuard(configuration)
        proguard.execute()

        /**
         * 對產物執行dex操作,並刪除臨時文件
         */
        if (proguardOutput.exists()) {
            NuwaAndroidUtils.dex(project, proguardOutput)
            File patchFile = new File("${proguardOutput.getParent()}/${PATCH_FILE_NAME}")
            if (patchFile.exists()) {
                FileUtils.copyFile(patchFile, destPatchJarFile)
                FileUtils.deleteDirectory(proguardOutput)
                FileUtils.forceDelete(patchFile)
            }

            FileUtils.deleteDirectory(patchDir)
        }
    } else {
        /**
         * 沒有混淆的步驟直接執行dex操作
         */
        NuwaAndroidUtils.dex(project, patchDir)
        File patchFile = new File("${patchDir.getParent()}/${PATCH_FILE_NAME}")
        if (patchFile.exists()) {
            FileUtils.copyFile(patchFile, destPatchJarFile)
            FileUtils.deleteDirectory(patchDir)
            FileUtils.forceDelete(patchFile)
        }
    }
}
上面的代碼關鍵的一點就是我們需要將我們混淆的代碼加入到configuration.programJars中去,我們混淆的依賴代碼加入到configuration.libraryJars中去,而我們依賴的代碼就是我們的transform的輸入文件,我們需要將這些輸入文件一一保存起來,這樣我們混淆的時候才能拿到。我們只需在遍歷輸入文件的時候加入到一個變量中即可。
/**
* 定義混淆時需要依賴的庫
*/
List proguardLibfiles = new ArrayList<>();

/**
 * 遍歷輸入文件
 */
inputs.each { TransformInput input ->
    /**
     * 遍歷目錄
     */
    input.directoryInputs.each { DirectoryInput directoryInput ->

        /**
         * 加入到混淆時的依賴
         */
        proguardLibfiles.add(directoryInput.file)
        //其他處理
    }

    /**
     * 遍歷jar
     */
    input.jarInputs.each { JarInput jarInput ->

        proguardLibfiles.add(jarInput.file)

        //其他處理
    }
}
別問我上面的混淆的代碼是怎麼來的,我不會告訴你的,自己看gradle的源碼實現去吧。
代碼就差不多是這樣了,如何打補丁呢?打補丁的過程沒有像Nuwa那樣麻煩,你只需要正常的進行發版,這時候在build/outputs/nuwa目錄下就會有mapping(混淆存在的情況下)和hash文件的產物,你需要將這個nuwa目錄拷貝到一個地方保持起來後續打補丁時使用,這一步和Nuwa是沒有差別的。接著打補丁的時候,你需要在gradle中定義你保存的上一次發版時留下來的文件的絕對路徑,就像這樣子.
oldNuwaDir = "/Users/lizhangqu/AndroidStudioProjects/Hotpatch/bak/nuwa"
之後怎麼做呢,修改了bug之後還是正常的執行gradle clean assemble。然後就會在build/outputs/nuwa/buildTypeAndFlavors/patch目錄下產生patch.jar文件,這個文件就是補丁文件了,下發到客戶端就可以打補丁了,就是這麼簡單,有木有。
最後說一句
重要的事當然要說三遍了。
源碼下載
木有源碼下載,源碼都在上面了,自行組織吧,gradle這東西,只有自己踩過坑之後才會有所成長
另外附上另一種gradle plugin 1.5下的Nuwa解決方法,你完全可以hook DexTransform這個task,將它的輸入文件拿到做處理。主要就是提醒思維不要被我的文章所局限。
 Android開發4: Notification編程基礎、Broadcast的使用及其靜態注冊、動態注冊方式,靜態庫與動態庫編程
Android開發4: Notification編程基礎、Broadcast的使用及其靜態注冊、動態注冊方式,靜態庫與動態庫編程前言 啦啦啦~(博主每次開篇都要賣個萌
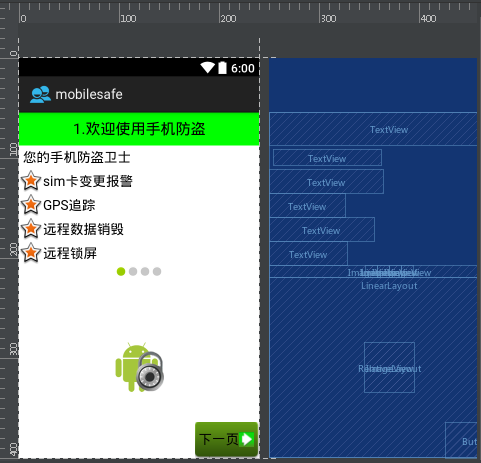
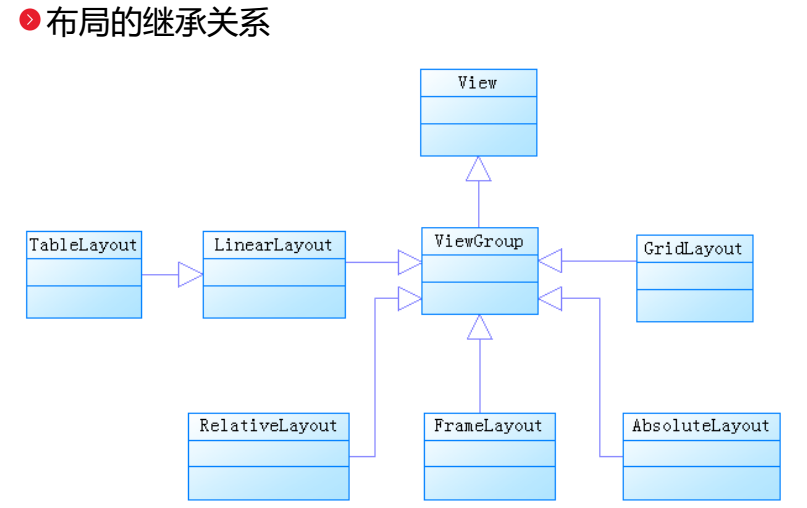 安卓的主要幾大布局,安卓布局
安卓的主要幾大布局,安卓布局今天我們的主要內容就是安卓的主要幾個基礎的布局方式。(主要布局如下:) 1.線性布局(LinerLayout) 2.相對布局(Relative
 Android安全攻防戰,反編譯與混淆技術完全解析(下)
Android安全攻防戰,反編譯與混淆技術完全解析(下) 在上一篇文章當中,我們學習了Android程序反編譯方面的知識,包括反編譯代碼、反編譯資源、以及重新打包等內
 dagger2記錄篇,dagger2記錄
dagger2記錄篇,dagger2記錄作為一個碼農,什麼都不用多講,貼代碼 build project build module Application pub