TelephonyManager類主要提供了一系列用於訪問與手機通訊相關的狀態和信息的get方法。其中包括手機SIM的狀態和信息、電信網絡的狀態及手機用戶的信息。在應用程序中可以使用這些get方法獲取相關數據。
TelephonyManager類的對象可以通過Context.getSystemService(Context.TELEPHONY_SERVICE)方法來獲得,需要注意的是有些通訊信息的獲取對應用程序的權限有一定的限制,在開發的時候需要為其添加相應的權限。
一、設計界面
1、布局文件
打開res/layout/activity_main.xml文件。
輸入以下代碼:
[html] view plain copy
- <?xml version="1.0" encoding="utf-8"?>
- <LinearLayout
- xmlns:android="http://schemas.android.com/apk/res/android"
- android:layout_width="match_parent"
- android:layout_height="match_parent"
- android:orientation="vertical" >
-
- <Button
- android:id="@+id/getphoneinfo"
- android:layout_width="wrap_content"
- android:layout_height="wrap_content"
- android:text="獲得手機網絡信息" />
-
- </LinearLayout>
二、程序文件
打開“src/com.genwoxue.contentprovider_b/MainActivity.java”文件。
然後輸入以下代碼:
[java] view plain copy
- package com.genwoxue.telephony;
-
-
- import android.os.Bundle;
- import android.view.View;
- import android.view.View.OnClickListener;
- import android.widget.Button;
- import android.widget.EditText;
- import android.widget.Toast;
- import android.app.Activity;
- import android.telephony.TelephonyManager;
- import android.content.Context;
-
- public class MainActivity extends Activity {
-
- private Button btnGet=null;
-
- @Override
- protected void onCreate(Bundle savedInstanceState) {
- super.onCreate(savedInstanceState);
- setContentView(R.layout.activity_main);
-
- btnGet=(Button)super.findViewById(R.id.getphoneinfo);
- btnGet.setOnClickListener(new OnClickListener(){
- public void onClick(View v)
- {
- StringBuilder info=new StringBuilder();
- //獲取TelephonyManager服務
- TelephonyManager telphony=(TelephonyManager)MainActivity.this.getSystemService(Context.TELEPHONY_SERVICE);
- //獲取移動服務商名稱
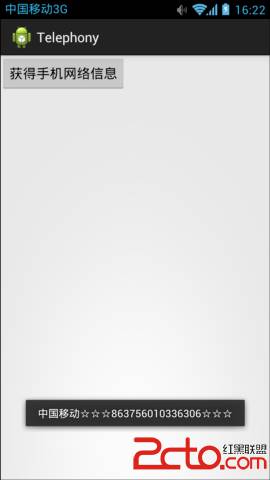
- info.append(telphony.getNetworkOperatorName()+"☆☆☆");
- //獲取設備號碼
- info.append(telphony.getDeviceId()+"☆☆☆");
-
- Toast.makeText(getApplicationContext(), info, Toast.LENGTH_LONG).show();
- }
- });
- }
- }
三、配置文件
打開“AndroidManifest.xml”文件。
然後輸入以下代碼:
[html] view plain copy
- <?xml version="1.0" encoding="utf-8"?>
- <manifest xmlns:android="http://schemas.android.com/apk/res/android"
- package="com.genwoxue.telephony"
- android:versionCode="1"
- android:versionName="1.0" >
-
- <uses-sdk
- android:minSdkVersion="11"
- android:targetSdkVersion="15" />
-
- <uses-permission android:name="android.permission.READ_PHONE_STATE"/>
-
- <application
- android:allowBackup="true"
- android:icon="@drawable/ic_launcher"
- android:label="@string/app_name"
- android:theme="@style/AppTheme" >
- <activity
- android:name="com.genwoxue.telephony.MainActivity"
- android:label="@string/app_name" >
- <intent-filter>
- <action android:name="android.intent.action.MAIN" />
-
- <category android:name="android.intent.category.LAUNCHER" />
- </intent-filter>
- </activity>
- </application>
-
- </manifest>
注意:需要在AndroidManifest.xml文件中添加權限:
<uses-permission android:name="android.permission.READ_PHONE_STATE"/>
四、運行結果
 7.5.5 WebView緩存問題
 第50章、自動提示AutoCompleteTextView(從零開始學Android)
 第89章、系統服務之SMS服務(從零開始學Android)
 9.1 使用SoundPool播放音效(Duang~)