編輯:關於Android編程
Ctrl+T可以知道這個類的所有子類和父類。
如果你每個頁面都有相同的布局,那麼你就可以在 style文件裡面定義一個相同的style。
然後這樣就可以防止代碼的重復使用。
給你的控件設置
如果你設置的是marquee(跑馬燈)就是一個滾動效果 如果你設置為none就是不設置點。
獲取焦點:
android:focusable="true"
android:focusableInTouchMode="true"
————————
自定義控件:自動獲取焦點
1.自定義控件編寫流程
創建一個默認就能獲取焦點的TextView
1.創建一個類繼承至TextView,FocusTextView
2.重寫其構造方法
public class FocusTextView extends TextView {
	//使用在通過java代碼創建控件
	public FocusTextView(Context context) {
		super(context);
	}

	//由系統調用(帶屬性+上下文環境構造方法)
	public FocusTextView(Context context, AttributeSet attrs) {
		super(context, attrs);
	}

	//由系統調用(帶屬性+上下文環境構造方法+布局文件中定義樣式文件構造方法)
	public FocusTextView(Context context, AttributeSet attrs, int defStyle) {
		super(context, attrs, defStyle);
	}

	//重寫獲取焦點的方法,由系統調用,調用的時候默認就能獲取焦點
	@Override
	public boolean isFocused() {//對應xml裡面的 android:focusable="true"和android:focusableInTouchMode="true"
		return true;
	}
}
4.使用過程獲取當前類的全路徑名稱,作為xml中的標簽存在,其余屬性的使用方式和TextView一致
————————————————————————
2,GridView使用,和ListView使用方式類似
列數(3列)
數據填充(模塊名稱,模塊圖片)
數據適配器一致的
注意一點你設置適配器的時候,定義的布局文件中的控件一定要居中!!!
ImageView 有一個方法 setBackgroundResource(int id) 這個方法可以傳遞一個圖片的id
進來 然後設置給這個控件.
傳遞的id為R.drawable.xxxxxx
————————————
當你需要設置一個控件,當做一條線的時候。直接使用
————————————————————————————
3,自定義組合控件
1.將已經編寫好的布局文件,抽取到一個類中去做管理,下次還需要使用此布局結構的時候,
直接使用組合控件對應的對象.
2.將組合控件的布局,抽取到單獨的一個xml中
3.通過一個單獨的類,去加載此段布局文件.
記住最後一個參數要寫this,因為我們需要將前面抽取出來的控件作為一個root(根),讓他加載到我們現在這個類裡面。
public class SettingItemView extends RelativeLayout {public SettingItemView(Context context) {
this(context,null);
}
public SettingItemView(Context context, AttributeSet attrs) {
this(context, attrs,0);
}
public SettingItemView(Context context, AttributeSet attrs, int defStyle) {
super(context, attrs, defStyle);
//xml--->view 將設置界面的一個條目轉換成view對象,直接添加到了當前SettingItemView對應的view中
View.inflate(context, R.layout.setting_item_view, this);
//等同於以下兩行代碼
/*View view = View.inflate(context, R.layout.setting_item_view, null);
this.addView(view);*/
//自定義組合控件中的標題描述
TextView tv_title = (TextView) findViewById(R.id.tv_title);
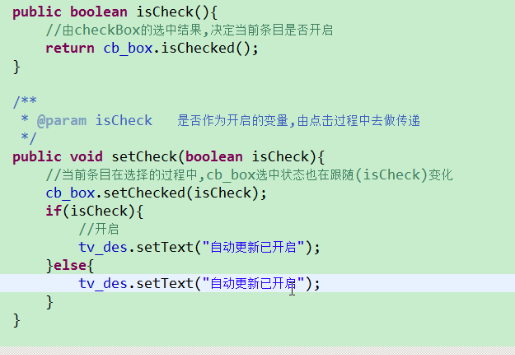
tv_des = (TextView) findViewById(R.id.tv_des);
cb_box = (CheckBox) findViewById(R.id.cb_box);
}

然後在SettingActivity中設置找到控件,並給他設置監聽
CheckBox響應當前的點擊事件,則SettingItemView就不能再去響應此事件,不能調用onClick方法,去改變狀態
這個是第一種方式:
讓我們的外部控件事件傳遞給內部控件,然後內部控件不去響應事件,在回傳給外部控件。
第二種方式:
讓我們的事件直接不能傳遞給內部控件,只能在外部控件。這個要去重寫事件響應的API
這裡我們使用第一種方式。
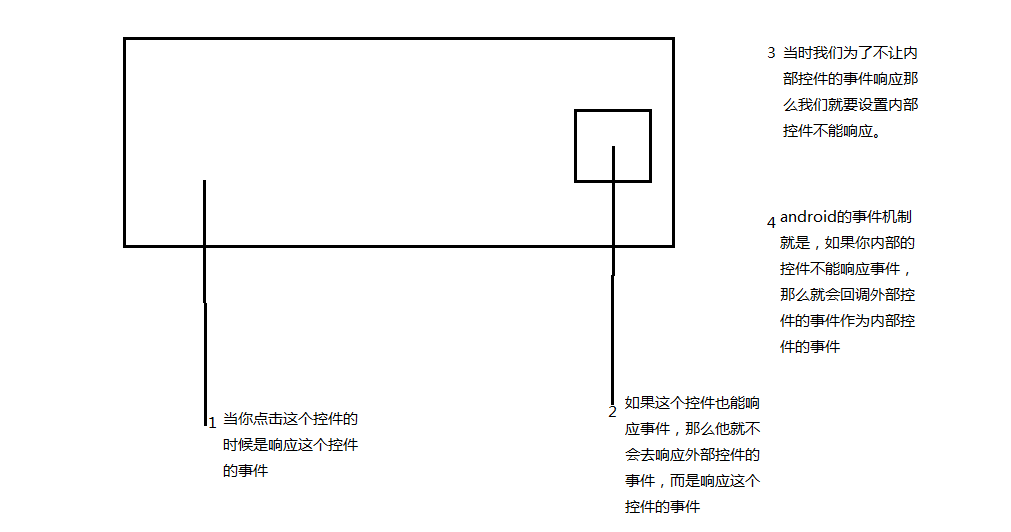
解決此問題的方案為:不讓checkBox響應點擊事件
_____________________________________
sputil類:
用來保存一些配置。
比如保存你的checkBox的勾選情況,下次進來的時候可以自動使用上次的勾選。
public class SpUtil {
	private static SharedPreferences sp;
	/**
	 * 寫入boolean變量至sp中
	 * @param ctx	上下文環境
	 * @param key	存儲節點名稱
	 * @param value	存儲節點的值 boolean
	 */
	public static void putBoolean(Context ctx,String key,boolean value){
		//(存儲節點文件名稱,讀寫方式)
		if(sp == null){
			sp = ctx.getSharedPreferences("config", Context.MODE_PRIVATE);
		}
		sp.edit().putBoolean(key, value).commit();
	}
	/**
	 * 讀取boolean標示從sp中
	 * @param ctx	上下文環境
	 * @param key	存儲節點名稱
	 * @param defValue	沒有此節點默認值
	 * @return		默認值或者此節點讀取到的結果
	 */
	public static boolean getBoolean(Context ctx,String key,boolean defValue){
		//(存儲節點文件名稱,讀寫方式)
		if(sp == null){
			sp = ctx.getSharedPreferences("config", Context.MODE_PRIVATE);
		}
		return sp.getBoolean(key, defValue);
	}
如果你在其他類調用這個類的方法的時候。
//獲取已有的開關狀態,用作顯示
boolean open_update = SpUtil.getBoolean(this, ConstantValue.OPEN_UPDATE, false);
		//是否選中,根據上一次存儲的結果去做決定
		siv_update.setCheck(open_update);
public class ConstantValue {
	/**
	 * 是否開啟更新的key
	 */
	public static final String OPEN_UPDATE = "open_update";

	/**
	 * 是否設置密碼key
	 */
	public static final String MOBILE_SAFE_PSD = "mobile_safe_psd";
}
注意一個問題:
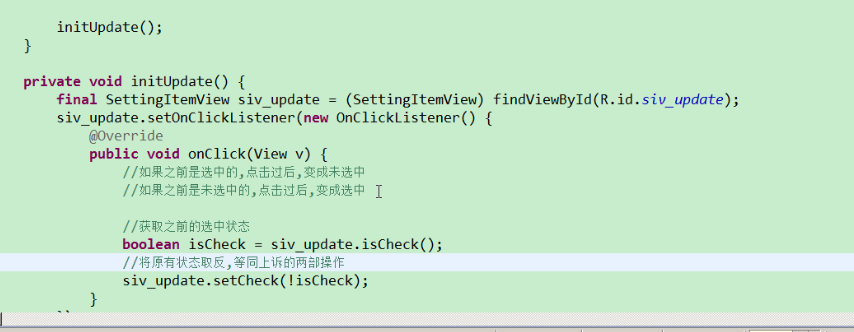
private void initUpdate() {
		final SettingItemView siv_update = (SettingItemView) findViewById(R.id.siv_update);

		//獲取已有的開關狀態,用作顯示
		boolean open_update = SpUtil.getBoolean(this, ConstantValue.OPEN_UPDATE, false);
		//是否選中,根據上一次存儲的結果去做決定
		siv_update.setCheck(open_update);

		siv_update.setOnClickListener(new OnClickListener() {
			@Override
			public void onClick(View v) {
				//如果之前是選中的,點擊過後,變成未選中
				//如果之前是未選中的,點擊過後,變成選中

				//獲取之前的選中狀態
				boolean isCheck = siv_update.isCheck();
				//將原有狀態取反,等同上訴的兩部操作
				siv_update.setCheck(!isCheck);
				//將取反後的狀態存儲到相應sp中
				SpUtil.putBoolean(getApplicationContext(), ConstantValue.OPEN_UPDATE,!isCheck);

			}
		});
我們這裡在onclicklistener()
裡面去保存isCheck的狀態的時候 調用SpUtil類的時候傳遞進去的context 不能是this
因為在
new OnClickListener()
這個內部類裡面的this 是這個類的對象。
我們需要的context是activity裡面的對象。所以我們需要用getApplicationContext();
_________________________________________
mHandler.sendMessageDelayed(msg, 4000);
//在發送消息4秒後去處理,ENTER_HOME狀態碼指向的消息
mHandler.sendEmptyMessageDelayed(ENTER_HOME, 4000);
這兩個方法就是延時的去處理消息,不是延時去發送消息.
_______________________________________________________________
5,自定義屬性,(設置中心,有多個條目,在復用SettingItemView的時候,每一個條目對應的標示,描述內容都不一致)
1.查看源碼,定義屬性時候做法
sdk所在目錄\platforms\android-16\data\res\values\attrs.xml
2.給SettingItemView定義屬性,工程res\values\attrs.xml
3.自定義屬性的使用
Android之所以能用控件的屬性,比如是因為我們定義了命名空間:xmlns:android="http://schemas.android.com/apk/res/android"。
這樣就相當於連接到了這個文件的目錄下定義好的屬性。
所以我們要使用自定義的屬性也需要給它命名空間。
定義名空間namespace
mobilesafe替換掉原有android
com.itheima.mobilesafe74必須這樣編寫,替換掉了android,代表當前應用自定義屬性
xmlns:mobilesafe="http://schemas.android.com/apk/res/com.itheima.mobilesafe74"
android:id="@+id/siv_update"
android:layout_width="match_parent"
android:layout_height="wrap_content"
mobilesafe:destitle="自動更新設置"
mobilesafe:desoff="自動更新已關閉"
mobilesafe:deson="自動更新已開啟">
4.獲取屬性值
mobilesafe:destitle="自動更新設置"
mobilesafe:desoff="自動更新已關閉"
mobilesafe:deson="自動更新已開啟"
以上的是哪個屬性都需要給自定義組合控件(SettingItemView)內部的兩個TextView去使用,獲取屬性值
//通過屬性索引獲取屬性名稱&屬性值 for(int i=0;i 5.將獲取的屬性值,設置給title,des des根據是否點中決定 true deson false desoffpublic class SettingItemView extends RelativeLayout {
private static final String NAMESPACE = "http://schemas.android.com/apk/res/com.itheima.mobilesafe74"; private static final String tag = "SettingItemView"; private CheckBox cb_box; private TextView tv_des; private String mDestitle; private String mDesoff; private String mDeson; public SettingItemView(Context context) { this(context,null); } public SettingItemView(Context context, AttributeSet attrs) { this(context, attrs,0); } public SettingItemView(Context context, AttributeSet attrs, int defStyle) { super(context, attrs, defStyle); //xml--->view 將設置界面的一個條目轉換成view對象,直接添加到了當前SettingItemView對應的view中 View.inflate(context, R.layout.setting_item_view, this); //等同於以下兩行代碼 /*View view = View.inflate(context, R.layout.setting_item_view, null); this.addView(view);*/ //自定義組合控件中的標題描述 TextView tv_title = (TextView) findViewById(R.id.tv_title); tv_des = (TextView) findViewById(R.id.tv_des); cb_box = (CheckBox) findViewById(R.id.cb_box); //獲取自定義以及原生屬性的操作,寫在此處,AttributeSet attrs對象中獲取 initAttrs(attrs); //獲取布局文件中定義的字符串,賦值給自定義組合控件的標題 tv_title.setText(mDestitle); } /** * 返回屬性集合中自定義屬性屬性值 * @param attrs 構造方法中維護好的屬性集合 */ private void initAttrs(AttributeSet attrs) { /*//獲取屬性的總個數 Log.i(tag, "attrs.getAttributeCount() = "+attrs.getAttributeCount()); //獲取屬性名稱以及屬性值 for(int i=0;i
注意事項:當我們需要重寫一個自定義控件的自定義屬性的時候。
我們需要在這個工程的values文件下面創一個attrs.xml
————————————————————————————————
6,自定義對話框
這裡我們同理用spUtil來保存密碼,將key設置為常量類裡面的常量。即可
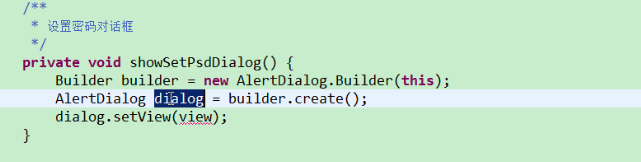
自定義對話框步驟:
第一步我們new出對話框的Builder對象。
然後因為我們要定義自己的布局對話框界面。
所以第二步我們要創建一個對話框。
第三步就是調用setView方法,去使用一個布局文件。
就是使用xml---->view對象(使用infate)
技巧:TextUtils.isEmpty(str) 這個方法可以判斷str是否為""(空字符串) 或者為null
這裡會出現button空指針異常。因為你直接使用findViewById是 在當前控件指定的布局文件中去找控件。
但是你現在要使用的button 是在view中的。所以我們需要使用view.findviewbyid.
/** * 設置密碼對話框 */ private void showSetPsdDialog() { //因為需要去自己定義對話框的展示樣式,所以需要調用dialog.setView(view); //view是由自己編寫的xml轉換成的view對象xml----->view Builder builder = new AlertDialog.Builder(this); final AlertDialog dialog = builder.create(); final View view = View.inflate(this, R.layout.dialog_set_psd, null); //讓對話框顯示一個自己定義的對話框界面效果 dialog.setView(view); dialog.show(); Button bt_submit = (Button) view.findViewById(R.id.bt_submit); Button bt_cancel = (Button) view.findViewById(R.id.bt_cancel); bt_submit.setOnClickListener(new OnClickListener() { @Override public void onClick(View v) { EditText et_set_psd = (EditText) view.findViewById(R.id.et_set_psd); EditText et_confirm_psd = (EditText)view.findViewById(R.id.et_confirm_psd); String psd = et_set_psd.getText().toString(); String confirmPsd = et_confirm_psd.getText().toString(); if(!TextUtils.isEmpty(psd) && !TextUtils.isEmpty(confirmPsd)){ if(psd.equals(confirmPsd)){ //進入應用手機防盜模塊,開啟一個新的activity Intent intent = new Intent(getApplicationContext(), TestActivity.class); startActivity(intent); //跳轉到新的界面以後需要去隱藏對話框 dialog.dismiss(); SpUtil.putString(getApplicationContext(), ConstantValue.MOBILE_SAFE_PSD, psd); }else{ ToastUtil.show(getApplicationContext(),"確認密碼錯誤"); } }else{ //提示用戶密碼輸入有為空的情況 ToastUtil.show(getApplicationContext(), "請輸入密碼"); } } }); bt_cancel.setOnClickListener(new OnClickListener() { @Override public void onClick(View v) { dialog.dismiss(); } }); }
Eclipse快捷鍵:Ctrl+D 快速刪除一行代碼。
6,密碼加密(了解)
md5加密:將字符串轉換成 32位的字符串(16進制字符(0~f)) 不可逆
import java.beans.Encoder; import java.security.MessageDigest; import java.security.NoSuchAlgorithmException; public class Md5Util { /** * @param args */ public static void main(String[] args) { //加鹽 String psd = "123"+"abc"; encoder(psd); } /**給指定字符串按照md5算法去加密 * @param psd 需要加密的密碼 */ private static void encoder(String psd) { try { //1,指定加密算法類型 MessageDigest digest = MessageDigest.getInstance("MD5"); //2,將需要加密的字符串中轉換成byte類型的數組,然後進行隨機哈希過程 byte[] bs = digest.digest(psd.getBytes()); // System.out.println(bs.length); //3,循環遍歷bs,然後讓其生成32位字符串,固定寫法 //4,拼接字符串過程 StringBuffer stringBuffer = new StringBuffer(); for (byte b : bs) { int i = b & 0xff; //int類型的i需要轉換成16機制字符 String hexString = Integer.toHexString(i); // System.out.println(hexString); if(hexString.length()<2){ hexString = "0"+hexString; } stringBuffer.append(hexString); } //5,打印測試 System.out.println(stringBuffer.toString()); } catch (NoSuchAlgorithmException e) { e.printStackTrace(); } } }
 Android自定義View實現隨機驗證碼
對於android開發來說自定義View還是一個比較重要的技能,所以在這裡寫一篇自定義View入門的文章,也是實現一個相對簡單的隨機產生驗證碼的功能: 自定義View主要
 Android開發本地及網絡Mp3音樂播放器(十九)通知媒體庫更新剛下載的MP3
實現功能:通知媒體庫更新糾結了幾天,百度到一個方法,可以在安卓4.4,通知媒體庫更新。媒體庫更新了,重新打開APP,就可以看到新的歌曲,但這樣還是不完善。後續將博文,將實
 Android基礎第二篇
1. 測試相關概念1.1. 測試的分類按照是否知道源代碼:1.黑盒測試:不知道源代碼2.白盒測試:知道源代碼按照測試的粒度:1.方法測試 function test2.單
 Android 推薦幾款好用的開源作品(二)之萬能RecyclerView適配器
前言:RecyclerView出現已經有一段時間了,我們肯定不陌生了,可以通過導入support-v7對其進行使用。根據官方的文檔,該控件用於在有限的窗口中展示大量數據集