編輯:關於Android編程
Android中一共提供了兩種動畫,其一便是tween動畫,tween動畫通過對view的內容進行一系列的圖像變換(包括平移,縮放,旋轉,改變透明度)來實現動畫效果,動畫效果的定義可以使用xml,也可以使用編碼來實現。 下面我們逐一查看tween能夠實現的動畫效果。
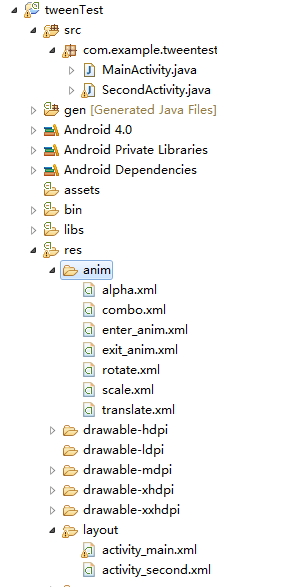
先看看工程的整體結構吧:
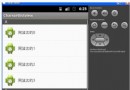
我們要實現的效果圖如圖

點擊按鈕則執行相應的動畫操作。
布局文件activity_main.xml
<LinearLayout xmlns:android="http://schemas.android.com/apk/res/android"
 xmlns:tools="http://schemas.android.com/tools"
 android:layout_width="match_parent"
 android:layout_height="match_parent"
 android:orientation="vertical"
 tools:context="com.example.tweentest.MainActivity" >

 <LinearLayout
 android:layout_width="match_parent"
 android:layout_height="wrap_content"
 android:orientation="vertical" >

 <LinearLayout
  android:layout_width="match_parent"
  android:layout_height="wrap_content"
  android:orientation="horizontal" >

  <Button
  android:id="@+id/alpha"
  android:layout_width="wrap_content"
  android:layout_height="wrap_content"
  android:onClick="doanim"
  android:text="透明" />

  <Button
  android:id="@+id/scale"
  android:layout_width="wrap_content"
  android:layout_height="wrap_content"
  android:onClick="doanim"
  android:text="縮放" />

  <Button
  android:id="@+id/rotate"
  android:layout_width="wrap_content"
  android:layout_height="wrap_content"
  android:onClick="doanim"
  android:text="旋轉" />

  <Button
  android:id="@+id/translate"
  android:layout_width="wrap_content"
  android:layout_height="wrap_content"
  android:onClick="doanim"
  android:text="移動" />

  <Button
  android:id="@+id/combo"
  android:layout_width="wrap_content"
  android:layout_height="wrap_content"
  android:onClick="doanim"
  android:text="組合" />
 </LinearLayout>

 <Button
  android:id="@+id/go_other_activity"
  android:layout_width="wrap_content"
  android:layout_height="wrap_content"
  android:onClick="doanim"
  android:text="GO!" />
 </LinearLayout>

 <LinearLayout
 android:layout_width="match_parent"
 android:layout_height="match_parent"
 android:orientation="horizontal" >

 <ImageView
  android:id="@+id/image1"
  android:layout_width="200dp"
  android:layout_height="200dp"
  android:src="@drawable/jiafeimao" />
 </LinearLayout>

</LinearLayout>
好了,先來看第一個動畫效果。
要實現讓圖片變成透明的動畫效果,先在anim文件夾中新建一個名為alpha的xml文件,關於透明的動畫效果都寫在這個文件中:
<?xml version="1.0" encoding="utf-8"?>
<set xmlns:android="http://schemas.android.com/apk/res/android"
 android:shareInterpolator="false" >

 <!-- 花1000毫秒,從不透明(1)變為透明(0) -->
 <!--
 repeatCount表示重復次數
 repeatMode表示開始的模式,restart表示每次重新開始,reverse表示接著來,即不透明->透明->不透明
 -->
 <alpha
 android:duration="2000"
 android:fromAlpha="1"
 android:repeatCount="5"
 android:repeatMode="reverse"
 android:toAlpha="0" />

</set>
duration屬性表示動畫執行的時間,以毫秒為單位,repeatCount表示動畫重復的次數,repeatMode屬性有兩個值,一個是restart,表示動畫每次執行完之後都重新開始執行(不透明->透明,不透明->透明….),reverse表示動畫每次執行完之後不重新開始而是接著反向執行(不透明->透明->不透明->透明….),換句話說,如果是reverse,則表示動畫從不透明變為透明後再慢慢變回不透明,如果是restart則表示動畫從不透明變為透明後,然後快速恢復原狀。以上這三個屬性在所有的tween動畫中都有,也是最常用的屬性。fromAlpha表示初始透明度,1表示不透明,0表示完全透明;toAlpha表示動畫結束時的透明度。
這是動畫的xml文件,再看看Java代碼是怎樣的。
public class MainActivity extends Activity {

 private ImageView iv = null;
 private Animation animation = null;
 @Override
 protected void onCreate(Bundle savedInstanceState) {
 super.onCreate(savedInstanceState);
 setContentView(R.layout.activity_main);
 this.iv = (ImageView) this.findViewById(R.id.image1);
 }
 public void doanim(View v){
 switch (v.getId()) {
 case R.id.alpha:
  //讀取動畫文件
  animation = AnimationUtils.loadAnimation(this, R.anim.alpha);
  //動畫結束之後使用什麼頁面填充
  //使用動畫結束後的樣子填充,即保持結束時的畫面
  animation.setFillAfter(true);
  //應用動畫特效
  iv.startAnimation(animation);
  break;
 case R.id.scale:
  animation = AnimationUtils.loadAnimation(this, R.anim.scale);
  iv.startAnimation(animation);
  break;
 case R.id.rotate:
  animation = AnimationUtils.loadAnimation(this, R.anim.rotate);
  iv.startAnimation(animation);
  break;
 case R.id.translate:
  animation = AnimationUtils.loadAnimation(this, R.anim.translate);
  iv.startAnimation(animation);
  break;
 case R.id.combo:
  animation = AnimationUtils.loadAnimation(this, R.anim.combo);
  iv.startAnimation(animation);
  break;
 case R.id.go_other_activity:
  Intent intent = new Intent(MainActivity.this,SecondActivity.class);
  startActivity(intent);
  //設置讓MainActivity從左邊出,SecondActivity從右邊進
  overridePendingTransition(R.anim.enter_anim, R.anim.exit_anim);
  break;
 }
 }
}
先拿到ImageView,然後在點擊按鈕時讀取動畫文件,並給imageview設置動畫效果。
縮放動畫:
<?xml version="1.0" encoding="utf-8"?>
<set xmlns:android="http://schemas.android.com/apk/res/android"
 android:shareInterpolator="false" >

 <!--
 兩個1表示開始時圖像大小不變,兩個2表示圖像放大一倍,
 如果小於1則表示圖像縮小。兩個0表示基於左上角進行放大
 pivotX如果是50%,表示基於圖像中心放大
 pivotX如果是50%p,表示基於父級中心放大
 infinite如它的英文意思,無限循環

 -->
 <scale
 android:duration="1000"
 android:fromXScale="1"
 android:fromYScale="1"
 android:pivotX="0"
 android:pivotY="0"
 android:repeatCount="infinite"
 android:repeatMode="reverse"
 android:toXScale="2"
 android:toYScale="2" />

</set>
fromXScale和fromYScale分別表示初始時圖像的縮放比例,1表示不縮放,toXScale和toYScale表示動畫結束時的縮放比例,2表示動畫放大一倍,如果是0.5則表示縮小一倍。pivotX和pivotY表示執行縮放時的參考點,兩個值都為0表示是基於圖像左上角來執行縮放操作,如果都是50%表示基於圖像中心來執行縮放操作,如果是100%表示基於圖像右下角執行縮放操作,如果是50%p,表示基於屏幕的中心執行縮放操作,如果是100%p表示基於屏幕的右下角執行縮放操作。
java代碼見上文。
旋轉動畫:
<?xml version="1.0" encoding="utf-8"?>
<set xmlns:android="http://schemas.android.com/apk/res/android"
 android:shareInterpolator="false" >

 <!-- fromDegrees表示開始的角度
 toDegrees結束的角度,180表示旋轉半圈
 兩個100%表示基於自己的右下角旋轉
 想讓倒著轉,把180改為-180即可
 -->
 <rotate
 android:duration="1000"
 android:fromDegrees="0"
 android:pivotX="100%"
 android:pivotY="100%"
 android:toDegrees="180" />

</set>
這裡有兩個參數解釋,fromDegrees表示初始角度,0表示正常,toDegrees表示旋轉角度,180表示順時針旋轉180度,-180表示逆時針旋轉180度pivotX參數的意義和縮放動畫中的參數意義相同。
Java代碼同上文。
移動動畫:
<?xml version="1.0" encoding="utf-8"?>
<set xmlns:android="http://schemas.android.com/apk/res/android"
 android:shareInterpolator="false" >
<!-- from表示從哪裡開始移動
to表示移動到那裡
100%表示移動到自己的右下角
100%p表示移動到屏幕右下角
 -->
 <translate
 android:repeatCount="infinite"
 android:repeatMode="reverse"
 android:duration="1000"
 android:fromXDelta="0"
 android:fromYDelta="0"
 android:toXDelta="100%"
 android:toYDelta="100%" />

</set>
fromXDelta表示初始時圖像在x軸的位置toXDelta表示結束時圖像在X軸的位置。
四種動畫效果都已經說完,如果要實現組合效果呢?
<?xml version="1.0" encoding="utf-8"?>
<set xmlns:android="http://schemas.android.com/apk/res/android"
 android:shareInterpolator="false" >

 <rotate
 android:duration="1000"
 android:fromDegrees="0"
 android:pivotX="100%"
 android:pivotY="100%"
 android:toDegrees="180" />

 <alpha
 android:duration="2000"
 android:fromAlpha="1"
 android:repeatCount="5"
 android:repeatMode="reverse"
 android:toAlpha="0" />

 <scale
 android:duration="1000"
 android:fromXScale="1"
 android:fromYScale="1"
 android:pivotX="0"
 android:pivotY="0"
 android:repeatCount="infinite"
 android:repeatMode="reverse"
 android:toXScale="2"
 android:toYScale="2" />

 <translate
 android:duration="1000"
 android:fromXDelta="0"
 android:fromYDelta="0"
 android:repeatCount="infinite"
 android:repeatMode="reverse"
 android:toXDelta="100%"
 android:toYDelta="100%" />

</set>
把之前所有的動畫效果放在一個文件中就可以了。
android中的動畫效果可以對任何組件使用,因為組件都是繼承自View,而startAnimation(Animation animation)方法就是View中的方法。那麼兩個Activity之間切換能不能使用動畫效果呢?當然可以。上文中的Java代碼中,有這麼一句:
case R.id.go_other_activity:
  Intent intent = new Intent(MainActivity.this,SecondActivity.class);
  startActivity(intent);
  //設置讓MainActivity從左邊出,SecondActivity從右邊進
  overridePendingTransition(R.anim.enter_anim, R.anim.exit_anim);
  break;
想要實現activity之間切換的動畫,使用overridePendingTransition(R.anim.enter_anim, R.anim.exit_anim);方法即可,該方法要兩個參數,分別表示新activity進入時的動畫和舊activity出去時的動畫。
進入時動畫:
<?xml version="1.0" encoding="utf-8"?>
<set xmlns:android="http://schemas.android.com/apk/res/android"
 android:shareInterpolator="false" >
 <translate
 android:duration="1000"
 android:fromXDelta="100%"
 android:fromYDelta="0"
 android:toXDelta="0"
 android:toYDelta="0" />

</set>
出去時動畫:
<?xml version="1.0" encoding="utf-8"?>
<set xmlns:android="http://schemas.android.com/apk/res/android"
 android:shareInterpolator="false" >
 <translate
 android:duration="1000"
 android:fromXDelta="0"
 android:fromYDelta="0"
 android:toXDelta="-100%"
 android:toYDelta="0" />

</set>
效果如圖:
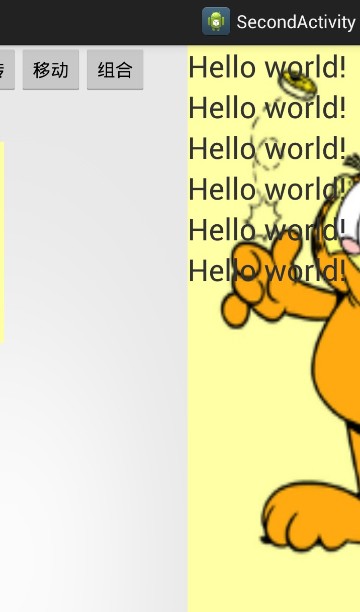
MainActivity逐漸移出,SecondActivity逐漸從右邊進來。
原文鏈接:http://blog.csdn.net/u012702547/article/details/45697505
以上就是本文的全部內容,希望對大家的學習有所幫助,也希望大家多多支持本站。
 Android登錄界面的實現代碼分享
最近由於項目需要,寶寶好久沒搞Android啦,又是因為項目需要,現在繼續弄Android,哎,說多了都是淚呀,別的不用多說,先搞一個登錄界面練練手,登錄界面可以說是An
 自定義Adapter並通過布局泵LayoutInflater抓取layout模板編輯每一個item實現思路
寫在前面的話: 看到標題這麼長可能大家有點抓狂了,是的,我在剛剛學這一篇的時候有一些不理解,什麼是布局泵?編輯每一個模板然後什麼是自定義Adapter?下面我們開始學習這
 Android Framework Application Framework層簡單介紹
引言 Andr
 Android實現微信首頁左右滑動切換效果
大家看到微信首頁切換效果有沒有覺得很炫,滑動切換,點擊底部bar瞬間切換,滑動切換漸變效果,線上效果圖:之前也在博客上看到別人的實現,再次基礎上,我做了些優化。首先說下實