編輯:關於Android編程
我們使用百度地圖的時候,點擊地圖上的Marker,會彈出一個該地點詳細信息的窗口,如下左圖所示,有時候,我們希望自己定義這個彈出窗口的內容,或者,干脆用自己的數據來構造這樣的彈出窗口,但是,在百度地圖最新的Android SDK中,沒有方便操作這種彈出窗口的類,雖然有一個PopupOverlay,但是它只支持將彈出內容轉化為不多於三個Bitmap,如果這個彈出窗口裡想有按鈕來響應點擊事件,用這個就不能滿足要求了,於是,看了一遍百度地圖覆蓋物的API,我決定用自定義View的方法來實現類似的效果,先貼一下大體效果圖,如下右圖: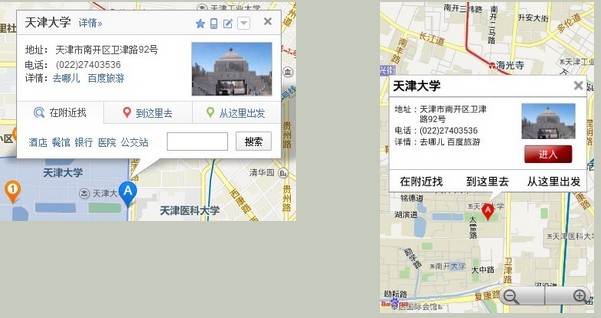
基本原理就是用ItemizedOverlay來添加附加物,在OnTap方法中向MapView上添加一個自定義的View(如果已存在就直接設為可見),下面具體來介紹我的實現方法:
一、自定義覆蓋物類:MyPopupOverlay,這個類是最關鍵的一個類ItemizedOverlay,用於設置Marker,並定義Marker的點擊事件,彈出窗口,至於彈出窗口的內容,則通過定義Listener,放到Activity中去構造。如果沒有特殊需求,這個類不需要做什麼改動。代碼如下,popupLinear這個對象,就是加到地圖上的自定義View:
復制代碼 代碼如下:
public class MyPopupOverlay extends ItemizedOverlay<OverlayItem> {
private Context context = null;
// 這是彈出窗口, 包括內容部分還有下面那個小三角
private LinearLayout popupLinear = null;
// 這是彈出窗口的內容部分
private View popupView = null;
private MapView mapView = null;
private Projection projection = null;
// 這是彈出窗口內容部分使用的layoutId,在Activity中設置
private int layoutId = 0;
// 是否使用百度帶有A-J字樣的Marker
private boolean useDefaultMarker = false;
private int[] defaultMarkerIds = { R.drawable.icon_marka,
R.drawable.icon_markb, R.drawable.icon_markc,
R.drawable.icon_markd, R.drawable.icon_marke,
R.drawable.icon_markf, R.drawable.icon_markg,
R.drawable.icon_markh, R.drawable.icon_marki,
R.drawable.icon_markj, };
// 這個Listener用於在Marker被點擊時讓Activity填充PopupView的內容
private OnTapListener onTapListener = null;
public MyPopupOverlay(Context context, Drawable marker, MapView mMapView) {
super(marker, mMapView);
this.context = context;
this.popupLinear = new LinearLayout(context);
this.mapView = mMapView;
popupLinear.setOrientation(LinearLayout.VERTICAL);
popupLinear.setVisibility(View.GONE);
projection = mapView.getProjection();
}
@Override
public boolean onTap(GeoPoint pt, MapView mMapView) {
// 點擊窗口以外的區域時,當前窗口關閉
if (popupLinear != null && popupLinear.getVisibility() == View.VISIBLE) {
LayoutParams lp = (LayoutParams) popupLinear.getLayoutParams();
Point tapP = new Point();
projection.toPixels(pt, tapP);
Point popP = new Point();
projection.toPixels(lp.point, popP);
int xMin = popP.x - lp.width / 2 + lp.x;
int yMin = popP.y - lp.height + lp.y;
int xMax = popP.x + lp.width / 2 + lp.x;
int yMax = popP.y + lp.y;
if (tapP.x < xMin || tapP.y < yMin || tapP.x > xMax
|| tapP.y > yMax)
popupLinear.setVisibility(View.GONE);
}
return false;
}
@Override
protected boolean onTap(int i) {
// 點擊Marker時,該Marker滑動到地圖中央偏下的位置,並顯示Popup窗口
OverlayItem item = getItem(i);
if (popupView == null) {
// 如果popupView還沒有創建,則構造popupLinear
if (!createPopupView()){
return true;
}
}
if (onTapListener == null)
return true;
popupLinear.setVisibility(View.VISIBLE);
onTapListener.onTap(i, popupView);
popupLinear.measure(0, 0);
int viewWidth = popupLinear.getMeasuredWidth();
int viewHeight = popupLinear.getMeasuredHeight();
LayoutParams layoutParams = new LayoutParams(viewWidth, viewHeight,
item.getPoint(), 0, -60, LayoutParams.BOTTOM_CENTER);
layoutParams.mode = LayoutParams.MODE_MAP;
popupLinear.setLayoutParams(layoutParams);
Point p = new Point();
projection.toPixels(item.getPoint(), p);
p.y = p.y - viewHeight / 2;
GeoPoint point = projection.fromPixels(p.x, p.y);
mapView.getController().animateTo(point);
return true;
}
private boolean createPopupView() {
// TODO Auto-generated method stub
if (layoutId == 0)
return false;
popupView = LayoutInflater.from(context).inflate(layoutId, null);
popupView.setBackgroundResource(R.drawable.popupborder);
ImageView dialogStyle = new ImageView(context);
dialogStyle.setImageDrawable(context.getResources().getDrawable(
R.drawable.iw_tail));
popupLinear.addView(popupView);
android.widget.LinearLayout.LayoutParams lp = new android.widget.LinearLayout.LayoutParams(
LayoutParams.MATCH_PARENT, LayoutParams.WRAP_CONTENT);
lp.topMargin = -2;
lp.leftMargin = 60;
popupLinear.addView(dialogStyle, lp);
mapView.addView(popupLinear);
return true;
}
@Override
public void addItem(List<OverlayItem> items) {
// TODO Auto-generated method stub
int startIndex = getAllItem().size();
for (OverlayItem item : items){
if (startIndex >= defaultMarkerIds.length)
startIndex = defaultMarkerIds.length - 1;
if (useDefaultMarker && item.getMarker() == null){
item.setMarker(context.getResources().getDrawable(
defaultMarkerIds[startIndex++]));
}
}
super.addItem(items);
}
@Override
public void addItem(OverlayItem item) {
// TODO Auto-generated method stub
// 重載這兩個addItem方法,主要用於設置自己默認的Marker
int index = getAllItem().size();
if (index >= defaultMarkerIds.length)
index = defaultMarkerIds.length - 1;
if (useDefaultMarker && item.getMarker() == null){
item.setMarker(context.getResources().getDrawable(
defaultMarkerIds[getAllItem().size()]));
}
super.addItem(item);
}
public void setLayoutId(int layoutId) {
this.layoutId = layoutId;
}
public void setUseDefaultMarker(boolean useDefaultMarker) {
this.useDefaultMarker = useDefaultMarker;
}
public void setOnTapListener(OnTapListener onTapListener) {
this.onTapListener = onTapListener;
}
public interface OnTapListener {
public void onTap(int index, View popupView);
}
}
二、MainActivity,這是主界面,用來顯示地圖,創建MyPopupOverlay對象,在使用我寫的MyPopupOverlay這個類時,需要遵循以下步驟:
創建MyPopupOverlay對象,構造函數為public MyPopupOverlay(Context context, Drawable marker, MapView mMapView),四個參數分別為當前的上下文、通用的Marker(這是ItemizedOverlay需要的,當不設置Marker時的默認Marker)以及百度地圖對象。
設置自定義的彈出窗口內容的布局文件ID,使用的方法為public void setLayoutId(int layoutId)。
設置是使用自定義的Marker,還是預先寫好的帶有A-J字樣的百度地圖原裝Marker,使用的方法為public void setUseDefaultMarker(boolean useDefaultMarker),只有當這個值為true且沒有調用OverlayItem的setMarker方法為特定點設置Marker時,才使用原裝Marker。
創建Marker所在的點,即分別創建一個個OverlayItem,然後調用public void addItem(OverlayItem item)或public void addItem(List<OverlayItem> items)方法來把這些OverlayItem添加到自定義的附加層上去。
為MyPopupOverlay對象添加onTap事件,當Marker被點擊時,填充彈出窗口中的內容(也就是第2條中layoutId布局中的內容),設置方法為public void setOnTapListener(OnTapListener onTapListener),OnTapListener是定義在MyPopupOverlay中的接口,實現這個接口需要覆寫public void onTap(int index, View popupView)方法,其中,index表示被點擊的Marker(確切地說是OverlayItem)的索引,popupView是使用layoutId這個布局的View,也就是彈出窗口除了下面的小三角之外的部分。
把這個MyPopupOverlay對象添加到地圖上去:mMapView.getOverlays().add(myOverlay);mMapView.refresh();
下面是我的代碼(MainActivity):
復制代碼 代碼如下:
public class MainActivity extends Activity {
private BMapManager mBMapMan = null;
private MapView mMapView = null;
private String keyString = "這裡填入申請的KEY";
@Override
protected void onCreate(Bundle savedInstanceState) {
// TODO Auto-generated method stub
super.onCreate(savedInstanceState);
mBMapMan = new BMapManager(getApplication());
mBMapMan.init(keyString, new MKGeneralHandler(MainActivity.this));//MKGeralHandler是一個實現MKGeneralListener接口的類,詳見百度的文檔
setContentView(R.layout.activity_main);// activity_main.xml中就是百度地圖官方文檔提供的LinearLayout下面放一個MapView的布局
mMapView = (MapView) findViewById(R.id.bmapsView);// 獲取地圖MapView對象
mMapView.setBuiltInZoomControls(true);
final MapController mMapController = mMapView.getController();
mMapController.setZoom(16);
GeoPoint p1 = new GeoPoint(39113458, 117183652);// 天大正門的坐標
GeoPoint p2 = new GeoPoint(39117258, 117178252);// 天大大活的坐標
mMapController.animateTo(p1);
//聲明MyPopupOverlay對象
MyPopupOverlay myOverlay = new MyPopupOverlay(
MainActivity.this,
getResources().getDrawable(R.drawable.icon_gcoding),
mMapView);// 這是第1步,創建MyPopupOverlay對象
myOverlay.setLayoutId(R.layout.popup_content);// 這是第2步,設置彈出窗口的布局文件
myOverlay.setUseDefaultMarker(true);// 這是第3步,設置是否使用A-J的Marker
OverlayItem item1 = new OverlayItem(p1, "", "");
OverlayItem item2 = new OverlayItem(p2, "", "");
List<OverlayItem> items = new ArrayList<OverlayItem>();
items.add(item1);
items.add(item2);
myOverlay.addItem(items);// 這是第4步,向MyPopupOverlay中依次添加OverlayItem對象,或存到鏈表中一次性添加
// myOverlay.addItem(item2);
final List<MapPopupItem> mItems = new ArrayList<MapPopupItem>();// 這是暫時自己造的model對象,存儲顯示的數據
MapPopupItem mItem = new MapPopupItem();
mItem.setTitle("天津大學");
// ...... 這裡依次添加了地址、電話、標簽、圖片等信息
mItems.add(mItem);
mItem = new MapPopupItem();
mItem.setTitle("天津大學大學生活動中心");
// ...... 同樣添加第二個點的地址、電話、標簽、圖片信息
mItems.add(mItem);
myOverlay.setOnTapListener(new OnTapListener() {
@Override
public void onTap(int index, View popupView) {// 這是第5步,設置監聽器,為popupView填充數據
// TODO Auto-generated method stub
MapPopupItem mItem = mItems.get(index);// 這是存儲model數據的數組,根據被點擊的點的index獲取具體對象
TextView shopName = (TextView) popupView.findViewById(R.id.name);
// ...... 依次獲得視圖中的各個控件(地址、電話、標簽、圖片等)
shopName.setText(mItem.getTitle());
// ...... 依次為這些控件賦上值(地址、電話、標簽、圖片等信息)
}
});
mMapView.getOverlays().add(myOverlay); // 最後一步,添加覆蓋物層
mMapView.refresh();
}
@Override
protected void onDestroy() {
mMapView.destroy();
if (mBMapMan != null) {
mBMapMan.destroy();
mBMapMan = null;
}
super.onDestroy();
}
@Override
protected void onPause() {
mMapView.onPause();
if (mBMapMan != null) {
mBMapMan.stop();
}
super.onPause();
}
@Override
protected void onResume() {
mMapView.onResume();
if (mBMapMan != null) {
mBMapMan.start();
}
super.onResume();
}
}
這就是主要的思路和代碼了,因為代碼文件、資源文件弄得比較多,不大容易貼出來全部能直接運行的代碼,而且布局文件裡控件太多也不容易理解,就這麼寫了,如果大家有什麼更好的方法,或者有什麼好的建議,歡迎討論和指正。
注:為了說明問題,主類中我簡化了很多東西,而且有些圖片找起來也挺麻煩,把源代碼附在這裡供大家參考,運行前需要在MainActivity中修改百度地圖的Key。
 Android 控件的觸摸事件傳遞與處理
了解Android控件的觸摸事件傳遞與處理對我們日常開發中自定義控件和觸摸事件沖突解決有重大意義。Android控件的觸摸事件傳遞和處理主要有以下幾個方法,下面一一介紹。
 Android 框架啟動流程
As we all know,Android手機系統本質上是一個基於Linux的應用程序,它以Linux系統為內核。因此系統的啟動過程包括Linux內核啟動和Androi
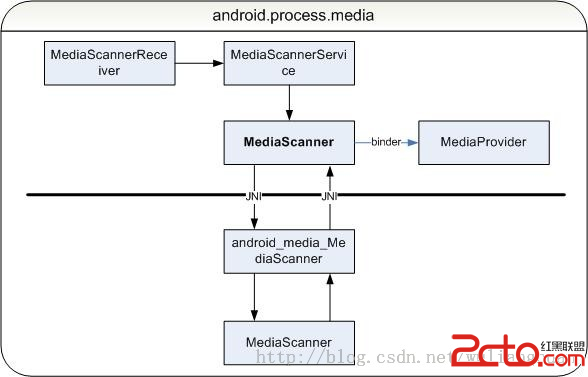 Android MediaScanner 總綱
1. MediaScanner HEAD2. 應用層 MediaProviderpackagesprovidersMediaProvider(1) MediaProvid
 Android安卓---Hellword 簡單提示框
添加公用單元文件com..java package com.example.myapplication;import android.a