編輯:關於Android編程
原型的是一種創建的設計模式,主用來創建的復雜的對象和構建耗時的實例。通過克隆已有的對象來創建的新的對象,從而節省時間和內存。
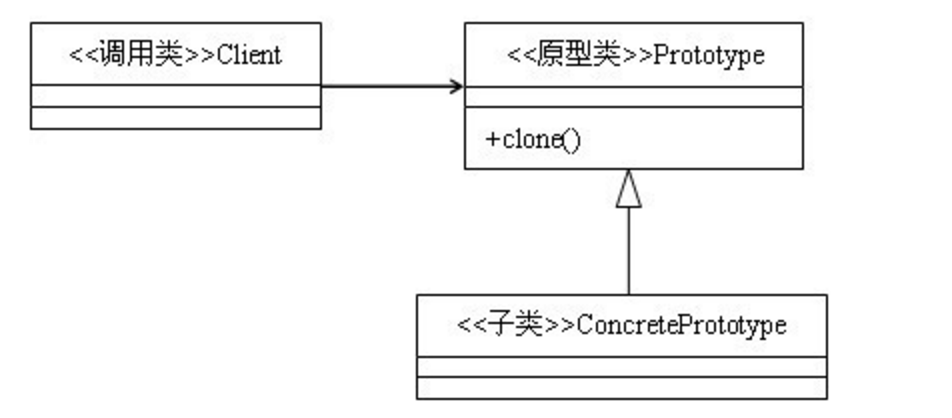
- Client 客戶端類調用的類
- Prototype 提供clone()等方法的原型抽象接口
- ConcretePrototype 具體的原型的函數
案例分析:多賬號系統管理
我們需要做一個的類似的多用戶登陸的簡單系統,我們只能夠在我的裡面去創建的用戶,並修改用戶的屬性,再其他的地方我們只能使用的這個的用戶,不能夠去修改這個用戶的屬性,但是隨著的代碼的迭代,可能在後期的維護過程中,有人會修改用戶的信息,從而造成整體的問題。所以我們需要在其他的地方去使用的這個對象的副本。所以在這裡我們可以使用原型模式。
package的截圖

典型的model類,實現的Cloneable
public class Account implements Cloneable{
    private int id;
    private String name;
    private int age;
    private String desc;

    public Account(int id,int age,String name,String desc){
        this.id = id;
        this.age = age;
        this.name = name;
        this.desc = desc;
    }

    public Account clone(){
        Account clone = null;
        try {
            clone = (Account) super.clone();
        } catch (CloneNotSupportedException e) {
            e.printStackTrace();
        }

        return clone;
    }

    public int getId(){
        return id;
    }

    public String getName(){
        return name;
    }

    public int getAge(){
        return age;
    }

    public String getDesc(){
        return desc;
    }
}
管理的Account,提供最原始的以及生成新的副本的Account。
public class AccountManager {
    public static AccountManager sAccountManager;

    private AccountManager(){}

    public static AccountManager getAccountManager(){
        if(sAccountManager==null){
            synchronized(AccountManager.class){
                if(sAccountManager==null){
                    sAccountManager = new AccountManager();
                }
            }
        }
        return sAccountManager;
    }


    private Map accountMap = new HashMap();

    public synchronized Account newAccount(int id,int age,String name,String desc){
        Account account = accountMap.containsKey(id) ? accountMap.get(id) : new Account(id,age,name,desc);
        accountMap.put(id, account);
        return account;
    }

    public Account getAccountById(int id) throws Exception{
        if(!accountMap.containsKey(id)){
            throw new Exception("沒有當前的id的帳號");
        }

        return (Account) accountMap.get(id).clone();
    }

    public Account getRootAccountById(int id) throws Exception{
        if(!accountMap.containsKey(id)){
            throw new Exception("沒有當前的id的帳號");
        }

        return accountMap.get(id);
    }
}
public class Client {
public static void main(String[] args) {
//我的界面,生成新的Account
AccountManager.getAccountManager().newAccount(1, 13, "Rrtoyewx", "Rrtoyewx是一個長不大的孩子");
//其他的界面中客戶端去獲取的account,不允許修改的account的屬性。即使修改了也不能去的改變最原始的
try {
Account accountClone = AccountManager.getAccountManager().getAccountById(1);
Account accountRoot = AccountManager.getAccountManager().getRootAccountById(1);
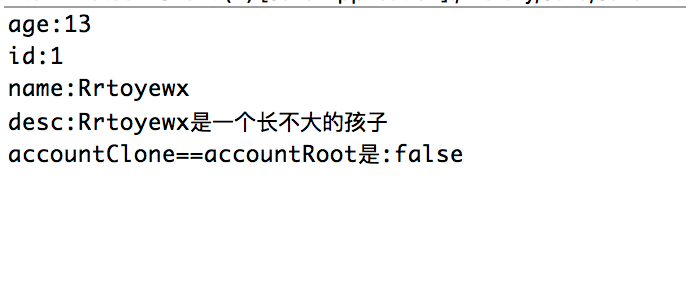
System.out.println("age:"+accountClone.getAge());
System.out.println("id:"+accountClone.getId());
System.out.println("name:"+accountClone.getName());
System.out.println("desc:"+accountClone.getDesc());
System.out.println("accountClone==accountRoot是:"+(accountClone==accountRoot));
} catch (Exception e) {
e.printStackTrace();
}
}
}
 vciltcO1vWNsb25ltcRBY2NvdW50IKOsvLTKuc7Sw8fIpdDeuMTG5Mr00NS1xLXEu7CjrLbUztLDx7XEQWNjb3VudE1hbmFnZXK53MDttcRBY2NvdW50sqLDu9PQsvrJ+tOwz+yhozwvcD4NCjxoMiBpZD0="原型模式的注意點">原型模式的注意點
原型的模式必須要的又個提供克隆的主體。不然沒辦法進行clone的。 clone產生的副本,不會走構造器的方法。 cloned的效率要比通過構造器生成的對象的效率要高。所以在嘗試多次生成數據結構復雜的對象的時候,考慮好情況下,盡量使用原型模式去創建的對象。 深度拷貝和淺拷貝。
vciltcO1vWNsb25ltcRBY2NvdW50IKOsvLTKuc7Sw8fIpdDeuMTG5Mr00NS1xLXEu7CjrLbUztLDx7XEQWNjb3VudE1hbmFnZXK53MDttcRBY2NvdW50sqLDu9PQsvrJ+tOwz+yhozwvcD4NCjxoMiBpZD0="原型模式的注意點">原型模式的注意點
原型的模式必須要的又個提供克隆的主體。不然沒辦法進行clone的。 clone產生的副本,不會走構造器的方法。 cloned的效率要比通過構造器生成的對象的效率要高。所以在嘗試多次生成數據結構復雜的對象的時候,考慮好情況下,盡量使用原型模式去創建的對象。 深度拷貝和淺拷貝。
上述的栗子是一個典型淺拷貝,上面的Account類成員變量都是8中常見的包裝類以及string類,完全的淺拷貝
如果對於上述的Account的類,我們多了一個成員字段Address,Address是一個引用的類型
Account 類
public class Account implements Cloneable{
    private int id;
    private String name;
    private int age;
    private String desc;
    private Address address;

    public Account(int id,int age,String name,String desc){
        this.id = id;
        this.age = age;
        this.name = name;
        this.desc = desc;
    }

    public Account(int id,int age,String name,String desc,Address address){
        this.id = id;
        this.age = age;
        this.name = name;
        this.desc = desc;
        this.address = address;
    }


    public int getId(){
        return id;
    }

    public String getName(){
        return name;
    }

    public int getAge(){
        return age;
    }

    public String getDesc(){
        return desc;
    }

    public Address getAddress(){
        return address;
    }

    public Account clone(){
        Account clone = null;

        try {
            clone = (Account) super.clone();
            clone.address = this.address.clone();
        } catch (CloneNotSupportedException e) {
            e.printStackTrace();
        }

        return clone;
    }
}
Address 類
public class Address implements Cloneable {
    private String name;
    private String location;

    public Address(){}

    public Address(String name,String location){
        this.name = name;
        this.location = location;
    }
}
Client類
public class Client {
    public static void main(String[] args) {
        //我的界面,生成新的Account
        AccountManager.getAccountManager().newAccount(1, 13, "Rrtoyewx", "Rrtoyewx是一個長不大的孩子",new Address("北京","昌平"));

        //其他的界面中客戶端去獲取的account,不允許修改的account的屬性。即使修改了也不能去的改變最原始的
        try {
            Account accountClone = AccountManager.getAccountManager().getAccountById(1);
            Account accountRoot = AccountManager.getAccountManager().getRootAccountById(1);

            System.out.println("clone age:"+accountClone.getAge());
            System.out.println("clone id:"+accountClone.getId());
            System.out.println("clone name:"+accountClone.getName());
            System.out.println("clone desc:"+accountClone.getDesc());
            System.out.println("clone address:"+accountClone.getAddress());
            System.out.println("address:"+accountRoot.getAddress());
            System.out.println("accountClone==accountRoot是:"+(accountClone==accountRoot));

        } catch (Exception e) {
            e.printStackTrace();
        }
    }
}
這個Account 類中有個Address引用類型的address成員變量,這個時候還是采用軟拷貝的方式,我們會看到打印的log
log圖:

我們可以看到new Account對象Address對象的地址和Clone Account是一樣,所以在從某種的意義上來說,還並沒有保護好Account對象。因為我們修改了Clone Account的Address的地址,那麼原生的Account的Address對象地址也同樣會被修改了。所以我們這個時候需要采用了深度拷貝。我們對Address的類要做修改。
Address 實現Cloneable的接口,並重寫clone()的方法。
public Address clone(){
        Address clone = null;
        try {
            clone = (Address) super.clone();
            clone.location = this.location;
            clone.name = this.name;
        } catch (CloneNotSupportedException e) {
            e.printStackTrace();
        }

        return clone;
    }
Account類clone()的方法。
public Account clone(){
        Account clone = null;

        try {
            clone = (Account) super.clone();
            clone.address = this.address.clone();
        } catch (CloneNotSupportedException e) {
            e.printStackTrace();
        }

        return clone;
    }
Address 定義的deepclone的方法,並通過對象流寫入和讀出的操作實現的復制的功能。
public Address deepClone() throws IOException, ClassNotFoundException{
        ByteArrayOutputStream baos = new ByteArrayOutputStream();
        ObjectOutputStream oos =  new ObjectOutputStream(baos);
        oos.writeObject(this);

        ByteArrayInputStream bais = new ByteArrayInputStream(baos.toByteArray());
        ObjectInputStream ois = new ObjectInputStream(bais);

        return (Address) ois.readObject();
    }
Account類的修改
public Account clone(){
        Account clone = null;

        try {
            clone = (Account) super.clone();
            clone.address = this.address.deepClone();
        } catch (CloneNotSupportedException e) {
            e.printStackTrace();
        } catch(IOException e){
            e.printStackTrace();
        } catch(ClassNotFoundException e){
            e.printStackTrace();
        }

        return clone;
    }
無論是第一種clone深度拷貝還是第二種的序列化的深度拷貝打印的log都為下圖

上面我們知道原型模式存在深拷貝和淺拷貝,所以對於model包下的類,我們不能簡單概括為一個clone的方法,我們區分深拷貝和淺拷貝的。
所以在實際的使用情況,我們可以自定義一個PrototypeAble的接口。
PrototypeAbled接口:
public interface PrototypeAble extends Cloneable,Serializable{

    PrototypeAble lightClone() throws CloneNotSupportedException;

    PrototypeAble deepClone() throws CloneNotSupportedException, ClassNotFoundException, IOException;

    PrototypeAble root();
}
當我們定義好這樣的一個接口後,我們對上面的栗子進行修改如下,
AccountPrototype類
public class AccountPrototype implements PrototypeAble{
    private int id;
    private String name;
    private int age;
    private String desc;
    private Address address;

    public AccountPrototype(int id,int age,String name,String desc,Address address){
        this.id = id;
        this.age = age;
        this.name = name;
        this.desc = desc;
        this.address = address;
    }

    @Override
    public PrototypeAble lightClone() throws CloneNotSupportedException {
        return (PrototypeAble) super.clone();
    }

    @Override
    public PrototypeAble deepClone() throws CloneNotSupportedException, ClassNotFoundException, IOException {
        AccountPrototype clone = null;

        clone = (AccountPrototype) super.clone();
        clone.address = this.address.deepClone();

        return clone;
    }

    @Override
    public PrototypeAble root() {
        return this;
    }

    @Override
    public String toString() {
        return "AccountPrototype [id=" + id + ", name=" + name + ", age=" + age + ", desc=" + desc + ", address="
                + address + "]";
    }
}
AddressPrototype類
public class AddressPrototype implements PrototypeAble {
    private String name;
    private String location;

    @Override
    public PrototypeAble lightClone() throws CloneNotSupportedException {
        return (PrototypeAble) super.clone();
    }

    @Override
    public PrototypeAble deepClone() throws CloneNotSupportedException {
        return (PrototypeAble) super.clone();
    }

    @Override
    public PrototypeAble root() {
        return this;
    }
}
AccountManager類
public class AccountManager {
    public static AccountManager sAccountManager;

    private Map accountMap = new HashMap();

    private AccountManager(){}

    public static AccountManager getAccountManager(){
        if(sAccountManager==null){
            synchronized(AccountManager.class){
                if(sAccountManager==null){
                    sAccountManager = new AccountManager();
                }
            }
        }
        return sAccountManager;
    }

    public synchronized AccountPrototype newAccount(int id,int age,String name,String desc,Address address){
        AccountPrototype account = accountMap.containsKey(id) ? accountMap.get(id) : new AccountPrototype(id,age,name,desc,address);
        accountMap.put(id, account);
        return account;
    }

    public AccountPrototype getDeepCloneAccountById(int id) throws Exception{
        if(!accountMap.containsKey(id)){
            throw new Exception("沒有當前的id的帳號");
        }

        return (AccountPrototype) accountMap.get(id).deepClone();
    }

    public AccountPrototype getLightCloneAccountById(int id) throws Exception{
        if(!accountMap.containsKey(id)){
            throw new Exception("沒有當前的id的帳號");
        }

        return (AccountPrototype) accountMap.get(id).lightClone();
    }

    public AccountPrototype getRootAccountById(int id) throws Exception{
        if(!accountMap.containsKey(id)){
            throw new Exception("沒有當前的id的帳號");
        }

        return (AccountPrototype) accountMap.get(id).root();
    }
}
client類
public class Client {
    public static void main(String[] args) {
        //我的界面,生成新的Account
        AccountManager.getAccountManager().newAccount(1, 13, "Rrtoyewx", "Rrtoyewx是一個長不大的孩子",new Address("北京","昌平"));

        //其他的界面中客戶端去獲取的account,不允許修改的account的屬性。即使修改了也不能去的改變最原始的
        try {
            AccountPrototype deepCloneAccount = AccountManager.getAccountManager().getDeepCloneAccountById(1);
            AccountPrototype lightCloneAccount = AccountManager.getAccountManager().getLightCloneAccountById(1);
            AccountPrototype rootAccount = AccountManager.getAccountManager().getRootAccountById(1);

            System.out.println("deepCloneAccount: "+deepCloneAccount.toString());
            System.out.println("lightCloneAccount: "+lightCloneAccount.toString());
            System.out.println("rootAccount: "+rootAccount.toString());

        } catch (Exception e) {
            e.printStackTrace();
        }
    }
}
這個時候類的結構圖已經正如我們一開始uml的圖表示那樣的,
- Client 客戶端類調用的類,如我們此時的Client的類
- Prototype 提供clone()等方法的原型抽象接口,相當於我們的PrototypeAble的接口
- ConcretePrototype 具體的原型的函數,如栗子種的AccountPrototype和AddressPrototype類
- AccountManager Account的管理類
打印的結果也如下圖

打印的結果也正如我們前面說的那樣。
至此我們已經將原型模式說完。記住
1. 原型模式是一種創建模式
2. 原型模式適用於構建較復雜,耗時較長的對象
3. 原型模式不經過構造方法
4. 使用原型模式區分好深拷貝和淺拷貝
5. 對於簡單的對象,不建議使用的原型模式
 Android_JSON數據分析
一.JSON的簡介:JSON建構於兩種結構:(1)“名稱/值”對的集合(A collection of name/value pairs)。不同的
 android 動態加載自定義控件
首先介紹功能,我要實現動態加載布局的效果,之前是采用的new組件的辦法來實現,但是android內存有限,new的對象會達到500多個,為了減少new的對象,我決定使用x
 Android酷炫實用的開源框架(UI框架)
前言忙碌的工作終於可以停息一段時間了,最近突然有一個想法,就是自己寫一個app,所以找了一些合適開源控件,這樣更加省時,再此分享給大家,希望能對大家有幫助,此博文介紹的都
 Android開發之用Bmob實現短信驗證碼功能
這篇文章主要介紹發送驗證碼和校驗驗證碼的功能,用到一個第三方平台Bmob,那Bmob是什麼呢?Bmob可以開發一個雲存儲的移動應用軟件,他提供了大量的標准的API接口,根