編輯:關於Android編程
要想讓您的控件水平居中或垂直居中其實很簡單,只要在控件的上一級中設置【android:gravity="center"】屬性即可
如:
<LinearLayout xmlns:android="http://schemas.android.com/apk/res/android"
  android:orientation="vertical"
  android:gravity="center"
  android:background="#000000"
  android:layout_width="fill_parent"
  android:layout_height="fill_parent"
  >
  <ImageView
  android:id="@+id/logo"
  android:src="@drawable/logo"
  android:layout_width="wrap_content"
  android:layout_height="wrap_content"
  />
</LinearLayout>
這樣一個ImageView控件就乖乖的待在你選定區域的正中間了。 gravity的屬性值還有很多,可以單獨設置水平或垂直居中。大家可以查看相應的文檔,或使用Eclipse的提示功能快速查看。
我們來看一個實例,如果你想實現這樣的布局,兩個按鈕居中,該怎樣做?
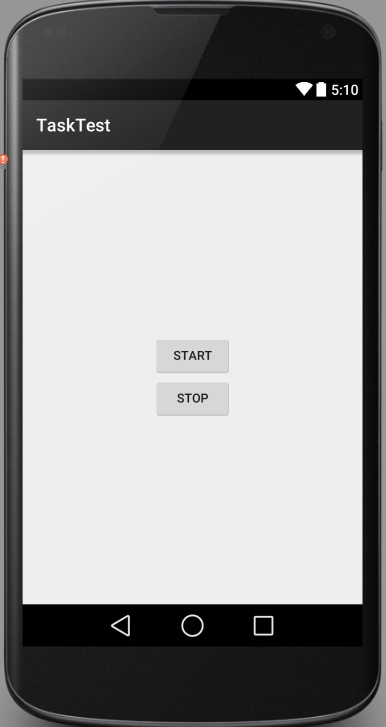
比較容易實現的是LinearLayout布局,當然如果換成RelativeLayout同樣也可以實現。
這裡簡單說一下用RelativeLayout布局如何實現,首先需找中心點,然後以這個中心點為參照物即可實現。接下來看一下更容易實現的LinearLayout布局的實現。
<?xml version="1.0" encoding="utf-8"?>
<LinearLayout xmlns:android="http://schemas.android.com/apk/res/android"
       android:orientation="vertical"
       android:layout_width="match_parent"
       android:layout_height="match_parent"
       android:gravity="center">
  <Button
      android:layout_width="wrap_content"
      android:layout_height="wrap_content"
      android:id="@+id/start_server"
      android:text="Start" />
  <Button
      android:layout_width="wrap_content"
      android:layout_height="wrap_content"
      android:id="@+id/stop_server"
      android:text="Stop" />
</LinearLayout>
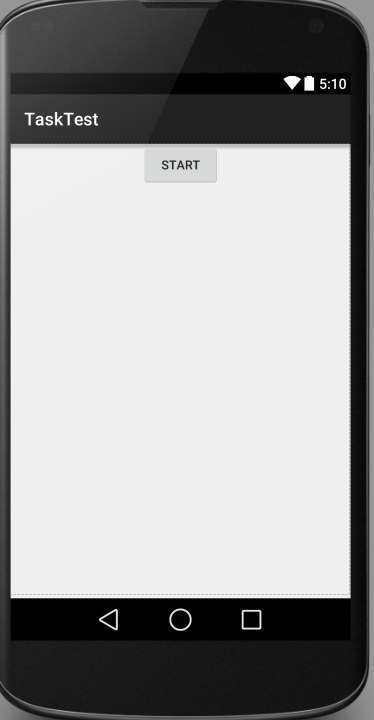
如果現在需求改變了,中間只需要一個Button即可,那麼實現起來很簡單,只需要將上面的其中一個Button標簽刪除即可,但是有些人這麼去實現
<?xml version="1.0" encoding="utf-8"?>
<LinearLayout xmlns:android="http://schemas.android.com/apk/res/android"
       android:orientation="vertical"
       android:layout_width="match_parent"
       android:layout_height="match_parent">
  <Button
      android:layout_width="wrap_content"
      android:layout_height="wrap_content"
      android:id="@+id/start_server"
      android:layout_gravity="center"
      android:text="Start" />
</LinearLayout>
這麼實現顯然不能居中,雖然在Button標簽指定了android:layout_gravity="center"但是貌似布局不領情,為啥?
原因很簡單,LinearLayout只能有一個方向,要麼Vertical,要麼Horizontal,完全不會領layout_gravity這個屬性的情,所以上面的實現只有這麼一個結果
如果改成水平方向的布局
<?xml version="1.0" encoding="utf-8"?>
<LinearLayout xmlns:android="http://schemas.android.com/apk/res/android"
       android:orientation="horizontal"
       android:layout_width="match_parent"
       android:layout_height="match_parent">
  <Button
      android:layout_width="wrap_content"
      android:layout_height="wrap_content"
      android:id="@+id/start_server"
      android:layout_gravity="center"
      android:text="Start" />
</LinearLayout>
會變成這樣的結果
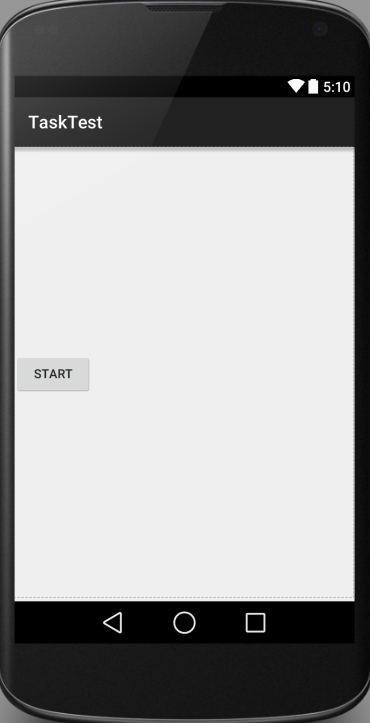
按照上面的理論也就能想通了,所以android:layout_gravity="center"這個屬性雖然LinearLayout也具有,但是卻虛晃一槍,真正其作用的還是其本身的屬性android:gravity="center",當然如果想一探究竟,為啥不起作用,可以從LinearLayout這個布局的源代碼看起,這裡不再贅述。
 Android自定義ViewGroup實現標簽浮動效果
前面在學習鴻洋大神的一些自定義的View文章,看到了自定義ViewGroup實現浮動標簽,初步看了下他的思路以及結合自己的思路完成了自己的浮動標簽的自定義ViewGrou
 Android自定義UI手勢密碼終結版
之前寫過3篇手勢密碼的demo,不過沒有集成到真實的企業項目中,這幾天正好領到一個手勢密碼項目,昨天剛好弄完,今天抽空整理下,目前還沒有完善,有一些地方需要更改,不過基本
 Android通過String.format格式化(動態改變)字符串資源的顯示內容
一、實現效果: 最近在項目中需要做類似於上圖顯示的效果,裡面的數字和稱謂是動態獲取的,對於這種顯示效果,有如下兩種解決方案來處理: (1)通過代碼動態設置TextVie
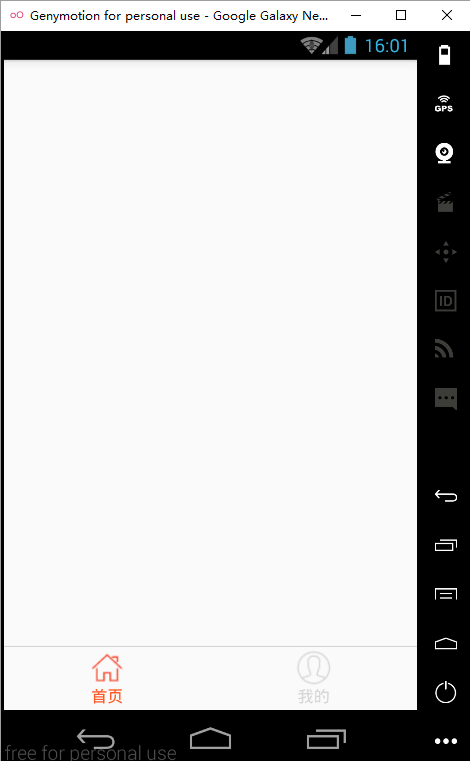 react native 實戰系列教程之Navigator實現頁面跳轉
主界面開發上一節,我們已經完成了首頁的開發,現在,我們繼續完成主界面的開發,就是添加底部‘首頁’和‘我的’兩個tabbar
 使用數據源碼解析Android中的Adapter、BaseAdapter、ArrayAdapter、SimpleAdapter和SimpleCursorAdapter
Adapter相當於一個數據源,可以給AdapterView提供數據,並