編輯:關於Android編程
我們在Android系統增加硬件服務的目的是為了讓應用層的APP能夠通過Java接口來訪問硬件服務。那麼, APP如何通過Java接口來訪問Application Frameworks層提供的硬件服務呢?在這一篇文章中,我們將在Android系統的應用層增加一個內置的應用程序,這個內置的應用程序通過ServiceManager接口獲取指定的服務,然後通過這個服務來獲得硬件服務。
一. 參照在Ubuntu Android實現Application Frameworks層增加硬件訪問服務一文,在Application Frameworks層定義好自己的硬件服務HelloService,並提供IHelloService接口提供訪問服務。
二. 為了方便開發,我們可以在IDE環境下使用Android SDK來開發Android應用程序。
開發完成後,再把程序源代碼移植到Android源代碼工程目錄中。使用Eclipse的Android插件ADT創建Android工程很方便,這裡不述,可以參考網上其它資料。工程名稱為Hello,下面主例出主要文件:
主程序是src/shy/luo/hello/Hello.java:
package shy.luo.hello;

import shy.luo.hello.R;
import android.app.Activity;
import android.os.ServiceManager;
import android.os.Bundle;
import android.os.IHelloService;
import android.os.RemoteException;
import android.util.Log;
import android.view.View;
import android.view.View.OnClickListener;
import android.widget.Button;
import android.widget.EditText;

public class Hello extends Activity implements OnClickListener {
	private final static String LOG_TAG = "shy.luo.renju.Hello";

	private IHelloService helloService = null;

	private EditText valueText = null;
	private Button readButton = null;
	private Button writeButton = null;
	private Button clearButton = null;

 /** Called when the activity is first created. */
 @Override
 public void onCreate(Bundle savedInstanceState) {
 super.onCreate(savedInstanceState);
 setContentView(R.layout.main);

	helloService = IHelloService.Stub.asInterface(
		ServiceManager.getService("hello"));

 valueText = (EditText)findViewById(R.id.edit_value);
 readButton = (Button)findViewById(R.id.button_read);
 writeButton = (Button)findViewById(R.id.button_write);
 clearButton = (Button)findViewById(R.id.button_clear);

	readButton.setOnClickListener(this);
	writeButton.setOnClickListener(this);
	clearButton.setOnClickListener(this);

 Log.i(LOG_TAG, "Hello Activity Created");
 }

 @Override
 public void onClick(View v) {
 	if(v.equals(readButton)) {
		try {
 			int val = helloService.getVal();
 			String text = String.valueOf(val);
 			valueText.setText(text);
		} catch (RemoteException e) {
			Log.e(LOG_TAG, "Remote Exception while reading value from device.");
		}
 	}
 	else if(v.equals(writeButton)) {
		try {
 			String text = valueText.getText().toString();
 			int val = Integer.parseInt(text);
			helloService.setVal(val);
		} catch (RemoteException e) {
			Log.e(LOG_TAG, "Remote Exception while writing value to device.");
		}
 	}
 	else if(v.equals(clearButton)) {
 		String text = "";
 		valueText.setText(text);
 	}
 }
}
程序通過ServiceManager.getService("hello")來獲得HelloService,接著通過IHelloService.Stub.asInterface函數轉換為IHelloService接口。其中,服務名字“hello”是系統啟動時加載HelloService時指定的,而IHelloService接口定義在android.os.IHelloService中,具體可以參考在Ubuntu上為Android系統的Application Frameworks層增加硬件訪問服務一文。這個程序提供了簡單的讀定自定義硬件有寄存器val的值的功能,通過IHelloService.getVal和IHelloService.setVal兩個接口實現。
界面布局文件res/layout/main.xml:
<?xml version="1.0" encoding="utf-8"?>
 <LinearLayout xmlns:android="http://schemas.android.com/apk/res/android"
 android:orientation="vertical"
 android:layout_width="fill_parent"
 android:layout_height="fill_parent">
 <LinearLayout
 android:layout_width="fill_parent"
 android:layout_height="wrap_content"
 android:orientation="vertical"
 android:gravity="center">
 <TextView
 android:layout_width="wrap_content"
 android:layout_height="wrap_content"
 android:text="@string/value">
 </TextView>
 <EditText
 android:layout_width="fill_parent"
 android:layout_height="wrap_content"
 android:id="@+id/edit_value"
 android:hint="@string/hint">
 </EditText>
 </LinearLayout>
 <LinearLayout
 android:layout_width="fill_parent"
 android:layout_height="wrap_content"
 android:orientation="horizontal"
 android:gravity="center">
 <Button
 android:id="@+id/button_read"
 android:layout_width="wrap_content"
 android:layout_height="wrap_content"
 android:text="@string/read">
 </Button>
 <Button
 android:id="@+id/button_write"
 android:layout_width="wrap_content"
 android:layout_height="wrap_content"
 android:text="@string/write">
 </Button>
 <Button
 android:id="@+id/button_clear"
 android:layout_width="wrap_content"
 android:layout_height="wrap_content"
 android:text="@string/clear">
 </Button>
 </LinearLayout>
 </LinearLayout>
字符串文件res/values/strings.xml:
<?xml version="1.0" encoding="utf-8"?>
 <resources>
 <string name="app_name">Hello</string>
 <string name="value">Value</string>
 <string name="hint">Please input a value...</string>
 <string name="read">Read</string>
 <string name="write">Write</string>
 <string name="clear">Clear</string>
 </resources>
程序描述文件AndroidManifest.xml:
<?xml version="1.0" encoding="utf-8"?>
 <manifest xmlns:android="http://schemas.android.com/apk/res/android"
 package="shy.luo.hello"
 android:versionCode="1"
 android:versionName="1.0">
 <application android:icon="@drawable/icon" android:label="@string/app_name">
 <activity android:name=".Hello"
  android:label="@string/app_name">
 <intent-filter>
 <action android:name="android.intent.action.MAIN" />
 <category android:name="android.intent.category.LAUNCHER" />
 </intent-filter>
 </activity>
 </application>
 </manifest>
三. 將Hello目錄拷貝至packages/experimental目錄,新增Android.mk文件:
USER-NAME@MACHINE-NAME:~/Android/packages/experimental$ vi Android.mk
Android.mk的文件內容如下:
LOCAL_PATH:= $(call my-dir)
include $(CLEAR_VARS)
LOCAL_MODULE_TAGS := optional
LOCAL_SRC_FILES := $(call all-subdir-java-files)
LOCAL_PACKAGE_NAME := Hello
include $(BUILD_PACKAGE)
四. 編譯:
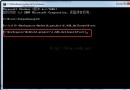
USER-NAME@MACHINE-NAME:~/Android$ mmm packages/experimental/Hello
編譯成功後,便可以在out/target/product/generic/system/app目錄下看到Hello.apk文件了。
五. 重新打包系統鏡像文件system.img:
USER-NAME@MACHINE-NAME:~/Android$ make snod
重新打包後的system.img文件就內置了Hello.apk文件了。
六. 運行Android模擬器:
USER-NAME@MACHINE-NAME:~/Android$ emulator -kernel kernel/common/arch/arm/boot/zImage &
在Home Screen中可以看到Hello應用程序:

打開Hello應用程序:
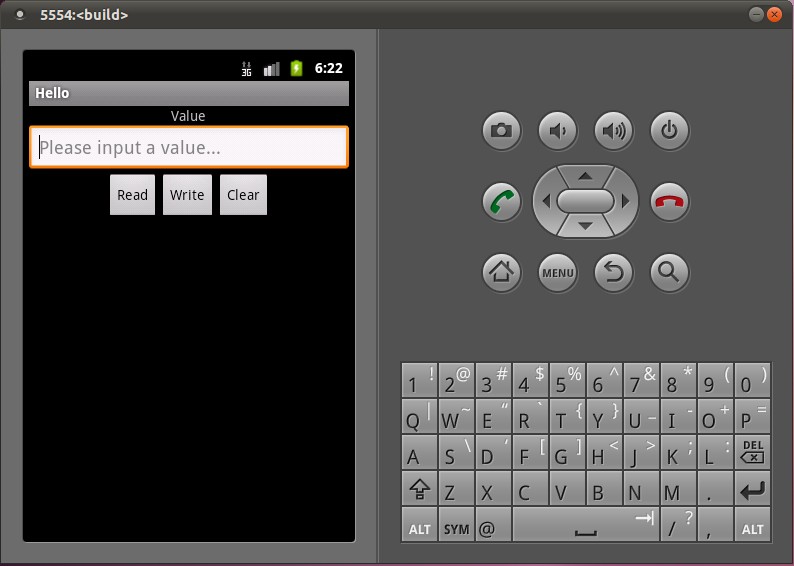
點擊Read按鈕,可以從HelloService中讀取硬件寄存器val的值;點擊Clear按鈕,可以清空文本框的值;在文本框中輸入一個數值,再點擊Write按鈕,便可以將這個值寫入到硬件寄存器val中去,可以再次點擊Read按鈕來驗證是否正確寫入了值。
至此,我們就完整地學習了在Android的Linux內核空間添加硬件驅動程序、在Android的硬件抽象層添加硬件接口、在Android的Application Frameworks層提供硬件服務以及在Android的應用層調用硬件服務的整個過程了,希望能為讀者進入Android系統提供入門幫助。重新學習整個過程。
系列文章:
Android源碼 在Ubuntu上下載,編譯和安裝
Android內核源碼 在Ubuntu上下載,編譯,安裝
Ubuntu Android系統上編寫Linux內核驅動程序實現方法
Ubuntu Android HAL編寫JNI方法提供JAVA訪問硬件服務接口
Ubuntu Android實現Application Frameworks層增加硬件訪問服務
以上就是Ubuntu Android 實現簡單的應用,從內核到驅動,HAL,Frameworks層,在到APP的實現, 希望能幫到深入研究Android源碼的朋友。
 Android自定義控件實現溫度旋轉按鈕效果
首先看下效果圖溫度旋轉按鈕實現思路 初始化一些參數 繪制刻度盤 繪制刻度盤下的圓弧 繪制標題與溫度標識 繪制旋轉按鈕 繪制溫度 處理滑動事件 提供一些接口
 (Android 基礎(十三)) selector
介紹A StateListDrawable is a drawable object defined in XML that uses a several differe
 Android之——JNI初探
這裡,我將用一個小例子的形式來幫助大家初探JNI的用法,首先,大家要先搭建好NDK環境,請大家先閱讀《Android之——NDK環境搭建》一文。一
 Android移動APP開發筆記——最新版Cordova 5.3.1(PhoneGap)搭建開發環境
引言 簡單介紹一下Cordova的來歷,Cordova的前身叫PhoneGap,自被Adobe收購後交由Apache管理,並將其核心功能開源改名為Cordova。它能讓你