編輯:關於Android編程
To create a dynamic and multi-pane user interface on Android, you need to encapsulate UI components and activity behaviors into modules that you can swap into and out of your activities. You can create these modules with the Fragment class, which behaves somewhat like a nested activity that can define its own layout and manage its own lifecycle.
要在Android創建一個動態的多屏用戶界面,你需要將UI組件和Activity的行為壓縮到模型中以便你可以在你的activity中切換。你可以使用Fragment類創建這些模型,Fragment就像是嵌套的activity,他可以定義自己的布局管理自己的生命周期。
When a fragment specifies its own layout, it can be configured in different combinations with other fragments inside an activity to modify your layout configuration for different screen sizes (a small screen might show one fragment at a time, but a large screen can show two or more).
當一個Fragment指定自己的布局,在一個activity中,他可以和其他Fragment配置成不同的組合,以修改你的布局配置來適配不同尺寸的屏幕。(一個小屏設備也許一次只能顯示一個Fragment,但是大屏可能可以顯示兩個或更多)
This class shows you how to create a dynamic user experience with fragments and optimize your app’s user experience for devices with different screen sizes, all while continuing to support devices running versions as old as Android 1.6.
這節課展示如何用Fragment創建一個動態用戶界面並提高不同尺寸屏幕上你的app的用戶體驗,所有支持運行的設備版本至少是Android1.6.(Fragment 最早在Android 3.0.x API11中新增)。
You can think of a fragment as a modular section of an activity, which has its own lifecycle, receives its own input events, and which you can add or remove while the activity is running (sort of like a “sub activity” that you can reuse in different activities). This lesson shows how to extend the Fragment class using the Support Library so your app remains compatible with devices running system versions as low as Android 1.6.
你可以把Fragment想象成一個模塊化的activity,他有自己的生命周期,接收自己的鍵盤輸入事件,在你的activity還在運行時你可以把Fragment移除(有幾分像一個你可以在不同的activity重用的“子activity”),本節課向你展示如何使用支持類庫繼承Fragment,而且你的app在Android1.6這樣低的版本上也能保持穩定。
Before you begin this lesson, you must set up your Android project to use the Support Library. If you have not used the Support Library before, set up your project to use the v4 library by following the Support Library Setup document. However, you can also include the app bar in your activities by instead using the v7 appcompat library, which is compatible with Android 2.1 (API level 7) and also includes the Fragment APIs.
在你開始這節課之前,你必須設置你的Android項目使用支持類庫。如果你之前沒有使用過支持類庫,通過以下的支持類庫設置文檔設置你的項目使用v4類庫。另外,在你的activity你也可以導入v7應用程序兼容類庫,v7類庫在Android2.1(API 等級 7)且也包含
Create a Fragment Class
To create a fragment, extend the Fragment class, then override key lifecycle methods to insert your app logic, similar to the way you would with an Activity class.
為了創建Fragment,既存Fragment類,然後重寫關鍵的生命周期方法以便插入你的應用程序邏輯,類似你創建Activity時所需要做的操作。
One difference when creating a Fragment is that you must use the onCreateView() callback to define the layout. In fact, this is the only callback you need in order to get a fragment running. For example, here’s a simple fragment that specifies its own layout:
與創建Activity的一個不同點是你必須使用onCreateView()的回調來定義你的布局。實際上,這是你需要的惟一的回調來讓Fragment運行。例如,這裡有一個簡單的Fragment,並且定義了他的布局
import android.os.Bundle;
import android.support.v4.app.Fragment;
import android.view.LayoutInflater;
import android.view.ViewGroup;

public class ArticleFragment extends Fragment {
    @Override
    public View onCreateView(LayoutInflater inflater, ViewGroup container,
        Bundle savedInstanceState) {
        // Inflate the layout for this fragment
        return inflater.inflate(R.layout.article_view, container, false);
    }
}
Just like an activity, a fragment should implement other lifecycle callbacks that allow you to manage its state as it is added or removed from the activity and as the activity transitions between its lifecycle states. For instance, when the activity’s onPause() method is called, any fragments in the activity also receive a call to onPause().
就像一個Activity,一個Fragment應該繼承其他生命周期回調,這會允許你在Fragment被添加到Activity或者從Activity移除的時候已經Activity之間切換的時候管理Fragment的生命周期。舉例:當一個Activity的onPause()方法被調用,任何在該Activity的Fragment都會受到onPause的回調。
More information about the fragment lifecycle and callback methods is available in the Fragments developer guide.
更多關於Fragment的生命周期和回調方法參見Fragments開發指南
Add a Fragment to an Activity using XML
While fragments are reusable, modular UI components, each instance of a Fragment class must be associated with a parent FragmentActivity. You can achieve this association by defining each fragment within your activity layout XML file.
Fragment是可重用的,模塊化UI組件,每個Fragment類的實例必須關聯一個父類FragmentActivity。你可以實現這種關聯,通過在你的Activity XML布局文件定義每個Fragment。
Note: FragmentActivity is a special activity provided in the Support Library to handle fragments on system versions older than API level 11. If the lowest system version you support is API level 11 or higher, then you can use a regular Activity.
注意:FragmentActivity是一個特殊的Activity,他被提供,來提供支持類庫處理系統版本低於API等級低於11的設備上的Fragment。
Here is an example layout file that adds two fragments to an activity when the device screen is considered “large” (specified by the large qualifier in the directory name).
例子:添加兩個Fragment到一個Activity的布局文件,當屏幕是大屏的時候(定義在layout-large目錄中)。
res/layout-large/news_articles.xml
Tip: For more about creating layouts for different screen sizes, read Supporting Different Screen Sizes.
貼士:更多關於創建不同屏幕布局的信息,參見Supporting Different Screen Sizes。
Then apply the layout to your activity:
將布局文件應用到你的Activity
import android.os.Bundle;
import android.support.v4.app.FragmentActivity;

public class MainActivity extends FragmentActivity {
    @Override
    public void onCreate(Bundle savedInstanceState) {
        super.onCreate(savedInstanceState);
        setContentView(R.layout.news_articles);
    }
}
If you’re using the v7 appcompat library, your activity should instead extend AppCompatActivity, which is a subclass of FragmentActivity. For more information, read Adding the App Bar).
如果你使用v7應用程序兼容性庫,你的Activity應繼承AppCompatActivity,AppCompatActivity是FragmentActivity的子類。更多信息參見Adding the App Bar
Note: When you add a fragment to an activity layout by defining the fragment in the layout XML file, you cannot remove the fragment at runtime. If you plan to swap your fragments in and out during user interaction, you must add the fragment to the activity when the activity first starts, as shown in the next lesson.
注意:當你通過XML文件添加一個Fragment到Activity布局,你無法在Activity運行中將Fragment移除。如果你打算在用戶操作中切換Fragment,你必須在Activity初次創建的時候將Fragment添加到Activity,也就是下節課要講的。
When designing your application to support a wide range of screen sizes, you can reuse your fragments in different layout configurations to optimize the user experience based on the available screen space.
For example, on a handset device it might be appropriate to display just one fragment at a time for a single-pane user interface. Conversely, you may want to set fragments side-by-side on a tablet which has a wider screen size to display more information to the user.
在設計支持各種屏幕尺寸的應用時,你可以在不同的布局配置中重復使用 Fragment ,以便根據相應的屏幕空間提供更出色的用戶體驗。
例如,一次只顯示一個 Fragment 可能就很適合手機這種單窗格界面,但在平板電腦上,你可能需要設置並列的 Fragment,因為平板電腦的屏幕尺寸較寬闊,可向用戶顯示更多信息。

Figure 1. Two fragments, displayed in different configurations fZ喎?/kf/ware/vc/" target="_blank" class="keylink">vciB0aGUgc2FtZSBhY3Rpdml0eSBvbiBkaWZmZXJlbnQgc2NyZWVuIHNpemVzLiBPbiBhIGxhcmdlIHNjcmVlbiwgYm90aCBmcmFnbWVudHMgZml0IHNpZGUgYnkgc2lkZSwgYnV0IG9uIGEgaGFuZHNldCBkZXZpY2UsIG9ubHkgb25lIGZyYWdtZW50IGZpdHMgYXQgYSB0aW1lIHNvIHRoZSBmcmFnbWVudHMgbXVzdCByZXBsYWNlIGVhY2ggb3RoZXIgYXMgdGhlIHVzZXIgbmF2aWdhdGVzLjxiciAvPg0KzbwgMaO6IMG9uPYgRnJhZ21lbnSjrM/Uyr7U2rK7zayz37TnxsHEu8nPzazSuyBBY3Rpdml0eSC1xLK7zazF5NbD1tCho9Tavc+/7cCrtcTGwcS7yc+jrMG9uPYgRnJhZ21lbnQgv8myosHQz9TKvqO71NrK1rv6yc+jrNK7tM7Wu8Tcz9TKvtK7uPYgRnJhZ21lbnSjrNLytMux2NDr1NrTw7untby6vcqxuPy7uyBGcmFnbWVudKGjPC9wPg0KPHA+VGhlIEZyYWdtZW50TWFuYWdlciBjbGFzcyBwcm92aWRlcyBtZXRob2RzIHRoYXQgYWxsb3cgeW91IHRvIGFkZCwgcmVtb3ZlLCBhbmQgcmVwbGFjZSBmcmFnbWVudHMgdG8gYW4gYWN0aXZpdHkgYXQgcnVudGltZSBpbiBvcmRlciB0byBjcmVhdGUgYSBkeW5hbWljIGV4cGVyaWVuY2UuPGJyIC8+DQrA+9PDIEZyYWdtZW50TWFuYWdlciDA4Mzhuam1xLe9t6ijrMTjv8nS1NTa1MvQ0MqxzO2806Gi0saz/brNzOa7uyBBY3Rpdml0eSDW0LXEIEZyYWdtZW50o6zS1LHjzqrTw7unzOG5qdK71ta2r8yszOXR6aGjPC9wPg0KPHA+PHN0cm9uZz5BZGQgYSBGcmFnbWVudCB0byBhbiBBY3Rpdml0eSBhdCBSdW50aW1lPC9zdHJvbmc+PC9wPg0KPHA+UmF0aGVyIHRoYW4gZGVmaW5pbmcgdGhlIGZyYWdtZW50cyBmb3IgYW4gYWN0aXZpdHkgaW4gdGhlIGxheW91dCBmaWxlJm1kYXNoO2FzIHNob3duIGluIHRoZSBwcmV2aW91cyBsZXNzb24gd2l0aCB0aGUgPGNvZGU+PGZyYWdtZW50PiBlbGVtZW50Jm1kYXNoO3lvdSBjYW4gYWRkIGEgZnJhZ21lbnQgdG8gdGhlIGFjdGl2aXR5IGR1cmluZyB0aGUgYWN0aXZpdHkgcnVudGltZS4gVGhpcyBpcyBuZWNlc3NhcnkgaWYgeW91IHBsYW4gdG8gY2hhbmdlIGZyYWdtZW50cyBkdXJpbmcgdGhlIGxpZmUgb2YgdGhlIGFjdGl2aXR5LjwvZnJhZ21lbnQ+PC9jb2RlPjwvcD4NCjxwPjxjb2RlPlRvIHBlcmZvcm0gYSB0cmFuc2FjdGlvbiBzdWNoIGFzIGFkZCBvciByZW1vdmUgYSBmcmFnbWVudCwgeW91IG11c3QgdXNlIHRoZSBGcmFnbWVudE1hbmFnZXIgdG8gY3JlYXRlIGEgRnJhZ21lbnRUcmFuc2FjdGlvbiwgd2hpY2ggcHJvdmlkZXMgQVBJcyB0byBhZGQsIHJlbW92ZSwgcmVwbGFjZSwgYW5kIHBlcmZvcm0gb3RoZXIgZnJhZ21lbnQgdHJhbnNhY3Rpb25zLjxiciAvPg0KxOO/ydLU1NogQWN0aXZpdHkg1MvQ0Mqxz/LG5MztvNMgRnJhZ21lbnSjrLb4srvTw8/xyc/Su7/O1tC96cnctcTEx9H5o6zKudPDINSqy9jU2rK8vtbOxLz+1tDOqiBBY3Rpdml0eSC2qNLlIEZyYWdtZW50oaPI57n7xOO08svj1NogQWN0aXZpdHkg1MvQ0NbcxtrE2rj8uMQgRnJhZ21lbnSjrL7NsdjQ69Xi0fnX9qGjPC9jb2RlPjwvcD4NCjxwPjxjb2RlPtKq1rTQ0MztvNO78tLGs/0gRnJhZ21lbnQgtcjKws7xo6zE47HY0OvKudPDIEZyYWdtZW50TWFuYWdlciC0tL2o0ru49iBGcmFnbWVudFRyYW5zYWN0aW9uo6y689Xfv8nM4bmp08PT2ta00NDM7bzToaLSxrP9oaLM5ru70tS8sMbky/sgRnJhZ21lbnQgysLO8bXEIEFQSaGjPC9jb2RlPjwvcD4NCjxwPjxjb2RlPklmIHlvdXIgYWN0aXZpdHkgYWxsb3dzIHRoZSBmcmFnbWVudHMgdG8gYmUgcmVtb3ZlZCBhbmQgcmVwbGFjZWQsIHlvdSBzaG91bGQgYWRkIHRoZSBpbml0aWFsIGZyYWdtZW50KHMpIHRvIHRoZSBhY3Rpdml0eSBkdXJpbmcgdGhlIGFjdGl2aXR5JnJzcXVvO3Mgb25DcmVhdGUoKSBtZXRob2QuPC9jb2RlPjwvcD4NCjxwPjxjb2RlPkFuIGltcG9ydGFudCBydWxlIHdoZW4gZGVhbGluZyB3aXRoIGZyYWdtZW50cyZtZGFzaDtlc3BlY2lhbGx5IHdoZW4gYWRkaW5nIGZyYWdtZW50cyBhdCBydW50aW1lJm1kYXNoO2lzIHRoYXQgeW91ciBhY3Rpdml0eSBsYXlvdXQgbXVzdCBpbmNsdWRlIGEgY29udGFpbmVyIFZpZXcgaW4gd2hpY2ggeW91IGNhbiBpbnNlcnQgdGhlIGZyYWdtZW50LjxiciAvPg0KyOe5+yBBY3Rpdml0eSDW0LXEIEZyYWdtZW50IL/J0tTSxrP9us3M5ru7o6zE49Om1Nq199PDIEFjdGl2aXR5ILXEIG9uQ3JlYXRlKCkgt723qMbavOTOqiBBY3Rpdml0eSDM7bzTs/XKvCBGcmFnbWVudChzKaGjPC9jb2RlPjwvcD4NCjxwPjxjb2RlPtTatKbA7SBGcmFnbWVudKOozNix8MrH1NrUy9DQyrHM7bzTtcQgRnJhZ21lbnQgo6nKsaOsx+u997zH0tTPwtbY0qq55tTyo7qx2NDr1NqyvL7W1tDOqiBGcmFnbWVudCDM4bmpIFZpZXcgyN3G96Os0tSx47GjtOYgRnJhZ21lbnQgtcSyvL7WoaM8L2NvZGU+PC9wPg0KPHA+PGNvZGU+VGhlIGZvbGxvd2luZyBsYXlvdXQgaXMgYW4gYWx0ZXJuYXRpdmUgdG8gdGhlIGxheW91dCBzaG93biBpbiB0aGUgcHJldmlvdXMgbGVzc29uIHRoYXQgc2hvd3Mgb25seSBvbmUgZnJhZ21lbnQgYXQgYSB0aW1lLiBJbiBvcmRlciB0byByZXBsYWNlIG9uZSBmcmFnbWVudCB3aXRoIGFub3RoZXIsIHRoZSBhY3Rpdml0eSZyc3F1bztzIGxheW91dCBpbmNsdWRlcyBhbiBlbXB0eSBGcmFtZUxheW91dCB0aGF0IGFjdHMgYXMgdGhlIGZyYWdtZW50IGNvbnRhaW5lci48L2NvZGU+PC9wPg0KPHA+PGNvZGU+Tm90aWNlIHRoYXQgdGhlIGZpbGVuYW1lIGlzIHRoZSBzYW1lIGFzIHRoZSBsYXlvdXQgZmlsZSBpbiB0aGUgcHJldmlvdXMgbGVzc29uLCBidXQgdGhlIGxheW91dCBkaXJlY3RvcnkgZG9lcyBub3QgaGF2ZSB0aGUgbGFyZ2UgcXVhbGlmaWVyLCBzbyB0aGlzIGxheW91dCBpcyB1c2VkIHdoZW4gdGhlIGRldmljZSBzY3JlZW4gaXMgc21hbGxlciB0aGFuIGxhcmdlIGJlY2F1c2UgdGhlIHNjcmVlbiBkb2VzIG5vdCBmaXQgYm90aCBmcmFnbWVudHMgYXQgdGhlIHNhbWUgdGltZS48YnIgLz4NCs/Cw+bKx8nP0ru/zsv5yr6yvL7WtcTM5rT6sry+1qOs1eLW1rK8vtbSu7TO1ru74c/Uyr7Su7j2IEZyYWdtZW50oaPSqtPD0ru49iBGcmFnbWVudCDM5ru7we3Su7j2IEZyYWdtZW50o6wgQWN0aXZpdHkgtcSyvL7W1tDQ6NKqsPy6rNK7uPbX986qIEZyYWdtZW50IMjdxve1xL/VIEZyYW1lTGF5b3V0oaM8L2NvZGU+PC9wPg0KPHA+PGNvZGU+x+vXotLio6y4w87EvP7D+9Pryc/Su7/O1tCyvL7WzsS8/rXEw/uzxs/gzayjrLWrsry+1sS/wrzDu9PQIGxhcmdlINXi0rvP3raot/uho9LytMujrLTLsry+1rvh1NrJ6LG4xsHEu9Ch09ombGRxdW87bGFyZ2UmcmRxdW87tcTH6b/2z8LKudPDo6zUrdLyysez37Tnvc/QobXExsHEu7K7ysq6z82syrHP1Mq+wb249iBGcmFnbWVudKGjPC9jb2RlPjwvcD4NCjxwPjxjb2RlPnJlcy9sYXlvdXQvbmV3c19hcnRpY2xlcy54bWw6PC9jb2RlPjwvcD4NCjxwcmUgY2xhc3M9"brush:java;">
<framelayout android:id="@+id/fragment_container" android:layout_height="match_parent" android:layout_width="match_parent" xmlns:android="http://schemas.android.com/apk/res/android"></framelayout>
Inside your activity, call getSupportFragmentManager() to get a FragmentManager using the Support Library APIs. Then call beginTransaction() to create a FragmentTransaction and call add() to add a fragment.
You can perform multiple fragment transaction for the activity using the same FragmentTransaction. When you’re ready to make the changes, you must call commit().
For example, here’s how to add a fragment to the previous layout:
在 Activity 內部,使用 Support Library API 調用 getSupportFragmentManager() 以獲取 FragmentManager,然後調用 beginTransaction() 創建 FragmentTransaction,同時調用 add() 添加 Fragment。
你可以使用同一個 FragmentTransaction 對 Activity 執行多 Fragment 事務。當你准備好進行更改時,必須調用 commit()。
例如,下面介紹了如何為上述布局添加 Fragment :
import android.os.Bundle;
import android.support.v4.app.FragmentActivity;

public class MainActivity extends FragmentActivity {
    @Override
    public void onCreate(Bundle savedInstanceState) {
        super.onCreate(savedInstanceState);
        setContentView(R.layout.news_articles);

        // Check that the activity is using the layout version with
        // the fragment_container FrameLayout
        if (findViewById(R.id.fragment_container) != null) {

            // However, if we're being restored from a previous state,
            // then we don't need to do anything and should return or else
            // we could end up with overlapping fragments.
            if (savedInstanceState != null) {
                return;
            }

            // Create a new Fragment to be placed in the activity layout
            HeadlinesFragment firstFragment = new HeadlinesFragment();

            // In case this activity was started with special instructions from an
            // Intent, pass the Intent's extras to the fragment as arguments
            firstFragment.setArguments(getIntent().getExtras());

            // Add the fragment to the 'fragment_container' FrameLayout
            getSupportFragmentManager().beginTransaction()
                    .add(R.id.fragment_container, firstFragment).commit();
        }
    }
}
Because the fragment has been added to the FrameLayout container at runtime—instead of defining it in the activity’s layout with a
由於該 Fragment 已在運行時添加到 FrameLayout 容器中,而不是在 Activity 布局中通過
Replace One Fragment with Another
The procedure to replace a fragment is similar to adding one, but requires the replace() method instead of add().
Keep in mind that when you perform fragment transactions, such as replace or remove one, it’s often appropriate to allow the user to navigate backward and “undo” the change. To allow the user to navigate backward through the fragment transactions, you must call addToBackStack() before you commit the FragmentTransaction.

替換 Fragment 的步驟與添加 Fragment 的步驟相似,但需要調用 replace() 方法,而非 add()。
請注意,當你執行替換或移除 Fragment 等 Fragment 事務時,最好能讓用戶向後導航和“撤消”所做更改。要通過 Fragment 事務允許用戶向後導航,你必須調用 addToBackStack(),然後再執行 FragmentTransaction。
Note: When you remove or replace a fragment and add the transaction to the back stack, the fragment that is removed is stopped (not destroyed). If the user navigates back to restore the fragment, it restarts. If you do not add the transaction to the back stack, then the fragment is destroyed when removed or replaced.

注意:當你移除或替換 Fragment 並向返回堆棧添加事務時,已移除的 Fragment 會停止(而不是銷毀)。如果用戶向後導航,還原該 Fragment,它會重新啟動。如果你沒有向返回堆棧添加事務,那麼該 Fragment 在移除或替換時就會被銷毀。
Example of replacing one fragment with another:

替換 Fragment 的示例:
// Create fragment and give it an argument specifying the article it should show
ArticleFragment newFragment = new ArticleFragment();
Bundle args = new Bundle();
args.putInt(ArticleFragment.ARG_POSITION, position);
newFragment.setArguments(args);

FragmentTransaction transaction = getSupportFragmentManager().beginTransaction();

// Replace whatever is in the fragment_container view with this fragment,
// and add the transaction to the back stack so the user can navigate back
transaction.replace(R.id.fragment_container, newFragment);
transaction.addToBackStack(null);

// Commit the transaction
transaction.commit();
The addToBackStack() method takes an optional string parameter that specifies a unique name for the transaction. The name isn’t needed unless you plan to perform advanced fragment operations using the FragmentManager.BackStackEntry APIs.

addToBackStack() 方法可接受可選的字符串參數,來為事務指定獨一無二的名稱。除非你打算使用 FragmentManager.BackStackEntry API 執行高級 Fragment 操作,否則無需使用此名稱。
Communicating with Other FragmentsIn order to reuse the Fragment UI components, you should build each as a completely self-contained, modular component that defines its own layout and behavior. Once you have defined these reusable Fragments, you can associate them with an Activity and connect them with the application logic to realize the overall composite UI.
為了重用FragmentUI組件,你應該創建的時候就應該讓他們保持完全獨立和模塊化,定義他們自己的布局和行為。一旦你定義了這些可重用的Fragments,你可以使用Activity關聯到他們,用應用的邏輯與他們通信。
Often you will want one Fragment to communicate with another, for example to change the content based on a user event. All Fragment-to-Fragment communication is done through the associated Activity. Two Fragments should never communicate directly.

通常你會希望一個Fragment與另一個Fragment通信,比如說根據用戶事件改變內容。所有Fragment間的通信都是通過Activity關系起來的。兩個Fragments永遠不應該直接通信。
Define an Interface

定義一個接口

To allow a Fragment to communicate up to its Activity, you can define an interface in the Fragment class and implement it within the Activity. The Fragment captures the interface implementation during its onAttach() lifecycle method and can then call the Interface methods in order to communicate with the Activity.

為了允許Fragment和Activity通信,你可以在Fragment類定義一個接口並在Activity實現它。當Fragment執行到他的onAttach生命周期時,Fragment將會捕獲這個接口的實現,然後就可以通過接口方法與Activity通信。

Here is an example of Fragment to Activity communication:

下面是一個Activity與Fragment通信的例子:
public class HeadlinesFragment extends ListFragment {
    OnHeadlineSelectedListener mCallback;

    // Container Activity must implement this interface
    public interface OnHeadlineSelectedListener {
        public void onArticleSelected(int position);
    }

    @Override
    public void onAttach(Activity activity) {
        super.onAttach(activity);

        // This makes sure that the container activity has implemented
        // the callback interface. If not, it throws an exception
        try {
            mCallback = (OnHeadlineSelectedListener) activity;
        } catch (ClassCastException e) {
            throw new ClassCastException(activity.toString()
                    + " must implement OnHeadlineSelectedListener");
        }
    }

    ...
}
Now the fragment can deliver messages to the activity by calling the onArticleSelected() method (or other methods in the interface) using the mCallback instance of the OnHeadlineSelectedListener interface.

現在Fragment可以通過調用OnHeadlineSelectedListener接口的實例:mCallback的onArticleSelected方法(或者接口中的其他方法)去向Activity發送messages
For example, the following method in the fragment is called when the user clicks on a list item. The fragment uses the callback interface to deliver the event to the parent activity.

舉個例子,當用戶點擊list選項時,下面的Fragment的方法將會被調用。Fragment利用回調接口傳遞這個用戶操作事件給父類Activity。
    @Override
    public void onListItemClick(ListView l, View v, int position, long id) {
        // Send the event to the host activity
        mCallback.onArticleSelected(position);
    }
Implement the Interface
In order to receive event callbacks from the fragment, the activity that hosts it must implement the interface defined in the fragment class.

為了接受來自Fragment的回調事,宿主Activity必須實現定義在Fragment類裡的方法。
For example, the following activity implements the interface from the above example.

舉個例子,下面的Activity時序了上面例子中Fragment的接口
public static class MainActivity extends Activity
        implements HeadlinesFragment.OnHeadlineSelectedListener{
    ...

    public void onArticleSelected(int position) {
        // The user selected the headline of an article from the HeadlinesFragment
        // Do something here to display that article
    }
}
Deliver a Message to a Fragment
The host activity can deliver messages to a fragment by capturing the Fragment instance with findFragmentById(), then directly call the fragment’s public methods.

宿主Activity通過findFragmentById拿到Fragment實例,可以傳遞messages給Fragment,然後調用Fragment的公共方法
For instance, imagine that the activity shown above may contain another fragment that’s used to display the item specified by the data returned in the above callback method. In this case, the activity can pass the information received in the callback method to the other fragment that will display the item:

比如,想象一下 顯示著的Activity也許包含另一個Fragment,該Fragment顯示著item,item數據從上面的回調方法中取得。這種情況下,Activity可以傳遞從回調方法中接收的信息到其他Fragment,以顯示具體item信息
public static class MainActivity extends Activity
        implements HeadlinesFragment.OnHeadlineSelectedListener{
    ...

    public void onArticleSelected(int position) {
        // The user selected the headline of an article from the HeadlinesFragment
        // Do something here to display that article

        ArticleFragment articleFrag = (ArticleFragment)
                getSupportFragmentManager().findFragmentById(R.id.article_fragment);

        if (articleFrag != null) {
            // If article frag is available, we're in two-pane layout...

            // Call a method in the ArticleFragment to update its content
            articleFrag.updateArticleView(position);
        } else {
            // Otherwise, we're in the one-pane layout and must swap frags...

            // Create fragment and give it an argument for the selected article
            ArticleFragment newFragment = new ArticleFragment();
            Bundle args = new Bundle();
            args.putInt(ArticleFragment.ARG_POSITION, position);
            newFragment.setArguments(args);

            FragmentTransaction transaction = getSupportFragmentManager().beginTransaction();

            // Replace whatever is in the fragment_container view with this fragment,
            // and add the transaction to the back stack so the user can navigate back
            transaction.replace(R.id.fragment_container, newFragment);
            transaction.addToBackStack(null);

            // Commit the transaction
            transaction.commit();
        }
    }
}
Next class
 Android開發自定義控件實現一個折線圖
實現一個如下圖所示的折線圖首先是控件繪圖區域的劃分,控件左邊取一小部分(控件總寬度的八分之一)繪制表頭,右邊剩余的部分繪制表格確定表格的行列數,首先繪制一個三行八列的網格
 初涉Rx套餐 之RxBinding
最近下班回家都在WOW,周末就爆肝,感覺人都要GO DIE了,昨天下午看了看RxBinding相關的功能感覺還是蠻強大的,所提供的API也是相當豐富(基本Rx套餐都是互通
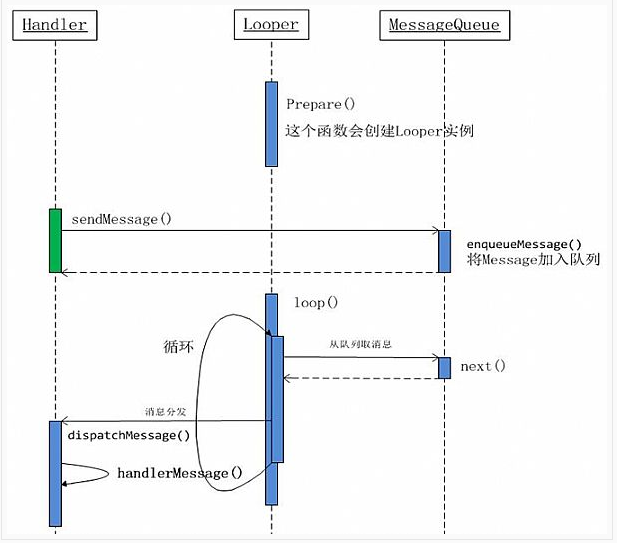 從源碼角度剖析Handler機制
android中,在進行耗時操作更新UI用到最多的方法就是Handler了,一般在子線程中進行耗時操作(訪問網絡等),然後發送消息到UI線程(主線程),使得界面得以更新。
 Android界面編程——對話框控件(四)
2.5對話框控件對話框是提示用戶作出決定或輸入額外信息的小窗口。對話框不會填充屏幕,通常用於需要用戶采取行動才能繼續執行的模式事件。Android中常見跟對話框相關控件有