編輯:關於android開發
This chapter introduces some of the basics of dependency management in Gradle.
Very roughly, dependency management is made up of two pieces. Firstly, Gradle needs to know about the things that your project needs to build or run, in order to find them. We call these incoming files the dependencies of the project. Secondly, Gradle needs to build and upload the things that your project produces. We call these outgoing files the publications of the project. Let's look at these two pieces in more detail:
Most projects are not completely self-contained. They need files built by other projects in order to be compiled or tested and so on. For example, in order to use Hibernate in my project, I need to include some Hibernate jars in the classpath when I compile my source. To run my tests, I might also need to include some additional jars in the test classpath, such as a particular JDBC driver or the Ehcache jars.
These incoming files form the dependencies of the project. Gradle allows you to tell it what the dependencies of your project are, so that it can take care of finding these dependencies, and making them available in your build. The dependencies might need to be downloaded from a remote Maven or Ivy repository, or located in a local directory, or may need to be built by another project in the same multi-project build. We call this process dependency resolution.
Note that this feature provides a major advantage over Ant. With Ant, you only have the ability to specify absolute or relative paths to specific jars to load. With Gradle, you simply declare the “names” of your dependencies, and other layers determine where to get those dependencies from. You can get similar behavior from Ant by adding Apache Ivy, but Gradle does it better.
//注意,這個特性提供了優於ant的重要的優勢,使用ant,你只有一個辦法就是通過指定絕對或者相對路徑來指定要加載的jar包,使用gradle,你只需要簡單的聲明依賴的名字,或者其他的可以得到依賴的地方。這個可以通過在ant上添加Apache Ivy來實現,但是gradle做的更好
Often, the dependencies of a project will themselves have dependencies. For example, Hibernate core requires several other libraries to be present on the classpath with it runs. So, when Gradle runs the tests for your project, it also needs to find these dependencies and make them available. We call these transitive dependencies.
The main purpose of most projects is to build some files that are to be used outside the project. For example, if your project produces a Java library, you need to build a jar, and maybe a source jar and some documentation, and publish them somewhere.
These outgoing files form the publications of the project. Gradle also takes care of this important work for you. You declare the publications of your project, and Gradle take care of building them and publishing them somewhere. Exactly what “publishing” means depends on what you want to do. You might want to copy the files to a local directory, or upload them to a remote Maven or Ivy repository. Or you might use the files in another project in the same multi-project build. We call this processpublication.
Let's look at some dependency declarations. Here's a basic build script:
//下面是一個基本的構建腳本
Example 7.1. Declaring dependencies
build.gradle
apply plugin: 'java'

repositories {
    mavenCentral()
}

dependencies {
    compile group: 'org.hibernate', name: 'hibernate-core', version: '3.6.7.Final'
    testCompile group: 'junit', name: 'junit', version: '4.+'
}
What's going on here? This build script says a few things about the project. Firstly, it states that Hibernate core 3.6.7.Final is required to compile the project's production source. By implication, Hibernate core and its dependencies are also required at runtime. The build script also states that any junit >= 4.0 is required to compile the project's tests. It also tells Gradle to look in the Maven central repository for any dependencies that are required. The following sections go into the details.
In Gradle dependencies are grouped into configurations. A configuration is simply a named set of dependencies. We will refer to them as dependency configurations.
//gradle中依賴以組的形式配置,一個配置就是一個簡單的依賴的名字的集合。我們稱它依賴配置
You can use them to declare the external dependencies of your project. As we will see later, they are also used to declare the publications of your project.
//我們可以使用它們聲明外部依賴,後面我們也會看到,它們也可以用來聲明項目的發布
The Java plugin defines a number of standard configurations. These configurations represent the classpaths that the Java plugin uses. Some are listed below, and you
can find more details in Table 45.5, “Java plugin - dependency configurations”.
//java插件定義了一些標准配置,部分如下
compile
The dependencies required to compile the production source of the project.
//用於編譯項目源代碼的依賴
The dependencies required by the production classes at runtime. By default, also includes the compile time dependencies.
//
The dependencies required to compile the test source of the project. By default, also includes the compiled production classes and the compile time dependencies.
The dependencies required to run the tests. By default, also includes the compile, runtime and test compile dependencies.
Various plugins add further standard configurations. You can also define your own custom configurations to use in your build. Please see Section 23.3, “Dependency configurations” for the details of defining and customizing dependency configurations.
There are various types of dependencies that you can declare. One such type is an external dependency. This is a dependency on some files built outside the current build, and stored in a repository of some kind, such as Maven central, or a corporate Maven or Ivy repository, or a directory in the local file system.
To define an external dependency, you add it to a dependency configuration:
//為了定義外部依賴,你需要把它添加到依賴配置中
Example 7.2. Definition of an external dependency
build.gradle
dependencies {
    compile group: 'org.hibernate', name: 'hibernate-core', version: '3.6.7.Final'
}
An external dependency is identified using group, name and version attributes. Depending on which kind of repository you are using, group and version may be optional.
//外部依賴使用group name和version屬性來生命,group和version是可選的
The shortcut form for declaring external dependencies looks like “group:name:version
//生命外部依賴的簡潔寫法為group:name:version
Example 7.3. Shortcut definition of an external dependency
build.gradle
dependencies {
    compile 'org.hibernate:hibernate-core:3.6.7.Final'
}
To find out more about defining and working with dependencies, have a look at Section 23.4, “How to declare your dependencies”.
How does Gradle find the files for external dependencies? Gradle looks for them in a repository. A repository is really just a collection of files,
organized by group, name andversion. Gradle understands several different repository formats, such as Maven and Ivy, and several different ways of accessing the repository, such as using the local file system or HTTP.
//gradle是如何找到這些外部依賴的呢,gradle會在repository(倉庫)中尋找。一個倉庫是一個真正存儲的文件的存儲集合,按照group,name,version的類型組織起來。gradle了解幾種不同類型的倉庫形式,例如maven,ivy,gradle也了解一些不同的訪問倉庫的方法,例如使用本地文件系統或者http
By default, Gradle does not define any repositories. You need to define at least one before you can use external dependencies. One option is use the Maven central repository:
//默認情況gradle不會定義任何倉庫,你需要在使用外部依賴前至少定義一個。一種選擇是使用Maven central 倉庫
Example 7.4. Usage of Maven central repository
build.gradle
repositories {
    mavenCentral()
}
Or Bintray's JCenter:
Example 7.5. Usage of JCenter repository
build.gradle
repositories {
    jcenter()
}
Or a any other remote Maven repository:
Example 7.6. Usage of a remote Maven repository
build.gradle
repositories {
    maven {
        url "http://repo.mycompany.com/maven2"
    }
}
Or a remote Ivy repository:
Example 7.7. Usage of a remote Ivy directory
build.gradle
repositories {
    ivy {
        url "http://repo.mycompany.com/repo"
    }
}
You can also have repositories on the local file system. This works for both Maven and Ivy repositories.
//你也可以使用本地文件系統的倉庫,對於maven和ivy都可以這樣用。
Example 7.8. Usage of a local Ivy directory
build.gradle
repositories {
    ivy {
        // URL can refer to a local directory
        url "../local-repo"
    }
}
A project can have multiple repositories. Gradle will look for a dependency in each repository in the order they are specified, stopping at the first repository that contains the requested module.
//一個項目可以有多個倉庫,gradle會按照倉庫定義的順序依次在每個倉庫中尋找,找到第一個包含這個請求模塊的倉庫後就停止尋找。
To find out more about defining and working with repositories, have a look at Section 23.6, “Repositories”.
Dependency configurations are also used to publish files.[2] We call these files publication artifacts, or usually just artifacts.
//我們稱發布的文件為publication artifacts或artifacts
The plugins do a pretty good job of defining the artifacts of a project, so you usually don't need to do anything special to tell Gradle what needs to be published. However, you do need to tell Gradle where to publish the artifacts. You do this by attaching repositories to the uploadArchives task. Here's an example of publishing to a remote Ivy repository:
//通常你不需要做任何指定來告訴gradle要發布什麼,但是你需要告訴gradle要把artifacts發布在哪。
Example 7.9. Publishing to an Ivy repository
build.gradle
uploadArchives {
    repositories {
        ivy {
            credentials {
                username "username"
                password "pw"
            }
            url "http://repo.mycompany.com"
        }
    }
}
Now, when you run gradle uploadArchives, Gradle will build and upload your Jar. Gradle will also generate and upload an ivy.xml as well.
//當你運行gradle uploadArchives命令時,gradle將會構建和上傳jar包。gradle也會生成ivy.xml文件並上傳。
You can also publish to Maven repositories. The syntax is slightly different.[3] Note that you also need to apply the Maven plugin in order to publish to a Maven repository. when this is in place, Gradle will generate and upload a pom.xml.
//你也可以發布到maven倉庫中,語法稍微不同。maven也會生成pom.xml文件並上傳
Example 7.10. Publishing to a Maven repository
build.gradle
apply plugin: 'maven'

uploadArchives {
    repositories {
        mavenDeployer {
            repository(url: "file://localhost/tmp/myRepo/")
        }
    }
}
To find out more about publication, have a look at Chapter 30, Publishing artifacts.
For all the details of dependency resolution, see Chapter 23, Dependency Management, and for artifact publication see Chapter 30, Publishing artifacts.
If you are interested in the DSL elements mentioned here, have a look at Project.configurations{}, Project.repositories{} and Project.dependencies{}.
Otherwise, continue on to some of the other tutorials.
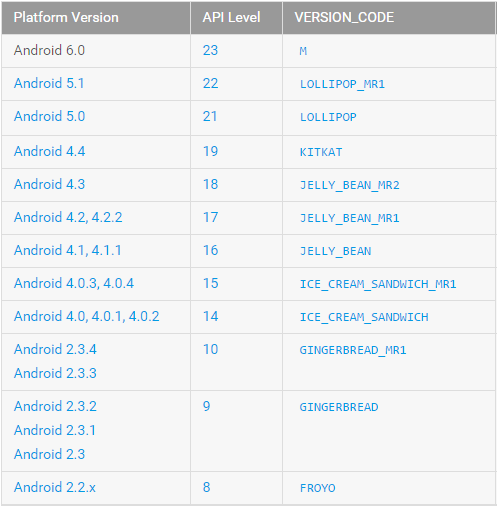 minSdkVersion maxSdkVersion targetSdkVersion target 的區別,targetsdkversion
minSdkVersion maxSdkVersion targetSdkVersion target 的區別,targetsdkversionminSdkVersion
 android:使用gallery和imageSwitch制作可左右循環滑動的圖片浏覽器
android:使用gallery和imageSwitch制作可左右循環滑動的圖片浏覽器 為了使圖片浏覽器左右無限循環滑動 我們要自定義gallery的adapte
 左右滑動刪除ListView條目Item--第三方開源--SwipeToDismiss,第三方listview
左右滑動刪除ListView條目Item--第三方開源--SwipeToDismiss,第三方listview Android的SwipeToDismiss是github
 Android_JSON數據分析
Android_JSON數據分析 一.JSON的簡介: JSON建構於兩種結構: (1)“名稱/值”對的集合(A collection of na