編輯:關於android開發
Android開發中的ListView, 顧名方法思義,就是表視圖。表示圖在iOS開發中就是TableView。兩者雖然名稱不一樣,但是其使用方法,使用場景以及該控件的功能都極為相似,都是用來展示大量數據並帶有分頁的控件。本篇博客將要類比著iOS開發來認識一下ListView, 如果你是Android開發者,你可以看一下iOS中TableView的工作方式。如果你是初學者,那麼只看Android的開發即可。其實Android開發和iOS開發有許多東西都是相通的,盡管控件的名稱以及具體的使用方式不同,但是其使用的本質思想是一樣的。今天的博客就在恰當的地方類比一下iOS開發來好好的搞一下Android開發這個高級控件ListView。
言歸正傳,今天就先認識一下Android開發中系統自帶的ListView. 然後再進一步認識一下ListView, 來自定義一下屬於自己的ListView。在自定義屬於自己的ListView時,是結合者某個理財App中,財富管理頁面的列表來實現的。開始今天博客的主題。
一. 系統自帶的ListView
ListView也就是表視圖,表視圖中擺放的是一個個的Cell(單元格),Cell上放的是我們要展示的數據。在博客的第一部分,我們先使用一下AndroidSDK中預定義的一種ListView,當然還有其他種,但是我們使用最簡單的,也就是Cell上只有一個標題。開始我們這第一部分的正題。
1. 創建ListView
ListView雖然是高級控件,但是高級控件也是控件不是,在XML中也是有ListView標簽的。首先我們創建一個空的Activity,在Activity對應的xml文件中添加ListView標簽。下方就是所添加的內容。
1     <ListView
2         android:id="@+id/list_view"
3         android:layout_width="match_parent"
4         android:layout_height="match_parent">
5     </ListView>
2. 創建模擬數據
ListView上顯示的是一個數據的集合,所以我們要先創建一個Array, 其中存放著在ListView上顯示的數據。模擬數據如下:
1 private String[] dataSource = {"Android", "Google","Java", "Go","iOS", "Apple", "Objc", "Swift"};
3. 數據顯示
第三部要做的就是在ListView上顯示上面數組中的值了。每個Cell上顯示一個元素,在Android開發中,為了在ListView中顯示數據,引入了數據適配器的概念,這個數據適配其其實就是對應著iOS開發中的TableViewCell。Android中的ArrayAdapter其實就是Cell的不同模板,我們把數據賦值給數據適配器,數據適配器就會把要顯示的數據放到相應的Cell上,並且在ListView上展示。
下方第一行代碼是通過ID從XML中獲取ListView對象。然後創建ArrayAdatper(數組適配器),適配器的構造函數第一個參數是數據所在的Activity,第二個參數是單元格要使用的模板,也就是Cell的上要顯示的數據及其布局方式(對應著iOS開發中Cell的布局),第三個參數是數據源即在ListView上顯示的數據集合。最後就是給ListView對接數據適配器進行數據的顯示了
1         //通過ID獲取ListView對象
2         ListView listView = (ListView) findViewById(R.id.list_view);
3         //創建數據適配器
4         ArrayAdapter<String> adapter = new ArrayAdapter<String>(FirstListViewActivit.this, R.layout.support_simple_spinner_dropdown_item, dataSource);
5         //給ListView添加數據
6         listView.setAdapter(adapter);
經過上面這幾步,你就可以創建並顯示一個簡單的ListView了,上面的Activity運行後,效果如下所示:
二. 自定義ListView
如果你經過第一步覺得過於簡單沒有挑戰性的話,那麼我們緊接著來第二部分自定義屬於你自己的ListView. 在開發中大部分還是自定義ListView居多,接下來就來一個真實的案例。下方是我們要實現的效果,也就是我們寫完代碼運行後的一個效果,下方是某知名互聯網金融公司其中一個理財App中“我的財富”模塊中的一部分ListView。下方是運行後的效果,我參與項目開發時,做的是iOS版本,接下來看下Android開發中要實現下方的一個ListView應如何去實現呢。
1.對布局進行分析
磨刀不誤砍柴工,拿到一個UI設計時,不要急著動手,要先分析UI的結構。一個UI的結構分析透了,那麼實現起來就容易多了。在iOS開發中,如果想分析其他App中的UI實現方式,可以使用一個叫Reveal的神器,至於安卓中有木有類似強大的UI分析神器,我就不可而知了。好,我們開始分析上面的UI, 其實上面的Cell是重復的,只要對一個UI進行分析透即可,下方是我們摘抄出來的Cell:
《Android開發之基本控件和詳解四種布局方式》其中對Android開發中常用的布局進行了介紹。
2.上述布局的實現
布局分析完了,接下來就是該如何實現了。實現起來就是寫XML文件了。如果上面真正的分析透徹了,寫布局文件應該不算話下。緊接著需要創建一個XML布局文件,然後對上述布局進行實現,並為相應控件指定id。下方是上面Cell的布局代碼,如下所示:

3.自定義Cell的布局上面就實現好了,接下來,我們要為每個Cell上顯示的數據定義一個數據實體類來表示Cell上的數據,這一點在開發中也是經常使用到的。接下來定義的就是我們的Model類,也就是實體類,如下所示:
1 public class ProductModel {
2     public String productName = "";
3     public String productBuyState = "";
4     public String lendMoney = "0.00";
5     public String interest = "0.00";
6     public String endDate = "0000-00-00";
7 }
4.緊接著要定制上述布局的數據適配器了,我們將要創建的適配器是繼承自系統的ArrayAdapter適配器的,我們可以在此基礎上來做一些屬於我們自己的一些東西。其中有一個私有變量是resourceId, 我們用它來暫存上面布局文件的Id的,由此我們就可以找到該適配器對應的布局方式了。在自定義的ProductAdatper中我們還重寫了getView方法,該方法返回的就是帶有數據的Cell。
在getView方法中,我們可以通過getItem(position)來獲取當前將要顯示在Cell上的數據,通過LayoutInflater來獲取Cell布局文件,在接著就是把數據賦值給Cell上相應的TextView了。最後就是返回這個View(也就是iOS開發中的Cell)。到此這個自定義產品數據適配器就實現完畢了。具體代碼如下所示。
 1 /**
 2  * Created by lizelu on 15/12/20.
 3  * Adapter類似於iOS開發中UITableViewCell源文件,就是給每個Cell賦值的
 4  */
 5 public class ProductAdapter extends ArrayAdapter<ProductModel> {
 6     private int resourceId;
 7     /**
 8      * Constructor
 9      *
10      * @param context  listView所在的上下文,也就是ListView所在的Activity
11      * @param resource Cell的布局資源文件
12      * @param objects  Cell上要顯示的數據list,也就是實體類集合
13      */
14     public ProductAdapter(Context context, int resource, List<ProductModel> objects) {
15         super(context, resource, objects);
16         resourceId = resource;
17     }
18
19     @Override
20     /**
21      * @param position 當前設置的Cell行數,類似於iOS開發中的indexPath.row
22      */
23     public View getView(int position, View convertView, ViewGroup parent) {
24         ProductModel product = getItem(position);
25
26         View productView = LayoutInflater.from(getContext()).inflate(resourceId, null);
27
28         TextView productName = (TextView) productView.findViewById(R.id.product_name);
29         TextView productStatus = (TextView) productView.findViewById(R.id.product_status);
30         TextView productLendMoney = (TextView) productView.findViewById(R.id.product_lend_money);
31         TextView productInterest = (TextView) productView.findViewById(R.id.product_interest);
32         TextView productEndDate = (TextView) productView.findViewById(R.id.product_date);
33
34         productName.setText(product.productName);
35         productStatus.setText(product.productBuyState);
36         productLendMoney.setText(product.lendMoney);
37         productInterest.setText(product.interest);
38         productEndDate.setText(product.endDate);
39
40         return productView;
41     }
42 }
5.自定義完以後,接下來就是制造在ListView上顯示的模擬數據了,模擬數據就是一個ArrayList, 其中存放的是一個個ProductModel,每個ProductModel對應著一個Cell。下方函數就是創建模擬數據的函數,如下所示:
 1     private  void createProductList() {
 2         for (int i=0; i<20; i++) {
 3             ProductModel product = new ProductModel();
 4             product.productName = "產品名稱" + i;
 5             if (i % 2 == 0){
 6                 product.productBuyState = "認購中";
 7             } else {
 8                 product.productBuyState = "認購成功";
 9             }
10             product.lendMoney = "" + (i * 100 + i);
11             product.interest = "" + (i * 10);
12             if (i < 10) {
13                 product.endDate = "2016-01-0" + i;
14             } else {
15                 product.endDate = "2016-01-" + i;
16             }
17             productList.add(i, product);
18         }
19     }
6.這是最後一步,也是放大招的時刻。接下來就是利用數據適配器對接ListView和ProductModel數據集合的時候了。此時可以把數據適配器看做是iOS開發中TableViewDatasource中的代理方法。形象點就是轉換器(適配器)一頭連接著數據源,一頭則連接著顯示數據的ListView, 而適配器的功能就是把數據轉換成在TableView上顯示的元素,下方就是這個轉換的過程。
1         ProductAdapter adapter = new ProductAdapter(CustomeItemListViewActivity.this, R.layout.custome_item, productList);
2         ListView listView = (ListView)findViewById(R.id.second_list_view);
3         listView.setAdapter(adapter);
7.如果你想給每個Cell都加上點擊事件,換句話說,你想在點擊Cell時做一些事情,那麼你需要為ListView的每個item添加點擊事件,為每個Cell添加點擊事件的代碼如下所示,點擊Cell是我們就使用Toast顯示當前Cell的產品名稱。
1         listView.setOnItemClickListener(new AdapterView.OnItemClickListener() {
2             @Override
3             public void onItemClick(AdapterView<?> parent, View view, int position, long id) {
4                 ProductModel product = productList.get(position);
5                 Toast.makeText(CustomeItemListViewActivity.this, product.productName, Toast.LENGTH_SHORT).show();
6             }
7         });
到此,上述Demo以實現完畢,你還可以在此基礎上做許多擴充,比如下拉刷新, 上拉加載等listView常用的功能,在此就不做過多贅述了。
上述Demo在GitHub上的分分享地址:https://github.com/lizelu/AndroidListViewDemo
 春秋旅行安卓客戶端源碼項目,旅行安卓客戶端源碼
春秋旅行安卓客戶端源碼項目,旅行安卓客戶端源碼春秋旅行安卓客戶端源碼,這是一款高度模仿春秋旅行app開發的一款應用,通過抓包工具獲取到的接口,希望大家能夠喜歡,並且對大家
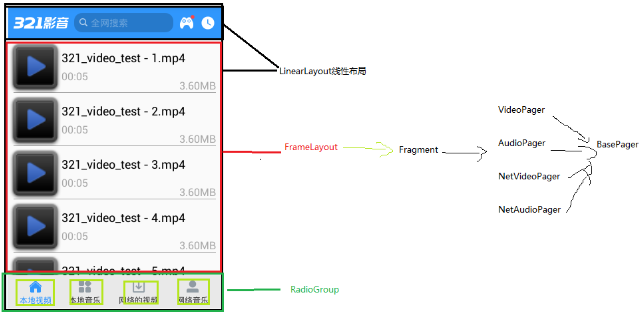 手機影音2--軟件架構分析,影音2--架構分析
手機影音2--軟件架構分析,影音2--架構分析 1.標題欄 <?xml version=1.0 encoding=utf-8?> <com.atgui
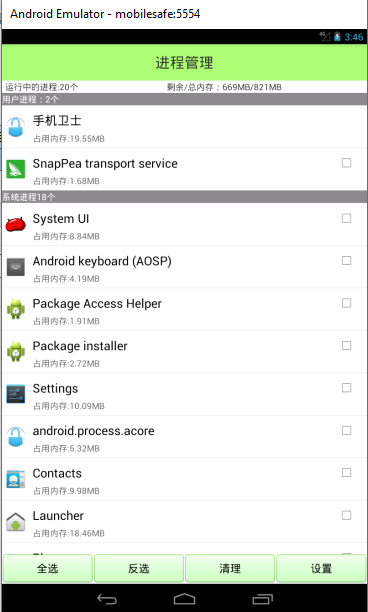 手機安全衛士——進程管理,安全衛士進程管理
手機安全衛士——進程管理,安全衛士進程管理首先看一下界面: TaskManagerActivity .java //進程管理 public class TaskMan
 React Native控件之PullToRefreshViewAndroid下拉刷新組件講解
React Native控件之PullToRefreshViewAndroid下拉刷新組件講解 (一)前言 今天我們一起來看一下PullToRefreshViewAn