編輯:關於android開發
Only the smallest of projects has a single build file and source tree, unless it happens to be a massive, monolithic application. It’s often much easier to digest and understand a project that has been split into smaller, inter-dependent modules. The word “inter-dependent” is important, though, and is why you typically want to link the modules together through a single build.
Gradle supports this scenario through multi-project builds.
Such builds come in all shapes and sizes, but they do have some common characteristics:
//gradle具有的一些通用的特性
A settings.gradle file in the root or master directory of the project //在項目的根目錄下有一個settings.gradle文件
A build.gradle file in the root or master directory //在根目錄下有一個build.gradle文件
Child directories that have their own *.gradle build files (some multi-project builds may omit child project build scripts) //每個子目錄有他們自己的*.gradle文件
The settings.gradle file tells Gradle how the project and subprojects are structured. Fortunately, you don’t have to read this file simply to learn what the project structure is as you can run the command gradle projects. Here's the output from using that command on the Java multiproject build in the Gradle samples:
//settings.gradle文件告訴gradle工程和子工程是如何被組織的。幸運的是,你不需要讀這個文件來了解項目結構,你可以使用gradle projects命令。例子如下:
Example 8.1. Listing the projects in a build
Output of gradle -q projects
> gradle -q projects

------------------------------------------------------------
Root project
------------------------------------------------------------

Root project 'multiproject'
+--- Project ':api'
+--- Project ':services'
|    +--- Project ':services:shared'
|    \--- Project ':services:webservice'
\--- Project ':shared'

To see a list of the tasks of a project, run gradle <project-path>:tasks
For example, try running gradle :api:tasks
This tells you that multiproject has three immediate child projects: api, services and shared. The services project then has its own children, shared and webservice. These map to the directory structure, so it’s easy to find them. For example, you can find webservice in <root>/services/webservice.
Each project will usually have its own build file, but that's not necessarily the case. In the above example, the services project is just a container or grouping of other subprojects. There is no build file in the corresponding directory. However, multiproject does have one for the root project.
//每一個項目通常會有一個自己的build文件,但是這不是必須要有的。在上面的例子中,services工程就是一個其他子工程的容器,因此在其對應的目錄下沒有build文件。然後多工程必須在根目錄下有一個build文件
The root build.gradle is often used to share common configuration between the child projects, for example by applying the same sets of plugins and dependencies to all the child projects. It can also be used to configure individual subprojects when it is preferable to have all the configuration in one place. This means you should always check the root build file when discovering how a particular subproject is being configured.
//根目錄下的build.gradle文件通常被用來共享子工程的通用配置,例如給所有的子工程應用相同的插件設置。它也可以用來配置子工程的獨立配置,這意味著當研究某一個特定子工程是如何被配置的問題時,根目錄的build.gradle文件應該是需要查看的。
Another thing to bear in mind is that the build files might not be called build.gradle. Many projects will name the build files after the subproject names, such asapi.gradle and services.gradle from the previous example. Such an approach helps a lot in IDEs because it’s tough to work out which build.gradle file out of twenty possibilities is the one you want to open. This little piece of magic is handled by the settings.gradle file, but as a build user you don’t need to know the details of how it’s done. Just have a look through the child project directories to find the files with the .gradle suffix.
//另一個事需要了解的是,build文件可能不叫build.gradle.很多工程會自己命名子工程下的build文件,例如上面例子中的api.gradle 和 services.gradle.這種方法幫了IDE很大的忙,因為讓ide從20多重可能的文件中找到你想要打開的那個build文件是艱難的。這個處理邏輯在setting.gradle文件中。
Once you know what subprojects are available, the key question for a build user is how to execute the tasks within the project.
From a user's perspective, multi-project builds are still collections of tasks you can run. The difference is that you may want to control which project's tasks get executed. You have two options here:
//從用戶的角度看,多工程構建仍然是一堆你可以運行的任務的集合。不同的是,你可能想去控制哪個工程的任務來執行,這裡你有兩個選項:
Change to the directory corresponding to the subproject you’re interested in and just execute gradle <task> as normal. //切換目錄到需要構建的子工程目錄下,然後像正常情況一樣執行gradle <task>
Use a qualified task name from any directory, although this is usually done from the root. For example: gradle :services:webservice:build will build the webservicesubproject and any subprojects it depends on. //在任何目錄下使用全稱的任務名
The first approach is similar to the single-project use case, but Gradle works slightly differently in the case of a multi-project build. The command gradle test will execute the test task in any subprojects, relative to the current working directory, that have that task. So if you run the command from the root project directory, you’ll run test inapi, shared, services:shared and services:webservice. If you run the command from the services project directory, you’ll only execute the task in services:shared andservices:webservice.
//第一種方法和在只有一個工程的項目中使用方法是相似的,但是在多工程的項目中gradle的操作會有一些不同。命令gradle test將會執行所有子工程中的test任務,相對於當前的工作目錄並且有test任務的都會執行。所以,如果你在根目錄運行這個命令,你將會運行在api,shared,services:shared,services:webservice中的test任務,如果你在setvices工程目錄中運行這個命令,你將只會執行在servics:shared和service:webservice中的test任務
For more control over what gets executed, use qualified names (the second approach mentioned). These are paths just like directory paths, but use ‘:’ instead of ‘/’ or ‘\’. If the path begins with a ‘:’, then the path is resolved relative to the root project. In other words, the leading ‘:’ represents the root project itself. All other colons are path separators.
//想要更高級的控制執行的內容,使用全稱名字(上面提到的第二種辦法)。有一些像目錄路徑一樣的路徑信息,但是使用冒號:而不是/,如果路徑以:開頭,那麼這個路徑就是相對根工程而言的,換句話說,開頭的:代表根工程它自己。所有其他的冒號表示的是路徑下劃線。
This approach works for any task, so if you want to know what tasks are in a particular subproject, just use the tasks task, e.g. gradle :services:webservice:tasks .
//這個方法適用於所有的任務。如果你想知道在某一個特定子工程中有哪些task,執行tasks任務。
Regardless of which technique you use to execute tasks, Gradle will take care of building any subprojects that the target depends on. You don’t have to worry about the inter-project dependencies yourself. If you’re interested in how this is configured, you can read about writing multi-project builds later in the user guide.
There’s one last thing to note. When you’re using the Gradle wrapper, the first approach doesn’t work well because you have to specify the path to the wrapper script if you’re not in the project root. For example, if you’re in the webservice subproject directory, you would have to run ../../gradlew build.
//使用第一種方法時候如果想要執行gradlew命令,需要切到根工程目錄下:../../gradlew build
That’s all you really need to know about multi-project builds as a build user. You can now identify whether a build is a multi-project one and you can discover its structure. And finally, you can execute tasks within specific subprojects.
 一款IT閱讀學習類的應用安卓源碼,it學習類安卓源碼
一款IT閱讀學習類的應用安卓源碼,it學習類安卓源碼 BingoWorld介紹BingoWorld是一款IT閱讀學習類的開源軟件,在不久的將來會擁有豐富的學習內容,
 我的android學習經歷12,android學習經歷12
我的android學習經歷12,android學習經歷12自動匹配輸入的內容(文章最後有一個問題有興趣的可以解答一下,謝謝大神了) 這個主要是兩個控件MultiAutoC
 Android中Canvas繪圖之MaskFilter圖文詳解(附源碼下載)
Android中Canvas繪圖之MaskFilter圖文詳解(附源碼下載) 如果對Canvas繪圖不熟悉,強烈建議您閱讀博文《Android中Canvas繪圖基礎詳
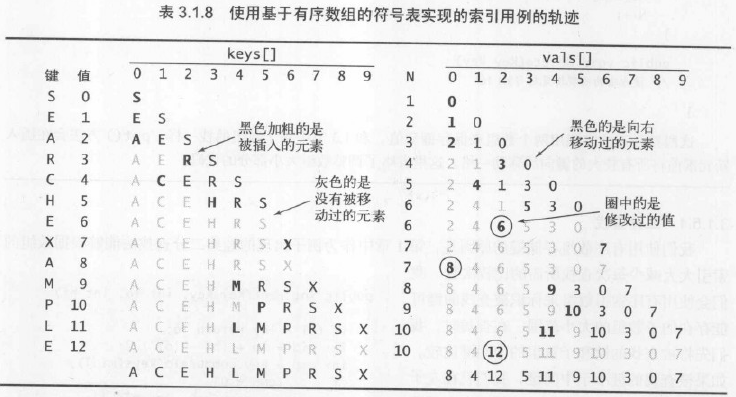 算法—8.有序數組中的二分查找,算法數組二分
算法—8.有序數組中的二分查找,算法數組二分 1.具體算法 /** * 算法3.2 二分查找(基於有序數組) * Created by huazhou on 201