(一) AsyncTask,是android提供的輕量級的異步類。可以直接繼承AsyncTask,在類中實現異步操作,可以通過接口實現UI進度更新,最後反饋執行的結果給UI主線程
。之所以有Handler和AsyncTask,都是為了不阻塞主線程(UI線程),且UI的更新只能在主線程中完成,因此異步處理是不可避免的。
AsyncTask直接繼承於Object類,位置為android.os.AsyncTask。要使用AsyncTask工作我們要提供三個泛型參數,並重載幾個方法(至少重載一個)。
1、AsyncTask定義了三種泛型類型 Params,Progress和Result。
(1)Params 啟動任務執行的輸入參數,比如HTTP請求的URL。
(2)Progress 後台任務執行的百分比。
(3)Result 後台執行任務最終返回的結果,比如String。
2、使用過AsyncTask 最少要重寫以下這兩個方法:
(1)doInBackground(Params…) 後台執行,比較耗時的操作都可以放在這裡。注意這裡不能直接操作UI。此方法在後台線程執行,完成任務的主要工作,通常需要較長的時間。在執行過程中可以調用publicProgress(Progress…)來更新任務的進度。
(2)onPostExecute(Result) 相當於Handler 處理UI的方式,在這裡面可以使用在doInBackground 得到的結果處理操作UI。 此方法在主線程執行,任務執行的結果作為此方法的參數返回
另外三個方法可選,不是必須的:
(3)onProgressUpdate(Progress…) 可以使用進度條增加用戶體驗度。 此方法在主線程執行,用於顯示任務執行的進度。
(4)onPreExecute() 這裡是最終用戶調用Excute時的接口,當任務執行之前開始調用此方法,可以在這裡顯示進度對話框。
(5)onCancelled() 用戶調用取消時,要做的操作
3、使用AsyncTask類,以下是幾條必須遵守的准則:
(1)Task的實例必須在UI thread中創建;
(2)execute方法必須在UI thread中調用;
(3)不要手動的調用onPreExecute(), onPostExecute(Result),doInBackground(Params...), onProgressUpdate(Progress...)這幾個方法;
(4)該task只能被執行一次,否則多次調用時將會出現異常;
(二)AsyncTask和Handler對比
1、AsyncTask實現的原理,和適用的優缺點
AsyncTask,是android提供的輕量級的異步類,可以直接繼承AsyncTask,在類中實現異步操作,並提供接口反饋當前異步執行的程度(可以通過接口實現UI進度更新),最後反饋執行的結果給UI主線程.
(1)使用的優點:
A、簡單,快捷;
B、過程可控。
(2)使用的缺點:
在使用多個異步操作和並需要進行Ui變更時,就變得復雜起來。
2、Handler異步實現的原理和適用的優缺點
在Handler 異步實現時,涉及到Handler、Looper、Message、Thread四個對象,實現異步的流程是主線程啟動Thread(子線程)àthread(子線程)運行並生成Message-Looper獲取Message並傳遞給HandleràHandler逐個獲取Looper中的Message,並進行UI變更。
(1)使用的優點:
A、 結構清晰,功能定義明確
B、 對於多個後台任務時,簡單,清晰
(2)使用的缺點:
在單個後台異步處理時,顯得代碼過多,結構過於復雜(相對性)
一、設計界面
1、布局文件
打開res/layout/activity_main.xml文件。
輸入以下代碼:
[html] view plain copy
- <LinearLayout
- xmlns:android="http://schemas.android.com/apk/res/android"
- android:layout_width="match_parent"
- android:layout_height="match_parent"
- android:orientation="vertical" >
- <EditText
- android:id="@+id/url"
- android:layout_width="wrap_content"
- android:layout_height="wrap_content"
- android:layout_alignParentLeft="true" >
- <requestFocus />
- </EditText>
-
- <Button
- android:id="@+id/open"
- android:layout_width="wrap_content"
- android:layout_height="wrap_content"
- android:layout_alignParentLeft="true"
- android:text="AsyncTask處理" />
-
- <EditText
- android:id="@+id/message"
- android:layout_width="match_parent"
- android:layout_height="wrap_content"
- android:inputType="textMultiLine" />
-
- </LinearLayout>
二、程序文件
打開“src/com.genwoxue.contentprovider_b/MainActivity.java”文件。
然後輸入以下代碼:
[java] view plain copy
- package com.genwoxue.asynctask;
-
- import java.io.ByteArrayOutputStream;
- import java.io.InputStream;
- import org.apache.http.HttpEntity;
- import org.apache.http.HttpResponse;
- import org.apache.http.client.HttpClient;
- import org.apache.http.client.methods.HttpGet;
- import org.apache.http.impl.client.DefaultHttpClient;
- import android.app.Activity;
- import android.app.ProgressDialog;
- import android.content.Context;
- import android.content.DialogInterface;
- import android.os.AsyncTask;
- import android.os.Bundle;
- import android.view.View;
- import android.widget.Button;
- import android.widget.EditText;
- import android.widget.TextView;
-
- public class MainActivity extends Activity{
- private EditText message;
- private Button open;
- private EditText url;
-
- @Override
- public void onCreate(Bundle savedInstanceState) {
- super.onCreate(savedInstanceState);
- setContentView(R.layout.activity_main);
- message= (EditText) findViewById(R.id.message);
- url= (EditText) findViewById(R.id.url);
- url.setText("http://www.genwoxue.com");
- open= (Button) findViewById(R.id.open);
- open.setOnClickListener(new View.OnClickListener() {
- public void onClick(View arg0) {
- connect();
- }
- });
- }
- private void connect() {
- PageTask task = new PageTask(this);
- task.execute(url.getText().toString());
- }
-
- /* 四個步驟:
- * (1)onPreExecute(),執行預處理,它運行於UI線程,
- * 可以為後台任務做一些准備工作,比如繪制一個進度條控件。
- * (2)doInBackground(Params...),後台進程執行的具體計算在這裡實現,
- * doInBackground(Params...)是AsyncTask的關鍵,此方法必須重載。
- * 在這個方法內可以使用 publishProgress(Progress...)改變當前的進度值。
- * (3)onProgressUpdate(Progress...),運行於UI線程。如果
- * 在doInBackground(Params...) 中使用了publishProgress(Progress...),就會
- * 觸發這個方法。在這裡可以對進度條控件根據進度值做出具體的響應。
- * (4)onPostExecute(Result),運行於UI線程,可以對後台任務的結果做出處理,結果
- * 就是doInBackground(Params...)的返回值。此方法也要經常重載,如果Result為
- * null表明後台任務沒有完成(被取消或者出現異常)。 *
- */
- class PageTask extends AsyncTask<String, Integer, String> {
- // 可變長的輸入參數,與AsyncTask.exucute()對應
- ProgressDialog pdialog;
- public PageTask(Context context){
- pdialog = new ProgressDialog(context, 0);
- pdialog.setButton("cancel", new DialogInterface.OnClickListener() {
- public void onClick(DialogInterface dialog, int i) {
- dialog.cancel();
- }
- });
-
- pdialog.setOnCancelListener(new DialogInterface.OnCancelListener() {
- public void onCancel(DialogInterface dialog) {
- finish();
- }
- });
-
- pdialog.setCancelable(true);
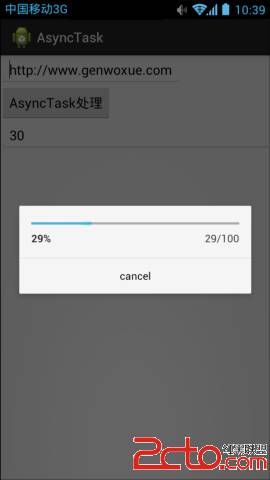
- pdialog.setMax(100);
- pdialog.setProgressStyle(ProgressDialog.STYLE_HORIZONTAL);
- pdialog.show();
- }
-
- // (1)任務啟動
- @Override
- protected void onPreExecute() {
- message.setText("task_started");
- }
-
- //(2)後台執行:主要工作在這裡實現
- @Override
- protected String doInBackground(String... params) {
- String result = null;
- try{
- HttpClient client = new DefaultHttpClient();
- HttpGet get = new HttpGet(params[0]); // params[0]代表連接的url
- HttpResponse response = client.execute(get);
- HttpEntity entity = response.getEntity();
- long length = entity.getContentLength();
- InputStream is = entity.getContent();
- if(is != null) {
- ByteArrayOutputStream baos = new ByteArrayOutputStream();
- byte[] buf = new byte[128];
- int ch = -1;
- int count = 0;
- while((ch = is.read(buf)) != -1) {
- baos.write(buf, 0, ch);
-
- count += ch;
- if(length > 0) {
- // 如果知道響應的長度,調用publishProgress()更新進度
- publishProgress((int) ((count / (float) length) * 100));
- }
- Thread.sleep(50); // 讓線程休眠50ms
- }
- result = new String(baos.toByteArray());
- }
- return result; // 返回結果
- } catch(Exception e) {
- e.printStackTrace();
- }
- return null;
- }
-
-
- //(3)由doInBackground中的publishProgress(Progress...)觸發onProgressUpdate這個方法
- @Override
- protected void onProgressUpdate(Integer... values) {
- // 更新進度
- System.out.println(""+values[0]);
- message.setText(""+values[0]);
- pdialog.setProgress(values[0]);
- }
-
- //(4)可以對後台任務的結果做出處理,結果就是doInBackground(Params...)的返回值。
- @Override
- protected void onPostExecute(String result) {
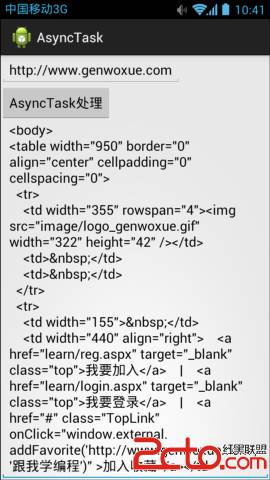
- // 返回HTML頁面的內容
- message.setText(result);
- pdialog.dismiss();
- }
-
- @Override
- protected void onCancelled() {
- super.onCancelled();
- }
-
- }
- }
三、配置文件
打開“AndroidManifest.xml”文件。
然後輸入以下代碼:
[html] view plain copy
- <?xml version="1.0" encoding="utf-8"?>
- <manifest xmlns:android="http://schemas.android.com/apk/res/android"
- package="com.genwoxue.asynctask"
- android:versionCode="1"
- android:versionName="1.0" >
-
- <uses-sdk
- android:minSdkVersion="10"
- android:targetSdkVersion="15" />
-
- <span style="color:#ff0000;"><strong><uses-permission android:name="android.permission.INTERNET"/></strong>
- </span>
- <application
- android:allowBackup="true"
- android:icon="@drawable/ic_launcher"
- android:label="@string/app_name"
- android:theme="@style/AppTheme" >
- <activity
- android:name="com.genwoxue.asynctask.MainActivity"
- android:label="@string/app_name" >
- <intent-filter>
- <action android:name="android.intent.action.MAIN" />
-
- <category android:name="android.intent.category.LAUNCHER" />
- </intent-filter>
- </activity>
- </application>
-
- </manifest>
注意:需要在AndroidManifest.xml文件中添加權限:
<uses-permission android:name="android.permission.INTERNET"/>
四、運行結果
 第100章、WebView應用之Javascript調用Android(從零開始學Android)
 第14章、布局Layouts之FrameLayout框架布局(從零開始學Android)
 第87章、系統服務之WIFI_SERVICE(從零開始學Android)
 7.5.2 WebView和JavaScrip交互基礎