手機都有聲音模式,聲音、靜音還有震動,甚至震動加聲音兼備,這些都是手機的基本功能。在Android手機中,我們同樣可以通過Android的SDK提供的聲音管理接口來管理手機聲音模式以及調整聲音大小,這就是Android中AudioManager的使用。
一、設計界面
1、布局文件
打開res/layout/activity_main.xml文件。
輸入以下代碼:
[html] view plain copy
- <?xml version="1.0" encoding="utf-8" ?>
-
- <LinearLayout
- xmlns:android="http://schemas.android.com/apk/res/android"
- android:orientation="vertical"
- android:layout_width="fill_parent"
- android:layout_height="fill_parent">
-
- <Button
- android:id="@+id/normal"
- android:layout_width="wrap_content"
- android:layout_height="wrap_content"
- android:text="鈴聲" />
-
- <Button
- android:id="@+id/silent"
- android:layout_width="wrap_content"
- android:layout_height="wrap_content"
- android:text="靜音" />
-
- <Button
- android:id="@+id/vibrate"
- android:layout_width="wrap_content"
- android:layout_height="wrap_content"
- android:text="振動" />
-
- </LinearLayout>
二、程序文件
打開“src/com.genwoxue.audiomanager/MainActivity.java”文件。
然後輸入以下代碼:
[java] view plain copy
- package com.genwoxue.audiomanager;
-
- import android.app.Activity;
- import android.content.Context;
- import android.media.AudioManager;
- import android.os.Bundle;
- import android.view.View;
- import android.view.View.OnClickListener;
- import android.widget.Button;
- import android.widget.Toast;
-
- public class MainActivity extends Activity {
-
- private Button btnNormal=null;
- private Button btnSilent=null;
- private Button btnVibrate=null;
-
- private AudioManager audioManager=null;
- @Override
- public void onCreate(Bundle savedInstanceState) {
- super.onCreate(savedInstanceState);
- setContentView(R.layout.activity_main);
-
- btnNormal=(Button)super.findViewById(R.id.normal);
- btnSilent=(Button)super.findViewById(R.id.silent);
- btnVibrate=(Button)super.findViewById(R.id.vibrate);
-
- audioManager=(AudioManager)super.getSystemService(Context.AUDIO_SERVICE);
-
- //手機鈴聲模式
- btnNormal.setOnClickListener(new OnClickListener(){
- public void onClick(View v)
- {
- audioManager.setRingerMode(AudioManager.RINGER_MODE_NORMAL);
- Toast.makeText(getApplicationContext(), "手機鈴聲模式!",Toast.LENGTH_LONG).show();
- }
- });
-
- //手機靜音模式
- btnSilent.setOnClickListener(new OnClickListener(){
- public void onClick(View v)
- {
- audioManager.setRingerMode(AudioManager.RINGER_MODE_SILENT);
- Toast.makeText(getApplicationContext(), "手機靜音模式!",Toast.LENGTH_LONG).show();
- }
- });
-
- //手機振動模式
- btnVibrate.setOnClickListener(new OnClickListener(){
- public void onClick(View v)
- {
- audioManager.setRingerMode(AudioManager.RINGER_MODE_VIBRATE);
- Toast.makeText(getApplicationContext(), "手機振動模式!",Toast.LENGTH_LONG).show();
- }
- });
- }
-
- }
三、配置文件
采用默認生成的“AndroidManifest.xml”文件即可,無需另行配置。
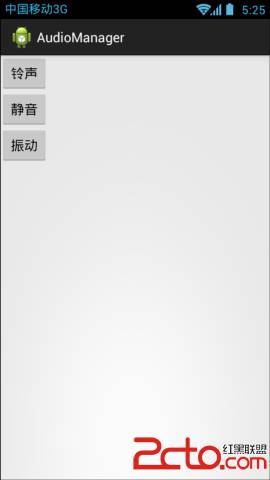
四、運行結果
 7.5.2 WebView和JavaScrip交互基礎
 第96章、手機電話監聽(從零開始學Android)
 2.6.2 菜單(Menu)
 第100章、WebView應用之Javascript調用Android(從零開始學Android)