編輯:Android技術基礎
本節繼續帶來的是Android系統服務中的LayoutInflater(布局服務),說到布局,大家第一時間 可能想起的是寫完一個布局的xml,然後調用Activity的setContentView()加載布局,然後把他顯示 到屏幕上是吧~其實這個底層走的還是這個LayoutInflater,用的Android內置的Pull解析器來解析 布局。一般在Android動態加載布局或者添加控件用得較多,本節我們就來學習下他在實際開發中 的一些用法~
官方API文檔:LayoutInflater
答:一個用於加載布局的系統服務,就是實例化與Layout XML文件對應的View對象,不能直接使用, 需要通過getLayoutInflater( )方法或getSystemService( )方法來獲得與當前Context綁定的 LayoutInflater實例!
①獲取LayoutInflater實例的三種方法:
LayoutInflater inflater1 = LayoutInflater.from(this);
LayoutInflater inflater2 = getLayoutInflater();
LayoutInflater inflater3 = (LayoutInflater) getSystemService(LAYOUT_INFLATER_SERVICE);
PS:後面兩個其實底層走的都是第一種方法~
②加載布局的方法:
public View inflate (int resource, ViewGroup root, boolean attachToRoot) 該方法的三個參數依次為:
①要加載的布局對應的資源id
②為該布局的外部再嵌套一層父布局,如果不需要的話,寫null就可以了!
③是否為加載的布局文件的最外層套一層root布局,不設置該參數的話, 如果root不為null的話,則默認為true 如果root為null的話,attachToRoot就沒有作用了! root不為null,attachToRoot為true的話,會在加載的布局文件最外層嵌套一層root布局; 為false的話,則root失去作用! 簡單理解就是:是否為加載的布局添加一個root的外層容器~!
③通過LayoutInflater.LayoutParams來設置相關的屬性:
比如RelativeLayout還可以通過addRule方法添加規則,就是設置位置:是參考父容器呢? 還是參考子控件?又或者設置margin等等,這個由你決定~
我們早已習慣了使用XML生成我們需要的布局,但是在一些特定的情況下,我們 需要使用Java代碼往我們的布局中動態的添加組件或者布局!
但是不建議大家完全地使用Java代碼來編寫Android頁面布局,首先一點就是代碼會多, 一多久容易亂,而且不利於業務的分離,我們還是建議使用xml來完成布局,然後通過 Java代碼對裡面的組件進行修改,當然有些時候可能需要使用Java動態的來添加組件!
——Step 1:
①創建容器:LinearLayout ly = new LinearLayout(this);
②創建組件:Button btnOne = new Button(this);
——Step 2:
可以為容器或者組件設置相關屬性: 比如:LinearLayout,我們可以設置組件的排列方向:ly.setOrientation(LinearLayout.VERTICAL); 而組件也可以:比如Button:btnOne.setText("按鈕1"); 關於設置屬性的方法可參見Android 的API,通常xml設置的屬性只需在前面添加:set即可,比如 setPadding(左,上,右,下);
——Step 3:
將組件或容器添加到容器中,這個時候我們可能需要設置下組件的添加位置,或者設置他的大小: 我們需要用到一個類:LayoutParams,我們可以把它看成布局容器的一個信息包!封裝位置與大小 等信息的一個類!先演示下設置大小的方法:(前面的LinearLayout可以根據不同容器進行更改)
LinearLayout.LayoutParams lp1 = new LinearLayout.LayoutParams(
        LayoutParams.WRAP_CONTENT, LayoutParams.WRAP_CONTENT);
很簡單,接著就到這個設置位置了,設置位置的話,通常我們考慮的只是RelativeLayout! 這個時候用到LayoutParams的addRule( )方法!可以添加多個addRule( )哦! 設置組件在父容器中的位置,
比如設置組件的對其方式:
RelativeLayout rly = new RelativeLayout(this);
RelativeLayout.LayoutParams lp2 = new RelativeLayout.LayoutParams(
                LayoutParams.WRAP_CONTENT, LayoutParams.WRAP_CONTENT);
lp2.addRule(RelativeLayout.ALIGN_PARENT_BOTTOM);
Button btnOne = new Button(this);
rly.addView(btnOne, lp2);
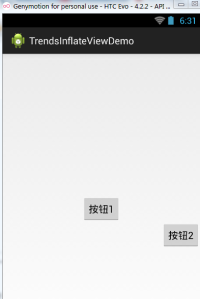
參照其他組件的對其方式: (有個缺點,就是要為參考組件手動設置一個id,是手動!!!!) 比如:設置btnOne居中後,讓BtnTwo位於btnOne的下方以及父容器的右邊!
public class MainActivity extends Activity {
    @Override
    protected void onCreate(Bundle savedInstanceState) {
        super.onCreate(savedInstanceState);
        RelativeLayout rly = new RelativeLayout(this);
        Button btnOne = new Button(this);
        btnOne.setText("按鈕1");
        Button btnTwo = new Button(this);
        btnTwo.setText("按鈕2");
        // 為按鈕1設置一個id值
        btnOne.setId(123);
        // 設置按鈕1的位置,在父容器中居中
        RelativeLayout.LayoutParams rlp1 = new RelativeLayout.LayoutParams(
                LayoutParams.WRAP_CONTENT, LayoutParams.WRAP_CONTENT);
        rlp1.addRule(RelativeLayout.CENTER_IN_PARENT);
        // 設置按鈕2的位置,在按鈕1的下方,並且對齊父容器右面
        RelativeLayout.LayoutParams rlp2 = new RelativeLayout.LayoutParams(
                LayoutParams.WRAP_CONTENT, LayoutParams.WRAP_CONTENT);
        rlp2.addRule(RelativeLayout.BELOW, 123);
        rlp2.addRule(RelativeLayout.ALIGN_PARENT_RIGHT);
        // 將組件添加到外部容器中
        rly.addView(btnTwo, rlp2);
        rly.addView(btnOne, rlp1);
        // 設置當前視圖加載的View即rly
        setContentView(rly);
    }
}
——step 4:
調用setContentView( )方法加載布局對象即可! 另外,如果你想移除某個容器中的View,可以調用容器.removeView(要移除的組件);
運行截圖:
第二點我們講解了使用純Java代碼來加載布局,實際當中用得並不多,更多的時候是動態 的添加View控件以及動態的加載XML布局!
動態添加組件的寫法有兩種,區別在於是否需要先setContentView(R.layout.activity_main); 下面演示下兩種不同寫法添加一個Button的例子:
先寫個布局文件先:activity_main.xml:
<RelativeLayout xmlns:android="http://schemas.android.com/apk/res/android"
    android:id="@+id/RelativeLayout1"
    android:layout_width="match_parent"
    android:layout_height="match_parent" >

    <TextView
        android:id="@+id/txtTitle"
        android:layout_width="match_parent"
        android:layout_height="wrap_content"
        android:text="我是xml文件加載的布局"/>

</RelativeLayout>
第一種不需要setContentView()加載布局文件先:
public class MainActivity extends Activity {
    @Override
    protected void onCreate(Bundle savedInstanceState) {
        super.onCreate(savedInstanceState);
        Button btnOne = new Button(this);
        btnOne.setText("我是動態添加的按鈕");
        RelativeLayout.LayoutParams lp2 = new RelativeLayout.LayoutParams(
                LayoutParams.WRAP_CONTENT, LayoutParams.WRAP_CONTENT);
        lp2.addRule(RelativeLayout.CENTER_IN_PARENT);
        LayoutInflater inflater = LayoutInflater.from(this);
        RelativeLayout rly = (RelativeLayout) inflater.inflate(
                R.layout.activity_main, null)
                .findViewById(R.id.RelativeLayout1);
        rly.addView(btnOne,lp2);
        setContentView(rly);
    }
}
第二種不需要setContentView()加載布局文件先:
public class MainActivity extends Activity {
    @Override
    protected void onCreate(Bundle savedInstanceState) {
        super.onCreate(savedInstanceState);
        setContentView(R.layout.activity_main);
        Button btnOne = new Button(this);
        btnOne.setText("我是動態添加的按鈕");
        RelativeLayout.LayoutParams lp2 = new RelativeLayout.LayoutParams(
                LayoutParams.WRAP_CONTENT, LayoutParams.WRAP_CONTENT);
        lp2.addRule(RelativeLayout.CENTER_IN_PARENT);
        RelativeLayout rly = (RelativeLayout) findViewById(R.id.RelativeLayout1);
        rly.addView(btnOne,lp2);
    }
}
分析總結:
代碼很簡單,創建按鈕後,我們又創建了一個LayoutParams對象,用來設置Button的大小, 又通過addRule()方法設置了Button的位置!
第一種方法:通過LayoutInflate的inflate()方法加載了activity_main布局,獲得了外層容器, 接著addView添加按鈕進容器,最後setContentView();
第二種方法:因為我們已經通過setContetView()方法加載了布局,此時我們就可以通過 findViewById找到這個外層容器,接著addView,最後setContentView()即可!
另外,關於這個setContentView( )他設置的視圖節點是整個XML的根節點!
接下來的話,我們換一個,這次加載的是xml文件!動態地添加xml文件! 先寫下主布局文件和動態加載的布局文件:
activity_main.xml:
<RelativeLayout xmlns:android="http://schemas.android.com/apk/res/android"
    android:id="@+id/RelativeLayout1"
    android:layout_width="match_parent"
    android:layout_height="match_parent" >
    <Button
        android:id="@+id/btnLoad"
        android:layout_width="match_parent"
        android:layout_height="wrap_content"
        android:text="動態加載布局"/>
</RelativeLayout>
inflate.xml:
<?xml version="1.0" encoding="utf-8"?>
<LinearLayout xmlns:android="http://schemas.android.com/apk/res/android"
    android:layout_width="match_parent"
    android:layout_height="match_parent"
    android:gravity="center"
    android:orientation="vertical"
    android:id="@+id/ly_inflate" >

    <TextView
        android:layout_width="wrap_content"
        android:layout_height="wrap_content"
        android:text="我是Java代碼加載的布局" />

    <Button
        android:layout_width="wrap_content"
        android:layout_height="wrap_content"
        android:text="我是布局裡的一個小按鈕" />

</LinearLayout>
接著到我們的MainActivity.java在這裡動態加載xml布局:
public class MainActivity extends Activity {
    @Override
    protected void onCreate(Bundle savedInstanceState) {
        super.onCreate(savedInstanceState);
        setContentView(R.layout.activity_main);
        //獲得LayoutInflater對象;
        final LayoutInflater inflater = LayoutInflater.from(this);
        //獲得外部容器對象
        final RelativeLayout rly = (RelativeLayout) findViewById(R.id.RelativeLayout1);
        Button btnLoad = (Button) findViewById(R.id.btnLoad);
        btnLoad.setOnClickListener(new OnClickListener() {
            @Override
            public void onClick(View v) {
                //加載要添加的布局對象
                LinearLayout ly = (LinearLayout) inflater.inflate(
                        R.layout.inflate, null, false).findViewById(
                        R.id.ly_inflate);
                //設置加載布局的大小與位置
                RelativeLayout.LayoutParams lp = new RelativeLayout.LayoutParams(
                        LayoutParams.WRAP_CONTENT, LayoutParams.WRAP_CONTENT);
                lp.addRule(RelativeLayout.CENTER_IN_PARENT);
                rly.addView(ly,lp);
            }
        });
    }
}
運行截圖:
代碼分析:
①獲取容器對象:
final RelativeLayout rly = (RelativeLayout) findViewById(R.id.RelativeLayout1);②獲得Inflater對象,同時加載被添加的布局的xml,通過findViewById找到最外層的根節點
final LayoutInflater inflater = LayoutInflater.from(this);
LinearLayout ly = (LinearLayout) inflater.inflate(R.layout.inflate, null, false)
   .findViewById(R.id.ly_inflate);
③為這個容器設置大小與位置信息:
RelativeLayout.LayoutParams lp = new RelativeLayout.LayoutParams(
               LayoutParams.WRAP_CONTENT, LayoutParams.WRAP_CONTENT);
       lp.addRule(RelativeLayout.CENTER_IN_PARENT);
④添加到外層容器中:
rly.addView(ly,lp);
最後提供下LayoutInflater的inflate()方法的源碼吧,有興趣的可以看看~,其實就是Pull解析而已~
public View inflate(XmlPullParser parser, ViewGroup root, boolean attachToRoot) {
    synchronized (mConstructorArgs) {
        final AttributeSet attrs = Xml.asAttributeSet(parser);
        mConstructorArgs[0] = mContext;
        View result = root;
        try {
            int type;
            while ((type = parser.next()) != XmlPullParser.START_TAG &&
                    type != XmlPullParser.END_DOCUMENT) {
            }
            if (type != XmlPullParser.START_TAG) {
                throw new InflateException(parser.getPositionDescription()
                        + ": No start tag found!");
            }
            final String name = parser.getName();
            if (TAG_MERGE.equals(name)) {
                if (root == null || !attachToRoot) {
                    throw new InflateException("merge can be used only with a valid "
                            + "ViewGroup root and attachToRoot=true");
                }
                rInflate(parser, root, attrs);
            } else {
                View temp = createViewFromTag(name, attrs);
                ViewGroup.LayoutParams params = null;
                if (root != null) {
                    params = root.generateLayoutParams(attrs);
                    if (!attachToRoot) {
                        temp.setLayoutParams(params);
                    }
                }
                rInflate(parser, temp, attrs);
                if (root != null && attachToRoot) {
                    root.addView(temp, params);
                }
                if (root == null || !attachToRoot) {
                    result = temp;
                }
            }
        } catch (XmlPullParserException e) {
            InflateException ex = new InflateException(e.getMessage());
            ex.initCause(e);
            throw ex;
        } catch (IOException e) {
            InflateException ex = new InflateException(
                    parser.getPositionDescription()
                    + ": " + e.getMessage());
            ex.initCause(e);
            throw ex;
        }
        return result;
    }
}
本節給大家講解了一下Android中的LayoutInflater(布局服務),以及動態加載View和控件 相關的東西,相信對初學控件的朋友帶來幫助~好的,就說這麼多,謝謝~
 第8章、下拉列表框Spinner(從零開始學Android)
在Android App應用中,下拉列表框Spinner的使用頻次是相當高的,如果你對Spinner陌生,你一定不會對HTML中的SELECT陌生,他們的作用是一樣的,都
 4.2.2 Service進階
本節引言上節我們學習了Service的生命周期,以及兩種啟動Service的兩種方法,本節繼續來深入了解Service中的IntentService
 第18章、基於監聽器的事件處理(從零開始學Android)
事件,我們並不陌生!所有的基於UI的應用程序,事件都變得不可或缺!試想一下,如果我們做的程序單擊按鈕和其它控件都沒有反應,那麼就如同一個人在這個世界上聽不到聲音一樣!An
 第99章、Android調用Javascript(從零開始學Android)
在某些Android應用中,使用Javascript調用Android中的方法也是會用到的。(1)用WebView來顯示HTML代碼;(2)允許WebView執行Java