編輯:Android技術基礎
在上一節中我們對HttpURLConnection進行了學習,本節到第二種方式:HttpClient,盡管被Google 棄用了,但是我們我們平時也可以拿HttpClient來抓下包,配合Jsoup解析網頁效果更佳!HttpClient 用於接收/發送Http請求/響應,但不緩存服務器響應,不執行HTML頁面潛入的JS代碼,不會對頁面內容 進行任何解析,處理!開始本節內容!
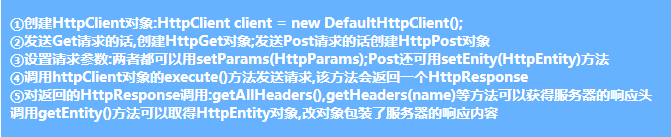
基本流程:
直接貼下簡單的發送Get請求的代碼:
public class MainActivity extends Activity implements OnClickListener {

    private Button btnGet;
    private WebView wView;
    public static final int SHOW_DATA = 0X123;
    private String detail = "";

    private Handler handler = new Handler() {
        public void handleMessage(Message msg) {
            if(msg.what == SHOW_DATA)
            {
                wView.loadDataWithBaseURL("",detail, "text/html","UTF-8","");
            }
        };
    };
    @Override
    protected void onCreate(Bundle savedInstanceState) {
        super.onCreate(savedInstanceState);
        setContentView(R.layout.activity_main);
        initView();
        setView();
    }

    private void initView() {
        btnGet = (Button) findViewById(R.id.btnGet);
        wView = (WebView) findViewById(R.id.wView);
    }

    private void setView() {
        btnGet.setOnClickListener(this);
        wView.getSettings().setDomStorageEnabled(true);
    }
    @Override
    public void onClick(View v) {
        if (v.getId() == R.id.btnGet) {
            GetByHttpClient();
        }
    }
    private void GetByHttpClient() {
        new Thread()
        {
            public void run()
            {
                    try {
                        HttpClient httpClient = new DefaultHttpClient();
                        HttpGet httpGet = new HttpGet("http://www.w3cschool.cc/python/python-tutorial.html");
                        HttpResponse httpResponse = httpClient.execute(httpGet);
                        if (httpResponse.getStatusLine().getStatusCode() == 200) {
                            HttpEntity entity = httpResponse.getEntity();
                            detail = EntityUtils.toString(entity, "utf-8");
                            handler.sendEmptyMessage(SHOW_DATA);
                        }
                    } catch (Exception e) {
                        e.printStackTrace();
                    }
            };
        }.start();
    }

}
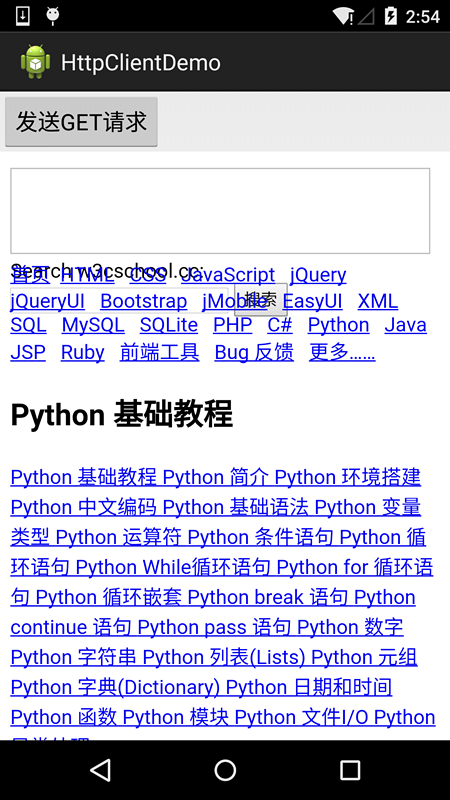
運行截圖
另外,如果是帶有參數的GET請求的話,我們可以將參數放到一個List集合中,再對參數進行URL編碼, 最後和URL拼接下就好了:
List<BasicNameValuePair> params = new LinkedList<BasicNameValuePair>();
params.add(new BasicNameValuePair("user", "豬小弟"));
params.add(new BasicNameValuePair("pawd", "123"));
String param = URLEncodedUtils.format(params, "UTF-8");
HttpGet httpGet = new HttpGet("http://www.baidu.com"+"?"+param);
POST請求比GET稍微復雜一點,創建完HttpPost對象後,通過NameValuePair集合來存儲等待提交 的參數,並將參數傳遞到UrlEncodedFormEntity中,最後調用setEntity(entity)完成, HttpClient.execute(HttpPost)即可;這裡就不寫例子了,暫時沒找到Post的網站,又不想 自己寫個Servlet,So,直接貼核心代碼吧~
核心代碼:
private void PostByHttpClient(final String url)
{
    new Thread()
    {
        public void run()
        {
            try{
                HttpClient httpClient = new DefaultHttpClient();
                HttpPost httpPost = new HttpPost(url);
                List<NameValuePair> params = new ArrayList<NameValuePair>();
                params.add(new BasicNameValuePair("user", "豬大哥"));
                params.add(new BasicNameValuePair("pawd", "123"));
                UrlEncodedFormEntity entity = new UrlEncodedFormEntity(params,"UTF-8");
                httpPost.setEntity(entity);
                HttpResponse httpResponse =  httpClient.execute(httpPost);
                if (httpResponse.getStatusLine().getStatusCode() == 200) {
                    HttpEntity entity2 = httpResponse.getEntity();
                    detail = EntityUtils.toString(entity2, "utf-8");
                    handler.sendEmptyMessage(SHOW_DATA);
                }
            }catch(Exception e){e.printStackTrace();}
        };
    }.start();
}
其實關於HttpClient的例子有很多,比如筆者曾經用它來抓學校教務系統上學生的課程表: 這就涉及到Cookie,模擬登陸的東西,說到抓數據(爬蟲),一般我們是搭配著JSoup來解析 抓到數據的,有興趣可以自己查閱相關資料,這裡貼下筆者畢設app裡獲取網頁部分的關鍵 代碼!大家可以體會下:
HttpClient可以通過下述代碼獲取與設置Cookie: HttpResponse loginResponse = new DefaultHttpClient().execute(getLogin); 獲得Cookie:cookie = loginResponse.getFirstHeader("Set-Cookie").getValue(); 請求時帶上Cookie:httpPost.setHeader("Cookie", cookie);
//獲得鏈接,模擬登錄的實現:
public int getConnect(String user, String key) throws Exception {
    // 先發送get請求 獲取cookie值和__ViewState值
    HttpGet getLogin = new HttpGet(true_url);
    // 第一步:主要的HTML:
    String loginhtml = "";
    HttpResponse loginResponse = new DefaultHttpClient().execute(getLogin);
    if (loginResponse.getStatusLine().getStatusCode() == 200) {
        HttpEntity entity = loginResponse.getEntity();
        loginhtml = EntityUtils.toString(entity);
        // 獲取響應的cookie值
        cookie = loginResponse.getFirstHeader("Set-Cookie").getValue();
        System.out.println("cookie= " + cookie);
    }

    // 第二步:模擬登錄
    // 發送Post請求,禁止重定向
    HttpPost httpPost = new HttpPost(true_url);
    httpPost.getParams().setParameter(ClientPNames.HANDLE_REDIRECTS, false);

    // 設置Post提交的頭信息的參數
    httpPost.setHeader("User-Agent",
            "Mozilla/5.0 (Windows NT 6.3; WOW64; Trident/7.0; rv:11.0) like Gecko");
    httpPost.setHeader("Referer", true_url);
    httpPost.setHeader("Cookie", cookie);

    // 設置請求數據
    List<NameValuePair> params = new ArrayList<NameValuePair>();

    params.add(new BasicNameValuePair("__VIEWSTATE",
            getViewState(loginhtml)));// __VIEWSTATE參數,如果變化可以動態抓取獲取
    params.add(new BasicNameValuePair("Button1", ""));
    params.add(new BasicNameValuePair("hidPdrs", ""));
    params.add(new BasicNameValuePair("hidsc", ""));
    params.add(new BasicNameValuePair("lbLanguage", ""));
    params.add(new BasicNameValuePair("RadioButtonList1", "%D1%A7%C9%FA"));
    params.add(new BasicNameValuePair("txtUserName", user));
    params.add(new BasicNameValuePair("TextBox2", key));
    params.add(new BasicNameValuePair("txtSecretCode", "")); // ( ╯□╰ )逗比正方,竟然不需要驗證碼

    // 設置編碼方式,響應請求,獲取響應狀態碼:
    httpPost.setEntity(new UrlEncodedFormEntity(params, "gb2312"));
    HttpResponse response = new DefaultHttpClient().execute(httpPost);
    int Status = response.getStatusLine().getStatusCode();
    if(Status == 200)return Status;
    System.out.println("Status= " + Status);

    // 重定向狀態碼為302
    if (Status == 302 || Status == 301) {
        // 獲取頭部信息中Location的值
        location = response.getFirstHeader("Location").getValue();
        System.out.println(location);
        // 第三步:獲取管理信息的主頁面
        // Get請求
        HttpGet httpGet = new HttpGet(ip_url + location);// 帶上location地址訪問
        httpGet.setHeader("Referer", true_url);
        httpGet.setHeader("Cookie", cookie);

        // 主頁的html
        mainhtml = "";
        HttpResponse httpResponseget = new DefaultHttpClient()
                .execute(httpGet);
        if (httpResponseget.getStatusLine().getStatusCode() == 200) {
            HttpEntity entity = httpResponseget.getEntity();
            mainhtml = EntityUtils.toString(entity);
        }

    }
    return Status;
}
示例代碼如下:
public static int PutActCode(String actCode, String licPlate, Context mContext) {
    int resp = 0;
    String cookie = (String) SPUtils.get(mContext, "session", "");
    HttpPut httpPut = new HttpPut(PUTACKCODE_URL);
    httpPut.setHeader("Cookie", cookie);
    try {

        List<NameValuePair> params = new ArrayList<NameValuePair>();
        params.add(new BasicNameValuePair("activation_code", actCode));
        params.add(new BasicNameValuePair("license_plate", licPlate));
        httpPut.setEntity(new UrlEncodedFormEntity(params, "UTF-8"));
        HttpResponse course_response = new DefaultHttpClient().execute(httpPut);
        if (course_response.getStatusLine().getStatusCode() == 200) {
            HttpEntity entity2 = course_response.getEntity();
            JSONObject jObject = new JSONObject(EntityUtils.toString(entity2));
            resp = Integer.parseInt(jObject.getString("status_code"));
            return resp;
        }
    } catch (Exception e) {
        e.printStackTrace();
    }
    return resp;
}
好的,本節關於Android HTTP的第二種請求方式:HttpClient就到這裡, 下節開始我們來學習XML以及Json的解析,本節就到這裡,謝謝~
 9.4 使用MediaRecord錄音
本節引言本節是Android多媒體基本API調用的最後一節,帶來的是MediaRecord的簡單使用,用法非常簡單,我們寫個例子來熟悉熟悉~1.使用
 第3章、第一個“Hello,world!”之Android App(從零開始學Android)
幾乎所有中、英、法、德、美等版本的編程教材中,“hello,world!”程序總是作為開篇之作,可謂經典之中的經典!我本打算用“Hel
 5.2.5 Fragment實例精講——新聞(購物)類App列表Fragment的簡單實現
本節引言:相信大家對點擊列表,然後進入詳情這種App並不陌生吧,在購物類App和新聞類App中最為常見:下面我們簡單來講一下流程邏輯!1.邏輯流程講
 2.4.3 Date & Time組件(下)
本節引言:本節我們來繼續學習Android系統給我們提供的幾個原生的Date & Time組件,他們分別是:DatePicker(日期選擇器