在Android應用中實現activity之間的跳轉使用intent機制。
本例子簡單地簡紹如何利用intent使程序由MainActivity跳轉到另一個OtherActivity實現單一參數值,在返回MainActivity時利用Bundle進行批量回傳。
一、設計界面
1、MainActivity布局文件
打開res/layout/activity_main.xml文件。
輸入以下代碼:
[html] view plain copy
- <?xml version="1.0" encoding="utf-8"?>
- <LinearLayout
- xmlns:android="http://schemas.android.com/apk/res/android"
- android:layout_width="match_parent"
- android:layout_height="match_parent"
- android:orientation="vertical" >
-
- <Button
- android:id="@+id/open"
- android:layout_width="wrap_content"
- android:layout_height="wrap_content"
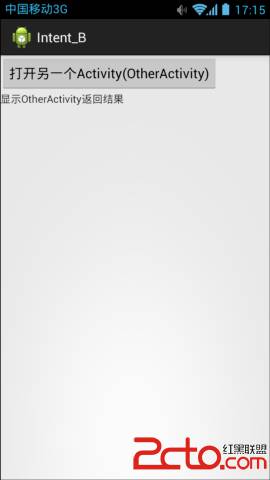
- android:text="打開另一個Activity(OtherActivity)" />
-
- <TextView
- android:id="@+id/result"
- android:layout_width="wrap_content"
- android:layout_height="wrap_content"
- android:text="顯示OtherActivity返回結果" />
-
- </LinearLayout>
2、OtherActivity布局文件
打開res/layout/otheractivity.xml文件。
輸入以下代碼:
[html] view plain copy
- <?xml version="1.0" encoding="utf-8"?>
- <LinearLayout xmlns:android="http://schemas.android.com/apk/res/android"
- android:layout_width="match_parent"
- android:layout_height="match_parent"
- android:orientation="vertical" >
-
- <Button
- android:id="@+id/back"
- android:layout_width="wrap_content"
- android:layout_height="wrap_content"
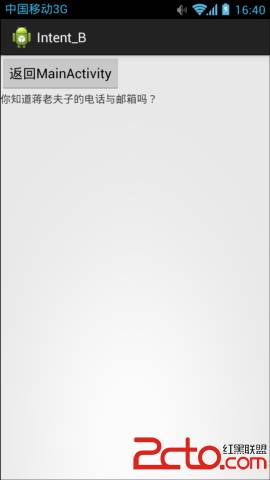
- android:text="返回MainActivity" />
-
- <TextView
- android:id="@+id/prompt"
- android:layout_width="wrap_content"
- android:layout_height="wrap_content"
- android:text="顯示MainActivity傳值" />
-
- </LinearLayout>
二、程序文件
1、打開“src/com.genwoxue.intent_b/MainActivity.java”文件。
然後輸入以下代碼:
[java] view plain copy
- package com.genwoxue.intent_b;
-
- import android.os.Bundle;
- import android.app.Activity;
- import android.content.Intent;
- import android.view.View;
- import android.view.View.OnClickListener;
- import android.widget.Button;
- import android.widget.TextView;
-
- public class MainActivity extends Activity {
-
- private TextView tvResult=null;
- private Button btnOpen=null;
- @Override
- public void onCreate(Bundle savedInstanceState)
- {
- super.onCreate(savedInstanceState);
- setContentView(R.layout.activity_main);
-
- tvResult=(TextView)super.findViewById(R.id.result);
-
- btnOpen=(Button)super.findViewById(R.id.open);
-
- //調用OtherActivity,並且傳值
- btnOpen.setOnClickListener(new OnClickListener(){
- public void onClick(View v)
- {
- Intent intent=new Intent(MainActivity.this,OtherActivity.class);
- intent.putExtra("prompt", "你知道蔣老夫子的電話與郵箱嗎?");
- MainActivity.this.startActivityForResult(intent, 1);
- }
- });
- }
-
- //處理接收的數據
- @Override
- protected void onActivityResult(int requestCode,int resultCode,Intent data){
- switch(resultCode){
- case RESULT_OK:
- super.onActivityResult(requestCode, resultCode, data);
- //接收數據:采用Bundle傳值
- Bundle bundle =data.getExtras();
- String employeeName=bundle.getString("employeeName");
- String mobile=bundle.getString("mobile");
- String email=bundle.getString("email");
- tvResult.setText("☆☆☆☆☆☆返回結果☆☆☆☆☆☆"+"\n員工:"+employeeName+"\n手機號碼:"+mobile+"\n電子郵件:"+email);
- break;
- case RESULT_CANCELED:
- tvResult.setText("操作取消");
- break;
- default:
- break;
- }
- }
- }
-
2、打開“src/com.genwoxue.contentprovider_b/OtherActivity.java”文件。
然後輸入以下代碼:
[java] view plain copy
- package com.genwoxue.intent_b;
-
- import android.os.Bundle;
- import android.app.Activity;
- import android.content.Intent;
- import android.view.View;
- import android.view.View.OnClickListener;
- import android.widget.Button;
- import android.widget.TextView;
-
- public class OtherActivity extends Activity {
-
- private TextView tvPrompt=null;
- private Button btnBack=null;
- @Override
- public void onCreate(Bundle savedInstanceState)
- {
- super.onCreate(savedInstanceState);
- setContentView(R.layout.activity_other);
- tvPrompt=(TextView)super.findViewById(R.id.prompt);
- btnBack=(Button)super.findViewById(R.id.back);
-
- //接收數據
- Intent intent=super.getIntent();
- String url=intent.getStringExtra("prompt");
- tvPrompt.setText(url);
-
- //返回MainActivity
- btnBack.setOnClickListener(new OnClickListener(){
- public void onClick(View v)
- {
- Bundle bundle = new Bundle();
- bundle.putString("employeeName", "蔣老夫子");
- bundle.putString("mobile", "139037100xx");
- bundle.putString("email", "[email protected]");
-
- Intent intent = new Intent(OtherActivity.this,MainActivity.class);
- intent.putExtras(bundle);
- OtherActivity.this.setResult(RESULT_OK, intent);
- OtherActivity.this.finish();
- }
- });
- }
- }
三、配置文件
打開“AndroidManifest.xml”文件。
然後輸入以下代碼:
[html] view plain copy
- <?xml version="1.0" encoding="utf-8"?>
- <manifest xmlns:android="http://schemas.android.com/apk/res/android"
- package="com.genwoxue.intent_b"
- android:versionCode="1"
- android:versionName="1.0" >
-
- <uses-sdk
- android:minSdkVersion="8"
- android:targetSdkVersion="15" />
-
- <application
- android:allowBackup="true"
- android:icon="@drawable/ic_launcher"
- android:label="@string/app_name"
- android:theme="@style/AppTheme" >
- <activity
- android:name="com.genwoxue.intent_b.MainActivity"
- android:label="@string/app_name" >
- <intent-filter>
- <action android:name="android.intent.action.MAIN" />
- <category android:name="android.intent.category.LAUNCHER" />
- </intent-filter>
- </activity>
-
- <span style="color:#ff0000;"><strong><activity
- android:name="com.genwoxue.intent_b.OtherActivity">
- </activity>
- </strong></span> </application>
-
- </manifest>
四、運行結果

 7.5.4 WebView文件下載
 8.3.1 三個繪圖工具類詳解
 第28章、列表視圖ListView之一(從零開始學Android)
 7.4 Android 調用 WebService