編輯:關於Android編程
一般一個View只有一面,但是可以自定義一個View,實現像翻書那樣的翻轉效果。
旋轉View:
/**
 * 兩種方式構造一個翻轉卡片
 * 1:直接提供一個特定命名格式的View
 * 2:提供兩個線性布局(正面和,反面)
 * Created by lip on 2015/4/8.
 */
public class FlipView extends LinearLayout implements View.OnClickListener,RotateAnimation.InterpolatedTimeListener
{
    private LinearLayout m_first_ll, m_second_ll;

    private boolean enableRefresh;
    private LinearLayout view;
    private View clickView;//當前的view
    private Context context;
    public FlipView(Context context)
    {
        super(context);
        this.context=context;
        //initViews();
    }
    public FlipView(Context context,AttributeSet attrs)
    {
        super(context,attrs);
        this.context=context;
        //initViews();
    }

    /**
     */
    public void initViews()
    {
        view=(LinearLayout)inflate(context,R.layout.flip_view,null);
        m_first_ll=(LinearLayout)view.findViewById(R.id.first_ll);
        m_second_ll=(LinearLayout)view.findViewById(R.id.second_ll);
        m_first_ll.setOnClickListener(this);
        m_second_ll.setOnClickListener(this);
        addView(view, ViewGroup.LayoutParams.MATCH_PARENT, ViewGroup.LayoutParams.MATCH_PARENT);
    }

    /**
     * @param ll1 正面
     * @param ll2  反面
     */
    public void addViews(LinearLayout ll1,LinearLayout ll2)
    {
        m_first_ll=ll1;
        m_second_ll=ll2;
        m_first_ll.setOnClickListener(this);
        m_second_ll.setOnClickListener(this);
        addView(m_first_ll, ViewGroup.LayoutParams.MATCH_PARENT, ViewGroup.LayoutParams.MATCH_PARENT);
        addView(m_second_ll, ViewGroup.LayoutParams.MATCH_PARENT, ViewGroup.LayoutParams.MATCH_PARENT);
    }

    /**
     * flag=0 翻到正面
     * flag=1 翻到反面
     * @param flag
     */
    public void show(int flag)
    {
        enableRefresh = true;
        RotateAnimation rotateAnim = null;
        float cX = this.getWidth() / 2.0f;
        float cY = this.getHeight() / 2.0f;
        if(flag==0)
        rotateAnim = new RotateAnimation(cX, cY,
                RotateAnimation.ROTATE_DECREASE);
        else if(flag==1)
            rotateAnim = new RotateAnimation(cX, cY,
                    RotateAnimation.ROTATE_INCREASE);
        if (rotateAnim != null) {
            rotateAnim.setInterpolatedTimeListener(this);
            rotateAnim.setFillAfter(true);
            this.startAnimation(rotateAnim);
        }
    }
    @Override
    public void onClick(View v) {
        Log.d(click:,v.toString());
        enableRefresh = true;
        clickView=v;
        RotateAnimation rotateAnim = null;
        float cX = this.getWidth() / 2.0f;
        float cY = this.getHeight() / 2.0f;
        if (m_first_ll==v) {
            rotateAnim = new RotateAnimation(cX, cY,
                    RotateAnimation.ROTATE_INCREASE);
        } else if (m_second_ll == v) {
            rotateAnim = new RotateAnimation(cX, cY,
                    RotateAnimation.ROTATE_DECREASE);
        }

        if (rotateAnim != null) {
            rotateAnim.setInterpolatedTimeListener(this);
            rotateAnim.setFillAfter(true);
            this.startAnimation(rotateAnim);
        }
    }

    @Override
    public void interpolatedTime(float interpolatedTime) {
        if (enableRefresh && interpolatedTime > 0.5f) {
            setHint();
            enableRefresh = false;
        }
    }

    public void setHint() {
        if (clickView == m_first_ll) {
            m_first_ll.setVisibility(View.GONE);
            m_second_ll.setVisibility(View.VISIBLE);
        } else if (clickView==m_second_ll) {
            m_second_ll.setVisibility(View.GONE);
            m_first_ll.setVisibility(View.VISIBLE);
        }

    }
}
來看看使用方法:
public class FlipActivity extends Activity
{
    private FlipView flipView;
    LinearLayout firstLL,secondLL;
    LinearLayout root;
    @Override
    protected void onCreate(Bundle savedInstanceState) {
        super.onCreate(savedInstanceState);
        //setContentView(R.layout.activity_flip);
        initViews();
    }
    private void initViews()
    {
        root=(LinearLayout)LayoutInflater.from(this).inflate(R.layout.activity_flip,null);
        flipView=(FlipView)root.findViewById(R.id.flip_view);
        /*********第一種方式(要主動調用initViews)*************/
//        firstLL=(LinearLayout)LayoutInflater.from(this).inflate(R.layout.flip_view1,null);
//        secondLL=(LinearLayout)LayoutInflater.from(this).inflate(R.layout.flip_view2,null);
        /*********第二種方式*************/
        firstLL=(LinearLayout)root.findViewById(R.id.root_ll1);
        secondLL=(LinearLayout)root.findViewById(R.id.root_ll2);
        root.removeView(firstLL);
        root.removeView(secondLL);
        flipView.addViews(firstLL,secondLL);
        setContentView(root);
    }
}
既然一個View 有兩面,那當然需要主動去設置正面和反面的內容了。
flipView.addViews(firstLL,secondLL);第一個參數就是正面的view,第二個參數是反面的view,這兩個view都是線性布局。我提供了兩種設置正反面的的方式,如果要是對於布局有一點了解,其實這是一樣的
旋轉工具類(網上參考別人的):
public class RotateAnimation extends Animation {

	/** 值為true時可明確查看動畫的旋轉方向。 */
	public static final boolean DEBUG = false;
	/** 沿Y軸正方向看,數值減1時動畫逆時針旋轉。 */
	public static final boolean ROTATE_DECREASE = true;
	/** 沿Y軸正方向看,數值減1時動畫順時針旋轉。 */
	public static final boolean ROTATE_INCREASE = false;
	/** Z軸上最大深度。 */
	public static final float DEPTH_Z = 310.0f;
	/** 動畫顯示時長。 */
	public static final long DURATION = 800l;
	/** 圖片翻轉類型。 */
	private final boolean type;
	private final float centerX;
	private final float centerY;
	private Camera camera;

	public RotateAnimation(float cX, float cY, boolean type) {
		centerX = cX;
		centerY = cY;
		this.type = type;
		// 設置動畫時長
		setDuration(DURATION);
	}

	@Override
	public void initialize(int width, int height, int parentWidth,
			int parentHeight) {
		// 在構造函數之後、applyTransformation()之前調用本方法。
		super.initialize(width, height, parentWidth, parentHeight);
		camera = new Camera();
	}

	@Override
	protected void applyTransformation(float interpolatedTime,
			Transformation transformation) {
		// interpolatedTime:動畫進度值,范圍為0~1,0.5為正好翻轉一半
		if (listener != null) {
			listener.interpolatedTime(interpolatedTime);
		}

		float from = 0.0f, to = 0.0f;
		if (type == ROTATE_DECREASE) {
			from = 0.0f;
			to = 180.0f;
		} else if (type == ROTATE_INCREASE) {
			from = 360.0f;
			to = 180.0f;
		}

		// 旋轉的角度
		float degree = from + (to - from) * interpolatedTime;
		boolean overHalf = (interpolatedTime > 0.5f);
		if (overHalf) {
			// 翻轉過半的情況下,為保證數字仍為可讀的文字而非鏡面效果的文字,需翻轉180度。
			degree = degree - 180;
		}

		// 旋轉深度
		float depth = (0.5f - Math.abs(interpolatedTime - 0.5f)) * DEPTH_Z;

		final Matrix matrix = transformation.getMatrix();
		camera.save();
		// 深度——》相當於與屏幕的距離
		camera.translate(0.0f, 0.0f, depth);
		// 以x軸旋轉
		// camera.rotateX(degree);
		// 以y軸旋轉
		camera.rotateY(degree);
		camera.getMatrix(matrix);
		camera.restore();

		if (DEBUG) {
			if (overHalf) {
				matrix.preTranslate(-centerX * 2, -centerY);
				matrix.postTranslate(centerX * 2, centerY);
			}
		} else {
			// 確保圖片的翻轉過程一直處於組件的中心點位置
			/*
			 * preTranslate是指在setScale前平移,postTranslate是指在setScale後平移,它們參數是平移的距離,
			 * 而不是平移目的地的坐標!
			 * 由於縮放是以(0,0)為中心的,所以為了把界面的中心與(0,0)對齊,就要preTranslate(-centerX,
			 * -centerY),setScale完成後, 調用postTranslate(centerX,
			 * centerY),再把圖片移回來,這樣看到的動畫效果就是activity的界面圖片從中心不停的縮放了
			 * 注:centerX和centerY是界面中心的坐標
			 */
			matrix.preTranslate(-centerX, -centerY);
			matrix.postTranslate(centerX, centerY);
		}
	}

	/** 用於監聽動畫進度。當值過半時需更新的內容。 */
	private InterpolatedTimeListener listener;

	public void setInterpolatedTimeListener(InterpolatedTimeListener listener) {
		this.listener = listener;
	}

	/** 動畫進度監聽器。 */
	public static interface InterpolatedTimeListener {
		public void interpolatedTime(float interpolatedTime);
	}

}
 下載、編譯、運行android 7.1系統詳解(ubuntu 16.0.4)
Android 7的系統版本新增的很多的新功能,比如說任務處理功能,允許用戶雙擊“最近”按鈕去快速切換到自己上一次使用的應用程序中。同時,“最近”菜單中還有一個“清除全部
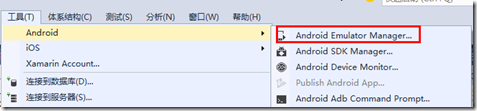 如何快速創建Android模擬器
調試手機應用程序一般先用模擬器來實現,只是因為每次都發布到手機上調試太麻煩了。當應用程序在模擬器上調試沒錯後,再發布到手機運行驗證就行了。一、模擬器創建方式為了在模擬器中
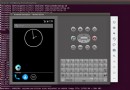
 Android畫個時鐘玩玩
先看下最終的效果 開始實現新建一個ClockView集成View public class ClockView extends View { }先重寫onM
 Android中使用BitmapShader類來制作各種圖片的圓角
public BitmapShader(Bitmap bitmap,Shader.TileMode tileX,Shader.TileMode t