編輯:關於Android編程
 接著,小編就來詳細介紹這幾種布局,小編是初學者,還請各位小伙伴多多指教哦。首先,我們來看:
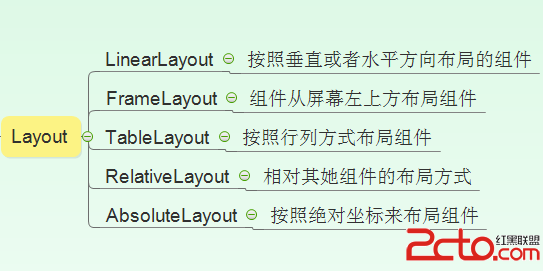
第一個LinearLayout---線性布局,線性布局是我們在開發Android項目中最常用的的一種布局方式,線性布局的方向有兩種,分別是垂直布局和水平布局,當垂直布局時,每一行就只有一個元素,多個元素依次垂直往下;水平布局時,只有一行,每一個元素依次向右排列。我們來看一個具體的例子,代碼如下所示:
[html] view plaincopyprint?
<SPAN style="FONT-SIZE: 18px"><?xml version="1.0" encoding="utf-8"?>
<LinearLayout xmlns:android="http://schemas.android.com/apk/res/android"
android:layout_width="match_parent"
android:layout_height="match_parent"
android:orientation="vertical" >
<LinearLayout
android:layout_width="fill_parent"
android:layout_height="fill_parent"
android:layout_weight="1"
android:orientation="horizontal">
<TextView
android:text="blue"
android:gravity="center_horizontal"
android:background="#52C8FA"
android:layout_width="wrap_content"
android:layout_height="fill_parent"
android:layout_weight="1"/>
<TextView
android:text="yellow"
android:gravity="center_horizontal"
android:background="#FFFF00"
android:layout_width="wrap_content"
android:layout_height="fill_parent"
android:layout_weight="1"/>
<TextView
android:text="pink"
android:gravity="center_horizontal"
android:background="#F60C88"
android:layout_width="wrap_content"
android:layout_height="fill_parent"
android:layout_weight="1"/>
<TextView
android:text="purple"
android:gravity="center_horizontal"
android:background="#722694"
android:layout_width="wrap_content"
android:layout_height="fill_parent"
android:layout_weight="1"/>
</LinearLayout>
<LinearLayout
android:orientation="vertical"
android:layout_width="fill_parent"
android:layout_height="fill_parent"
android:layout_weight="1">
<TextView
android:text="green"
android:textSize="15pt"
android:background="#39E18A"
android:layout_width="fill_parent"
android:layout_height="wrap_content"
android:layout_weight="1"/>
<TextView
android:text="pink"
android:textSize="15pt"
android:background="#F60C88"
android:layout_width="fill_parent"
android:layout_height="wrap_content"
android:layout_weight="1"/>
<TextView
android:text="yellow"
android:textSize="15pt"
android:background="#FFFF00"
android:layout_width="fill_parent"
android:layout_height="wrap_content"
android:layout_weight="1"/>
<TextView
android:text="blue"
android:textSize="15pt"
android:background="#52C8FA"
android:layout_width="fill_parent"
android:layout_height="wrap_content"
android:layout_weight="1" />
</LinearLayout>
</LinearLayout>
</SPAN>
<?xml version="1.0" encoding="utf-8"?>
<LinearLayout xmlns:android="http://schemas.android.com/apk/res/android"
android:layout_width="match_parent"
android:layout_height="match_parent"
android:orientation="vertical" >
<LinearLayout
android:layout_width="fill_parent"
android:layout_height="fill_parent"
android:layout_weight="1"
android:orientation="horizontal">
<TextView
android:text="blue"
android:gravity="center_horizontal"
android:background="#52C8FA"
android:layout_width="wrap_content"
android:layout_height="fill_parent"
android:layout_weight="1"/>
<TextView
android:text="yellow"
android:gravity="center_horizontal"
android:background="#FFFF00"
android:layout_width="wrap_content"
android:layout_height="fill_parent"
android:layout_weight="1"/>
<TextView
android:text="pink"
android:gravity="center_horizontal"
android:background="#F60C88"
android:layout_width="wrap_content"
android:layout_height="fill_parent"
android:layout_weight="1"/>
<TextView
android:text="purple"
android:gravity="center_horizontal"
android:background="#722694"
android:layout_width="wrap_content"
android:layout_height="fill_parent"
android:layout_weight="1"/>
</LinearLayout>
<LinearLayout
android:orientation="vertical"
android:layout_width="fill_parent"
android:layout_height="fill_parent"
android:layout_weight="1">
<TextView
android:text="green"
android:textSize="15pt"
android:background="#39E18A"
android:layout_width="fill_parent"
android:layout_height="wrap_content"
android:layout_weight="1"/>
<TextView
android:text="pink"
android:textSize="15pt"
android:background="#F60C88"
android:layout_width="fill_parent"
android:layout_height="wrap_content"
android:layout_weight="1"/>
<TextView
android:text="yellow"
android:textSize="15pt"
android:background="#FFFF00"
android:layout_width="fill_parent"
android:layout_height="wrap_content"
android:layout_weight="1"/>
<TextView
android:text="blue"
android:textSize="15pt"
android:background="#52C8FA"
android:layout_width="fill_parent"
android:layout_height="wrap_content"
android:layout_weight="1" />
</LinearLayout>
</LinearLayout>
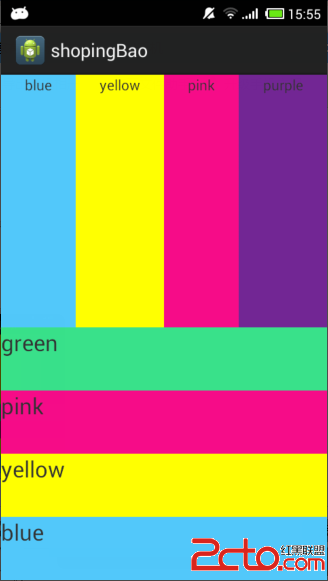
效果如下圖所示:
接著,小編就來詳細介紹這幾種布局,小編是初學者,還請各位小伙伴多多指教哦。首先,我們來看:
第一個LinearLayout---線性布局,線性布局是我們在開發Android項目中最常用的的一種布局方式,線性布局的方向有兩種,分別是垂直布局和水平布局,當垂直布局時,每一行就只有一個元素,多個元素依次垂直往下;水平布局時,只有一行,每一個元素依次向右排列。我們來看一個具體的例子,代碼如下所示:
[html] view plaincopyprint?
<SPAN style="FONT-SIZE: 18px"><?xml version="1.0" encoding="utf-8"?>
<LinearLayout xmlns:android="http://schemas.android.com/apk/res/android"
android:layout_width="match_parent"
android:layout_height="match_parent"
android:orientation="vertical" >
<LinearLayout
android:layout_width="fill_parent"
android:layout_height="fill_parent"
android:layout_weight="1"
android:orientation="horizontal">
<TextView
android:text="blue"
android:gravity="center_horizontal"
android:background="#52C8FA"
android:layout_width="wrap_content"
android:layout_height="fill_parent"
android:layout_weight="1"/>
<TextView
android:text="yellow"
android:gravity="center_horizontal"
android:background="#FFFF00"
android:layout_width="wrap_content"
android:layout_height="fill_parent"
android:layout_weight="1"/>
<TextView
android:text="pink"
android:gravity="center_horizontal"
android:background="#F60C88"
android:layout_width="wrap_content"
android:layout_height="fill_parent"
android:layout_weight="1"/>
<TextView
android:text="purple"
android:gravity="center_horizontal"
android:background="#722694"
android:layout_width="wrap_content"
android:layout_height="fill_parent"
android:layout_weight="1"/>
</LinearLayout>
<LinearLayout
android:orientation="vertical"
android:layout_width="fill_parent"
android:layout_height="fill_parent"
android:layout_weight="1">
<TextView
android:text="green"
android:textSize="15pt"
android:background="#39E18A"
android:layout_width="fill_parent"
android:layout_height="wrap_content"
android:layout_weight="1"/>
<TextView
android:text="pink"
android:textSize="15pt"
android:background="#F60C88"
android:layout_width="fill_parent"
android:layout_height="wrap_content"
android:layout_weight="1"/>
<TextView
android:text="yellow"
android:textSize="15pt"
android:background="#FFFF00"
android:layout_width="fill_parent"
android:layout_height="wrap_content"
android:layout_weight="1"/>
<TextView
android:text="blue"
android:textSize="15pt"
android:background="#52C8FA"
android:layout_width="fill_parent"
android:layout_height="wrap_content"
android:layout_weight="1" />
</LinearLayout>
</LinearLayout>
</SPAN>
<?xml version="1.0" encoding="utf-8"?>
<LinearLayout xmlns:android="http://schemas.android.com/apk/res/android"
android:layout_width="match_parent"
android:layout_height="match_parent"
android:orientation="vertical" >
<LinearLayout
android:layout_width="fill_parent"
android:layout_height="fill_parent"
android:layout_weight="1"
android:orientation="horizontal">
<TextView
android:text="blue"
android:gravity="center_horizontal"
android:background="#52C8FA"
android:layout_width="wrap_content"
android:layout_height="fill_parent"
android:layout_weight="1"/>
<TextView
android:text="yellow"
android:gravity="center_horizontal"
android:background="#FFFF00"
android:layout_width="wrap_content"
android:layout_height="fill_parent"
android:layout_weight="1"/>
<TextView
android:text="pink"
android:gravity="center_horizontal"
android:background="#F60C88"
android:layout_width="wrap_content"
android:layout_height="fill_parent"
android:layout_weight="1"/>
<TextView
android:text="purple"
android:gravity="center_horizontal"
android:background="#722694"
android:layout_width="wrap_content"
android:layout_height="fill_parent"
android:layout_weight="1"/>
</LinearLayout>
<LinearLayout
android:orientation="vertical"
android:layout_width="fill_parent"
android:layout_height="fill_parent"
android:layout_weight="1">
<TextView
android:text="green"
android:textSize="15pt"
android:background="#39E18A"
android:layout_width="fill_parent"
android:layout_height="wrap_content"
android:layout_weight="1"/>
<TextView
android:text="pink"
android:textSize="15pt"
android:background="#F60C88"
android:layout_width="fill_parent"
android:layout_height="wrap_content"
android:layout_weight="1"/>
<TextView
android:text="yellow"
android:textSize="15pt"
android:background="#FFFF00"
android:layout_width="fill_parent"
android:layout_height="wrap_content"
android:layout_weight="1"/>
<TextView
android:text="blue"
android:textSize="15pt"
android:background="#52C8FA"
android:layout_width="fill_parent"
android:layout_height="wrap_content"
android:layout_weight="1" />
</LinearLayout>
</LinearLayout>
效果如下圖所示:
 第二個FrameLayout---幀布局,幀布局是從屏幕的左上角(0,0)坐標開始布局,多個組件層疊排列,第一個添加的組件放到最底層,最後添加到框架中的視圖顯示在最上面。上一層的會覆蓋下一層的控件,代碼如下所示:
[html] view plaincopyprint?
<SPAN style="FONT-SIZE: 18px"><?xml version="1.0" encoding="utf-8"?>
<FrameLayout xmlns:android="http://schemas.android.com/apk/res/android"
android:layout_width="fill_parent"
android:layout_height="fill_parent" >
<TextView
android:layout_width="300dp"
android:layout_height="300dp"
android:background="#52C8FA"/>
<TextView
android:layout_width="260dp"
android:layout_height="260dp"
android:background="#FFFF00"/>
<TextView
android:layout_width="220dp"
android:layout_height="220dp"
android:background="#F60C88"/>
</FrameLayout> </SPAN>
<?xml version="1.0" encoding="utf-8"?>
<FrameLayout xmlns:android="http://schemas.android.com/apk/res/android"
android:layout_width="fill_parent"
android:layout_height="fill_parent" >
<TextView
android:layout_width="300dp"
android:layout_height="300dp"
android:background="#52C8FA"/>
<TextView
android:layout_width="260dp"
android:layout_height="260dp"
android:background="#FFFF00"/>
<TextView
android:layout_width="220dp"
android:layout_height="220dp"
android:background="#F60C88"/>
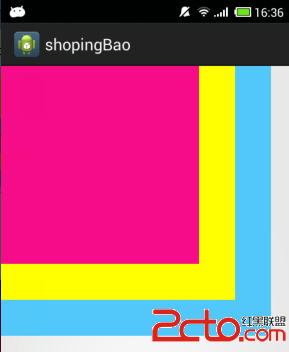
</FrameLayout> 運行效果如下所示:
第二個FrameLayout---幀布局,幀布局是從屏幕的左上角(0,0)坐標開始布局,多個組件層疊排列,第一個添加的組件放到最底層,最後添加到框架中的視圖顯示在最上面。上一層的會覆蓋下一層的控件,代碼如下所示:
[html] view plaincopyprint?
<SPAN style="FONT-SIZE: 18px"><?xml version="1.0" encoding="utf-8"?>
<FrameLayout xmlns:android="http://schemas.android.com/apk/res/android"
android:layout_width="fill_parent"
android:layout_height="fill_parent" >
<TextView
android:layout_width="300dp"
android:layout_height="300dp"
android:background="#52C8FA"/>
<TextView
android:layout_width="260dp"
android:layout_height="260dp"
android:background="#FFFF00"/>
<TextView
android:layout_width="220dp"
android:layout_height="220dp"
android:background="#F60C88"/>
</FrameLayout> </SPAN>
<?xml version="1.0" encoding="utf-8"?>
<FrameLayout xmlns:android="http://schemas.android.com/apk/res/android"
android:layout_width="fill_parent"
android:layout_height="fill_parent" >
<TextView
android:layout_width="300dp"
android:layout_height="300dp"
android:background="#52C8FA"/>
<TextView
android:layout_width="260dp"
android:layout_height="260dp"
android:background="#FFFF00"/>
<TextView
android:layout_width="220dp"
android:layout_height="220dp"
android:background="#F60C88"/>
</FrameLayout> 運行效果如下所示:
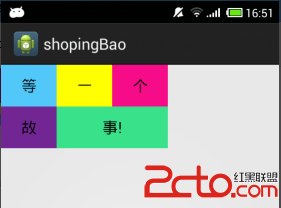
 第三個TableLayout---表格布局,表格布局是一個ViewGroup以表格顯示它的子視圖(view)元素,即行和列標識一個視圖的位置,每一個TableLayout裡面有表格行TableRow,TableRow裡面可以具體定義每一個元素。每一個布局都有自己適合的方式,這五個布局元素可以相互嵌套應用,代碼如下所示:
[html] view plaincopyprint?
<SPAN style="FONT-SIZE: 18px"><?xml version="1.0" encoding="utf-8"?>
<TableLayout xmlns:android="http://schemas.android.com/apk/res/android"
android:layout_width="fill_parent"
android:layout_height="fill_parent" >
<TableRow>
<Button
android:text="等"
android:background="#52C8FA"/>
<Button
android:text="一"
android:background="#FFFF00"/>
<Button
android:text="個"
android:background="#F60C88"/>
</TableRow>
<TableRow>
<Button
android:text="故"
android:background="#722694"/>
<Button
android:layout_span="2"
android:text="事!"
android:background="#39E18A"/>
</TableRow>
</TableLayout>
</SPAN>
<?xml version="1.0" encoding="utf-8"?>
<TableLayout xmlns:android="http://schemas.android.com/apk/res/android"
android:layout_width="fill_parent"
android:layout_height="fill_parent" >
<TableRow>
<Button
android:text="等"
android:background="#52C8FA"/>
<Button
android:text="一"
android:background="#FFFF00"/>
<Button
android:text="個"
android:background="#F60C88"/>
</TableRow>
<TableRow>
<Button
android:text="故"
android:background="#722694"/>
<Button
android:layout_span="2"
android:text="事!"
android:background="#39E18A"/>
</TableRow>
</TableLayout>
運行效果如下圖所示:
第三個TableLayout---表格布局,表格布局是一個ViewGroup以表格顯示它的子視圖(view)元素,即行和列標識一個視圖的位置,每一個TableLayout裡面有表格行TableRow,TableRow裡面可以具體定義每一個元素。每一個布局都有自己適合的方式,這五個布局元素可以相互嵌套應用,代碼如下所示:
[html] view plaincopyprint?
<SPAN style="FONT-SIZE: 18px"><?xml version="1.0" encoding="utf-8"?>
<TableLayout xmlns:android="http://schemas.android.com/apk/res/android"
android:layout_width="fill_parent"
android:layout_height="fill_parent" >
<TableRow>
<Button
android:text="等"
android:background="#52C8FA"/>
<Button
android:text="一"
android:background="#FFFF00"/>
<Button
android:text="個"
android:background="#F60C88"/>
</TableRow>
<TableRow>
<Button
android:text="故"
android:background="#722694"/>
<Button
android:layout_span="2"
android:text="事!"
android:background="#39E18A"/>
</TableRow>
</TableLayout>
</SPAN>
<?xml version="1.0" encoding="utf-8"?>
<TableLayout xmlns:android="http://schemas.android.com/apk/res/android"
android:layout_width="fill_parent"
android:layout_height="fill_parent" >
<TableRow>
<Button
android:text="等"
android:background="#52C8FA"/>
<Button
android:text="一"
android:background="#FFFF00"/>
<Button
android:text="個"
android:background="#F60C88"/>
</TableRow>
<TableRow>
<Button
android:text="故"
android:background="#722694"/>
<Button
android:layout_span="2"
android:text="事!"
android:background="#39E18A"/>
</TableRow>
</TableLayout>
運行效果如下圖所示:
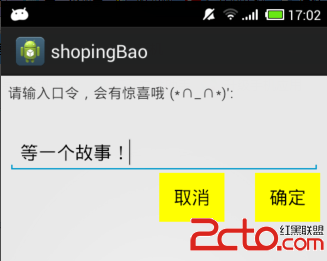
 第四個RelativeLayout---相對布局,相對布局是按照組件之間的相對位置來布局,比如在某個組件的左邊,右邊,上面和下面,相對布局可以理解為某一個元素為參照物,來定位的布局方式,具體代碼如下所示:
[html] view plaincopyprint?
<SPAN style="FONT-SIZE: 18px"><?xml version="1.0" encoding="utf-8"?>
<RelativeLayout xmlns:android="http://schemas.android.com/apk/res/android"
android:layout_width="fill_parent"
android:layout_height="wrap_content"
android:padding="10px"
>
<TextView
android:id="@+id/tev1"
android:layout_width="wrap_content"
android:layout_height="wrap_content"
android:layout_marginBottom="30dp"
android:text="請輸入口令,會有驚喜哦`(*∩_∩*)′:" />
<EditText
android:id="@+id/tx1"
android:layout_width="match_parent"
android:layout_height="wrap_content"
android:layout_below="@id/tev1" />
<Button
android:id="@+id/btn1"
android:layout_height="wrap_content"
android:layout_width="wrap_content"
android:layout_below="@id/tx1"
android:layout_alignParentRight="true"
android:text="確定"
android:background="#FFFF00"/>
<Button
android:id="@+id/btn2"
android:layout_height="wrap_content"
android:layout_width="wrap_content"
android:layout_below="@id/tx1"
android:layout_toLeftOf="@id/btn1"
android:layout_marginRight="30dp"
android:text="取消"
android:background="#FFFF00"/>
</RelativeLayout> </SPAN>
<?xml version="1.0" encoding="utf-8"?>
<RelativeLayout xmlns:android="http://schemas.android.com/apk/res/android"
android:layout_width="fill_parent"
android:layout_height="wrap_content"
android:padding="10px"
>
<TextView
android:id="@+id/tev1"
android:layout_width="wrap_content"
android:layout_height="wrap_content"
android:layout_marginBottom="30dp"
android:text="請輸入口令,會有驚喜哦`(*∩_∩*)′:" />
<EditText
android:id="@+id/tx1"
android:layout_width="match_parent"
android:layout_height="wrap_content"
android:layout_below="@id/tev1" />
<Button
android:id="@+id/btn1"
android:layout_height="wrap_content"
android:layout_width="wrap_content"
android:layout_below="@id/tx1"
android:layout_alignParentRight="true"
android:text="確定"
android:background="#FFFF00"/>
<Button
android:id="@+id/btn2"
android:layout_height="wrap_content"
android:layout_width="wrap_content"
android:layout_below="@id/tx1"
android:layout_toLeftOf="@id/btn1"
android:layout_marginRight="30dp"
android:text="取消"
android:background="#FFFF00"/>
</RelativeLayout> 效果如下圖所示:
第四個RelativeLayout---相對布局,相對布局是按照組件之間的相對位置來布局,比如在某個組件的左邊,右邊,上面和下面,相對布局可以理解為某一個元素為參照物,來定位的布局方式,具體代碼如下所示:
[html] view plaincopyprint?
<SPAN style="FONT-SIZE: 18px"><?xml version="1.0" encoding="utf-8"?>
<RelativeLayout xmlns:android="http://schemas.android.com/apk/res/android"
android:layout_width="fill_parent"
android:layout_height="wrap_content"
android:padding="10px"
>
<TextView
android:id="@+id/tev1"
android:layout_width="wrap_content"
android:layout_height="wrap_content"
android:layout_marginBottom="30dp"
android:text="請輸入口令,會有驚喜哦`(*∩_∩*)′:" />
<EditText
android:id="@+id/tx1"
android:layout_width="match_parent"
android:layout_height="wrap_content"
android:layout_below="@id/tev1" />
<Button
android:id="@+id/btn1"
android:layout_height="wrap_content"
android:layout_width="wrap_content"
android:layout_below="@id/tx1"
android:layout_alignParentRight="true"
android:text="確定"
android:background="#FFFF00"/>
<Button
android:id="@+id/btn2"
android:layout_height="wrap_content"
android:layout_width="wrap_content"
android:layout_below="@id/tx1"
android:layout_toLeftOf="@id/btn1"
android:layout_marginRight="30dp"
android:text="取消"
android:background="#FFFF00"/>
</RelativeLayout> </SPAN>
<?xml version="1.0" encoding="utf-8"?>
<RelativeLayout xmlns:android="http://schemas.android.com/apk/res/android"
android:layout_width="fill_parent"
android:layout_height="wrap_content"
android:padding="10px"
>
<TextView
android:id="@+id/tev1"
android:layout_width="wrap_content"
android:layout_height="wrap_content"
android:layout_marginBottom="30dp"
android:text="請輸入口令,會有驚喜哦`(*∩_∩*)′:" />
<EditText
android:id="@+id/tx1"
android:layout_width="match_parent"
android:layout_height="wrap_content"
android:layout_below="@id/tev1" />
<Button
android:id="@+id/btn1"
android:layout_height="wrap_content"
android:layout_width="wrap_content"
android:layout_below="@id/tx1"
android:layout_alignParentRight="true"
android:text="確定"
android:background="#FFFF00"/>
<Button
android:id="@+id/btn2"
android:layout_height="wrap_content"
android:layout_width="wrap_content"
android:layout_below="@id/tx1"
android:layout_toLeftOf="@id/btn1"
android:layout_marginRight="30dp"
android:text="取消"
android:background="#FFFF00"/>
</RelativeLayout> 效果如下圖所示:
 第五個AbsoluteLayout---絕對布局, 絕對布局通過指定子組件的確切X,Y坐標來確定組件的位置,在Android2.0 API文檔中標明該類已經過期,可以使用FrameLayout或者RelativeLayout來代替,小編就不在進行相關介紹了,有需要的小伙伴可以動動自己可愛的小手,在網絡這個大世界裡面尋找哦`(*∩_∩*)′!
小編寄語:該博客,小編主要簡單的介紹了Android中常用的布局,看著一個一個代碼運行成功,小編心裡很是高興,為了慶祝一下,今天晚上不吃黃焖雞了,從開始封閉開發項目到現在,小編天天吃黃焖雞,這輩子都不想吃了,雖然這些對大牛們來說不值得一提,但正是由於了這一步又一步小小的進步,小編才會成長的更加茁壯,更加美麗。
第五個AbsoluteLayout---絕對布局, 絕對布局通過指定子組件的確切X,Y坐標來確定組件的位置,在Android2.0 API文檔中標明該類已經過期,可以使用FrameLayout或者RelativeLayout來代替,小編就不在進行相關介紹了,有需要的小伙伴可以動動自己可愛的小手,在網絡這個大世界裡面尋找哦`(*∩_∩*)′!
小編寄語:該博客,小編主要簡單的介紹了Android中常用的布局,看著一個一個代碼運行成功,小編心裡很是高興,為了慶祝一下,今天晚上不吃黃焖雞了,從開始封閉開發項目到現在,小編天天吃黃焖雞,這輩子都不想吃了,雖然這些對大牛們來說不值得一提,但正是由於了這一步又一步小小的進步,小編才會成長的更加茁壯,更加美麗。
 Android自定義格式顯示Button的布局思路
先把來源貼上http://zrgiu.com/blog/2011/01/making-your-android-app-look-better/http://www.di
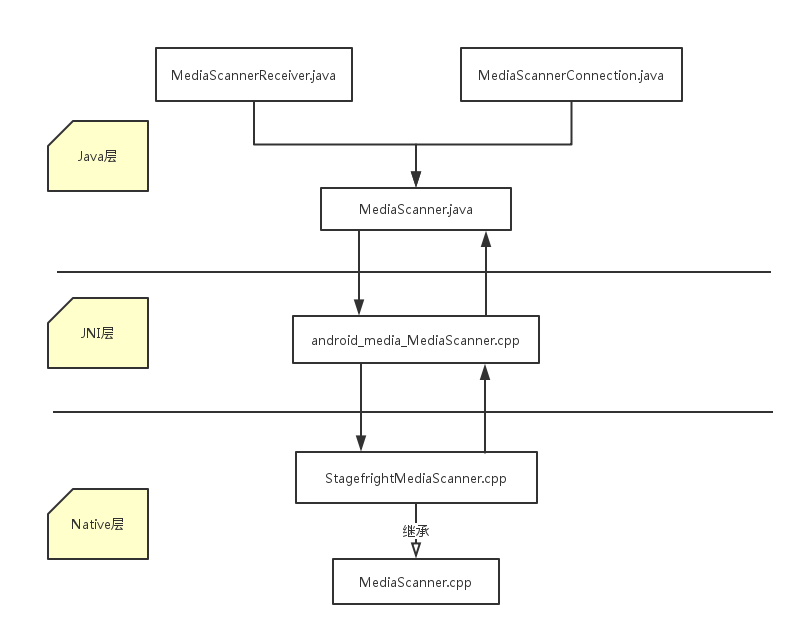 Media Data之多媒體掃描過程分析(一)
1.概述在Android系統中,多媒體文件通常在開機和SD卡掛載的時候進行掃描操作,目的是為了讓多媒體應用便捷地使用和管理多媒體文件。設想一下如果進入多媒體應用才開始掃描
 Android之——清理手機SD卡緩存
目前,市場上很多Android手機軟件都具有清理SD卡緩存的功能,比如360,金山等等。那麼這些軟件是如何實現清理sd卡緩存數據功能的呢?下面,我就給大家演示下,這些功能
 實現一個Android鎖屏App功能的難點總結
自定義一個漂亮實用的鎖屏app,如果能贏得用戶的認可,替換系統自帶的鎖屏,絕對是一個不小的日活入口。這段時間正好總結一下最近調研的Android平台的鎖屏app開發中的難