編輯:關於Android編程
授權流程:
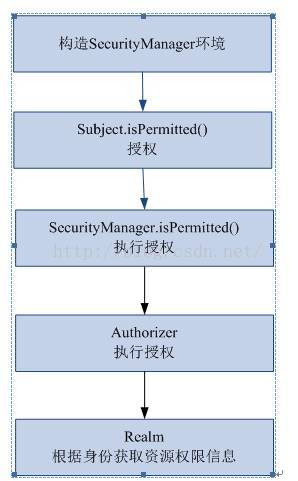
跟用戶的認證流程類似,shrio在用戶授權的時候,最後還是去Realm獲取信息。
shiro的三種授權方式:
Shiro 支持三種方式的授權:
Subject subject = SecurityUtils.getSubject();
if(subject.hasRole(“admin”)) {
//有權限
} else {
//無權限
}
@RequiresRoles("admin")
public void hello() {
//有權限
}
首先編寫ini文件:
#用戶
[users]
#用戶zhang的密碼是123,此用戶具有role1和role2兩個角色
zhangsan=123,role1,role2

#權限
[roles]
#角色role1對資源user擁有create、update權限
role1=user:create,user:update
#角色role2對資源user擁有create、delete權限
role2=user:create,user:delete
#角色role3對資源user擁有create權限
role3=user:create
權限標識符號規則:資源:操作:實例(中間使用半角:分隔)
user:create:01 表示對用戶資源的01實例進行create操作。
user:create:表示對用戶資源進行create操作,相當於user:create:*,對所有用戶資源實例進行create操作。
例如,user:*:01 表示對用戶資源實例01進行所有操作。
授權測試代碼:
/**
 * 授權測試
 * @author LiuHuiChao
 *
 */
public class AuthorizationTest {

	//角色授權,資源授權
	@Test
	public void  testAuthorization(){
		//創建SecurityManager工廠
		Factory factory=new IniSecurityManagerFactory("classpath:shiro-permission.ini");
		//創建SecurityManager
		SecurityManager securityManager=factory.getInstance();
		//將SecurityManager設置到系統運行環境,和spring整合後將SecurityManager配置到spring容器中
		SecurityUtils.setSecurityManager(securityManager);
		//創建subject
		Subject subject=SecurityUtils.getSubject();
		//執行認證
		UsernamePasswordToken token=new UsernamePasswordToken("zhangsan","123");
		try {
			subject.login(token);
		} catch (AuthenticationException e) {
			e.printStackTrace();
		}
		System.out.println("認證狀態:"+subject.isAuthenticated());

		//認證通過後執行授權
		/*基於角色的授權*/
		boolean IsHasRole=subject.hasRole("role1");
		System.out.println("是否有role1權限:"+IsHasRole);
		//判斷是否擁有多個角色
		boolean hasAllRoles=subject.hasAllRoles(Arrays.asList("role1","role2"));
		System.out.println("是否擁有所有角色([role1],[role2]):"+hasAllRoles);

		//使用check方法進行授權,如果授權不通過,拋出異常
		try {
			subject.checkRole("role12");
		} catch (AuthorizationException e) {
			System.out.println("用戶沒有role12角色");
			e.printStackTrace();
		}

		/*基於資源的授權*/
		boolean isPermitted=subject.isPermitted("user:create:1");
		System.out.println("是否有user:create權限:"+isPermitted);
		boolean isPremittedAll=subject.isPermittedAll("user:create","user:delete");
		System.out.println("是否有user:create,user:delete權限:"+isPermitted);

		//使用無返回值的check
		try {
			subject.checkPermission("user:post");
		} catch (AuthorizationException e) {
			System.out.println("用戶沒有user:post權限");
			e.printStackTrace();
		}
	}
}
注意,只需在用戶認證代碼的基礎上接著加就ok了,這樣就完成了簡單的用戶認證+授權。
 android高分段進階攻略(2)傳感器
一開始,先對昨晚在昆明市火車站遇難的同胞表示默哀,並對惡勢力進行譴責,你們如果有再大的冤情也不要對平民下手,所謂冤有頭債有主,該弄誰弄誰去啊,欺負百姓算是怎麼回事,所以在
 實例講解Android App使用自帶的SQLite數據庫的基本方法
SQLite數據庫是android系統內嵌的數據庫,小巧強大,能夠滿足大多數SQL語句的處理工作,而SQLite數據庫僅僅是個文件而已。雖然SQLite的有點很多,但並不
 屬於自己的Android對話框(Dialog)自定義集合
Activities提供了一種方便管理的創建、保存、回復的對話框機制,例如 onCreateDialog(int), onPrepareDialog(int, Dialo
 Android Studio開發基礎之Context用法說明
1、Context說明 Context是一個用於訪問全局信息的接口,如應用程序的資源(如圖片,字符串等),一些常用的組件繼承自Context,如Activity和Serv