編輯:關於Android編程
在開發過程中,經常會遇到系統中提供的控件無法滿足產品的設計需求,這時可能就需要考慮使用自定義的View來實現產品的設計細節了。對於自定義View,可以分為兩種,一種是自定義控件(繼承View),另一種是自定義布局容器(繼承ViewGroup),下面就針對自定義控件View的應用進行簡單的總結。
自定義View時,我們大部分只需要重寫兩個方法onMeasure(),onDraw()。onMeasure()負責對當前View尺寸進行測量,onDraw()負責把當前這個View繪制出來。另外在自定義View時,還需要寫一個帶AttributeSet參數的構造方法。
    public CustView(Context context) {
        super(context);
    }

    public CustView(Context context, AttributeSet attrs) {
        super(context, attrs);
    }
上面兩個不同的構造方法,表示了在創建該View時,可以有兩種不同的方式。如果直接使用代碼的形式創建CustView,調用的是第一種構造方法。如:
CustView custView = new CustView(this);
如果通過XML布局文件創建這個View的對象時,那麼系統自動調用第二個構造方法。該方法不能被省略,因為系統從這個方法中獲得該View設置在XML布局文件中的屬性。否則的話,系統將會拋出異常。有關這個方法,Google 文檔這樣描述:
public View(Context context, AttributeSet attrs)
Constructor that is called when inflating a view from XML. This is called when a view is being constructed from an XML file, supplying attributes that were specified in the XML file. This version uses a default style of 0, so the only attribute values applied are those in the Context’s Theme and the given AttributeSet.
這段話大概的意思就是,當從XML布局中填充一個View的時候,這個構造方法就會被調用。當View正在從XML布局中創建並提供在XML文件中指定的屬性時會被調用。
所以說XML布局中設置該View的屬性通過該方法傳遞進來。
上面所說onMeasure()方法是用來測量View的寬高尺寸的。在XML布局文件中,我們可以對屬性layout_width和layout_height可以不寫具體的尺寸,而是用wrap_content或match_parent。這兩個參數的意思就是“包裹住內容”和“匹配父布局給我們的所有空間”。默認情況下系統會針對上面的屬性值進行處理。我們可以通過重寫onMeasure(),來設置自己想要的尺寸。方法原型如下:
protected void onMeasure(int widthMeasureSpec, int heightMeasureSpec)
這個方法中包含了兩個參數widthMeasureSpec和heightMeasureSpec。這兩個參數代表了水平空間上父容器施加的要素和垂直空間上父容器施加的要素。說的通俗點,就是它們包含了寬高的尺寸大小和測量模式。
我們都知道設置寬高時可以有三個選擇,一個具體的數值,match_parent,和 wrap_content。而測量模式同樣也有三種:UNSPECIFIED,EXACTLY,AT_MOST。我們可以用MeasureSpec類取得上面參數對應的大小和測量模式。比如:
int widthSize = MeasureSpec.getSize(widthMeasureSpec);
int widthMode = MeasureSpec.getMode(widthMeasureSpec);
這三種測量模式分別代表的意義:
UNSPECIFIED:父容器沒有對當前View強加任何限制,當前View可以顯示任意尺寸大小。
EXACTLY:父容器確定了當前View的具體尺寸,View被限制在該尺寸中。當前的尺寸就是View應該設置的尺寸大小。
AT_MOST:當前尺寸是View能取得的最大尺寸。
上面三種測量模式與我們設置寬高屬性的值對應的關系如下:
match_parent 對應的是 EXACTLY:因為match_parent 表示的匹配父控件的大小,而父View的大小是卻定的,所以該View的尺寸同樣確定,所以測量模式為EXACTLY。
wrap_content 對應的是 AT_MOST:wrap_content 表示的是大小為包裹View中的內容,以父View作為參考尺寸,不超過父View的大小就可以。
固定尺寸(100dp)對應的是EXACTLY:用戶指定了尺寸大小,與match_parent 性質一致。
下面我們重寫onMeasure方法實現View的寬高為正方形。默認寬高為100px,可以設置其他大小值(大於默認值)
    @Override
    protected void onMeasure(int widthMeasureSpec, int heightMeasureSpec) {
        super.onMeasure(widthMeasureSpec, heightMeasureSpec);

        int width = getSize(100, widthMeasureSpec);
        int height = getSize(100, heightMeasureSpec);

        if(width > height){
            width = height;
        }else{
            height = width;
        }
        setMeasuredDimension(width, height);  //將新計算的寬高測量值進行存儲,否則不生效
    }

    private int getSize(int defaultSize, int measureSpec) {

        int mySize = defaultSize;
        int size = MeasureSpec.getSize(measureSpec);
        int mode = MeasureSpec.getMode(measureSpec);

        switch (mode) {
        case MeasureSpec.UNSPECIFIED: // 沒有指定大小,設置默認大小.

            mySize = defaultSize;

            break;
        case MeasureSpec.EXACTLY:      // 如果布局中設置的值大於默認值,則使用布局中設置的值,對應match_parent和固定值

            if(size > defaultSize){
                mySize = size;
            }

            break;
        case MeasureSpec.AT_MOST:     // 如果測量模式中的值大於默認值,取默認值,對應wrap_content

            if(size > defaultSize){
                mySize = defaultSize;
            }
            break;
        }
        return mySize;
    }
布局文件設置:
運行後效果圖如下:

如果注銷掉onMeasure方法時,效果圖如下:

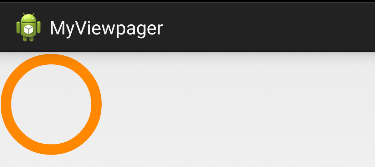
方法onDraw用來繪制用戶想要的圖形效果。下面我們實現了在View上繪制一個空心圓,如下:
    @Override
    protected void onDraw(Canvas canvas) {
        super.onDraw(canvas);

        int r = getMeasuredWidth()/2;    //使用getMeasuredWidth 可以獲得在onMeasure方法中新計算的寬度

        int cx = getLeft() + r;            //getLeft 表示的是當前View的左邊到屏幕左邊框的位置距離。這裡不建議使用,因為如果view在左邊使用其他View時,會影響該值。

        canvas.drawCircle(r, r, r-20, mPaint); //該方法中的四個參數,前兩個表示圓心的x,y的坐標。這兩個值表示的是相對於該View中的位置,與其他view的位置無關。
    }
上面還涉及到了一個Paint類,該類只需要在構造方法中初始化即可,方法:
 private void initPaint() {
        mPaint = new Paint();
        mPaint.setAntiAlias(true); //設置抗鋸齒的效果
        mPaint.setStyle(Paint.Style.STROKE); //設置畫筆樣式為描邊
        mPaint.setStrokeWidth(3);  //設置筆刷的粗細度
        mPaint.setColor(Color.BLUE); //設置畫筆的顏色
    }
上面代碼的執行效果,如圖:

我們為自定義View添加自定義屬性,這樣可以方便用戶使用該View應對不同的場景。使得該自定義View的擴展性更好。
首先,我們需要在/res/values目錄下新建一個名為attrs.xml的文件
上面定義屬性的文件中,每個屬性的名稱都有一個對應的format值,每個format值都代表這不同的含義,主要有一下幾個值:
創建完attrs.xml文件後,然後我們將attrs.xml中屬性應用到布局文件中
注意:布局文件中使用自定義的屬性時,必須要設置命名空間。命名控件的名稱可以隨便取,如:custView。但是命名空間的值是由固定的前綴“http://schemas.android.com/apk/res/”+“包名”組成。完成命名空間的設置後,我們才可以在控件屬性中添加自定義的屬性了,如:custView:paintColor和custView:paintSize。
最後,我們在代碼中調用自定義屬性,如下:
  private void initAttrs(Context context,AttributeSet attrs) {
        //通過該方法,可以取出attrs中的CustView屬性。CustView就是我們在attrs.xml文件中declare-styleable標簽名稱。
        TypedArray type = context.obtainStyledAttributes(attrs, R.styleable.CustView);

        //取出每個標簽屬性,命名方式為:R.styleable + 屬性集合名稱 + 下劃線 + 屬性名稱,如果沒有該值,則使用默認值
        paintColor = type.getColor(R.styleable.CustView_paintColor, Color.BLACK);
        paintSize = (int) type.getDimension(R.styleable.CustView_paintSize, 3);

        //最後需要將TypedArray對象回收
        type.recycle();
    }
完整的代碼如下:
package com.yuminfeng.myviewpager;

import android.content.Context;
import android.content.res.TypedArray;
import android.graphics.Canvas;
import android.graphics.Color;
import android.graphics.Paint;
import android.util.AttributeSet;
import android.view.View;

public class CustView extends View {

    private Paint mPaint;
    private int paintColor;
    private int paintSize;

    public CustView(Context context) {
        super(context);

        initPaint(); //初始化畫筆
    }

    public CustView(Context context, AttributeSet attrs) {
        super(context, attrs);

        initAttrs(context,attrs); //初始化屬性值

        initPaint(); //初始化畫筆

    }

    private void initAttrs(Context context,AttributeSet attrs) {
        //通過該方法,可以取出attrs中的CustView屬性。CustView就是我們在attrs.xml文件中declare-styleable標簽名稱。
        TypedArray type = context.obtainStyledAttributes(attrs, R.styleable.CustView);

        //取出每個標簽屬性,命名方式為:R.styleable + 屬性集合名稱 + 下劃線 + 屬性名稱,如果沒有該值,則使用默認值
        paintColor = type.getColor(R.styleable.CustView_paintColor, Color.BLACK);
        paintSize = (int) type.getDimension(R.styleable.CustView_paintSize, 3);

        //最後需要將TypedArray對象回收
        type.recycle();
    }

    private void initPaint() {
        mPaint = new Paint();
        mPaint.setAntiAlias(true); //設置抗鋸齒的效果
        mPaint.setStyle(Paint.Style.STROKE); //設置畫筆樣式為描邊
        mPaint.setStrokeWidth(paintSize);  //設置筆刷的粗細度
        mPaint.setColor(paintColor); //設置畫筆的顏色
    }


    @Override
    protected void onMeasure(int widthMeasureSpec, int heightMeasureSpec) {
        super.onMeasure(widthMeasureSpec, heightMeasureSpec);

        int width = getSize(100, widthMeasureSpec);
        int height = getSize(100, heightMeasureSpec);

        if(width > height){
            width = height;
        }else{
            height = width;
        }
        setMeasuredDimension(width, height);  //將新計算的寬高測量值進行存儲,否則不生效
    }

    private int getSize(int defaultSize, int measureSpec) {

        int mySize = defaultSize;
        int size = MeasureSpec.getSize(measureSpec);
        int mode = MeasureSpec.getMode(measureSpec);

        switch (mode) {
        case MeasureSpec.UNSPECIFIED: // 沒有指定大小,設置默認大小.

            mySize = defaultSize;

            break;
        case MeasureSpec.EXACTLY:      // 如果布局中設置的值大於默認值,則使用布局中設置的值,對應match_parent和固定值

            if(size > defaultSize){
                mySize = size;
            }

            break;
        case MeasureSpec.AT_MOST:     // 如果測量模式中的值大於默認值,取默認值,對應wrap_content

            if(size > defaultSize){
                mySize = defaultSize;
            }
            break;
        }
        return mySize;
    }

    @Override
    protected void onDraw(Canvas canvas) {
        super.onDraw(canvas);

        int r = getMeasuredWidth()/2;    //使用getMeasuredWidth 可以獲得在onMeasure方法中新計算的寬度

        int cx = getLeft() + r;            //getLeft 表示的是當前View的左邊到屏幕左邊框的位置距離。這裡不建議使用,因為如果view在左邊使用其他View時,會影響該值。

        canvas.drawCircle(r, r, r-20, mPaint); //該方法中的四個參數,前兩個表示圓心的x,y的坐標。這兩個值表示的是相對於該View中的位置,與其他view的位置無關。
    }
}
上面代碼的執行效果,如圖:
到此,自定義View就結束了,下一篇我將繼續講述自定ViewGroup。
 android網絡應用開發完全解析
Android網絡應用開發,主要有兩種方式,一種是socket(是對tcp/udp協議的封裝),另外一種就是使用Http協議,Android中主要
 Android中使用定時器的三種方法
本文實例為大家分享了Android中使用定時器的三種方法,供大家參考,具體內容如下圖示:因為都比較簡單,所以就直接貼代碼(慮去再次點擊停止的操作),有個全局的Handle
 Android TextView裡直接顯示圖片的三種方法
方法一:重寫TextView的onDraw方法,也挺直觀就是不太好控制顯示完圖片後再顯示字體所占空間的位置關系。一般如果字體是在圖片上重疊的推薦這樣寫。時間關系,這個不付
 oppo r9怎麼截圖 oppo r9截圖方法
OPPO R9是OPPO發布的最新款手機,對於它的操作使用,還有人不大清楚,如oppo r9怎麼截圖?下面小編就跟大家介紹一下oppo r9截圖方法,有需要