編輯:關於Android編程
通過前面幾篇博客,我們能夠自定義出一些比較簡單的自定義控件,但是這在實際應用中是遠遠不夠的,為了實現一些比較牛X的效果,比如側滑菜單、滑動卡片等等,我們還需要了解自定義ViewGroup。官方文檔中對ViewGroup這樣描述的:
ViewGroup是一種可以包含其他視圖的特殊視圖,他是各種布局和所有容器的基類,這些類也定義了ViewGroup.LayoutParams類作為類的布局參數。
之前,我們只是學習過自定義View,其實自定義ViewGroup和自定義View的步驟差不了多少,他們的的區別主要來自各自的作用不同,ViewGroup是容器,用來包含其他控件,而View是真正意義上看得見摸得著的,它需要將自己畫出來。ViewGroup需要重寫onMeasure方法測量子控件的寬高和自己的寬高,然後實現onLayout方法擺放子控件。而 View則是需要重寫onMeasure根據測量模式和父控件給出的建議的寬高值計算自己的寬高,然後再父控件為其指定的區域繪制自己的圖形。
根據以往經驗我們初步將自定義ViewGroup的步驟定為下面幾步:
1. 繼承ViewGroup,覆蓋構造方法
2. 重寫onMeasure方法測量子控件和自身寬高
3. 實現onLayout方法擺放子控件
我們先自定義一個ViewGroup作為布局容器,實現一個從左往右水平排列(排滿換行)的效果:
/**
 * 自定義布局管理器的示例。
 */
public class CustomLayout extends ViewGroup {
      private static final String TAG = "CustomLayout";

    public CustomLayout(Context context) {
        super(context);
    }

    public CustomLayout(Context context, AttributeSet attrs) {
        this(context, attrs, 0);
    }

    public CustomLayout(Context context, AttributeSet attrs, int defStyle) {
        super(context, attrs, defStyle);
    }

    /**
     * 要求所有的孩子測量自己的大小,然後根據這些孩子的大小完成自己的尺寸測量
     */
    @SuppressLint("NewApi") @Override
    protected void onMeasure( int widthMeasureSpec, int heightMeasureSpec) {
        // 計算出所有的childView的寬和高
        measureChildren(widthMeasureSpec, heightMeasureSpec);
        //測量並保存layout的寬高(使用getDefaultSize時,wrap_content和match_perent都是填充屏幕)
        //稍後會重新寫這個方法,能達到wrap_content的效果
        setMeasuredDimension( getDefaultSize(getSuggestedMinimumWidth(), widthMeasureSpec),
                getDefaultSize(getSuggestedMinimumHeight(), heightMeasureSpec));
    }

    /**
     * 為所有的子控件擺放位置.
     */
    @Override
    protected void onLayout( boolean changed, int left, int top, int right, int bottom) {
        final int count = getChildCount();
        int childMeasureWidth = 0;
        int childMeasureHeight = 0;
        int layoutWidth = 0;    // 容器已經占據的寬度
        int layoutHeight = 0;   // 容器已經占據的寬度
        int maxChildHeight = 0; //一行中子控件最高的高度,用於決定下一行高度應該在目前基礎上累加多少
        for(int i = 0; imaxChildHeight){
                  maxChildHeight = childMeasureHeight;
            }

             //確定子控件的位置,四個參數分別代表(左上右下)點的坐標值
            child.layout(left, top, right, bottom);
        }
    }
}
布局文件:
運行效果:

運行成功,是不是略有成就感?這個布局就是簡單版的 回想一下我們平時使用 看了上面的介紹,我們大概知道怎麼為我們的布局容器定義自己的布局屬性了吧,就不繞彎子了,按照下面的步驟做: 在定義屬性之前要弄清楚,我們自定義的布局容器需要滿足那些需求,需要哪些屬性,比如,我們現在要實現像相對布局一樣,為子控件設置一個位置屬性layout_position=”“,來控制子控件在布局中顯示的位置。暫定位置有五種:左上、左下、右上、右下、居中。有了需求,我們就在attr.xml定義自己的布局屬性(和之前講的自定義屬性一樣的操作,不太了解的可以翻閱 《深入解析自定義屬性》。 left就代表是左上(按常理默認就是左上方開始,就不用寫leftTop了,簡潔一點),bottom左下,right 右上,rightAndBottom右下,center居中。屬性類型是枚舉,同時只能設置一個值。 我們可以選擇繼承 在 注意引入命名空間 經過上面幾步之後,我們運行程序,就能獲取子控件的布局參數了,在onMeasure方法和onLayout方法中,我們按照自定義布局容器的特殊需求,對寬度和位置坐特殊處理。這裡我們需要注意一下,如果布局容器被設置為包裹類容,我們只需要保證能將最大的子控件包裹住就ok,代碼注釋比較詳細,就不多說了。 從運行結果看,我們自定義的布局容器在各種寬高設置下都能很好的測量大小和擺放子控件。現在我們讓他支持margin屬性 如果我們自定義的布局參數類繼承自 布局文件: onMeasure和onLayout: 總結一下今天學習的內容,這篇博客主要學習了兩個知識點: ①. 繼承ViewGroup,覆蓋構造方法 為布局容器自定義布局屬性: ①. 大致明確布局容器的需求,初步定義布局屬性 LinearLayout設置android:orientation ="hZ喎?/kf/ware/vc/" target="_blank" class="keylink">vcml6b250YWwmcXVvdDs8L2NvZGU+tcTQp7n7o6yxyMv7u7nFo1jSu7Xjo6y7ucTc19S2r7u70NCjqLn+uf6jqaGjvdPPwsC0ztLDx9KqyrXP1tK7uPa5psTco6zWu9Do0qrU2rK8vtbOxLz+1tDWuLaosry+1sr00NSjrL7NxNy/2NbG19O/2Lz+1NrKssO0zrvWw6OowODLxs/gttSyvL7WPGNvZGU+UmVsYXRpdmVMYXlvdXQ8L2NvZGU+o6mhozwvcD4NCjxwPiZuYnNwOzwvcD4NCjxoMSBpZD0="2-自定義layoutparams">2. 自定義LayoutParams
RelativeLayout的時候,在布局文件中使用android:layout_alignParentRight="true"、android:layout_centerInParent="true"等各種屬性,就能控制子控件顯示在父控件的上下左右、居中等效果。 在上一篇講onMeasure的博客中,我們有了解過ViewGroup.LayoutParams類,ViewGroup中有兩個內部類ViewGroup.LayoutParams和ViewGroup.MarginLayoutParams,MarginLayoutParams繼承自LayoutParams,這兩個內部類就是ViewGroup的布局參數類,比如我們在LinearLayout等布局中使用的layout_width\layout_hight等以“layout_ ”開頭的屬性都是布局屬性。
在View中有一個mLayoutParams的變量用來保存這個View的所有布局屬性。ViewGroup.LayoutParams有兩個屬性layout_width和layout_height,因為所有的容器都需要設置子控件的寬高,所以這個LayoutParams是所有布局參數的基類,如果需要擴展其他屬性,都應該繼承自它。比如RelativeLayout中就提供了它自己的布局參數類RelativeLayout.LayoutParams,並擴展了很多布局參數,我們平時在RelativeLayout中使用的布局屬性都來自它 :
①. 大致明確布局容器的需求,初步定義布局屬性
②. 繼承LayoutParams,定義布局參數類
ViewGroup.LayoutParams,這樣的話我們的布局只是簡單的支持layout_width和layout_height;也可以繼承MarginLayoutParams,就能使用layout_marginxxx屬性了。因為後面我們還要用到margin屬性,所以這裡方便起見就直接繼承MarginLayoutParams了。
覆蓋構造方法,然後在有AttributeSet參數的構造方法中初始化參數值,這個構造方法才是布局文件被映射為對象的時候被調用的。
public static class CustomLayoutParams extends MarginLayoutParams {
public static final int POSITION_MIDDLE = 0; // 中間
public static final int POSITION_LEFT = 1; // 左上方
public static final int POSITION_RIGHT = 2; // 右上方
public static final int POSITION_BOTTOM = 3; // 左下角
public static final int POSITION_RIGHTANDBOTTOM = 4; // 右下角
public int position = POSITION_LEFT; // 默認我們的位置就是左上角
public CustomLayoutParams(Context c, AttributeSet attrs) {
super(c, attrs);
TypedArray a = c.obtainStyledAttributes(attrs,R.styleable.CustomLayout );
//獲取設置在子控件上的位置屬性
position = a.getInt(R.styleable.CustomLayout_layout_position ,position );
a.recycle();
}
public CustomLayoutParams( int width, int height) {
super(width, height);
}
public CustomLayoutParams(ViewGroup.LayoutParams source) {
super(source);
}
}③. 重寫generateLayoutParams()
ViewGroup中有下面幾個關於LayoutParams的方法,generateLayoutParams (AttributeSet attrs)是在布局文件被填充為對象的時候調用的,這個方法是下面幾個方法中最重要的,如果不重寫它,我麼布局文件中設置的布局參數都不能拿到。後面我也會專門寫一篇博客來介紹布局文件被添加到activity窗口的過程,裡面會講到這個方法被調用的來龍去脈。其他幾個方法我們最好也能重寫一下,將裡面的LayoutParams換成我們自定義的CustomLayoutParams類,避免以後會遇到布局參數類型轉換異常。
@Override
public LayoutParams generateLayoutParams(AttributeSet attrs) {
return new CustomLayoutParams(getContext(), attrs);
}
@Override
protected ViewGroup.LayoutParams generateLayoutParams(ViewGroup.LayoutParams p) {
return new CustomLayoutParams (p);
}
@Override
protected LayoutParams generateDefaultLayoutParams() {
return new CustomLayoutParams (LayoutParams.MATCH_PARENT , LayoutParams.MATCH_PARENT);
}
@Override
protected boolean checkLayoutParams(ViewGroup.LayoutParams p) {
return p instanceof CustomLayoutParams ;
}④. 在布局文件中使用布局屬性
xmlns:openxu= "http://schemas.android.com/apk/res/包名"
⑤. 在onMeasure和onLayout中使用布局參數
@Override
protected void onMeasure( int widthMeasureSpec, int heightMeasureSpec) {
//獲得此ViewGroup上級容器為其推薦的寬和高,以及計算模式
int widthMode = MeasureSpec. getMode(widthMeasureSpec);
int heightMode = MeasureSpec. getMode(heightMeasureSpec);
int sizeWidth = MeasureSpec. getSize(widthMeasureSpec);
int sizeHeight = MeasureSpec. getSize(heightMeasureSpec);
int layoutWidth = 0;
int layoutHeight = 0;
// 計算出所有的childView的寬和高
measureChildren(widthMeasureSpec, heightMeasureSpec);
int cWidth = 0;
int cHeight = 0;
int count = getChildCount();
if(widthMode == MeasureSpec. EXACTLY){
//如果布局容器的寬度模式是確定的(具體的size或者match_parent),直接使用父窗體建議的寬度
layoutWidth = sizeWidth;
} else{
//如果是未指定或者wrap_content,我們都按照包裹內容做,寬度方向上只需要拿到所有子控件中寬度做大的作為布局寬度
for ( int i = 0; i < count; i++) {
View child = getChildAt(i);
cWidth = child.getMeasuredWidth();
//獲取子控件最大寬度
layoutWidth = cWidth > layoutWidth ? cWidth : layoutWidth;
}
}
//高度很寬度處理思想一樣
if(heightMode == MeasureSpec. EXACTLY){
layoutHeight = sizeHeight;
} else{
for ( int i = 0; i < count; i++) {
View child = getChildAt(i);
cHeight = child.getMeasuredHeight();
layoutHeight = cHeight > layoutHeight ? cHeight : layoutHeight;
}
}
// 測量並保存layout的寬高
setMeasuredDimension(layoutWidth, layoutHeight);
}
@Override
protected void onLayout( boolean changed, int left, int top, int right,
int bottom) {
final int count = getChildCount();
int childMeasureWidth = 0;
int childMeasureHeight = 0;
CustomLayoutParams params = null;
for ( int i = 0; i < count; i++) {
View child = getChildAt(i);
// 注意此處不能使用getWidth和getHeight,這兩個方法必須在onLayout執行完,才能正確獲取寬高
childMeasureWidth = child.getMeasuredWidth();
childMeasureHeight = child.getMeasuredHeight();
params = (CustomLayoutParams) child.getLayoutParams();
switch (params. position) {
case CustomLayoutParams. POSITION_MIDDLE: // 中間
left = (getWidth()-childMeasureWidth)/2;
top = (getHeight()-childMeasureHeight)/2;
break;
case CustomLayoutParams. POSITION_LEFT: // 左上方
left = 0;
top = 0;
break;
case CustomLayoutParams. POSITION_RIGHT: // 右上方
left = getWidth()-childMeasureWidth;
top = 0;
break;
case CustomLayoutParams. POSITION_BOTTOM: // 左下角
left = 0;
top = getHeight()-childMeasureHeight;
break;
case CustomLayoutParams. POSITION_RIGHTANDBOTTOM:// 右下角
left = getWidth()-childMeasureWidth;
top = getHeight()-childMeasureHeight;
break;
default:
break;
}
// 確定子控件的位置,四個參數分別代表(左上右下)點的坐標值
child.layout(left, top, left+childMeasureWidth, top+childMeasureHeight);
}
}
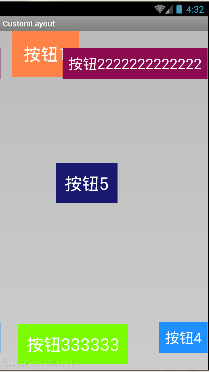
運行效果:
下面幾個效果分別對應布局容器寬高設置不同的屬性的情況(設置match_parent 、設置200dip、設置):


3. 支持layout_margin屬性
MarginLayoutParams,就自動支持了layout_margin屬性了,我們需要做的就是直接在布局文件中使用layout_margin屬性,然後再onMeasure和onLayout中使用margin屬性值測量和擺放子控件。需要注意的是我們測量子控件的時候應該調用measureChildWithMargin()方法。
protected void onMeasure(int widthMeasureSpec, int heightMeasureSpec) {
// 獲得此ViewGroup上級容器為其推薦的寬和高,以及計算模式
int widthMode = MeasureSpec. getMode(widthMeasureSpec);
int heightMode = MeasureSpec. getMode(heightMeasureSpec);
int sizeWidth = MeasureSpec. getSize(widthMeasureSpec);
int sizeHeight = MeasureSpec. getSize(heightMeasureSpec);
int layoutWidth = 0;
int layoutHeight = 0;
int cWidth = 0;
int cHeight = 0;
int count = getChildCount();
// 計算出所有的childView的寬和高
for( int i = 0; i < count; i++){
View child = getChildAt(i);
measureChildWithMargins(child, widthMeasureSpec, 0, heightMeasureSpec, 0);
}
CustomLayoutParams params = null;
if(widthMode == MeasureSpec. EXACTLY){
//如果布局容器的寬度模式時確定的(具體的size或者match_parent)
layoutWidth = sizeWidth;
} else{
//如果是未指定或者wrap_content,我們都按照包裹內容做,寬度方向上只需要拿到所有子控件中寬度做大的作為布局寬度
for ( int i = 0; i < count; i++) {
View child = getChildAt(i);
cWidth = child.getMeasuredWidth();
params = (CustomLayoutParams) child.getLayoutParams();
//獲取子控件寬度和左右邊距之和,作為這個控件需要占據的寬度
int marginWidth = cWidth+params.leftMargin+params.rightMargin ;
layoutWidth = marginWidth > layoutWidth ? marginWidth : layoutWidth;
}
}
//高度很寬度處理思想一樣
if(heightMode == MeasureSpec. EXACTLY){
layoutHeight = sizeHeight;
} else{
for ( int i = 0; i < count; i++) {
View child = getChildAt(i);
cHeight = child.getMeasuredHeight();
params = (CustomLayoutParams) child.getLayoutParams();
int marginHeight = cHeight+params.topMargin+params.bottomMargin ;
layoutHeight = marginHeight > layoutHeight ? marginHeight : layoutHeight;
}
}
// 測量並保存layout的寬高
setMeasuredDimension(layoutWidth, layoutHeight);
}
@Override
protected void onLayout( boolean changed, int left, int top, int right,
int bottom) {
final int count = getChildCount();
int childMeasureWidth = 0;
int childMeasureHeight = 0;
CustomLayoutParams params = null;
for ( int i = 0; i < count; i++) {
View child = getChildAt(i);
// 注意此處不能使用getWidth和getHeight,這兩個方法必須在onLayout執行完,才能正確獲取寬高
childMeasureWidth = child.getMeasuredWidth();
childMeasureHeight = child.getMeasuredHeight();
params = (CustomLayoutParams) child.getLayoutParams();
switch (params. position) {
case CustomLayoutParams. POSITION_MIDDLE: // 中間
left = (getWidth()-childMeasureWidth)/2 - params.rightMargin + params.leftMargin ;
top = (getHeight()-childMeasureHeight)/2 + params.topMargin - params.bottomMargin ;
break;
case CustomLayoutParams. POSITION_LEFT: // 左上方
left = 0 + params. leftMargin;
top = 0 + params. topMargin;
break;
case CustomLayoutParams. POSITION_RIGHT: // 右上方
left = getWidth()-childMeasureWidth - params.rightMargin;
top = 0 + params. topMargin;
break;
case CustomLayoutParams. POSITION_BOTTOM: // 左下角
left = 0 + params. leftMargin;
top = getHeight()-childMeasureHeight-params.bottomMargin ;
break;
case CustomLayoutParams. POSITION_RIGHTANDBOTTOM:// 右下角
left = getWidth()-childMeasureWidth - params.rightMargin;
top = getHeight()-childMeasureHeight-params.bottomMargin ;
break;
default:
break;
}
// 確定子控件的位置,四個參數分別代表(左上右下)點的坐標值
child.layout(left, top, left+childMeasureWidth, top+childMeasureHeight);
}
}
運行效果:
好了,就寫到這裡,如果想嘗試設置其他屬性,比如above、below等,感興趣的同學可以嘗試一下哦~。其實也沒什麼難的,無非就是如果布局屬性定義的多,那麼在onMeasure和onLayout中考慮的問題就更多更復雜,自定義布局容器就是根據自己的需求,讓容器滿足我們特殊的擺放要求。
自定義ViewGroup的步驟:
②. 重寫onMeasure方法測量子控件和自身寬高
③. 實現onLayout方法擺放子控件
②. 繼承LayoutParams,定義布局參數類
③. 重寫獲取布局參數的方法
④. 在布局文件中使用布局屬性
⑤. 在onMeasure和onLayout中使用布局參數
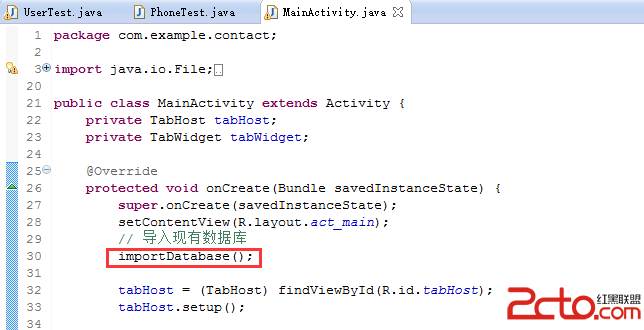 在Android程序中使用已有的SQLite數據庫
在之前做的聯系人項目中,應用安裝完以後需要顯示數據庫中預存的數據,這時需要導入已有的數據庫contact.db。這也是一個面試題,那麼如何實現呢?首先在res中新建raw
 Android 項目的代碼混淆,Android proguard 使用說明
簡介 Java代碼是非常容易反編譯的。為了很好的保護Java源代碼,我們往往會對編譯好的class文件進行混淆處理。 ProGuard是一個混淆代
 Android 完全退出應用程序的解決方法
有一種需要,我們在菜單項中點擊退出應用程序,應用程序就退出,不需要回到MainActivity設計:有兩個應用界面MainActivity和BActivity,以及用於程
 Android布局案例之人人android九宮格
人人android是人人網推出的一款優秀的手機應用軟件,我們在使用的時候發現他的首頁布局是九宮格模式的,讓人覺得很別致,因為現在很多的 android軟件很少使用這種布局