編輯:關於Android編程
public static RequestQueue newRequestQueue(Context context, HttpStack stack) {
        File cacheDir = new File(context.getCacheDir(), "volley");
        String userAgent = "volley/0";

        try {
            String network = context.getPackageName();
            PackageInfo queue = context.getPackageManager().getPackageInfo(network, 0);
            userAgent = network + "/" + queue.versionCode;
        } catch (NameNotFoundException var6) {
            ;
        }

        if(stack == null) {
            if(VERSION.SDK_INT >= 9) {
                stack = new HurlStack();
            } else {
                stack = new HttpClientStack(AndroidHttpClient.newInstance(userAgent));
            }
        }

        BasicNetwork network1 = new BasicNetwork((HttpStack)stack);
        RequestQueue queue1 = new RequestQueue(new DiskBasedCache(cacheDir), network1);
        queue1.start();
        return queue1;
    }
首先確定一個Volley網絡緩存文件夾交給DiskBasedCache去處理,而DiskBasedCache是Cache的唯一實現,具體實現,這裡我們不關心。然後根據Android的版本號去選擇要使用的處理請求的方式,3.0之前的用HttpClient,3.0以後就用HttpUrlConnection。然後交給BasicNetWork,通過我們的BasicNetWork生成RequestQueue,用到了適配器模式。
2.構造請求隊列
  public RequestQueue(Cache cache, Network network, int threadPoolSize, ResponseDelivery delivery) {
        this.mSequenceGenerator = new AtomicInteger();
        this.mWaitingRequests = new HashMap();
        this.mCurrentRequests = new HashSet();
        this.mCacheQueue = new PriorityBlockingQueue();
        this.mNetworkQueue = new PriorityBlockingQueue();
        this.mCache = cache;
        this.mNetwork = network;
        this.mDispatchers = new NetworkDispatcher[threadPoolSize];
        this.mDelivery = delivery;
    }
一起來看看它的構造方法,好多屬性要初始化。沒關系,弄懂他們就對Volley的理解差不多了。
mSequenceGenerator:是一個序列號生成器,算是對Request的一個標識。 mWaitingRequests : 這是一個Map容器,裡面維護了一個隊列。這個是Volley對於緩存請求的一個策略,後面就知道了。 mCurrentRequests : 這個是當前請求的Request,看到名字就知道啥意思了。 mCacheQueue : 這是一個緩存隊列,我們請求就會放到緩存隊列中,如果這裡面有就不用去從網絡上請求了。 mNetworkQueue : 這個是網絡請求隊列,是要從這個隊列上取Request去請求網絡的。 mCache:這是我們之前傳進來的DiskBaseCache,硬盤緩存。 mNetwork:這個就是我們之前傳進來的BasicNetwork,其實就是出去Http連接的封裝而已。 mDispatchers : 這個稱之為網絡請求分發者,就是從網絡請求隊列中獲取Request,並且處理的。mDelivery : 這個是執行傳達者,就是每當我們的請求處理完成之後,就是通過它告知我們的UI線程的,從而完成更新。
那麼,mDelivery是怎麼通知我們UI線程呢,其實就是封裝了一層Handler。
   public RequestQueue(Cache cache, Network network, int threadPoolSize) {
        this(cache, network, threadPoolSize, new ExecutorDelivery(new Handler(Looper.getMainLooper())));
    }
看,ExecutorDelivery是mDelivery的具體實現,就是通過獲得了主線程的Looper,然後把消息丟到MQ中,讓Handler從主線程中的Looper中去取消息。當然還有個重要的屬性沒有介紹,就是mCacheDispatcher,這個是下面個步驟才初始化的,它就是緩存分發者,就是從我們之前介紹的mCacheQueue 隊列中獲取Request的。
3.開始輪循
    public void start() {
        this.stop();
        this.mCacheDispatcher = new CacheDispatcher(this.mCacheQueue, this.mNetworkQueue, this.mCache, this.mDelivery);
        this.mCacheDispatcher.start();

        for(int i = 0; i < this.mDispatchers.length; ++i) {
            NetworkDispatcher networkDispatcher = new NetworkDispatcher(this.mNetworkQueue, this.mNetwork, this.mCache, this.mDelivery);
            this.mDispatchers[i] = networkDispatcher;
            networkDispatcher.start();
        }

    }
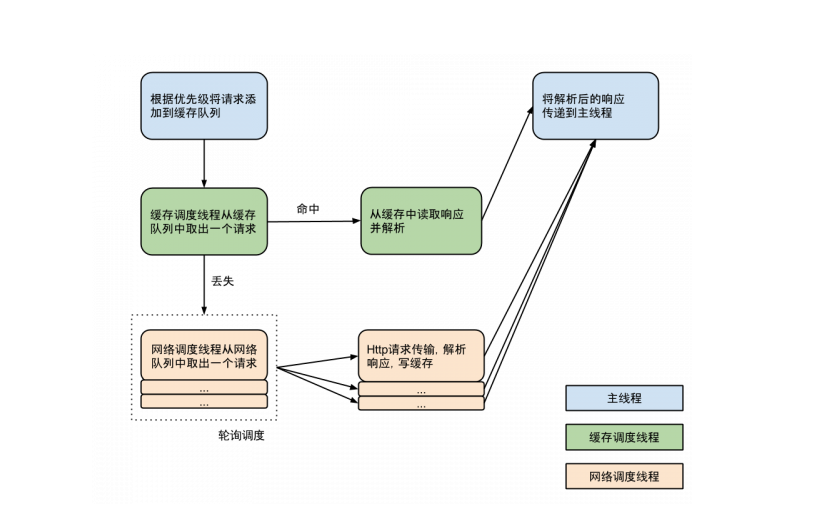
這裡,雖然代碼很簡單,但是做的事情卻很多,這裡將緩存分發者和網絡分發者都啟動了,那麼這些分發者是什麼呢?這些分發者都是繼承了Thread類,就是我們調用了RequestQueue.start()方法,啟動了這麼多線程,其中緩存線程是一條,網絡請求線程默認是4條,一共啟動了5條線程。
4.添加請求
public Request add(Request request) {
        request.setRequestQueue(this);
        Set var2 = this.mCurrentRequests;
        synchronized(this.mCurrentRequests) {
            this.mCurrentRequests.add(request);
        }

        request.setSequence(this.getSequenceNumber());
        request.addMarker("add-to-queue");
        if(!request.shouldCache()) {
            this.mNetworkQueue.add(request);
            return request;
        } else {
            Map var7 = this.mWaitingRequests;
            synchronized(this.mWaitingRequests) {
                String cacheKey = request.getCacheKey();
                if(this.mWaitingRequests.containsKey(cacheKey)) {
                    Object stagedRequests = (Queue)this.mWaitingRequests.get(cacheKey);
                    if(stagedRequests == null) {
                        stagedRequests = new LinkedList();
                    }

                    ((Queue)stagedRequests).add(request);
                    this.mWaitingRequests.put(cacheKey, stagedRequests);
                    if(VolleyLog.DEBUG) {
                        VolleyLog.v("Request for cacheKey=%s is in flight, putting on hold.", new Object[]{cacheKey});
                    }
                } else {
                    this.mWaitingRequests.put(cacheKey, (Object)null);
                    this.mCacheQueue.add(request);
                }

                return request;
            }
        }
    }
我喜歡直接看重點,如果開發者設置了不緩存,那麼直接將這個Request丟到網絡請求隊列,讓網絡請求分發者去處理,如果設置了緩存,那麼如果mWaitingRequests中沒有鍵的話,直接丟到緩存隊列中,讓緩存分發者去處理,同時把mWaitingRequests的值置為空,先開始,這裡我也沒理解,後來斷點調試了之後才明白。第一次請求進來,mWaitingRequests肯定是空,那麼就丟到緩存隊列中去了,第二次在進來,我們的mWaitingRequests中已經有key了,那麼Request就到了我們mWaitingRequests的key中維護的列隊中去了。這樣是為了防止多次網絡請求,節省流量,這是一種策略,如果我們的mWaitingRequests中有key的話,那麼我們的請求正在處理。那麼,你可以會問,那麼觸發了一個請求,然後過了幾秒還觸發了一個請求,那你不是攔截麼,其實,在Request處理完成之後,分發者們會調用Request中的RequestQueue中finish()方法,會清空mWaitingRequests所有的緩存。
    void finish(Request request) {
        Set var2 = this.mCurrentRequests;
        synchronized(this.mCurrentRequests) {
            this.mCurrentRequests.remove(request);
        }

        if(request.shouldCache()) {
            Map var7 = this.mWaitingRequests;
            synchronized(this.mWaitingRequests) {
                String cacheKey = request.getCacheKey();
                Queue waitingRequests = (Queue)this.mWaitingRequests.remove(cacheKey);
                if(waitingRequests != null) {
                    if(VolleyLog.DEBUG) {
                        VolleyLog.v("Releasing %d waiting requests for cacheKey=%s.", new Object[]{Integer.valueOf(waitingRequests.size()), cacheKey});
                    }

                    this.mCacheQueue.addAll(waitingRequests);
                }
            }
        }

    }
這樣,就很清楚了,Request中維護了一個RequestQueue對象,從而在處理完成了之後調用RequestQueue中的finish方法。至於Request什麼時候調用的,接著看。
5.緩存分發者
  public void run() {
        if (DEBUG) VolleyLog.v("start new dispatcher");
        Process.setThreadPriority(Process.THREAD_PRIORITY_BACKGROUND);

        // Make a blocking call to initialize the cache.
        mCache.initialize();

        while (true) {
            try {
                // Get a request from the cache triage queue, blocking until
                // at least one is available.
                final Request request = mCacheQueue.take();
                request.addMarker("cache-queue-take");

                // If the request has been canceled, don't bother dispatching it.
                if (request.isCanceled()) {
                    request.finish("cache-discard-canceled");
                    continue;
                }

                // Attempt to retrieve this item from cache.
                Cache.Entry entry = mCache.get(request.getCacheKey());
                if (entry == null) {
                    request.addMarker("cache-miss");
                    // Cache miss; send off to the network dispatcher.
                    mNetworkQueue.put(request);
                    continue;
                }

                // If it is completely expired, just send it to the network.
                if (entry.isExpired()) {
                    request.addMarker("cache-hit-expired");
                    request.setCacheEntry(entry);
                    mNetworkQueue.put(request);
                    continue;
                }

                // We have a cache hit; parse its data for delivery back to the request.
                request.addMarker("cache-hit");
                Response response = request.parseNetworkResponse(
                        new NetworkResponse(entry.data, entry.responseHeaders));
                request.addMarker("cache-hit-parsed");

                if (!entry.refreshNeeded()) {
                    // Completely unexpired cache hit. Just deliver the response.
                    mDelivery.postResponse(request, response);
                } else {
                    // Soft-expired cache hit. We can deliver the cached response,
                    // but we need to also send the request to the network for
                    // refreshing.
                    request.addMarker("cache-hit-refresh-needed");
                    request.setCacheEntry(entry);

                    // Mark the response as intermediate.
                    response.intermediate = true;

                    // Post the intermediate response back to the user and have
                    // the delivery then forward the request along to the network.
                    mDelivery.postResponse(request, response, new Runnable() {
                        @Override
                        public void run() {
                            try {
                                mNetworkQueue.put(request);
                            } catch (InterruptedException e) {
                                // Not much we can do about this.
                            }
                        }
                    });
                }

            } catch (InterruptedException e) {
                // We may have been interrupted because it was time to quit.
                if (mQuit) {
                    return;
                }
                continue;
            }
        }
    }
首先,緩存分發者,把我們的硬盤緩存初始化,然後再判斷Request是否已經取消,是否已經過期,如果都是true的話,就丟到網絡請求隊列中去,如果滿足了一系列要求,就直接用我們硬盤緩存中的數據,更新UI。否則通過傳達者放到網絡請求隊列中,讓網絡請求分發者去處理。當然,我們的緩存分發者一直都是在無限循環中,而我們的mCacheQueue.take()是個堵塞操作,沒有Request對象,就一直停留在那裡。底下的網絡請求分發者也是如此。
6網絡分發者
 @Override
    public void run() {
        Process.setThreadPriority(Process.THREAD_PRIORITY_BACKGROUND);
        Request request;
        while (true) {
            try {
                // Take a request from the queue.
                request = mQueue.take();
            } catch (InterruptedException e) {
                // We may have been interrupted because it was time to quit.
                if (mQuit) {
                    return;
                }
                continue;
            }

            try {
                request.addMarker("network-queue-take");

                // If the request was cancelled already, do not perform the
                // network request.
                if (request.isCanceled()) {
                    request.finish("network-discard-cancelled");
                    continue;
                }

                // Tag the request (if API >= 14)
                if (Build.VERSION.SDK_INT >= Build.VERSION_CODES.ICE_CREAM_SANDWICH) {
                    TrafficStats.setThreadStatsTag(request.getTrafficStatsTag());
                }

                // Perform the network request.
                NetworkResponse networkResponse = mNetwork.performRequest(request);
                request.addMarker("network-http-complete");

                // If the server returned 304 AND we delivered a response already,
                // we're done -- don't deliver a second identical response.
                if (networkResponse.notModified && request.hasHadResponseDelivered()) {
                    request.finish("not-modified");
                    continue;
                }

                // Parse the response here on the worker thread.
                Response response = request.parseNetworkResponse(networkResponse);
                request.addMarker("network-parse-complete");

                // Write to cache if applicable.
                // TODO: Only update cache metadata instead of entire record for 304s.
                if (request.shouldCache() && response.cacheEntry != null) {
                    mCache.put(request.getCacheKey(), response.cacheEntry);
                    request.addMarker("network-cache-written");
                }

                // Post the response back.
                request.markDelivered();
                mDelivery.postResponse(request, response);
            } catch (VolleyError volleyError) {
                parseAndDeliverNetworkError(request, volleyError);
            } catch (Exception e) {
                VolleyLog.e(e, "Unhandled exception %s", e.toString());
                mDelivery.postError(request, new VolleyError(e));
            }
        }
    }
這裡一步一步來,首先從網絡請求隊列中獲取Request對象,然後如果標識是取消狀態,則調用finish。之後就用BasicNetWork去執行網絡請求了,獲取了NetworkResponse對象,NetworkResponse對象內部封裝了服務器那邊返回的狀態碼,回復頭,回復體。如果狀態碼是304表示沒有修改,notModified也就是true,還有Request已經被傳達者傳達了了,那麼調用finish方法,結束請求,那麼需要更新內容呢,就
通過Request中的parseNetworkResponse解析服務器傳達過來的內容。如果需要緩存的話,就將內容保存到硬盤中,最後,通過傳達者更新UI,然後將request的是否已經傳達過的屬性改為true。
這裡值得注意的是,當調用request的parseNetworkResponse方法的時候,看了Request的實現StringRequest,其中的代碼是這樣的:
   @Override
    protected Response parseNetworkResponse(NetworkResponse response) {
        String parsed;
        try {
            parsed = new String(response.data, HttpHeaderParser.parseCharset(response.headers));
        } catch (UnsupportedEncodingException e) {
            parsed = new String(response.data);
        }
        return Response.success(parsed, HttpHeaderParser.parseCacheHeaders(response));
    }
再到HttpHeaderParser去看看
  public static Entry parseCacheHeaders(NetworkResponse response) {
        long now = System.currentTimeMillis();
        Map headers = response.headers;
        long serverDate = 0L;
        long serverExpires = 0L;
        long softExpire = 0L;
        long maxAge = 0L;
        boolean hasCacheControl = false;
        String serverEtag = null;
        String headerValue = (String)headers.get("Date");
        if(headerValue != null) {
            serverDate = parseDateAsEpoch(headerValue);
        }

        headerValue = (String)headers.get("Cache-Control");
        if(headerValue != null) {
            hasCacheControl = true;
            String[] entry = headerValue.split(",");

            for(int i = 0; i < entry.length; ++i) {
                String token = entry[i].trim();
                if(token.equals("no-cache") || token.equals("no-store")) {
                    return null;
                }

                if(token.startsWith("max-age=")) {
                    try {
                        maxAge = Long.parseLong(token.substring(8));
                    } catch (Exception var19) {
                        ;
                    }
                } else if(token.equals("must-revalidate") || token.equals("proxy-revalidate")) {
                    maxAge = 0L;
                }
            }
        }

        headerValue = (String)headers.get("Expires");
        if(headerValue != null) {
            serverExpires = parseDateAsEpoch(headerValue);
        }

        serverEtag = (String)headers.get("ETag");
        if(hasCacheControl) {
            softExpire = now + maxAge * 1000L;
        } else if(serverDate > 0L && serverExpires >= serverDate) {
            softExpire = now + (serverExpires - serverDate);
        }

        Entry var20 = new Entry();
        var20.data = response.data;
        var20.etag = serverEtag;
        var20.softTtl = softExpire;
        var20.ttl = var20.softTtl;
        var20.serverDate = serverDate;
        var20.responseHeaders = headers;
        return var20;
    }
這個是對http回復頭信息進行解析,http協議中有一行是”Cache-Control”,這個需要服務器那邊做支持的,否則就沒有這行內容,還有”Expires”過期的時間。這些協議都是屬於http應用層緩存,與volley無關的。
 android 類似360懸浮窗口實現源碼
當我們在手機上安裝360安全衛士時,手機屏幕上時刻都會出現一個小浮動窗口,點擊該浮動窗口可跳轉到安全衛士的操作界面,而且該浮動窗口不受其他activity的覆蓋影響仍然可
 Android代碼混淆及反編譯
概述:如果你目前還是一名學生或是沒有在應用商店中上傳過應用,恐怕對此的感受不深。而在企業中對Java代碼的混淆卻是一步很重要的步驟,從安全的角度來說,代碼混淆,防止居心不
 Android進階 — GitHub開源控件的使用合集
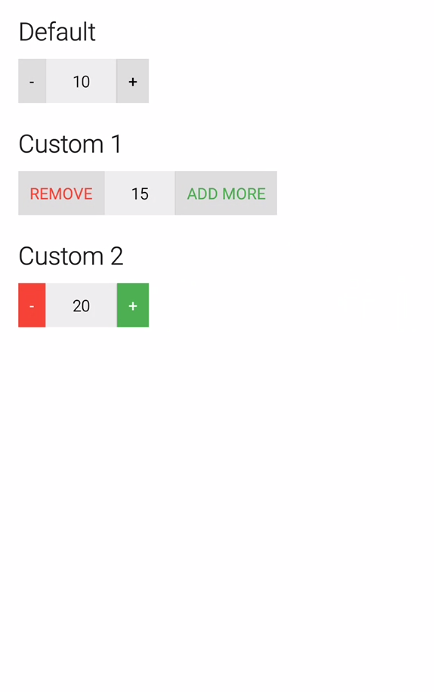
1、QuantityView 類似購物車數量調節:效果圖:項目在GitHub上的地址:https://github.com/himanshu-soni/QuantityV
 Android實現跟隨手指拖動並自動貼邊的View樣式(實例demo)
效果圖代碼/** * 根據手指拖動的當前位置,自動貼邊的View */public class DragView extends ImageView implements