編輯:關於Android編程
這一篇我想說說Linux下的部分,從上一篇我們可以知道,jni通過打開led設備/dev/led,進而使用ioctl函數來控制led的亮和滅和蜂鳴器的發聲。那麼在Linux下面,為什麼會接受ioctl控制,ioctl函數是怎麼控制led的?當然,其實到這個地步,已經和Android完全沒有關系了,純屬於Linux驅動的事情了。
最初,我以為板子上的led驅動是動態驅動模塊(*.ko),在系統啟動後進行加載的,可是當我查看系統配置文件的時候才發現,完全不是這個樣子的。我們看一下Android代碼裡初始化文件對led的配置,在CQA83TAndroid_v2.1.0_bv3/android/device/softwinner/octopus-f1/init.sun8i.rc裡面,如下圖
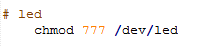
這裡僅僅是更改設備的權限,這裡也說明的當Android部分啟動時,led的驅動已經加載到Linux內核。如果還不清楚,來看一下,初始化文件對其他設備的配置。如下圖

到這個地方我們能說明,led驅動是在內核中加載完成的。那麼它究竟是在何時加載的?這個問題我們先不去探究。下面我們先看一下led驅動的源文件。
我們知道,led驅動屬於字符設備,那麼其源碼位置在Linux內核源碼的drivers/char/led.c ,其源代碼是:
#include#include #include #include #include #include #include #include #include #include #include #include #include #include #include #include #include #include #include #define LED_IOCTL_SET_ON 1 #define LED_IOCTL_SET_OFF 0 static script_item_u led_val[5]; static script_item_value_type_e led_type; static struct semaphore lock; //led_open static int led_open(struct inode *inode, struct file *file) { if (!down_trylock(&lock)) return 0; else return -EBUSY; } //led_close static int led_close(struct inode *inode, struct file *file) { up(&lock); return 0; } //led_ioctl static long led_ioctl(struct file *filep, unsigned int cmd, unsigned long arg) { unsigned int n; n = (unsigned int)arg; switch (cmd) { case LED_IOCTL_SET_ON: if (n < 1) return -EINVAL; if(led_val[n-1].gpio.gpio != -1) { __gpio_set_value(led_val[n-1].gpio.gpio, 1); printk("led%d on !\n", n); } break; case LED_IOCTL_SET_OFF: default: if (n < 1) return -EINVAL; if(led_val[n-1].gpio.gpio != -1) { __gpio_set_value(led_val[n-1].gpio.gpio, 0); printk("led%d off !\n", n); } break; } return 0; } //led_gpio static int __devinit led_gpio(void) { int i = 0; char gpio_num[10]; for(i =1 ; i < 6; i++) { sprintf(gpio_num, "led_gpio%d", i); led_type= script_get_item("led_para", gpio_num, &led_val[i-1]); if(SCIRPT_ITEM_VALUE_TYPE_PIO != led_type) { printk("led_gpio type fail !"); // gpio_free(led_val[i-1].gpio.gpio); led_val[i-1].gpio.gpio = -1; continue; } if(0 != gpio_request(led_val[i-1].gpio.gpio, NULL)) { printk("led_gpio gpio_request fail !"); led_val[i-1].gpio.gpio = -1; continue; } if (0 != gpio_direction_output(led_val[i-1].gpio.gpio, 0)) { printk("led_gpio gpio_direction_output fail !"); // gpio_free(led_val[i-1].gpio.gpio); led_val[i-1].gpio.gpio = -1; continue; } } return 0; } //file_operations static struct file_operations leds_ops = { .owner = THIS_MODULE, .open = led_open, .release = led_close, .unlocked_ioctl = led_ioctl, }; //miscdevice static struct miscdevice leds_dev = { .minor = MISC_DYNAMIC_MINOR, .name = "led", .fops = &leds_ops, }; //led_remove static int __devexit led_remove(struct platform_device *pdev) { return 0; } //led_probe static int __devinit led_probe(struct platform_device *pdev) { int led_used; script_item_u val; script_item_value_type_e type; int err; printk("led_para!\n"); type = script_get_item("led_para", "led_used", &val); if (SCIRPT_ITEM_VALUE_TYPE_INT != type) { printk("%s script_get_item \"led_para\" led_used = %d\n", __FUNCTION__, val.val); return -1; } led_used = val.val; printk("%s script_get_item \"led_para\" led_used = %d\n", __FUNCTION__, val.val); if(!led_used) { printk("%s led_used is not used in config, led_used=%d\n", __FUNCTION__,led_used); return -1; } err = led_gpio(); if (err) return -1; sema_init(&lock, 1); err = misc_register(&leds_dev); printk("======= cqa83 led initialized ================\n"); return err; } //platform_device struct platform_device led_device = { .name = "led", }; //platform_driver static struct platform_driver led_driver = { .probe = led_probe, .remove = __devexit_p(led_remove), .driver = { .name = "led", .owner = THIS_MODULE, }, }; //led_init static int __init led_init(void) { if (platform_device_register(&led_device)) { printk("%s: register gpio device failed\n", __func__); } if (platform_driver_register(&led_driver)) { printk("%s: register gpio driver failed\n", __func__); } return 0; } //led_exit static void __exit led_exit(void) { platform_driver_unregister(&led_driver); } module_init(led_init); module_exit(led_exit); MODULE_DESCRIPTION("Led Driver"); MODULE_LICENSE("GPL v2");
//led_ioctl
static long  led_ioctl(struct file *filep, unsigned int cmd,
		unsigned long arg)
{
	unsigned int n;
	n = (unsigned int)arg;
	switch (cmd) {
		case LED_IOCTL_SET_ON:
			if (n < 1)
				return -EINVAL;
			if(led_val[n-1].gpio.gpio != -1) {
				__gpio_set_value(led_val[n-1].gpio.gpio, 1);
				printk("led%d on !\n", n);
			}
			break;

		case LED_IOCTL_SET_OFF:
		default:
			if (n < 1)
				return -EINVAL;
			if(led_val[n-1].gpio.gpio != -1) {
				__gpio_set_value(led_val[n-1].gpio.gpio, 0);
				printk("led%d off !\n", n);
			}
			break;
	}

	return 0;
}
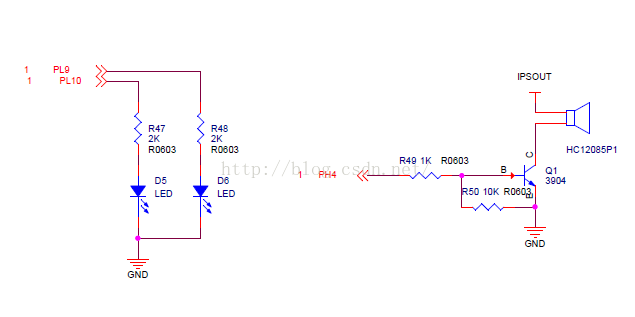
這樣就一目了然,它們是共地的,只有IO口輸出高電平時,led才能亮,蜂鳴器才能響。
下面我們看一下上面說的__gpio_set_value這個函數,這個函數的實現是在drivers/gpio/gpiolib.c這個文件裡面。我們看一下這個函數的實現,
/**
 * __gpio_set_value() - assign a gpio's value
 * @gpio: gpio whose value will be assigned
 * @value: value to assign
 * Context: any
 *
 * This is used directly or indirectly to implement gpio_set_value().
 * It invokes the associated gpio_chip.set() method.
 */
void __gpio_set_value(unsigned gpio, int value)
{
	struct gpio_chip	*chip;

	chip = gpio_to_chip(gpio);
	/* Should be using gpio_set_value_cansleep() */
	WARN_ON(chip->can_sleep);
	trace_gpio_value(gpio, 0, value);
	if (test_bit(FLAG_OPEN_DRAIN,  &gpio_desc[gpio].flags))
		_gpio_set_open_drain_value(gpio, chip, value);
	else if (test_bit(FLAG_OPEN_SOURCE,  &gpio_desc[gpio].flags))
		_gpio_set_open_source_value(gpio, chip, value);
	else
		chip->set(chip, gpio - chip->base, value);
}
EXPORT_SYMBOL_GPL(__gpio_set_value);
struct gpio_chip *chip;
對於結構體gpio_chip牽涉到了Linux gpio驅動模型,這裡簡單說一下gpio驅動模型:
GPIO是嵌入式系統最簡單、最常用的資源了,比如點亮LED,控制蜂鳴器,輸出高低電平,檢測按鍵,等等。GPIO分輸入和輸出,在davinci linux中,有關GPIO的最底層的寄存器驅動,\arch\arm\mach-davinci目錄下的gpio.c,這個是寄存器級的驅動,搞過單片機MCU的朋友應該比較熟悉寄存器級的驅動。
GPIO的驅動主要就是讀取GPIO口的狀態,或者設置GPIO口的狀態。就是這麼簡單,但是為了能夠寫好的這個驅動,在LINUX上作了一些軟件上的分層。為了讓其它驅動可以方便的操作到GPIO,在LINUX裡實現了對GPIO操作的統一接口,這個接口實則上就是GPIO驅動的框架,具體的實現文件為gpiolib.c在配置內核的時候,我們必須使用CONFIG_GENERIC_GPIO這個宏來支持GPIO驅動。
GPIO是與硬件體系密切相關的,linux提供一個模型來讓驅動統一處理GPIO,即各個板卡都有實現自己的gpio_chip控制模塊:request,free,input,output,get,set,irq...然後把控制模塊注冊到內核中,這時會改變全局gpio數組:gpio_desc[].當用戶請求gpio時,就會到這個數組中找到,並調用這個GPIO對應的gpio_chip的處理函數。gpio實現為一組可用的 gpio_chip,由驅動傳入對應 gpio的全局序號去 request,dataout,datain,free.這時會調用gpio_chip中具體的實現。
gpio是一組可控件的腳,由多個寄存器同時控制。通過設置對應的寄存器可以達到設置GPIO口對應狀態與功能。數據狀態,輸入輸出方向,清零,中斷(那個邊沿觸發), 一般是一組(bank)一組的。寄存器讀寫函數:__raw_writel()__raw_writeb()__raw_readl()__raw_readb()
結構體gpio_chip的定義在include/asm-generic/gpio.h文件中,具體內容是:
struct gpio_chip {
	const char		*label;
	struct device		*dev;
	struct module		*owner;

	int			(*request)(struct gpio_chip *chip,
						unsigned offset);
	void			(*free)(struct gpio_chip *chip,
						unsigned offset);

	int			(*direction_input)(struct gpio_chip *chip,
						unsigned offset);
	int			(*get)(struct gpio_chip *chip,
						unsigned offset);
	int			(*direction_output)(struct gpio_chip *chip,
						unsigned offset, int value);
	int			(*set_debounce)(struct gpio_chip *chip,
						unsigned offset, unsigned debounce);

	void			(*set)(struct gpio_chip *chip,
						unsigned offset, int value);

	int			(*to_irq)(struct gpio_chip *chip,
						unsigned offset);

	void			(*dbg_show)(struct seq_file *s,
						struct gpio_chip *chip);
	int			base;
	u16			ngpio;
	const char		*const *names;
	unsigned		can_sleep:1;
	unsigned		exported:1;

#if defined(CONFIG_OF_GPIO)
	/*
	 * If CONFIG_OF is enabled, then all GPIO controllers described in the
	 * device tree automatically may have an OF translation
	 */
	struct device_node *of_node;
	int of_gpio_n_cells;
	int (*of_xlate)(struct gpio_chip *gc,
		        const struct of_phandle_args *gpiospec, u32 *flags);
#endif
#ifdef CONFIG_PINCTRL
	/*
	 * If CONFIG_PINCTRL is enabled, then gpio controllers can optionally
	 * describe the actual pin range which they serve in an SoC. This
	 * information would be used by pinctrl subsystem to configure
	 * corresponding pins for gpio usage.
	 */
	struct list_head pin_ranges;
#endif
};
下面來看:
chip = gpio_to_chip(gpio);
在相同文件下的函數實現為:
/* caller holds gpio_lock *OR* gpio is marked as requested */
struct gpio_chip *gpio_to_chip(unsigned gpio)
{
	return gpio_desc[gpio].chip;
}
這個函數很簡單,我們來看gpio描述結構體gpio_desc,該結構體在同文件下,內容如下:
struct gpio_desc {
	struct gpio_chip	*chip;
	unsigned long		flags;
	/* flag symbols are bit numbers */
	#define FLAG_REQUESTED	0
	#define FLAG_IS_OUT	1
	#define FLAG_RESERVED	2
	#define FLAG_EXPORT	3	/* protected by sysfs_lock */
	#define FLAG_SYSFS	4	/* exported via /sys/class/gpio/control */
	#define FLAG_TRIG_FALL	5	/* trigger on falling edge */
	#define FLAG_TRIG_RISE	6	/* trigger on rising edge */
	#define FLAG_ACTIVE_LOW	7	/* sysfs value has active low */
	#define FLAG_OPEN_DRAIN	8	/* Gpio is open drain type */
	#define FLAG_OPEN_SOURCE 9	/* Gpio is open source type */

	#define ID_SHIFT	16	/* add new flags before this one */

	#define GPIO_FLAGS_MASK		((1 << ID_SHIFT) - 1)
	#define GPIO_TRIGGER_MASK	(BIT(FLAG_TRIG_FALL) | BIT(FLAG_TRIG_RISE))

	#ifdef CONFIG_DEBUG_FS
	const char		*label;
	#endif
};
static struct gpio_desc gpio_desc[ARCH_NR_GPIOS];
繼續看:
WARN_ON(chip->can_sleep);
這句是設置gpio值,gpio可休眠,同gpio_set_value_cansleep()函數。
trace_gpio_value(gpio, 0, value);
根據查資料,對gpio的值添加追蹤事件,我推測是應該是獲取你要操作的gpio的當前狀態。(沒有查到確切資料,如果哪位知道,請共享一下)
if (test_bit(FLAG_OPEN_DRAIN, &gpio_desc[gpio].flags))
_gpio_set_open_drain_value(gpio, chip, value);
else if (test_bit(FLAG_OPEN_SOURCE, &gpio_desc[gpio].flags))
_gpio_set_open_source_value(gpio, chip, value);
else
chip->set(chip, gpio - chip->base, value);
這三句就是給IO口寫值了,這裡牽涉到了硬件上GPIO控制器的GPIO的控制模式,test_bit函數是用來做位測試,test_bit(FLAG_OPEN_DRAIN, &gpio_desc[gpio].flags),這裡就是要測試gpio_desc[gpio].flags)的第FLAG_OPEN_DRAIN位是否為1。意思就是,該GPIO控制器是否支持開漏控制方式。
我們再進入到_gpio_set_open_drain_value(gpio, chip, value)和_gpio_set_open_source_value(gpio, chip, value)這個函數:
/*
 *  _gpio_set_open_drain_value() - Set the open drain gpio's value.
 * @gpio: Gpio whose state need to be set.
 * @chip: Gpio chip.
 * @value: Non-zero for setting it HIGH otherise it will set to LOW.
 */
static void _gpio_set_open_drain_value(unsigned gpio,
			struct gpio_chip *chip, int value)
{
	int err = 0;
	if (value) {
		err = chip->direction_input(chip, gpio - chip->base);
		if (!err)
			clear_bit(FLAG_IS_OUT, &gpio_desc[gpio].flags);
	} else {
		err = chip->direction_output(chip, gpio - chip->base, 0);
		if (!err)
			set_bit(FLAG_IS_OUT, &gpio_desc[gpio].flags);
	}
	trace_gpio_direction(gpio, value, err);
	if (err < 0)
		pr_err("%s: Error in set_value for open drain gpio%d err %d\n",
					__func__, gpio, err);
}

/*
 *  _gpio_set_open_source() - Set the open source gpio's value.
 * @gpio: Gpio whose state need to be set.
 * @chip: Gpio chip.
 * @value: Non-zero for setting it HIGH otherise it will set to LOW.
 */
static void _gpio_set_open_source_value(unsigned gpio,
			struct gpio_chip *chip, int value)
{
	int err = 0;
	if (value) {
		err = chip->direction_output(chip, gpio - chip->base, 1);
		if (!err)
			set_bit(FLAG_IS_OUT, &gpio_desc[gpio].flags);
	} else {
		err = chip->direction_input(chip, gpio - chip->base);
		if (!err)
			clear_bit(FLAG_IS_OUT, &gpio_desc[gpio].flags);
	}
	trace_gpio_direction(gpio, !value, err);
	if (err < 0)
		pr_err("%s: Error in set_value for open source gpio%d err %d\n",
					__func__, gpio, err);
}
到這裡,基本上是把Linux下GPIO驅動模型馬馬虎虎的了解了一點點,下載就一個感覺Linux好復雜。下面還是回到我們的驅動函數led.c裡面,從裡面不難發現,這個驅動使用了Linux的platform機制。
關於plantform先不在這裡分析,專門寫文章來分析。
在此非常感謝大神們的分享。
 ExtJS自定義控件 之一:datetimefield控件
這一年都在使用ExtJS 5.0開發系統,經常會遇到的一個場景就是時間日期的選擇了。比如說,預定場地的時候就必須由用戶選擇預定的日期和時間。可惜的是,ExtJS 5.0沒
 Android仿微信二維碼和條形碼
本文實例為大家分享了Android仿微信二維碼和條形碼的具體代碼,供大家參考,具體內容如下package your.QRCode.namespace;import jav
 Android基於socket實現的簡單C/S聊天通信功能
本文實例講述了Android基於socket實現的簡單C/S聊天通信功能。分享給大家供大家參考,具體如下:主要想法:在客戶端上發送一條信息,在後台開辟一個線程充當服務端,
 HDU 1849 Rabbit and Grass 簡單SG定理
點擊打開鏈接 Rabbit and Grass Time Limit: 1000/1000 MS (Java/Others) Memory Limit: 327