編輯:關於Android編程
谷歌在推出Android5.0的同時推出了全新的設計Material Design,谷歌為了給我們提供更加規范的MD設計風格的控件,在2015年IO大會上推出了Design支持包,Design常用的新控件包括:
TextInputLayout(文本輸入布局) TabLaout(選項卡布局) Snackbar FloatingActionButton(浮動按鈕) NavigationView(導航視圖) AppBarLayout(程序欄布局) CoordinatorLayout(協作布局)CollapsingToolbarLayout(折疊工具欄布局)
和往常一樣,主要還是想總結一下我在學習過程中的一些筆記以及一些需要注意的地方。
一、TextInputLayout的作用
TextInputLayout的作用是將EditText包裹起來,使得EditText的android:hint屬性的值以浮動標簽的形式顯示出來,同時可以通過setErrorEnabled(boolean)設置是否顯示一個錯誤信息和setError(CharSequence)來顯示錯誤信息。
在xml文件中定義TextInputLayout:
在java文件中設置錯誤信息:
package com.per.textinputlayout;

import android.app.Activity;
import android.os.Bundle;
import android.support.design.widget.TextInputLayout;

public class MainActivity extends Activity {
    private TextInputLayout textinputlayout;

    @Override
    protected void onCreate(Bundle savedInstanceState) {
        super.onCreate(savedInstanceState);
        setContentView(R.layout.activity_main);
        textinputlayout= (TextInputLayout) findViewById(R.id.text_input_layout);

        textinputlayout.setErrorEnabled(true);
        textinputlayout.setError("請檢查手機號碼是否正確");
    }
}
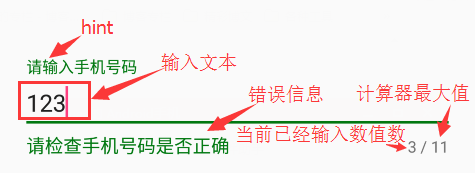
其中app:errorTextAppearance="@style/MyErrorStyle"表示錯誤提示的樣式,如果想更改錯誤提示的樣式的話,也可以在style.xml文件裡面,自定義一個style
二、TextInputLayout常用屬性
屬性名相關方法描述app:counterEnabled
setCounterEnabled(boolean)
設置是否顯示一個計數器,布爾值
app:counterMaxLength
setCounterMaxLength(int)
設置計數器的最大計數數值,整型
app:errorEnabled
setErrorEnabled(boolean)
設置是否顯示一個錯誤信息,布爾值
app:hintAnimationEnabled
setHintAnimationEnabled(boolean)
設置是否要顯示輸入狀態時候的動畫效果,布爾值
app:hintEnabled
setHintEnabled(boolean)
設置是否要用這個浮動標簽的功能,布爾值
app:hintTextAppearance
setHintTextAppearance(int)
設置提示文字的樣式(注意這裡是運行了動畫效果之後的樣式)
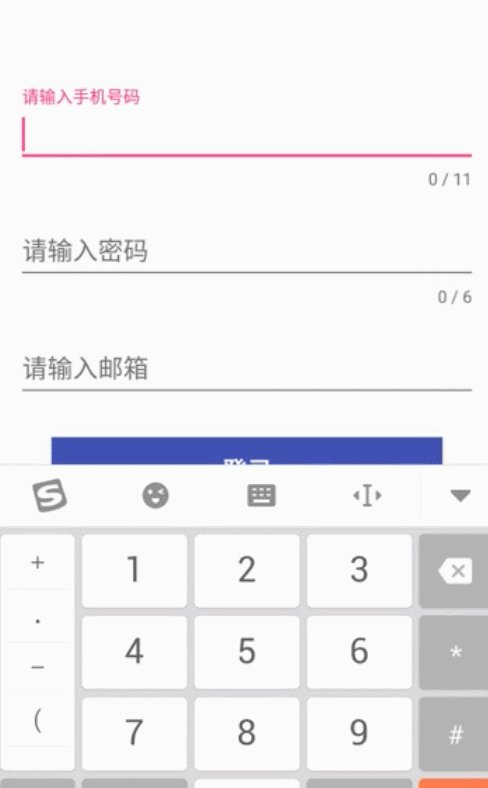
這裡寫了一個簡單的登錄頁面,僅供參考,效果圖如下:
OtherActivity.class
package com.per.textinputlayout;

import android.app.Activity;
import android.os.Bundle;
import android.support.design.widget.TextInputLayout;
import android.text.Editable;
import android.text.TextUtils;
import android.text.TextWatcher;
import android.view.View;
import android.widget.Button;
import android.widget.EditText;
import android.widget.Toast;

/**
 * Created by lijuan on 2016/8/21.
 */
public class OtherActivity extends Activity implements View.OnClickListener {
    private TextInputLayout mLayoutPhone, mLayoutPwd, mLayoutEmail;
    private EditText mEtPhone, mEtPwd, mEtEmail;
    private Button mBtnLogin;

    @Override
    protected void onCreate(Bundle savedInstanceState) {
        super.onCreate(savedInstanceState);
        setContentView(R.layout.activity_other);
        initView();
    }

    private void initView() {
        mLayoutPhone = (TextInputLayout) findViewById(R.id.layout_phone);
        mLayoutPwd = (TextInputLayout) findViewById(R.id.layout_pwd);
        mLayoutEmail = (TextInputLayout) findViewById(R.id.layout_email);

        mEtPhone = (EditText) findViewById(R.id.et_phone);
        mEtPwd = (EditText) findViewById(R.id.et_pwd);
        mEtEmail = (EditText) findViewById(R.id.et_email);

        mBtnLogin = (Button) findViewById(R.id.login);

        //設置監聽事件
        mBtnLogin.setOnClickListener(this);
        mEtPhone.addTextChangedListener(new MyTextWatcher(mEtPhone));
        mEtPwd.addTextChangedListener(new MyTextWatcher(mEtPwd));
        mEtEmail.addTextChangedListener(new MyTextWatcher(mEtEmail));
    }

    @Override
    public void onClick(View v) {
        switch (v.getId()) {
            case R.id.login:
                Login();
                break;
            default:
                break;
        }
    }

    /**
     * 登錄
     */
    private void Login() {
        if (!isNameValid()) {
            showMessage(getString(R.string.error_phone));
            return;
        }
        if (!isPasswordValid()) {
            showMessage(getString(R.string.error_pwd));
            return;
        }
        if (!isEmailValid()) {
            showMessage(getString(R.string.error_email));
            return;
        }
        showMessage(getString(R.string.login_success));
    }

    /**
     * 檢查輸入的手機號碼是否為空以及格式是否正確
     *
     * @return
     */
    public boolean isNameValid() {
        String phone = mEtPhone.getText().toString().trim();
        if (TextUtils.isEmpty(phone) || !RegularUtils.isPhone(phone)) {
            mLayoutPhone.setErrorEnabled(true);
            mLayoutPhone.setError(getString(R.string.error_phone));
            mEtPhone.requestFocus();
            return false;
        }
        mLayoutPhone.setErrorEnabled(false);
        return true;
    }

    /**
     * 檢查輸入的密碼是否為空
     *
     * @return
     */
    public boolean isPasswordValid() {
        String pwd = mEtPwd.getText().toString().trim();
        if (TextUtils.isEmpty(pwd)) {
            mLayoutPwd.setErrorEnabled(true);
            mLayoutPwd.setError(getResources().getString(R.string.error_pwd));
            mEtPwd.requestFocus();
            return false;
        }
        mLayoutPwd.setErrorEnabled(false);
        return true;
    }

    /**
     * 檢查輸入的郵箱是否為空以及格式是否正確
     *
     * @return
     */
    public boolean isEmailValid() {
        String email = mEtEmail.getText().toString().trim();
        if (TextUtils.isEmpty(email) || !RegularUtils.isEmail(email)) {
            mLayoutEmail.setErrorEnabled(true);
            mLayoutEmail.setError(getString(R.string.error_email));
            mLayoutEmail.requestFocus();
            return false;
        }
        mLayoutEmail.setErrorEnabled(false);
        return true;
    }

    //動態監聽輸入過程
    private class MyTextWatcher implements TextWatcher {

        private View view;

        private MyTextWatcher(View view) {
            this.view = view;
        }

        @Override
        public void beforeTextChanged(CharSequence s, int start, int count, int after) {
        }

        @Override
        public void onTextChanged(CharSequence s, int start, int before, int count) {
        }

        @Override
        public void afterTextChanged(Editable s) {
            switch (view.getId()) {
                case R.id.et_phone:
                    isNameValid();
                    break;
                case R.id.et_pwd:
                    isPasswordValid();
                    break;
                case R.id.et_email:
                    isEmailValid();
                    break;
            }
        }
    }

    private void showMessage(String message) {
        Toast.makeText(this, message, Toast.LENGTH_SHORT).show();
    }

}
這裡還涉及到了一個檢測手機號碼,郵箱等是否有效的一個工具類:RegularUtils.class
package com.per.textinputlayout;

import java.util.regex.Matcher;
import java.util.regex.Pattern;

/**
 * 檢測手機號碼,郵箱等是否有效
 * Created by xiaolijuan on 2016/8/21.
 */
public class RegularUtils {
    /**
     * 要更加准確的匹配手機號碼只匹配11位數字是不夠的,比如說就沒有以144開始的號碼段,
     * 故先要整清楚現在已經開放了多少個號碼段,國家號碼段分配如下:
     * 移動:134、135、136、137、138、139、150、151、157(TD)、158、159、187、188
     * 聯通:130、131、132、152、155、156、185、186   電信:133、153、180、189、(1349衛通)
     */
    public static boolean isPhone(String param) {
        Pattern p = Pattern.compile("^((13[0-9])|(15[^4,\\D])|(18[0,5-9]))\\d{8}$");
        Matcher m = p.matcher(param);
        return m.matches();
    }

    /**
     * 判斷email格式是否正確
     */
    public static boolean isEmail(String email) {
        String str = "^([a-zA-Z0-9_\\-\\.]+)@((\\[[0-9]{1,3}\\.[0-9]{1,3}\\.[0-9]{1,3}\\.)|(([a-zA-Z0-9\\-]+\\.)+))([a-zA-Z]{2,4}|[0-9]{1,3})(\\]?)$";
        Pattern p = Pattern.compile(str);
        Matcher m = p.matcher(email);
        return m.matches();
    }
}
activity_other.xml
好了,本篇文章已經全部寫完了,存在總結不到位的地方還望指導,感謝^_^
 RxJava兩步打造華麗的Android引導頁
前言之前的一篇文章:基於RxJava實現酷炫啟動頁 中,我們嘗試了用RxJava實現酷炫的啟動頁,今天我們在此基礎上加入首次使用APP時的引導頁功能。效果如下圖:思路:思
 MIUI 8和MIUI 7有什麼區別 MIUI 8和MIUI 7區別對比
期待已久的MIUI 8終於上線啦!經過全新設計的MIUI 8靈感來源於變幻萬千的“萬花筒”,在色彩、交互動畫、系統字體等方面的大膽改
 Android rom解包打包工具
eMMC主要是針對手機和平板電腦等產品的內嵌式存儲器,由於其在封裝中集成了一個控制器,且提供標准接口並管理閃存等優勢,越來越受到Android手機廠商的青睐,以eMMC為
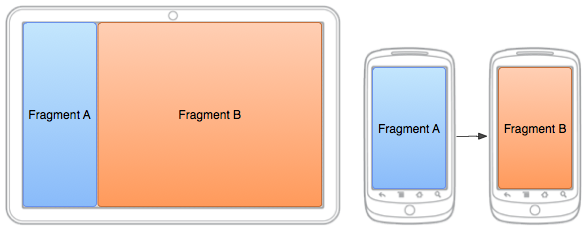 Android fragment(片段)構建靈活的UI
在以支持多種屏幕尺寸為目標設計應用時,您可以在不同的布局配置中重復使用您的fragment從而根據可用的屏幕空間優化用戶體驗。例如,在手機設備上,由於采用單窗格用戶界面,