編輯:關於Android編程
隨著項目中動態鏈接庫越來越多,我們也遇到了很多奇怪的問題,比如只在某一種 OS 上會出現的 java.lang.UnsatisfiedLinkError,但是明明我們動態庫名稱沒錯,ABI 也沒錯,方法也能對應的上,而且還只出現在某一些機型上,搞的我們百思不得其解。為了找到出現千奇百怪問題的原因,和能夠提供一個方式來解決一些比較奇怪的動態庫加載的問題,我發現了解一下 so 的加載流程是非常有必要的了,便於我們發現問題和解決問題,這就是本文的由來。
要想了解動態鏈接庫是如何加載的,首先是查看動態鏈接庫是怎麼加載的,從我們日常調用的 System.loadLibrary 開始。
為了書寫方便,後文中會用“so”來簡單替代“動態鏈接庫”概念。
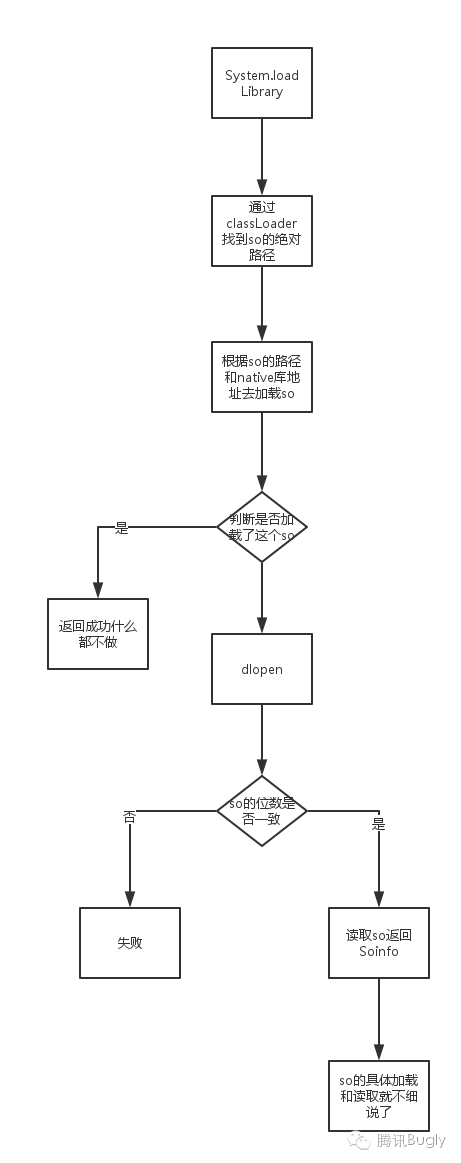
首先從宏觀流程上來看,對於 load 過程我們分為 find&load,首先是要找到 so 所在的位置,然後才是 load 加載進內存,同時對於 dalvik 和 art 虛擬機來說,他們加載 so 的流程和方式也不盡相同,考慮到歷史的進程我們分析 art 虛擬機的加載方式,先貼一張圖看看 so 加載的大概流程。
我的疑問
ClassLoader 是如何去找到so的呢? 如何判斷這個 so 是否加載過? native 庫的地址是如何來的 so 是怎麼弄到 native 庫裡面去的? 如何決定 app 進程是32位還是64位的?找到以上的幾個問題的答案,可以幫我們了解到哪個步驟沒有找到動態鏈接庫,是因為名字不對,還是 app 安裝後沒有拷貝過來動態鏈接庫還是其他原因等,我們先從第一個問題來了解。
首先我們從調用源碼看起,了解 System.loadLibrary 是如何去找到 so 的。
System.java
public void loadLibrary(String nickname) {
    loadLibrary(nickname, VMStack.getCallingClassLoader());
}
通過 ClassLoader 的 findLibaray 來找到 so 的地址
void loadLibrary(String libraryName, ClassLoader loader) {
        if (loader != null) {
            String filename = loader.findLibrary(libraryName);
            if (filename == null) {
                // It's not necessarily true that the ClassLoader used
                // System.mapLibraryName, but the default setup does, and it's
                // misleading to say we didn't find "libMyLibrary.so" when we
                // actually searched for "liblibMyLibrary.so.so".
                throw new UnsatisfiedLinkError(loader + " couldn't find \"" +
                                               System.mapLibraryName(libraryName) + "\"");
            }
            String error = doLoad(filename, loader);
            if (error != null) {
                throw new UnsatisfiedLinkError(error);
            }
            return;
        }
如果這裡沒有找到就要拋出來 so 沒有找到的錯誤了,這個也是我們非常常見的錯誤。所以這裡我們很需要知道這個 ClassLoader 是哪裡來的。
這裡的一切都要比較熟悉 app 的啟動流程,關於 app 啟動的流程網上已經說過很多了,我就不再詳細說了,一個 app 的啟動入口是在 ActivityThread 的 main 函數裡,這裡啟動了我們的 UI 線程,最終啟動流程會走到我們在 ActivityThread 的 handleBindApplication 函數中。
  private void handleBindApplication(AppBindData data) {
         ......
         ......
            ContextImpl instrContext = ContextImpl.createAppContext(this, pi);

            try {
                java.lang.ClassLoader cl = instrContext.getClassLoader();
                mInstrumentation = (Instrumentation)
                    cl.loadClass(data.instrumentationName.getClassName()).newInstance();
            } catch (Exception e) {
                throw new RuntimeException(
                    "Unable to instantiate instrumentation "
                    + data.instrumentationName + ": " + e.toString(), e);
            }

            mInstrumentation.init(this, instrContext, appContext,
                   new ComponentName(ii.packageName, ii.name), data.instrumentationWatcher,
                   data.instrumentationUiAutomationConnection);

           ......
           ......
        } finally {
            StrictMode.setThreadPolicy(savedPolicy);
        }
    }
我們找到了這個 classLoader 是從 ContextImpl 中拿過來的,有興趣的同學可以一步步看看代碼,最後的初始化其實是在 ApplicationLoaders 的 getClassLoader 中
ApplicationLoaders.java
 public ClassLoader getClassLoader(String zip, String libPath, ClassLoader parent)
    {
        ......
        ......
            if (parent == baseParent) {
                ClassLoader loader = mLoaders.get(zip);
                if (loader != null) {
                    return loader;
                }

                Trace.traceBegin(Trace.TRACE_TAG_ACTIVITY_MANAGER, zip);
                PathClassLoader pathClassloader =
                    new PathClassLoader(zip, libPath, parent);
                Trace.traceEnd(Trace.TRACE_TAG_ACTIVITY_MANAGER);

                mLoaders.put(zip, pathClassloader);
                return pathClassloader;
            }

            Trace.traceBegin(Trace.TRACE_TAG_ACTIVITY_MANAGER, zip);
            PathClassLoader pathClassloader = new PathClassLoader(zip, parent);
            Trace.traceEnd(Trace.TRACE_TAG_ACTIVITY_MANAGER);
            return pathClassloader;
        }
    }
其實是一個 PathClassLoader,他的基類是 BaseDexClassLoader,在他其中的實現了我們上文看到的 findLibrary 這個函數,通過 DexPathList 去 findLibrary。
BaseDexClassLoader.java
   public String findLibrary(String libraryName) {
        String fileName = System.mapLibraryName(libraryName);
        for (File directory : nativeLibraryDirectories) {
            File file = new File(directory, fileName);
            if (file.exists() && file.isFile() && file.canRead()) {
                return file.getPath();
            }
        }
        return null;
    }
代碼的意思很簡單,其實就是首先給 so 拼成完整的名字比如a拼接成 liba.so 這樣,然後再從存放 so 的文件夾中找這個 so,在哪個文件夾裡面找到了,我們就返回他的絕對路徑。所以這裡最關鍵的就是如何知道這個 nativeLibraryDirectories 的值是多少,於是也引出我們下一個疑問, native 地址庫是怎麼來的,是多少呢?
通過查看 DexPathList 可以知道,這個 nativeLibraryDirectories 的值來自於2個方面,一個是來自外部傳過來的 libraryPath,一個是來自 java.library.path 這個環境變量的值。
DexPathList.java
private static File[] splitLibraryPath(String path) {
        /*
         * Native libraries may exist in both the system and
         * application library paths, and we use this search order:
         *
         *   1. this class loader's library path for application
         *      libraries
         *   2. the VM's library path from the system
         *      property for system libraries
         *
         * This order was reversed prior to Gingerbread; see http://b/2933456.
         */
        ArrayList result = splitPaths(
                path, System.getProperty("java.library.path", "."), true);
        return result.toArray(new File[result.size()]);
    }
環境變量的值大家 getProp 一下就知道是什麼值了,一般來說大家在 so 找不到的情況下能看到這個環境變量的值,比如大部分只支持32位的系統情況是這個:“/vendor/lib,/system/lib”,搞清楚了這個環境變量,重點還是要知道這個 libraryPath 是如何來的,還記得我們前面講了 ClassLoader 是如何來的嗎,其實在初始化 ClassLoader 的時候從外面告訴了 Loader 這個文件夾的地址是哪裡來的,在 LoadedApk 的 getClassLoader 代碼中我們發現了主要是 libPath 這個 list 的 path 組成的,而這個 list 的組成主要來自下面2個地方:
LoadedApk.java
libPaths.add(mLibDir);
還有一個
     // Add path to libraries in apk for current abi
                if (mApplicationInfo.primaryCpuAbi != null) {
                    for (String apk : apkPaths) {
                      libPaths.add(apk + "!/lib/" + mApplicationInfo.primaryCpuAbi);
                    }
                }
這個 apkPath 大部分情況都會是 apk 的安裝路徑,對於用戶的 app 大部分路徑都是在 /data/app 下,所以我們要確認以下2個關鍵的值是怎麼來的,一個是 mLibDir,另外一個就是這個 primaryCpuAbi 的值。
首先我們來看看這個 mLibDir 是怎麼來的,通過觀察代碼我們了解到這個 mLibDir 其實就是 ApplicationInfo 裡面 nativeLibraryDir 來的,那麼這個 nativeLibraryDir 又是如何來的呢,這個我們還得從 App 安裝說起了,由於本文的重點是講述 so 的加載,所以這裡不細說 App 安裝的細節了,我這裡重點列一下這個 nativeLibraryDir 是怎麼來的。
不論是替換還是新安裝,都會調用 PackageManagerService 的 scanPackageLI 函數,然後跑去 scanPackageDirtyLI,在 scanPackageDirtyLI 這個函數上,我們可以找到這個設置 nativeLibraryDir 的邏輯。
PackageManagerService.java
  // Give ourselves some initial paths; we'll come back for another
            // pass once we've determined ABI below.
            setNativeLibraryPaths(pkg);
info.nativeLibraryDir = null;
        info.secondaryNativeLibraryDir = null;

        if (isApkFile(codeFile)) {
            // Monolithic install
            ......
            ......
                final String apkName = deriveCodePathName(codePath);
                info.nativeLibraryRootDir = new File(mAppLib32InstallDir, apkName)
                        .getAbsolutePath();
            }

            info.nativeLibraryRootRequiresIsa = false;
            info.nativeLibraryDir = info.nativeLibraryRootDir;
 static String deriveCodePathName(String codePath) {
        if (codePath == null) {
            return null;
        }
        final File codeFile = new File(codePath);
        final String name = codeFile.getName();
        if (codeFile.isDirectory()) {
            return name;
        } else if (name.endsWith(".apk") || name.endsWith(".tmp")) {
            final int lastDot = name.lastIndexOf('.');
            return name.substring(0, lastDot);
        } else {
            Slog.w(TAG, "Odd, " + codePath + " doesn't look like an APK");
            return null;
        }
    }
apkName 主要是來自於這個 codePath,codePath 一般都是app的安裝地址,類似於:/data/app/com.test-1.apk 這樣的文件格式,如果是以.apk 結尾的情況,這個 apkName 其實就是 com.test-1 這個名稱。
pkg.codePath = packageDir.getAbsolutePath();
而 nativeLibraryRootDir 的值就是 app native 庫的路徑這個的初始化主要是在 PackageManagerService 的構造函數中
mAppLib32InstallDir = new File(dataDir, "app-lib");
綜合上面的邏輯,連在一起就可以得到這個 libPath 的地址,比如對於 com.test 這個包的 app,最後的 nativeLibraryRootDir 其實就是 /data/app-lib/com.test-1 這個路徑下,你其實可以從這個路徑下找到你的 so 庫。
首先解釋下 Abi 的概念:
應用程序二進制接口(application binary interface,ABI) 描述了應用程序和操作系統之間,一個應用和它的庫之間,或者應用的組成部分之間的低接口 。ABI 不同於 API ,API 定義了源代碼和庫之間的接口,因此同樣的代碼可以在支持這個 API 的任何系統中編譯 ,然而 ABI 允許編譯好的目標代碼在使用兼容 ABI 的系統中無需改動就能運行。
而為什麼有 primaryCpuAbi 的概念呢,因為一個系統支持的 abi 有很多,不止一個,比如一個64位的機器上他的 supportAbiList 可能如下所示
public static final String[] SUPPORTED_ABIS = getStringList("ro.product.cpu.abilist", ",");
    root@:/ # getprop ro.product.cpu.abilist
    arm64-v8a,armeabi-v7a,armeabi
所以他能支持的 abi 有如上的三個,這個 primaryCpuAbi 就是要知道當前程序的 abi 在他支持的 abi 中最靠前的那一個, 這個邏輯我們要放在 so copy 的邏輯一起講,因為在 so copy 的時候會決定 primaryCpuAbi,同時依靠這個 primaryCpuAbi 的值來決定我們的程序是運行在32位還是64位下的。
這裡總結一下,這個 libraryPath 主要來自兩個方向:一個是 data 目錄下 app-lib 中安裝包目錄,比如:/data/app-lib/com.test-1,另一個方向就是來自於 apkpath+”!/lib/”+primaryCpuAbi 的地址了,比如:/data/app/com.test-1.apk!/lib/arm64-v8a。
這下我們基本了解清楚了系統會從哪些目錄下去找這個 so 的值了:一個是系統配置設置的值,這個主要針對的是系統 so 的路徑,另外一個就是 /data/app-lib 下和 /data/app apk 的安裝目錄下對應的 abi 目錄下去找。
另外不同的系統這些默認的 apkPath 和 codePath 可能會不一樣,要想知道最精確的值,可以在你的 so 找不到的時候輸出的日志中找到這個 so 的路徑,比如6.0的機器上的路徑又是這樣的:
nativeLibraryDirectories=[/data/app/com.qq.qcloud-1/lib/arm, /data/app/com.qq.qcloud-1/base.apk!/lib/armeabi-v7a, /vendor/lib, /system/lib]]]
了解了我們去哪找,如果找不到的話那就只有2個情況了,一個是比如 abi 對應錯了,另外就是是不是系統在安裝的時候沒有正常的將 so 拷貝這些路徑下,導致了找不到的情況呢?所以我們還是需要了解在安裝的時候這些 so 是如何拷貝到正常的路徑下的,中間是不是會出一些問題呢?
關於 so 的拷貝我們還是照舊不細說 App 的安裝流程了,主要還是和之前一樣不論是替換還是新安裝,都會調用 PackageManagerService 的 scanPackageLI() 函數,然後跑去 scanPackageDirtyLI 函數,而在這個函數中對於非系統的 APP 他調用了 derivePackageABI 這個函數,通過這個函數他將會覺得系統的abi是多少,並且也會進行我們最關心的 so 拷貝操作。
PackageManagerService.java
    public void derivePackageAbi(PackageParser.Package pkg, File scanFile,
                                 String cpuAbiOverride, boolean extractLibs)
            throws PackageManagerException {
            ......
            ......
            if (isMultiArch(pkg.applicationInfo)) {
                // Warn if we've set an abiOverride for multi-lib packages..
                // By definition, we need to copy both 32 and 64 bit libraries for
                // such packages.
                if (pkg.cpuAbiOverride != null
                        && !NativeLibraryHelper.CLEAR_ABI_OVERRIDE.equals(pkg.cpuAbiOverride)) {
                    Slog.w(TAG, "Ignoring abiOverride for multi arch application.");
                }

                int abi32 = PackageManager.NO_NATIVE_LIBRARIES;
                int abi64 = PackageManager.NO_NATIVE_LIBRARIES;
                if (Build.SUPPORTED_32_BIT_ABIS.length > 0) {
                    if (extractLibs) {
                        abi32 = NativeLibraryHelper.copyNativeBinariesForSupportedAbi(handle,
                                nativeLibraryRoot, Build.SUPPORTED_32_BIT_ABIS,
                                useIsaSpecificSubdirs);
                    } else {
                        abi32 = NativeLibraryHelper.findSupportedAbi(handle, Build.SUPPORTED_32_BIT_ABIS);
                    }
                }

                maybeThrowExceptionForMultiArchCopy(
                        "Error unpackaging 32 bit native libs for multiarch app.", abi32);

                if (Build.SUPPORTED_64_BIT_ABIS.length > 0) {
                    if (extractLibs) {
                        abi64 = NativeLibraryHelper.copyNativeBinariesForSupportedAbi(handle,
                                nativeLibraryRoot, Build.SUPPORTED_64_BIT_ABIS,
                                useIsaSpecificSubdirs);
                    } else {
                        abi64 = NativeLibraryHelper.findSupportedAbi(handle, Build.SUPPORTED_64_BIT_ABIS);
                    }
                }

                maybeThrowExceptionForMultiArchCopy(
                        "Error unpackaging 64 bit native libs for multiarch app.", abi64);

                if (abi64 >= 0) {
                    pkg.applicationInfo.primaryCpuAbi = Build.SUPPORTED_64_BIT_ABIS[abi64];
                }

                if (abi32 >= 0) {
                    final String abi = Build.SUPPORTED_32_BIT_ABIS[abi32];
                    if (abi64 >= 0) {
                        pkg.applicationInfo.secondaryCpuAbi = abi;
                    } else {
                        pkg.applicationInfo.primaryCpuAbi = abi;
                    }
                }
            } else {
                String[] abiList = (cpuAbiOverride != null) ?
                        new String[] { cpuAbiOverride } : Build.SUPPORTED_ABIS;

                // Enable gross and lame hacks for apps that are built with old
                // SDK tools. We must scan their APKs for renderscript bitcode and
                // not launch them if it's present. Don't bother checking on devices
                // that don't have 64 bit support.
                boolean needsRenderScriptOverride = false;
                if (Build.SUPPORTED_64_BIT_ABIS.length > 0 && cpuAbiOverride == null &&
                        NativeLibraryHelper.hasRenderscriptBitcode(handle)) {
                    abiList = Build.SUPPORTED_32_BIT_ABIS;
                    needsRenderScriptOverride = true;
                }

                final int copyRet;
                if (extractLibs) {
                    copyRet = NativeLibraryHelper.copyNativeBinariesForSupportedAbi(handle,
                            nativeLibraryRoot, abiList, useIsaSpecificSubdirs);
                } else {
                    copyRet = NativeLibraryHelper.findSupportedAbi(handle, abiList);
                }

                if (copyRet < 0 && copyRet != PackageManager.NO_NATIVE_LIBRARIES) {
                    throw new PackageManagerException(INSTALL_FAILED_INTERNAL_ERROR,
                            "Error unpackaging native libs for app, errorCode=" + copyRet);
                }

                if (copyRet >= 0) {
                    pkg.applicationInfo.primaryCpuAbi = abiList[copyRet];
                } else if (copyRet == PackageManager.NO_NATIVE_LIBRARIES && cpuAbiOverride != null) {
                    pkg.applicationInfo.primaryCpuAbi = cpuAbiOverride;
                } else if (needsRenderScriptOverride) {
                    pkg.applicationInfo.primaryCpuAbi = abiList[0];
                }
            }
        } catch (IOException ioe) {
            Slog.e(TAG, "Unable to get canonical file " + ioe.toString());
        } finally {
            IoUtils.closeQuietly(handle);
        }

        // Now that we've calculated the ABIs and determined if it's an internal app,
        // we will go ahead and populate the nativeLibraryPath.
        setNativeLibraryPaths(pkg);
    }
流程大致如下,這裡的 nativeLibraryRoot 其實就是我們上文提到過的 mLibDir,這樣就完成了我們的對應關系,我們要從 apk 中解壓出 so,然後拷貝到 mLibDir 下,這樣在 load 的時候才能去這裡找的到這個文件,這個值我們舉個簡單的例子方便理解,比如 com.test 的 app,這個 nativeLibraryRoot 的值基本可以理解成:/data/app-lib/com.test-1。
接下來的重點就是查看這個拷貝邏輯是如何實現的,代碼在 NativeLibraryHelper 中 copyNativeBinariesForSupportedAbi 的實現
public static int copyNativeBinariesForSupportedAbi(Handle handle, File libraryRoot,
            String[] abiList, boolean useIsaSubdir) throws IOException {
        createNativeLibrarySubdir(libraryRoot);

        /*
         * If this is an internal application or our nativeLibraryPath points to
         * the app-lib directory, unpack the libraries if necessary.
         */
        int abi = findSupportedAbi(handle, abiList);
        if (abi >= 0) {
            /*
             * If we have a matching instruction set, construct a subdir under the native
             * library root that corresponds to this instruction set.
             */
            final String instructionSet = VMRuntime.getInstructionSet(abiList[abi]);
            final File subDir;
            if (useIsaSubdir) {
                final File isaSubdir = new File(libraryRoot, instructionSet);
                createNativeLibrarySubdir(isaSubdir);
                subDir = isaSubdir;
            } else {
                subDir = libraryRoot;
            }

            int copyRet = copyNativeBinaries(handle, subDir, abiList[abi]);
            if (copyRet != PackageManager.INSTALL_SUCCEEDED) {
                return copyRet;
            }
        }

        return abi;
    }
函數 copyNativeBinariesForSupportedAbi,他的核心業務代碼都在 native 層,它主要做了如下的工作
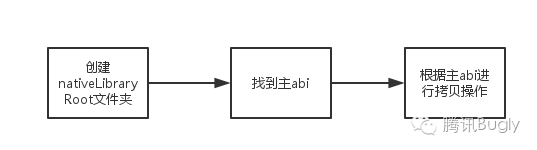
這個 nativeLibraryRootDir 上文在說到去哪找 so 的時候提到過了,其實是在這裡創建的,然後我們重點看看 findSupportedAbi 和 copyNativeBinaries 的邏輯。
findSupportedAbi 函數其實就是遍歷 apk(其實就是一個壓縮文件)中的所有文件,如果文件全路徑中包含 abilist 中的某個 abi 字符串,則記錄該 abi 字符串的索引,最終返回所有記錄索引中最靠前的,即排在 abilist 中最前面的索引。
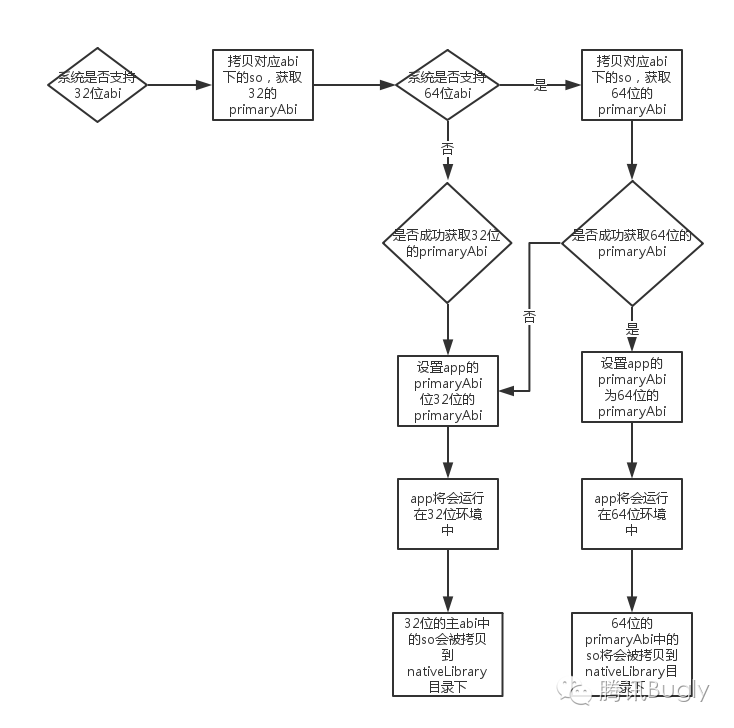
這裡的abi用來決定我們是32位還是64位,對於既有32位也有64位的情況,我們會采用64位,而對於僅有32位或者64位的話就認為他是對應的位數下,僅有32位就是32位,僅有64位就認為是64位的。
當前文確定好是用32位還是64位後,我們就會取出來對應的上文查找到的這個 abi 值,作為 primaryCpuAbi。
這個 primaryCpuAbi 的值是安裝的時候持久化在 pkg.applicationInfo 中的,所以一旦 abi 導致進程位數出錯或者 primaryCpuAbi 出錯,就可能會導致一直出錯,重啟也沒有辦法修復,需要我們用一些 hack 手段來進行修復。
NativeLibraryHelper 中的 findSupportedAbi 核心代碼主要如下,基本就是我們前文說的主要邏輯,遍歷 apk(其實就是一個壓縮文件)中的所有文件,如果文件全路徑中包含 abilist 中的某個 abi 字符串,則記錄該 abi 字符串的索引,最終返回所有記錄索引中最靠前的,即排在 abilist 中最前面的索引
NativeLibraryHelper.cpp
UniquePtrit(NativeLibrariesIterator::create(zipFile)); if (it.get() == NULL) { return INSTALL_FAILED_INVALID_APK; } ZipEntryRO entry = NULL; int status = NO_NATIVE_LIBRARIES; while ((entry = it->next()) != NULL) { // We're currently in the lib/ directory of the APK, so it does have some native // code. We should return INSTALL_FAILED_NO_MATCHING_ABIS if none of the // libraries match. if (status == NO_NATIVE_LIBRARIES) { status = INSTALL_FAILED_NO_MATCHING_ABIS; } const char* fileName = it->currentEntry(); const char* lastSlash = it->lastSlash(); // Check to see if this CPU ABI matches what we are looking for. const char* abiOffset = fileName + APK_LIB_LEN; const size_t abiSize = lastSlash - abiOffset; for (int i = 0; i < numAbis; i++) { const ScopedUtfChars* abi = supportedAbis[i]; if (abi->size() == abiSize && !strncmp(abiOffset, abi->c_str(), abiSize)) { // The entry that comes in first (i.e. with a lower index) has the higher priority. if (((i < status) && (status >= 0)) || (status < 0) ) { status = i; } } } }
舉個例子,加入我們的 app 中的 so 地址中有包含 arm64-v8a 的字符串,同時 abilist 是 arm64-v8a,armeabi-v7a,armeab,那麼這裡就會返回 arm64-v8a。這裡其實需要特別注意,返回的是第一個,這裡很可能會造成一些 so 位數不同,導致運行錯誤以及 so 找不到的情況。 具體我們還要結合 so 的 copy 來一起闡述。
主要的代碼邏輯也是在 NativeLibraryHelper.cpp 中的 iterateOverNativeFiles 函數中,核心代碼如下:
NativeLibraryHelper.cpp
if (cpuAbi.size() == cpuAbiRegionSize
                && *(cpuAbiOffset + cpuAbi.size()) == '/'
                && !strncmp(cpuAbiOffset, cpuAbi.c_str(), cpuAbiRegionSize)) {
            ALOGV("Using primary ABI %s\n", cpuAbi.c_str());
            hasPrimaryAbi = true;
        } else if (cpuAbi2.size() == cpuAbiRegionSize
                && *(cpuAbiOffset + cpuAbi2.size()) == '/'
                && !strncmp(cpuAbiOffset, cpuAbi2.c_str(), cpuAbiRegionSize)) {
            /*
             * If this library matches both the primary and secondary ABIs,
             * only use the primary ABI.
             */
            if (hasPrimaryAbi) {
                ALOGV("Already saw primary ABI, skipping secondary ABI %s\n", cpuAbi2.c_str());
                continue;
            } else {
                ALOGV("Using secondary ABI %s\n", cpuAbi2.c_str());
            }
        } else {
            ALOGV("abi didn't match anything: %s (end at %zd)\n", cpuAbiOffset, cpuAbiRegionSize);
            continue;
        }
        // If this is a .so file, check to see if we need to copy it.
        if ((!strncmp(fileName + fileNameLen - LIB_SUFFIX_LEN, LIB_SUFFIX, LIB_SUFFIX_LEN)
                    && !strncmp(lastSlash, LIB_PREFIX, LIB_PREFIX_LEN)
                    && isFilenameSafe(lastSlash + 1))
                || !strncmp(lastSlash + 1, GDBSERVER, GDBSERVER_LEN)) {
            install_status_t ret = callFunc(env, callArg, &zipFile, entry, lastSlash + 1);
            if (ret != INSTALL_SUCCEEDED) {
                ALOGV("Failure for entry %s", lastSlash + 1);
                return ret;
            }
        }
    }
主要的策略就是,遍歷 apk 中文件,當遍歷到有主 Abi 目錄的 so 時,拷貝並設置標記 hasPrimaryAbi 為真,以後遍歷則只拷貝主 Abi 目錄下的 so。這個主 Abi 就是我們前面 findSupportedAbi 的時候找到的那個 abi 的值,大家可以去回顧下。
當標記為假的時候,如果遍歷的 so 的 entry 名包含其他abi字符串,則拷貝該 so,拷貝 so 到我們上文說到 mLibDir 這個目錄下。
這裡有一個很重要的策略是:ZipFileRO 的遍歷順序,他是根據文件對應 ZipFileR0 中的 hash 值而定,而對於已經 hasPrimaryAbi 的情況下,非 PrimaryAbi 是直接跳過 copy 操作的,所以這裡可能會出現很多拷貝 so 失敗的情況。
舉個例子:假設存在這樣的 apk, lib 目錄下存在 armeabi/libx.so , armeabi/liby.so , armeabi-v7a/libx.so 這三個 so 文件,且 hash 的順序為 armeabi-v7a/libx.so 在 armeabi/liby.so 之前,則 apk 安裝的時候 liby.so 根本不會被拷貝,因為按照拷貝策略, armeabi-v7a/libx.so 會優先遍歷到,由於它是主 abi 目錄的 so 文件,所以標記被設置了,當遍歷到 armeabi/liby.so 時,由於標記被設置為真, liby.so 的拷貝就被忽略了,從而在加載 liby.so 的時候會報異常。
Android 在5.0以後其實已經支持64位了,而對於很多時候大家在運行so的時候也會遇到這樣的錯誤:dlopen failed: “xx.so” is 32-bit instead of 64-bit,這種情況其實是因為進程由 64zygote 進程 fork 出來,在64位的進程上必須要64位的動態鏈接庫。
Art 上支持64位程序的主要策略就是區分了 zygote32 和 zygote64,對於32位的程序通過 zygote32 去 fork 而64位的自然是通過 zygote64去 fork。相關代碼主要在 ActivityManagerService 中:
ActivityManagerService.java
   Process.ProcessStartResult startResult = Process.start(entryPoint,
                    app.processName, uid, uid, gids, debugFlags, mountExternal,
                    app.info.targetSdkVersion, app.info.seinfo, requiredAbi, instructionSet,
                    app.info.dataDir, entryPointArgs);
Process.java
return zygoteSendArgsAndGetResult(openZygoteSocketIfNeeded(abi), argsForZygote);
從代碼可以看出,startProcessLocked 方法實現啟動應用,再通過 Process 中的 startViaZygote 方法,這個方法最終是向相應的 zygote 進程發出 fork 的請求 zygoteSendArgsAndGetResult(openZygoteSocketIfNeeded(abi), argsForZygote);
其中 openZygoteSocketIfNeeded(abi) 會根據 abi 的類型,選擇不同的 zygote 的 socket 監聽的端口,在之前的 init 文件中可以看到,而這個 abi 就是我們上文一直在提到的 primaryAbi。
所以當你的 app 中有64位的 abi,那麼就必須所有的 so 文件都有64位的,不能出現一部分64位的一部分32位的,當你的 app 發現 primaryAbi 是64位的時候,他就會通過 zygote64 fork 在64位下,那麼其他的32位 so 在 dlopen 的時候就會失敗報錯。
我們前面說的都是 so 是怎麼找的,哪裡找的,以及他又是如何拷貝到這裡來的,而我們前面的大圖的流程有一個很明顯的流程就是找到後判斷已經加載過了,就不用再加載了。那麼是系統是依據什麼來判斷這個so已經加載過了呢,我們要接著 System.java的doLoad 函數看起。
Runtime.java
  private String doLoad(String name, ClassLoader loader) {
        String ldLibraryPath = null;
        if (loader != null && loader instanceof BaseDexClassLoader) {
            ldLibraryPath = ((BaseDexClassLoader) loader).getLdLibraryPath();
        }
        // nativeLoad should be synchronized so there's only one LD_LIBRARY_PATH in use regardless
        // of how many ClassLoaders are in the system, but dalvik doesn't support synchronized
        // internal natives.
        synchronized (this) {
            return nativeLoad(name, loader, ldLibraryPath);
        }
    }
主要代碼在 nativeLoad 這裡做的,這裡再往下走是 native 方法了,於是我們要走到 java_lang_runtime.cc 中去看這個 nativeLoad 的實現
java_lang_runtime.cc
static jstring Runtime_nativeLoad(JNIEnv* env, jclass, jstring javaFilename, jobject javaLoader,
                                  jstring javaLdLibraryPathJstr) {
  ScopedUtfChars filename(env, javaFilename);
  if (filename.c_str() == nullptr) {
    return nullptr;
  }
  SetLdLibraryPath(env, javaLdLibraryPathJstr);
  std::string error_msg;
  {
    JavaVMExt* vm = Runtime::Current()->GetJavaVM();
    bool success = vm->LoadNativeLibrary(env, filename.c_str(), javaLoader, &error_msg);
    if (success) {
      return nullptr;
    }
  }
  // Don't let a pending exception from JNI_OnLoad cause a CheckJNI issue with NewStringUTF.
  env->ExceptionClear();
  return env->NewStringUTF(error_msg.c_str());
}
然後我們發現核心在 JavaVMExt 中的 LoadNativeLibrary 函數實現的,於是我們又去了解這個函數。
java_vm_ext.cc
bool JavaVMExt::LoadNativeLibrary(JNIEnv* env,
                                  const std::string& path,
                                  jobject class_loader,
                                  jstring library_path,
                                  std::string* error_msg) {
  error_msg->clear();
  // See if we've already loaded this library.  If we have, and the class loader
  // matches, return successfully without doing anything.
  // TODO: for better results we should canonicalize the pathname (or even compare
  // inodes). This implementation is fine if everybody is using System.loadLibrary.
  SharedLibrary* library;
  Thread* self = Thread::Current();
  {
    // TODO: move the locking (and more of this logic) into Libraries.
    MutexLock mu(self, *Locks::jni_libraries_lock_);
    library = libraries_->Get(path);
  }
  void* class_loader_allocator = nullptr;
  {
    ScopedObjectAccess soa(env);
    // As the incoming class loader is reachable/alive during the call of this function,
    // it's okay to decode it without worrying about unexpectedly marking it alive.
    mirror::ClassLoader* loader = soa.Decode(class_loader);
    ClassLinker* class_linker = Runtime::Current()->GetClassLinker();
    if (class_linker->IsBootClassLoader(soa, loader)) {
      loader = nullptr;
      class_loader = nullptr;
    }
    class_loader_allocator = class_linker->GetAllocatorForClassLoader(loader);
    CHECK(class_loader_allocator != nullptr);
  }
其實查找規則和他的注釋說的基本一樣,發現 so 的 path 一樣,並且關聯的 ClassLoader 也是一致的那麼就認為這個 so 是已經加載過的什麼都不做,而這個 path 就是之前我們 findLibrary 中找到 so 的絕對路徑。
所以如果要動態替換 so 的話,在已經加載過 so 的情況下,有2個方式可以再不重啟的情況下就能做到 hotfix,要麼換 so 的 path,要麼就是改變 ClassLoader 對象,這個結論對我們後文的解決方案很有幫助。
那麼你說了這麼多,應該怎麼解決呢?
其實看了這麼多代碼,熟悉 hotpatch 的同學應該要說了,哎呀這個和 java 層的 patch 邏輯好像啊,只不過 java 層的 patch 是插入 dex 數組,咱們這個是插入到 nativeLibraryDirectory 數組中,通過這樣類似的方式就能動態 patch 修復這個問題了。
其實本質的原理和 java 層的 patch 是類似的,但是還有幾個點是需要注意的:
如果是 abi 導致拷貝不全的問題不一定需要 patch,可以自己解析一遍安裝的 apk 做一次完整拷貝,來插入到 nativeLibraryDirectory 的末尾,以此來保證 so 都能找到。
在拷貝 so 的時候要保證優先拷貝 primaryCpuAbi 的 so
解決拷貝時機問題,在某些機型上如果程序一起來就掛,你連拷貝的時機都沒有了
可以通過 patch 包來動態決定 primaryCpuAbi 的問題,解決一些 app 和 so 位數不一致的問題。patch 包解壓後的地址需要插入到 nativeLibraryDirectory 的數組首位,從而使得程序的位數和 so 的位數兼容。
組件剛剛開發完成,還在驗證階段,回頭再放出來,幫助大家解決動態庫加載遇到的各種問題,以後媽媽再也不用擔心了 UnsatisfiedLinkError 的錯誤了。
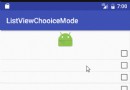 Android中ListView + CheckBox實現單選、多選效果
還是先來看看是不是你想要的效果:不廢話,直接上代碼,很簡單,代碼裡都有注釋1 單選public class SingleActivity extends AppCompa
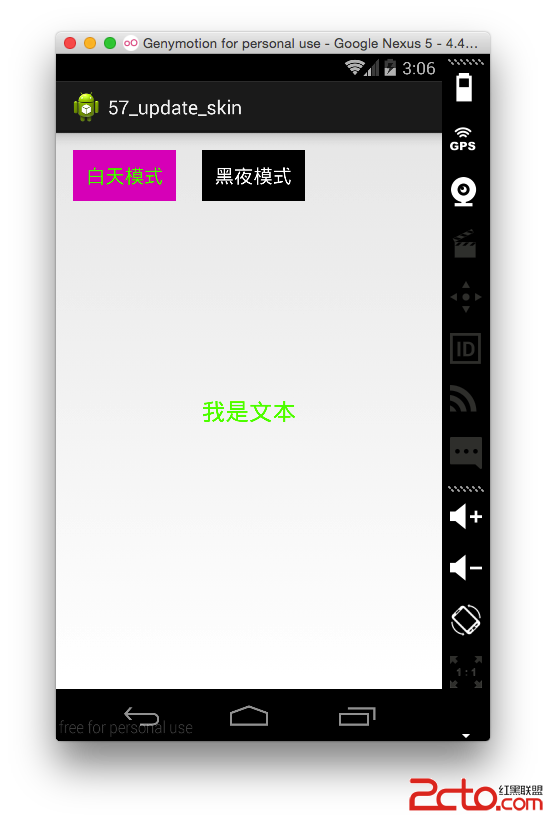 Android更換皮膚解決方案
Android更換皮膚解決方案 轉載請注明出處:IT_xiao小巫本篇博客要給大家分享的一個關於Android應用換膚的Demo,大家可以到我的github去下載demo
 android如果用ListView做一個表格形式
效果圖: 這樣來寫: @Override protected void onCreate(Bundle savedInstanceSta
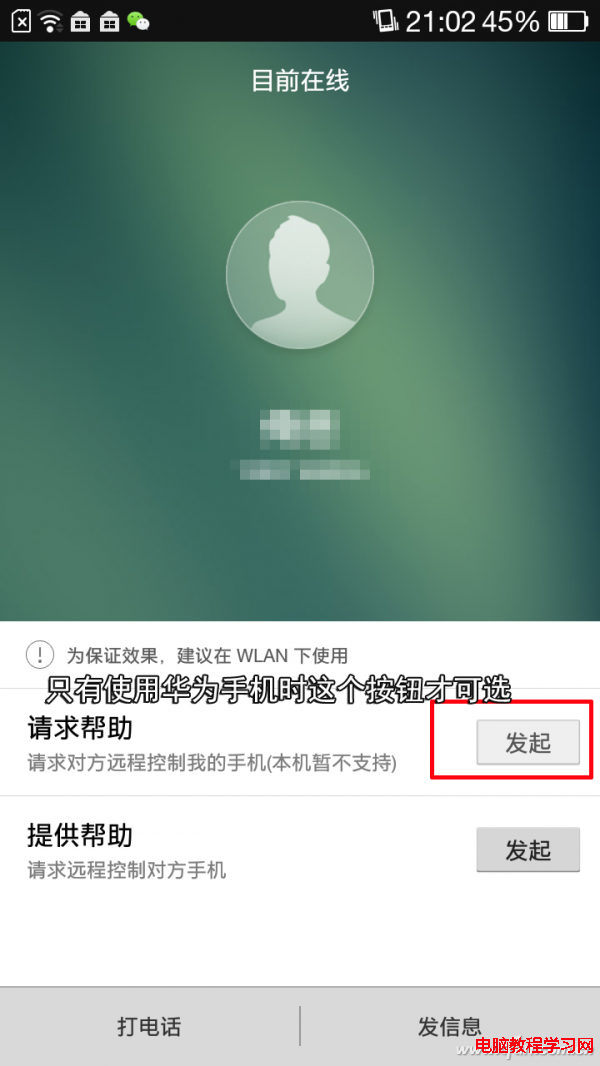 機器冰冷 仍有溫情 遠程協助玩轉Android手機
很多年齡較大的長輩和呆萌的MM們在操作Android手機的過程中總會遭遇“卡殼”問題,比如XX軟件不會設置、XX功能無法開啟等。那麼