編輯:關於Android編程
畫三角形是open GL ES中最簡單的入門項目,下面講解具體的流程,方便自己總結工具類,沒有別的意思。
為了使用OpenGL ES 2.0 API,需要添加如下聲明:
創建GLSurfaceViewGLSurfaceView是用來放置圖形view的容器。所有的東西都是繪制在GLSurfaceView上面的,就相當於畫布的概念,
這裡先實現一個GLSurfaceView。擴展自GLSurfaceView,實現自己的MyGLSurfaceView
    public class MyGLSurfaceView extends GLSurfaceView {

        private Context mContext;

        public MyGLSurfaceView(Context context) {
            super(context);
        }

        public MyGLSurfaceView(Context context, AttributeSet attrs) {
            super(context, attrs);
        }
    }
創建RenderRenderer類(渲染器類),即 GLSurfaceView.Renderer的實現類,它控制了與它相關聯的 GLSurfaceView 上繪制什麼。
需要實現一下接口:
 @Override
    public void onSurfaceCreated(GL10 gl, EGLConfig config) {

    }

    @Override
    public void onSurfaceChanged(GL10 gl, int width, int height) {

    }

    @Override
    public void onDrawFrame(GL10 gl) {

    }
onSurfaceCreated()函數在surface創建的時候調用,所以初始化的工作在裡面完成。 onSurfaceChanged()函數在surface發生改變的時候調用; onDrawFrame()函數是完成surfaceview上面顯示內容的繪制,每一幀的繪制都會去調用。
基礎參數設置
    //給shader中的變量傳參數時候用到的
    private final int mStrideBytes = 7 * 4;    //3 + 4   3表示坐標, 4表示顏色  一共7個float變量,每個變量4字節//一次性讀取 7 x 4個字節
    private final int mPositionOffset = 0;   //頂點坐標的偏移量
    private final int mPositionDataSize = 3;   //3個為一組,表示一個頂點坐標
    private final int mColorOffset = 3;    //顏色數據的變異量為3, 也就是每次讀取數據,從第三個開始是表示顏色的
    private final int mColorDataSize = 4;   //4個數據都是表示顏色的
mStrideBytes是指定buffer在讀取數據的時候一次讀取多少,7表示個數,7個數據, 4表示字節,7*4表示一次讀取多少字節的數據。

比如:
 -0.5f, -0.25f, 0.0f,    //point
1.0f, 0.0f, 0.0f, 1.0f, //color
mPositionOffset表示頂點坐標的偏移量 mPositionDataSize表示頂底每個頂點坐標用多少個數據表示,三個:-0.5f, -0.25f, 0.0f, //point mColorOffset讀取顏色數據時的偏移量,因為頂點坐標用3個數據表示,所以偏移量為3 mColorDataSize表示多少個數據表示一個顏色,4個參數分別為ARGB
頂點坐標和顏色坐標
//數據
    private final float vertexData[] = {
            // X, Y, Z,
            // R, G, B, A
            -0.5f, -0.25f, 0.0f,    //point
            1.0f, 0.0f, 0.0f, 1.0f, //color

            0.5f, -0.25f, 0.0f,     //point
            0.0f, 0.0f, 1.0f, 1.0f, //color

            0.0f, 0.559016994f, 0.0f,//point
            0.0f, 1.0f, 0.0f, 1.0f     //color
    };
可以看到,每組數據有7個,前面3個表示位置坐標,後面4個表示顏色值,可以結合前面的參數設置來理解。

這個數據是程序傳入openGL的數據。
創建Buffer存放數據
    //數據的buffer
    private FloatBuffer mShaderDateBuffer;
    private FloatBuffer getVertexBuffer(float[] data) {
        //先 創建內存地址
        ByteBuffer vbb = ByteBuffer.allocateDirect(data.length * 4);   //每個float是4個字節
        //ByteOrder.nativeOrder()返回本地jvm運行的硬件的字節順序.使用和硬件一致的字節順序可能使buffer更加有效.
        vbb.order(ByteOrder.nativeOrder());
        FloatBuffer vertexBuffer = vbb.asFloatBuffer();
        vertexBuffer.put(data);
        vertexBuffer.position(0);

        return vertexBuffer;
    }
上面代碼中的注釋已經很清楚了,裡面的代碼大多數是固定的寫法。
Matrix的設置openGL 中有三個類型份額舉證,分別是:
* Model Matrix 模型矩陣
* View Matrix 視圖矩陣
* Projection Matrix 投影矩陣
由於這幾個概念很繞,是個人都要糊弄一會兒才能搞清楚,下面就這幾個矩陣,好好的糊弄糊弄。
所謂的坐標變換,就是將一個坐標系下的坐標,在另外一個坐標系中表示出來。
下圖中世界坐標系下的相機:

這個東西就是將坐標從世界坐標轉換到相機坐標的矩陣,那世界坐標的原點為例(0,0,0,1), 有

在opengl中,數據從用戶構建的局部坐標系,經過一系列的處理,最終渲染在屏幕上面,主要經過了一下過程:


Open gl中只定義了裁剪坐標系、規范化設備坐標系以及屏幕坐標系,而局部坐標系、世界坐標系和相機坐標系是為了

方便用戶的,用戶在OpenGL中的轉換如下:


從坐標來看,就是一下過程


下圖中茶壺在Model Matrix中的定義


世界坐標系下的茶壺:


從世界坐標系到相機坐標系

為什麼要將世界坐標系轉化到相機坐標系,我們最終看到的就是相機拍到的,而不是上帝視角下看到的一切(純屬個人理解,不喜勿噴)。

從相機坐標系到裁剪坐標系,通過投影完成的。分為正交投影和透視投影兩種。

最後讀下來還是感覺很暈,的確很暈。那這些東西和上面提到的三個矩陣有什麼關系呢?

基本上就是: Model Matrix是模型坐標系轉換到世界坐標系用,View Matrix就是視圖坐標系,用來轉換到相機坐標系用的,Projection Matrix轉化裁剪坐標系的。
ES中坐標系矩陣的計算計算模型矩陣,裡面調用了rotateM接口
    private float[] mModelMatrix = new float[16];       //模型矩陣
    private void initModelMatrix() {
        // Do a complete rotation every 10 seconds.
        long time = SystemClock.uptimeMillis() % 10000L;
        float angleInDegrees = (360.0f / 10000.0f) * ((int) time);

        // Draw the triangle facing straight on.
        // 模型矩陣設為單位矩陣
        Matrix.setIdentityM(mModelMatrix, 0);
        // angleInDegrees是旋轉的角度,(0.0f, 0.0f, 1.0f)是模型矩陣
        Matrix.rotateM(mModelMatrix, 0, angleInDegrees, 0.0f, 0.0f, 1.0f);
    }
計算ViewMatrix,需要設置相機的位置,相機觀察的方向,以及相機的觀察正向向量
    private float[] mViewMatrix = new float[16];   //視圖矩陣
    private void initViewMatrix() {
        //放置eye眼睛的位置
        final float eyeX = 0.0f;
        final float eyeY = 0.0f;
        final float eyeZ = 1.5f;

        //設置look方向
        // look也成為center, center到eye所形成的向量,稱為視線方向,與真正的視線看過去的方向相反
        final float lookX = 0.0f;
        final float lookY = 0.0f;
        final float lookZ = -5.0f;

        //設置up坐標
        //eye的位置本身只代表一個坐標而已,但是 look向量和up向量結合右手螺旋准則才能唯一的確定一個坐標系
        //這個坐標系就是eye看到的坐標系,兩者垂直知識為了與常用的三位坐標系一樣
        final float upX = 0.0f;
        final float upY = 1.0f;
        final float upZ = 0.0f;

        //經過計算的到了 viewMatrix,
        Matrix.setLookAtM(mViewMatrix, 0, eyeX, eyeY, eyeZ, lookX, lookY, lookZ, upX, upY, upZ);

    }
投影矩陣,設置關於遠近 以及投影屏幕的大小等屬性。
    private float[] mProjectionMatrix = new float[16];   //投射矩陣
    private void initProjectionMatrix(int width, int height) {
        // Set the OpenGL viewport to the same size as the surface.
        GLES20.glViewport(0, 0, width, height);
        // Create a new perspective projection matrix. The height will stay the same
        // while the width will vary as per aspect ratio.
        final float ratio = (float) width / height;
        final float left = -ratio;
        final float right = ratio;
        final float bottom = -1.0f;
        final float top = 1.0f;
        final float near = 1.0f;
        final float far = 10.0f;

        Matrix.frustumM(mProjectionMatrix, 0, left, right, bottom, top, near, far);
    }
Shader數據傳入使用工具類:
    public static int compileShader(final int shaderType, final String shaderSource) {
        // 創建shader句柄
        int shaderHandle = GLES20.glCreateShader(shaderType);
        if (shaderHandle != 0) {
            // Pass in the shader source.
            // 使用glShaderSource()分別將頂點著色程序的源代碼字符數組綁定到頂點著色器對象,將片段著色程序的源代碼字符數組綁定到片段著色器對象;
            // 綁定作用
            GLES20.glShaderSource(shaderHandle, shaderSource);

            // Compile the shader.
            // 編譯
            GLES20.glCompileShader(shaderHandle);

            // Get the compilation status.
            // 得到計算結果
            final int[] compileStatus = new int[1];
            GLES20.glGetShaderiv(shaderHandle, GLES20.GL_COMPILE_STATUS, compileStatus, 0);

            // If the compilation failed, delete the shader.
            // 結果審查
            if (compileStatus[0] == 0) {
                Log.e(TAG, "Error compiling shader: " + GLES20.glGetShaderInfoLog(shaderHandle));
                GLES20.glDeleteShader(shaderHandle);
                shaderHandle = 0;
            }
        }

        if (shaderHandle == 0) {
            throw new RuntimeException("Error creating shader.");
        }

        return shaderHandle;
    }
shaderType為兩種,一種是GLES20.GL_VERTEX_SHADER,一種是GLES20.GL_FRAGMENT_SHADER。最終返回的是shader的句柄,後面要用到這個句柄傳入參數,

計算。

鏈接程序

vertexShader
    uniform mat4 u_MVPMatrix;   //應用程序傳入的變換矩陣 ,MVP 是modle view projection的意思,通過這個來計算最終的坐標
    attribute vec4 a_Position;  //應用程序傳入的 頂點的坐標
    attribute vec4 a_Color;     //應用程序傳入的 頂點顏色的坐標

    varying vec4 v_Color;   //這個變量會傳到 fragment shader中處理

    void main() {
        v_Color = a_Color;
        gl_Position = u_MVPMatrix * a_Position;
    }
fragmentShader
    precision mediump float;   //精度

    varying vec4 v_Color;   //這個名字一定要和在 vertex shader中聲明的一樣

    void main() {
        gl_FragColor = v_Color;
    }
變量,這些變量是在shader中定義的,這裡的名稱和c語言中定義的名稱一致。通過這個個名稱獲取變量,傳入參數
private String[] mAttributes = {
            "u_MVPMatrix",
            "a_Position",
            "a_Color"
    };
    public static int createAndLinkProgram(final int vertexShaderHandle, final int fragmentShaderHandle, final String[] attributes) {
        // 創建程序句柄
        int programHandle = GLES20.glCreateProgram();

        if (programHandle != 0) {
            // Bind the vertex shader to the program.
            // 綁定shader到program
            GLES20.glAttachShader(programHandle, vertexShaderHandle);

            // Bind the fragment shader to the program.
            GLES20.glAttachShader(programHandle, fragmentShaderHandle);

            // Bind attributes
            // 綁定參數到program
            if (attributes != null) {
                final int size = attributes.length;
                for (int i = 0; i < size; i++) {
                    GLES20.glBindAttribLocation(programHandle, i, attributes[i]);
                }
            }

            // Link the two shaders together into a program.
            GLES20.glLinkProgram(programHandle);

            // Get the link status.
            final int[] linkStatus = new int[1];
            GLES20.glGetProgramiv(programHandle, GLES20.GL_LINK_STATUS, linkStatus, 0);

            // If the link failed, delete the program.
            if (linkStatus[0] == 0) {
                Log.e(TAG, "Error compiling program: " + GLES20.glGetProgramInfoLog(programHandle));
                GLES20.glDeleteProgram(programHandle);
                programHandle = 0;
            }
        }

        if (programHandle == 0) {
            throw new RuntimeException("Error creating program.");
        }

        return programHandle;
    }
最後一步,繪制圖形onSurfaceCreated函數主要是做初始化用的。
    @Override
    public void onSurfaceCreated(GL10 gl, EGLConfig config) {
        //清屏指令
        GLES20.glClearColor(0f, 0f, 0f, 0f);
        //初始化相機的位置
        initViewMatrix();

        initShader();
    }

    private void initShader() {
        int vertexShaderHandle = ShaderHelper.compileShader(GLES20.GL_VERTEX_SHADER, TextResourceReader.readTextFileFromResource(mContext, R.raw.vertex_shader));
        int fragmentShaderHandle = ShaderHelper.compileShader(GLES20.GL_FRAGMENT_SHADER, TextResourceReader.readTextFileFromResource(mContext, R.raw.fragment_shader));

        int programHandle = ShaderHelper.createAndLinkProgram(vertexShaderHandle, fragmentShaderHandle, mAttributes);

        //者三個變量是我們在glsl文件中定義的三個變量,現在鏈接程序之後把他們取出來用,是為了後面賦值
        mMVPMatrixHandle = GLES20.glGetUniformLocation(programHandle, "u_MVPMatrix");
        mPositionHandle = GLES20.glGetAttribLocation(programHandle, "a_Position");
        mColorHandle = GLES20.glGetAttribLocation(programHandle, "a_Color");

        GLES20.glUseProgram(programHandle);
    }
onSurfaceChanged()函數
    @Override
    public void onSurfaceChanged(GL10 gl, int width, int height) {
        initProjectionMatrix(width, height);
    }
onDrawFrame()繪制
    @Override
    public void onDrawFrame(GL10 gl) {

        GLES20.glClear(GLES20.GL_DEPTH_BUFFER_BIT | GLES20.GL_COLOR_BUFFER_BIT);
        initModelMatrix();
        drawFrame(mShaderDateBuffer);

    }
    private void drawFrame(final FloatBuffer frameBuffer) {
        //移動到 表示坐標的起始位置
        frameBuffer.position(mPositionOffset);
        //glVertexAttribPointer(positionSlot, 2, GL_FLOAT, GL_FALSE, stride, pCoords);
        /* 為頂點著色器位置信息賦值,
            1.positionSlot表示頂點著色器位置屬性(即,Position);就是在glsl文件中聲明的attribute變量
            2.表示每一個頂點信息由幾個值組成,這個值必須位1,2,3或4;
            3.GL_FLOAT表示頂點信息的數據類型;
            4.GL_FALSE表示不要將數據類型標准化(即fixed-point);
            5.stride表示數組中每個元素的長度;pCoords表示數組的首地址
        */
        GLES20.glVertexAttribPointer(mPositionHandle, mPositionDataSize, GLES20.GL_FLOAT, false,
                mStrideBytes, frameBuffer);
        //開啟頂點屬性數組
        GLES20.glEnableVertexAttribArray(mPositionHandle);

        //定位到color數據首地址
        frameBuffer.position(mColorOffset);
        GLES20.glVertexAttribPointer(mColorHandle, mColorDataSize, GLES20.GL_FLOAT, false,
                mStrideBytes, frameBuffer);
        //開啟頂點屬性數組
        GLES20.glEnableVertexAttribArray(mColorHandle);

        Matrix.multiplyMM(mMVPMatrix, 0, mViewMatrix, 0, mModelMatrix, 0);

        // This multiplies the modelview matrix by the projection matrix, and stores the result in the MVP matrix
        // (which now contains model * view * projection).
        Matrix.multiplyMM(mMVPMatrix, 0, mProjectionMatrix, 0, mMVPMatrix, 0);

        GLES20.glUniformMatrix4fv(mMVPMatrixHandle, 1, false, mMVPMatrix, 0);
        GLES20.glDrawArrays(GLES20.GL_TRIANGLES, 0, 3);

    }
GLES20.glVertexAttribPointer(mPositionHandle, mPositionDataSize, GLES20.GL_FLOAT, false,
                mStrideBytes, frameBuffer);
mPositionHandle是GLES20.glGetAttribLocation(programHandle, "a_Position");綁定的變量,mPositionDataSize表示position坐標的數據個數,

也就是多少個數據表示一個坐標,mStrideBytes表示每次讀取多少字節數據。

同樣地,GLES20.glVertexAttribPointer(mColorHandle, mColorDataSize, GLES20.GL_FLOAT, false,mStrideBytes, frameBuffer);

是傳入color數據。

Matrix.multiplyMM是計算MVP矩陣。
glDrawArrays參數詳解在OpenGl中所有的圖形都是通過分解成三角形的方式進行繪制。
繪制圖形通過GL10類中的glDrawArrays方法實現,
該方法原型:

glDrawArrays(int mode, int first,int count)
*參數1:有三種取值

1.GL_TRIANGLES:每三個頂之間繪制三角形,之間不連接

2.GL_TRIANGLE_FAN:以V0V1V2,V0V2V3,V0V3V4,……的形式繪制三角形

3.GL_TRIANGLE_STRIP:順序在每三個頂點之間均繪制三角形。這個方法可以保證從相同的方向上所有三角形均被繪制。以V0V1V2,V1V2V3,V2V3V4……的形式繪制三角形

*參數2:從數組緩存中的哪一位開始繪制,一般都定義為0

*參數3:頂點的數量
MainActivityMainActivity中增加opengl版本支持相關代碼。
    //GLSurfaceView
    private MyGLSurfaceView mGLSurfaceView;
    @Override
    protected void onCreate(Bundle savedInstanceState) {
        super.onCreate(savedInstanceState);
        initGL();
        final ActivityManager activityManager = (ActivityManager) getSystemService(Context.ACTIVITY_SERVICE);
        final ConfigurationInfo configurationInfo = activityManager.getDeviceConfigurationInfo();
        final boolean supportsEs2 = configurationInfo.reqGlEsVersion >= 0x20000;
        if (supportsEs2)
        {
            // Request an OpenGL ES 2.0 compatible context.
            mGLSurfaceView.setEGLContextClientVersion(2);
            // Set the renderer to our demo renderer, defined below.
            mGLSurfaceView.setRenderer(new MyRender(this));
        }
        else
        {
            // This is where you could create an OpenGL ES 1.x compatible
            // renderer if you wanted to support both ES 1 and ES 2.
            return;
        }
        setContentView(mGLSurfaceView);
    }
    //初始化 opengl相關
    private void initGL() {
        mGLSurfaceView = new MyGLSurfaceView(this);
    }
    //在下面的兩個方法中,必須有對  GLSurfaceView的處理,當Activity暫停時,在onPause中處理
    //同樣在onResume中有相應的恢復處理
    //下面是最長見的處理方法
    @Override
    protected void onPause() {
        super.onPause();
        mGLSurfaceView.onPause();
    }
    @Override
    protected void onResume() {
        super.onResume();
        mGLSurfaceView.onResume();
    }
總結畫一個三角形和寫一個Hello World一樣難!!!
Referencesopen GL空間坐標系的理解
 Android 5.0中CoordinatorLayout的使用技巧
CoordinatorLayout 實現了多種Material Design中提到的滾動效果。目前這個框架提供了幾種不用寫動畫代碼就能工作的方法,這些效果包括: *讓浮動
 ReactNative與Android中的屏幕適配
前言:從開始接觸rn到現在終於能寫出點東西了,的確得為自己好好地點個贊 ,不管咋樣,學習還是得繼續啊,廢話少說了,在rn中我們也需要對屏幕進行適配,但是rn中的適配貌似比
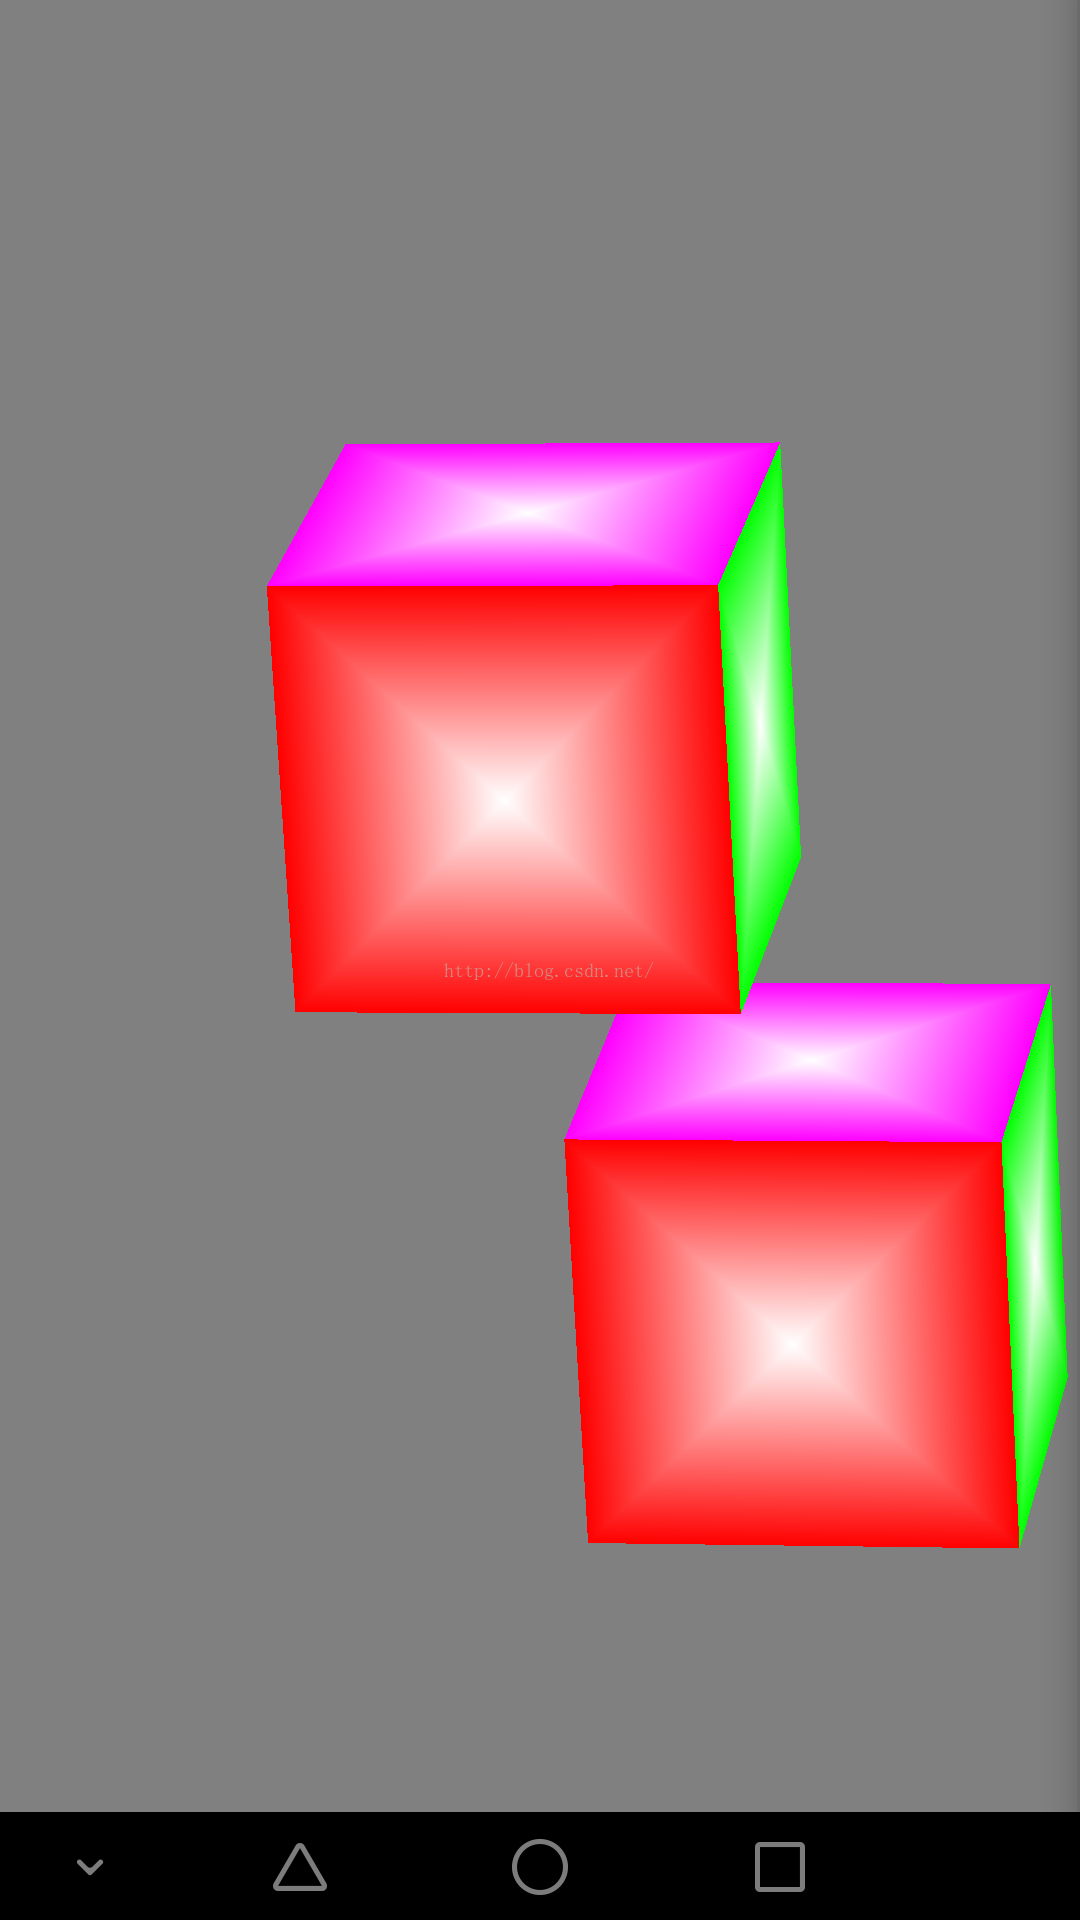 opengles繪制立方體
本人比較懶,不說廢話,直接貼代碼,代碼後附有完整項目package test.com.opengles5_3;import android.opengl.GLES20;i
 Android中WebView無法後退和js注入漏洞的解決方案
因重定向無法正常goBack()解決方案首先說下問題,初始頁面為A,點擊某個鏈接跳轉到B(http://xxx.com.cn/),B頁面重定向到C頁面(http://xx