編輯:關於Android編程
本文以實例講解了基於Android的可以調整透明度的圖片查看器實現方法,具體如下:
main.xml部分代碼如下:
<?xml version="1.0" encoding="utf-8"?>
<LinearLayout xmlns:android="http://schemas.android.com/apk/res/android"
  android:layout_width="fill_parent"
  android:layout_height="fill_parent"
  android:orientation="vertical" >

  <LinearLayout
    android:layout_width="match_parent"
    android:layout_height="wrap_content" >

    <Button
      android:id="@+id/button1"
      android:layout_width="wrap_content"
      android:layout_height="wrap_content"
      android:text="增大透明度" />

    <Button
      android:id="@+id/button2"
      android:layout_width="wrap_content"
      android:layout_height="wrap_content"
      android:text="減小透明度" />

    <Button
      android:id="@+id/button3"
      android:layout_width="wrap_content"
      android:layout_height="wrap_content"
      android:text="下一張" />
  </LinearLayout>
  <!-- 定義顯示整體圖片的ImageView -->

  <ImageView
    android:id="@+id/imageView1"
    android:layout_width="wrap_content"
    android:layout_height="wrap_content"
    android:background="#0000ff"
    android:scaleType="fitCenter"
    android:src="@drawable/shuangta" />
  <!-- 定義顯示局部圖片的ImageView -->

  <ImageView
    android:id="@+id/imageView2"
    android:layout_width="wrap_content"
    android:layout_height="wrap_content"
    android:layout_marginTop="10dp"
    android:background="#0000ff" />

</LinearLayout>
java部分代碼為:
package android.demo;

import android.app.Activity;
import android.graphics.Bitmap;
import android.graphics.BitmapFactory;
import android.graphics.drawable.BitmapDrawable;
import android.os.Bundle;
import android.view.MotionEvent;
import android.view.View;
import android.view.View.OnClickListener;
import android.view.View.OnTouchListener;
import android.widget.Button;
import android.widget.ImageView;

public class AndroidDemo5Activity extends Activity {
  // 定義一個訪問圖片的數組
  int[] images = new int[] { R.drawable.lijiang, R.drawable.qiao,
      R.drawable.shuangta, R.drawable.shui, R.drawable.xiangbi,
      R.drawable.ic_launcher, };
  // 定義當前顯示的圖片
  int currentImage = 2;
  // 定義圖片的初始透明度
  private int alpha = 255;

  @Override
  protected void onCreate(Bundle savedInstanceState) {
    // TODO Auto-generated method stub
    super.onCreate(savedInstanceState);
    setContentView(R.layout.main);
    final Button plusButton = (Button) findViewById(R.id.button1);
    final Button minuxButton = (Button) findViewById(R.id.button2);
    final Button nextButton = (Button) findViewById(R.id.button3);

    final ImageView imageview1 = (ImageView) findViewById(R.id.imageView1);
    final ImageView imageview2 = (ImageView) findViewById(R.id.imageView2);

    // 定義查看下一張圖片的時間監聽器
    nextButton.setOnClickListener(new OnClickListener() {

      @Override
      public void onClick(View v) {
        if (currentImage >= 5) {
          currentImage = -1;
        }
        BitmapDrawable bitmap = (BitmapDrawable) imageview1
            .getDrawable();
        // 如果圖片還沒有回收,先強制回收圖片
        if (!bitmap.getBitmap().isRecycled()) {
          bitmap.getBitmap().recycle();
        }
        // 改變ImageView的圖片
        imageview1.setImageBitmap(BitmapFactory.decodeResource(
            getResources(), images[++currentImage]));
      }
    });

    // 定義改變圖片透明度的方法
    OnClickListener listener = new OnClickListener() {

      @Override
      public void onClick(View v) {
        if (v == plusButton) {
          alpha += 20;
        }
        if (v == minuxButton) {
          alpha -= 20;
        }
        if (alpha > 255) {
          alpha = 255;
        }
        if (alpha <= 0) {
          alpha = 0;
        }
        // 改變圖片的透明度
        imageview1.setAlpha(alpha);

      }
    };

    // 為2個按鈕添加監聽器
    plusButton.setOnClickListener(listener);
    minuxButton.setOnClickListener(listener);
    imageview1.setOnTouchListener(new OnTouchListener() {

      @Override
      public boolean onTouch(View arg0, MotionEvent arg1) {
        // TODO Auto-generated method stub
        BitmapDrawable bitmapDeaw = (BitmapDrawable) imageview1
            .getDrawable();
        // 獲取第一個圖片顯示框中的位圖
        Bitmap bitmap = bitmapDeaw.getBitmap();
        double scale = bitmap.getWidth();
        // 或許需要顯示圖片的開始點
        int x = (int) (arg1.getX() * scale);
        int y = (int) (arg1.getY() * scale);
        if (x + 120 > bitmap.getWidth()) {
          x = bitmap.getWidth() - 120;
        }
        if (y + 120 > bitmap.getHeight()) {
          y = bitmap.getHeight() - 120;
        }

        // 顯示圖片的指定區域
        imageview2.setImageBitmap(Bitmap.createBitmap(bitmap, x, y,
            120, 120));
        imageview2.setAlpha(alpha);
        return false;
      }
    });
  }

}
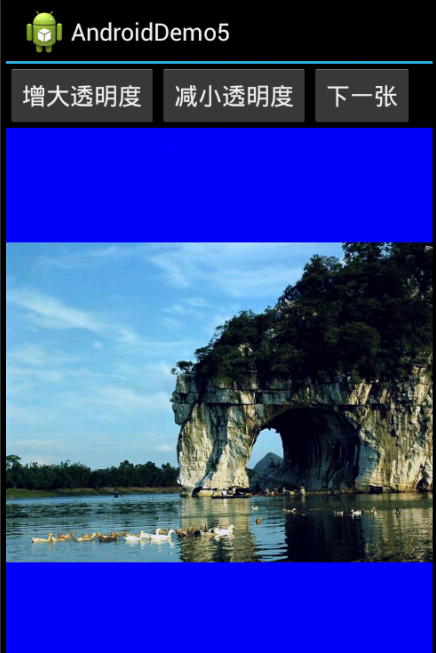
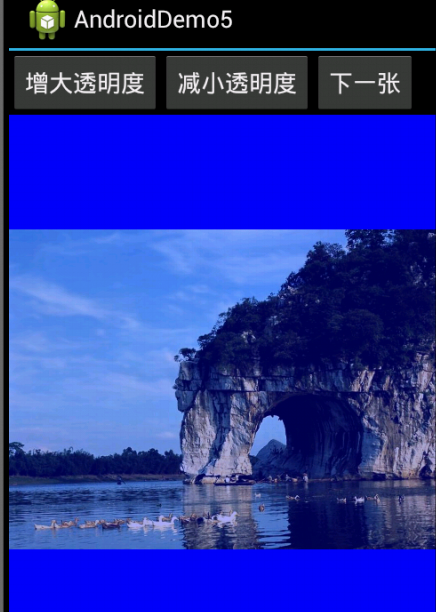
運行效果圖如下:
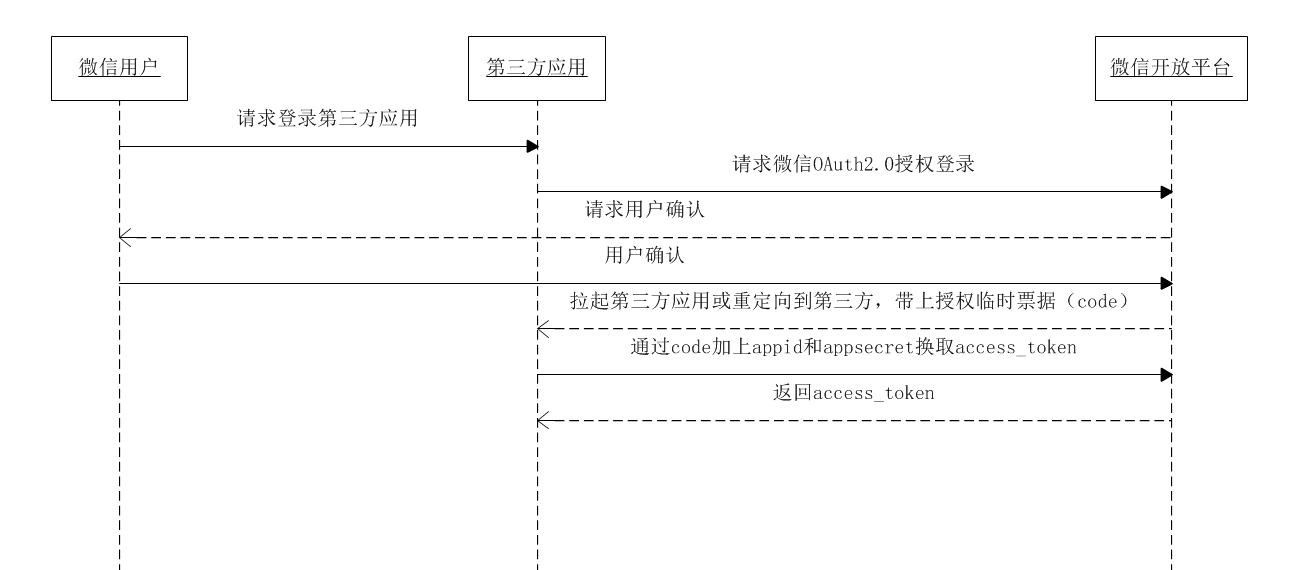 Android開發:微信授權登錄與微信分享完全解析
前言在移動互聯網浪潮中,聯網APP已經把單機拍死在沙灘上,很多公司都希望自家應用能夠有一套帳號系統,可是許多用戶卻並不一定買賬:我憑啥注冊你家應用的帳號?微博
 Android launcher 桌面抽屜切換動畫
版本:1.0日期:2014.11.10 2014.11.11版權:© 2014 kince 轉載注明出處一、概述 桌面抽屜之間的切換時Android用戶經
 Android Studio老是提示重啟ADB解決!
有時候你把手機接到電腦上調試時,Android Studio總是提示你重啟ADB,但是你點重啟後,立馬又跳出那個提示重啟的對話框。會再跳出提示對話框是因為你ADB重啟沒有
 Android編程布局控件之AbsoluteLayout用法實例分析
本文實例講述了Android編程布局控件之AbsoluteLayout用法。分享給大家供大家參考,具體如下:AbsoluteLayout是絕對布局管理器,指的是指定組件的