編輯:關於Android編程
本文在上一篇初步介紹TableLayout常用屬性的基礎上,將進一步介紹如何UI設計器設計TableLayout + TableRow。由於實際應用中,經常需要在代碼裡往TableLayout添加數據(9宮圖也可以用TableLayout做出來 ),本文就是介紹這方面的簡單使用方法。
main.xml的代碼如下,用到TableLayout的ID為TableLayout01:
<?xml version="1.0" encoding="utf-8"?>
<LinearLayout xmlns:android="http://schemas.android.com/apk/res/android"
  android:orientation="vertical"
  android:layout_width="fill_parent"
  android:layout_height="fill_parent"
  >
   <TableLayout
       android:id="@+id/TableLayout01"
       android:layout_width="fill_parent"
       android:layout_height="wrap_content">
   </TableLayout>
</LinearLayout>
JAVA代碼部分如下:
package com.LayoutDemo;
import com.LayoutDemo.R;
import android.app.Activity;
import android.os.Bundle;
import android.view.ViewGroup;
import android.widget.TableLayout;
import android.widget.TableRow;
import android.widget.TextView;
public class LayoutDemo extends Activity {
/** Called when the activity is first created. */
private final int WC = ViewGroup.LayoutParams.WRAP_CONTENT;
private final int FP = ViewGroup.LayoutParams.FILL_PARENT;
@Override
public void onCreate(Bundle savedInstanceState) {
super.onCreate(savedInstanceState);
setContentView(R.layout.main);
//新建TableLayout01的實例
TableLayout tableLayout = (TableLayout)findViewById(R.id.TableLayout01);
//全部列自動填充空白處
tableLayout.setStretchAllColumns(true);
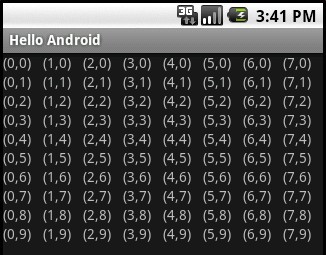
//生成10行,8列的表格
for(int row=0;row<10;row++)
{
TableRow tableRow=new TableRow(this);
for(int col=0;col<8;col++)
{
//tv用於顯示
TextView tv=new TextView(this);
tv.setText("("+col+","+row+")");
tableRow.addView(tv);
}
//新建的TableRow添加到TableLayout
tableLayout.addView(tableRow, new TableLayout.LayoutParams(FP, WC));
}
}
}
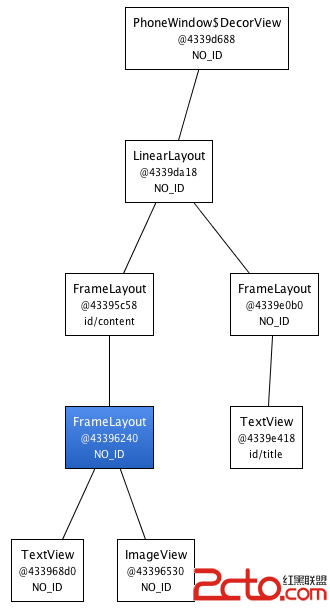
結果如下圖:
 Android基於ImageSwitcher實現圖片切換功能
左右切換圖片控件大家都用ViewPager, ViewFipper比較多吧,我之前也用ViewPager實現了,使用ViewPager實現左右循環滑動圖片,有興趣的可以去
 Android自定義控件之亂塗
隨著Android的不斷壯大,你想要的很多控件在github上基本都能找到,對於愛折騰的我來說,閒暇之余更喜歡自己倒騰,之前博客有提到想研究圖片這一塊,今天就來折騰一下編
 Android中編寫屬性動畫PropertyAnimation的進階實例
0、基礎回顧PropertyAnimation,屬性動畫,顧名思義就是利用對象的屬性變化形成動畫的效果。屬性動畫的類可以用Animator這個抽象類來表示,通常使用它的子
 Android實現Service獲取當前位置(GPS+基站)的方法
本文實例講述了Android實現Service獲取當前位置(GPS+基站)的方法。分享給大家供大家參考。具體如下:需求詳情:1)、Service中每隔1秒執行一次定位操作