編輯:關於Android編程
關鍵詞:藍牙blueZ A2DP、SINK、sink_connect、sink_disconnect、sink_suspend、sink_resume、sink_is_connected、sink_get_properties、AUDIO、DBUS
版本:基於android4.2之前版本 bluez
內核:linux/linux3.08
系統:android/android4.1.3.4
作者:xubin341719(歡迎轉載,請注明作者,請尊重版權謝謝)
歡迎指正錯誤,共同學習、共同進步!!
參考網站:
http://blog.csdn.net/u011960402/article/details/17216563
http://www.cnblogs.com/fityme/archive/2013/04/13/3019471.html socket相關
http://hi.baidu.com/wwwkljoel/item/a35e5745d14e02e6bcf45170 setsockopt
一、藍牙掃描常用的方法:
藍牙掃描的可以通過兩種途徑實現:命令行hciitool掃描;Android界面觸發,通過JNI、DUBS下發命令。
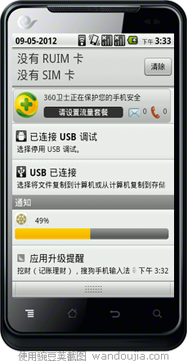
1、 命令行hciitool掃描(這部分通過Linux命令操作,跟android沒有關系)
通過bluez的tool發送掃描命令,如:hcitoool scan
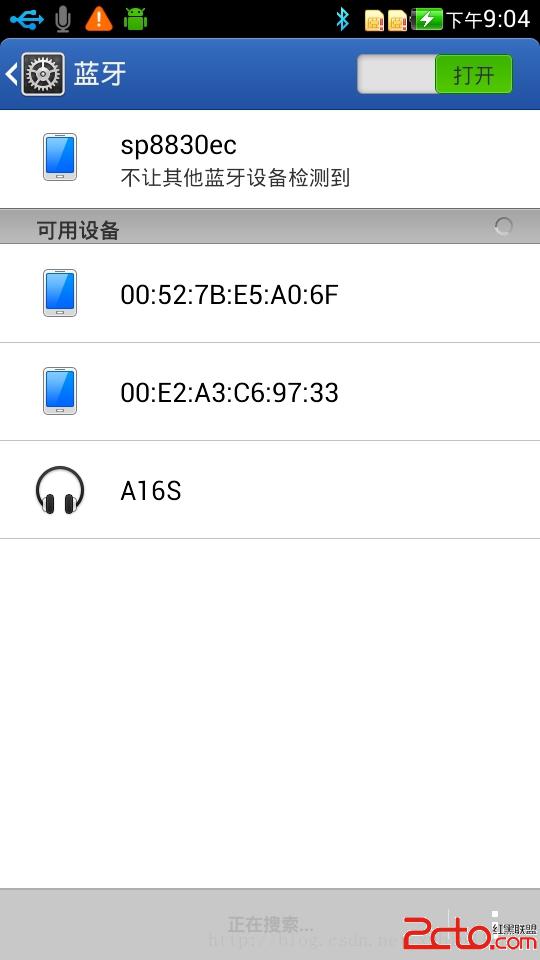
adb shell 下#hcitool scan掃描結果
Hcitool掃描邏輯如下所示: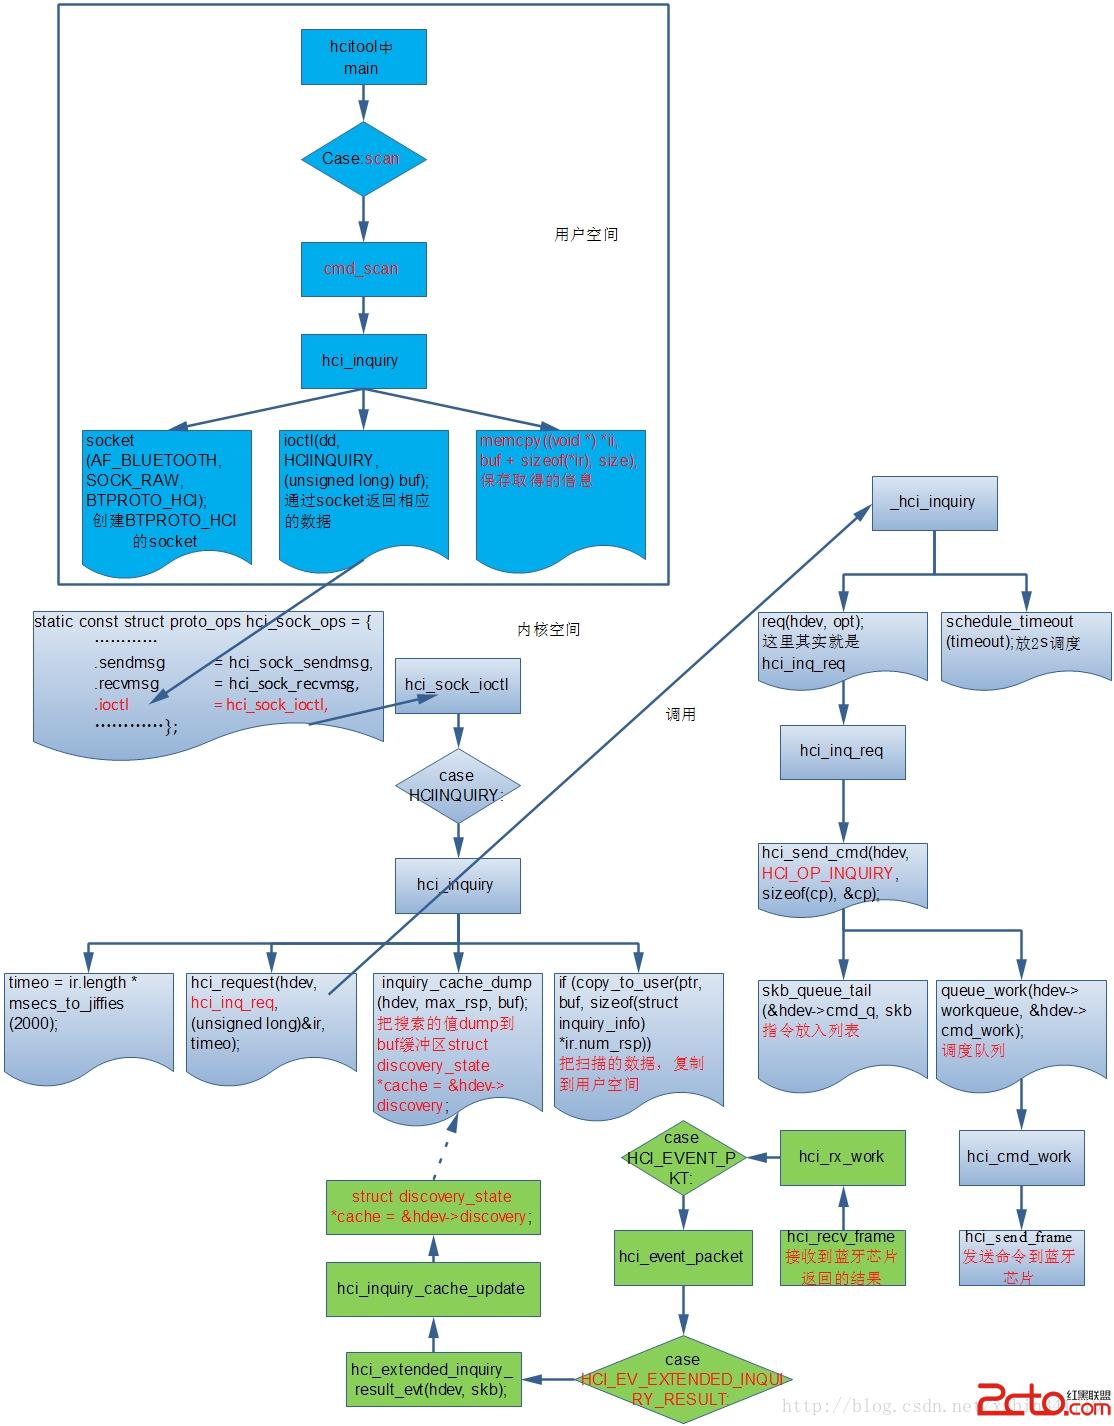
2、Android界面觸發,通過JNI、DUBS下發命令:通過android界面點擊搜索設備
應用掃描觸發邏輯流程:自上而下三種顏色,分別代表應用部分、JNI部分、linux blueZ部分。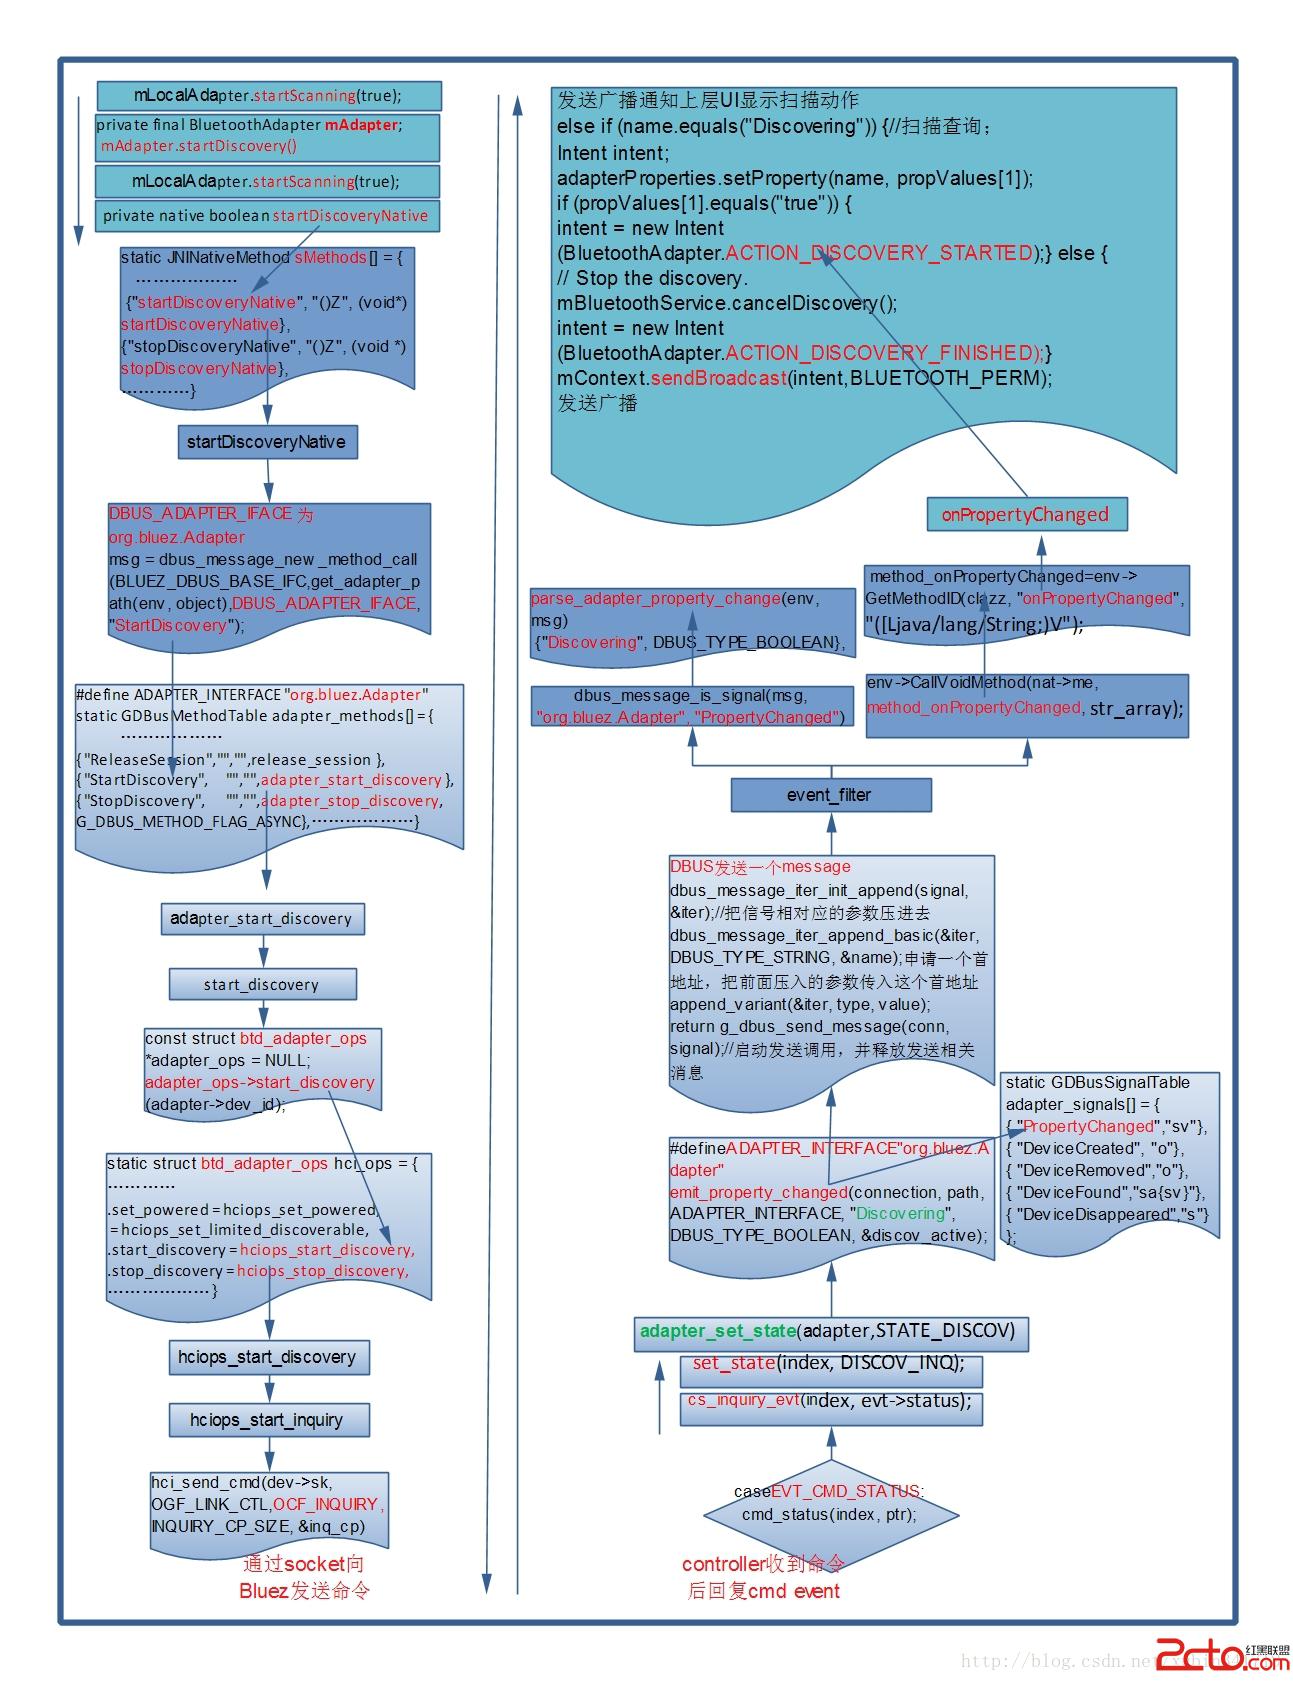 二、Hcitool觸發邏輯分析
1、hcitool這部分代碼比較簡單,實現函數
idh.code\external\bluetooth\bluez\tools\hcitool.c代碼大致流程如下:
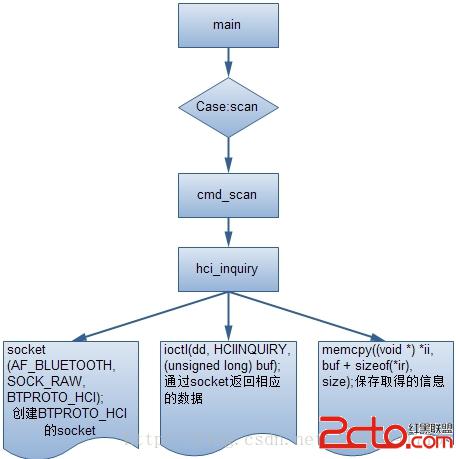
通過所帶的參數,找到cmd_scan,進入hci_inquriy。這個函數中創建一個BTPROTO_HCI的socket,通過ioctlHCINQUIRY向內核讀取數據,保存返回信息。
2、內核層邏輯:
當然IOCTL只是其中一項。
idh.code\kernel\net\bluetooth\ hci_sock.c
static const struct proto_ops hci_sock_ops = {
…………
	.ioctl		= hci_sock_ioctl,
	.poll		= datagram_poll,
	.listen		= sock_no_listen,
…………
};

它的流程就是構造查詢命令,放入命令隊列,調度隊列來發送命令,其中hci_send_frame後面會講解,這裡關鍵是命令的發送和數據的收集是分開的,所以它在裡面會放棄2s的調度,以此來等待數據的收集,收集的數據放在hdev->inq_cache裡面,我們來看看這個數據是如何取得的,如下圖所示:
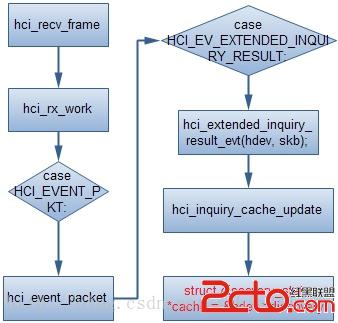
入口點hci_rx_wZ喎?/kf/ware/vc/" target="_blank" class="keylink">vcmvHsMPm0tG+rc/qz7i31s72uf3By6Os1eLA777NsrvLtcHLo6zL/MDvw+a74bj5vt2yu82stcTKwrz+wODQzdf2srvNrLXEtKbA7aOszaizo8fpv/bPwqOsyajD6La8yse0+NDFusXHv7bItcTJqMPoo6zL+dLU19+1xGhjaV9pbnF1aXJ5X3Jlc3VsdF93aXRoX3Jzc2lfZXZ0wrfP36Osu7nT0Mbky/y8uNbWyajD6Le9yr2jrLHIyOejukhDSV9FVl9JTlFVSVJZX1JFU1VMVKOsSENJX0VWX0VYVEVOREVEX0lOUVVJUllfUkVTVUxUtcijrLSmwO3C37yttryy7rK7tuC1xKOswO/D5rvhaGNpX2lucXVpcnlfY2FjaGVfdXBkYXRlwLSw0b3hufu3xbW9aGRldi0+ZGlzY292ZXJ5wbSx7cDvw+bIpaOsuam688PmtcSy6dGvo7uxyMjnx7DD5rX308O1xGlucXVpcnlfY2FjaGVfZHVtcLqvyv2+zb/J0tS009XiuPbBtLHtwO/D5rDRyv2+3cihs/bAtKOsyLu682NvcHm1vdPDu6ey46O7PGJyIC8+PHN0cm9uZz7I/aGiQW5kcm9pZL3nw+a0pbeio6zNqLn9Sk5JoaJEVUJTz8K3osP8we48YnIgLz48L3N0cm9uZz4J1fvM5cH3s8zI58/Cy/nKvqO6PGJyIC8+PGltZyBzcmM9"https://www.android5.online/Android/UploadFiles_5356/201702/2017022316441085.jpg" alt="\" />
(一)、應用部分:
1、 idh.code\packages\apps\Settings\src\com\android\settings\bluetooth\DeviceListPreferenceFragment.java
  @Override
    public boolean onPreferenceTreeClick(PreferenceScreen preferenceScreen,
        Preference preference) {
     	…………
        mLocalAdapter.startScanning(true);
        return true;
      }
2、 idh.code\packages\apps\Settings\src\com\android\settings\bluetooth\LocalBluetoothAdapter.java
 private final BluetoothAdapter mAdapter;
 void startScanning(boolean force) {
        // Only start if we're not already scanning
        if (!mAdapter.isDiscovering()) {
            if (!force) {
                // Don't scan more than frequently than SCAN_EXPIRATION_MS,
                // unless forced
                if (mLastScan + SCAN_EXPIRATION_MS > System.currentTimeMillis()) {
                    return;
                }
                // If we are playing music, don't scan unless forced.
                A2dpProfile a2dp = mProfileManager.getA2dpProfile();
                if (a2dp != null && a2dp.isA2dpPlaying()) {
                    return;
                }
            }
            if (mAdapter.startDiscovery()) {
                mLastScan = System.currentTimeMillis();
            }
        }
}
3、idh.code\frameworks\base\core\java\android\bluetooth\BluetoothAdapter.java
    public boolean startDiscovery() {
        if (getState() != STATE_ON) return false;
        try {
            return mService.startDiscovery();
        } catch (RemoteException e) {Log.e(TAG, "", e);}
        return false;
    }
4、JNI函數的調用idh.code\frameworks\base\core\java\android\server\BluetoothService.java
private native boolean startDiscoveryNative();//Native函數聲明
public class BluetoothService extends IBluetooth.Stub {
    private static final String TAG = "BluetoothService";
    private static final boolean DBG = true;
…………
public synchronized boolean startDiscovery() {
mContext.enforceCallingOrSelfPermission(BLUETOOTH_ADMIN_PERM,
        "Need BLUETOOTH_ADMIN permission");
        if (!isEnabledInternal()) return false;
        return startDiscoveryNative();
}
………………
}
(二)、JNI部分:
1、android_server_BluetoothService.cpp中JNI函數的對照表
idh.code\frameworks\base\core\jni\android_server_BluetoothService.cpp
static JNINativeMethod sMethods[] = {
     /* name, signature, funcPtr */
   ………………
    {"startDiscoveryNative", "()Z", (void*)startDiscoveryNative},
{"stopDiscoveryNative", "()Z", (void *)stopDiscoveryNative},
…………
}
2、對應Native函數的實現
這裡面有個知識點DBUS,這個後面我們單獨去講解
idh.code\frameworks\base\core\jni\android_server_BluetoothService.cpp
#define BLUEZ_DBUS_BASE_IFC       "org.bluez"
#define DBUS_ADAPTER_IFACE BLUEZ_DBUS_BASE_IFC ".Adapter"//其實DBUS_ADAPTER_IFACE 也就是 org.bluez.Adapter
static jboolean startDiscoveryNative(JNIEnv *env, jobject object) {

………………
    /* Compose the command */
    msg = dbus_message_new_method_call(BLUEZ_DBUS_BASE_IFC,
                                       get_adapter_path(env, object),
                                       DBUS_ADAPTER_IFACE, "StartDiscovery");
…………
}
Native函數startDiscoveryNative和字符串StartDiscovery對應。
(三)、DBUS部分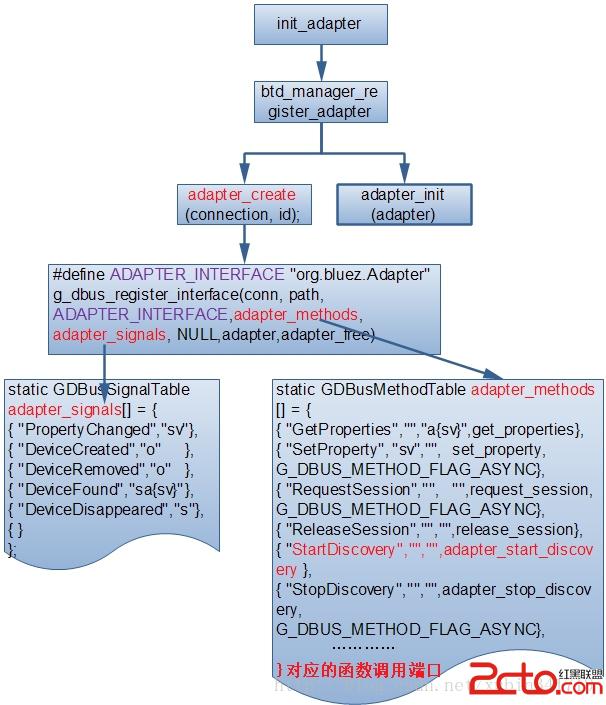
1、DBUS對應方法的實現,這裡跟JNI部分比較類似,也是用了函數結構體對應關系。
idh.code\external\bluetooth\bluez\src\adapter.c
#define ADAPTER_INTERFACE	"org.bluez.Adapter"
static GDBusMethodTable adapter_methods[] = {
………………
	{ "ReleaseSession",	"",	"",	release_session		},
	{ "StartDiscovery",	"",	"",	adapter_start_discovery },
	{ "StopDiscovery",	"",	"",	adapter_stop_discovery,
						G_DBUS_METHOD_FLAG_ASYNC},
………………
}
字符StartDiscovery又對應C中的實現函數adapter_start_discovery。
2、adapter_start_discovery的實現
idh.code\external\bluetooth\bluez\src\adapter.c
static DBusMessage *adapter_start_discovery(DBusConnection *conn,
						DBusMessage *msg, void *data)
{
…………
	err = start_discovery(adapter);
	if (err < 0 && err != -EINPROGRESS)
		return btd_error_failed(msg, strerror(-err));

done:
	req = create_session(adapter, conn, msg, 0,
				session_owner_exit);

	adapter->disc_sessions = g_slist_append(adapter->disc_sessions, req);

	return dbus_message_new_method_return(msg);
}
3、 start_discovery調用
idh.code\external\bluetooth\bluez\src\adapter.c
const struct btd_adapter_ops *adapter_ops = NULL;
static int start_discovery(struct btd_adapter *adapter)
{
…………
	pending_remote_name_cancel(adapter);
	return adapter_ops->start_discovery(adapter->dev_id);
}
adapter_ops對應結構體btd_adapter_ops中對應函數,如下:上面部分就對應到btd_adapter_ops中的hci_ops結構體。
4、btd_adapter_ops中的hci_ops結構體
idh.code\external\bluetooth\bluez\plugins\hciops.c
static struct btd_adapter_ops hci_ops = {
…………
	.set_powered = hciops_set_powered,
	.set_discoverable = hciops_set_discoverable,
	.set_pairable = hciops_set_pairable,
	.set_limited_discoverable = hciops_set_limited_discoverable,
	.start_discovery = hciops_start_discovery,
	.stop_discovery = hciops_stop_discovery,
	………………
	.create_bonding = hciops_create_bonding,
	.cancel_bonding = hciops_cancel_bonding,
	.read_local_oob_data = hciops_read_local_oob_data,
	.add_remote_oob_data = hciops_add_remote_oob_data,
	.remove_remote_oob_data = hciops_remove_remote_oob_data,
	.set_link_timeout = hciops_set_link_timeout,
	.retry_authentication = hciops_retry_authentication,
};
5、hciops_start_discovery函數的實現
idh.code\external\bluetooth\bluez\plugins\hciops.c
static int hciops_start_discovery(int index)
{
	int adapter_type = get_adapter_type(index);

	switch (adapter_type) {
	case BR_EDR_LE:
		return hciops_start_inquiry(index, LENGTH_BR_LE_INQ);
	case BR_EDR: //藍牙芯片為2.1+EDR的
		return hciops_start_inquiry(index, LENGTH_BR_INQ);
	case LE_ONLY:
		return hciops_start_scanning(index, TIMEOUT_LE_SCAN);
	default:
		return -EINVAL;
	}
}
6、hciops_start_inquiry
idh.code\external\bluetooth\bluez\plugins\hciops.c
static int hciops_start_inquiry(int index, uint8_t length)
{
	struct dev_info *dev = &devs[index];
	uint8_t lap[3] = { 0x33, 0x8b, 0x9e };
	inquiry_cp inq_cp;

	DBG("hci%d length %u", index, length);

	memset(&inq_cp, 0, sizeof(inq_cp));
	memcpy(&inq_cp.lap, lap, 3);
	inq_cp.length = length;
	inq_cp.num_rsp = 0x00;

	if (hci_send_cmd(dev->sk, OGF_LINK_CTL,
			OCF_INQUIRY, INQUIRY_CP_SIZE, &inq_cp) < 0)
		return -errno;

	return 0;
}
7、idh.code\external\bluetooth\bluez\lib\hci.c
/* HCI functions that require open device
 * dd - Device descriptor returned by hci_open_dev. */
dd = socket(AF_BLUETOOTH, SOCK_RAW, BTPROTO_HCI);
int hci_send_cmd(int dd, uint16_t ogf, uint16_t ocf, uint8_t plen, void *param)
{
………………
	if (plen) {
		iv[2].iov_base = param;
		iv[2].iov_len  = plen;
		ivn = 3;
	}

	while (writev(dd, iv, ivn) < 0) {//writev這裡把數據寫到socket裡面。
		if (errno == EAGAIN || errno == EINTR)
			continue;
		return -1;
	}
	return 0;
}
(四)、內核部分:
1、HCI FILTER的設置
HCIsocket的類型為BTPROTO_HCI。上層調用setsockopt的時候,觸發了內核的hci_sock_setsockopt函數的執行,在這裡面設置了socket的filter特性,包括包類型,包括事件類型;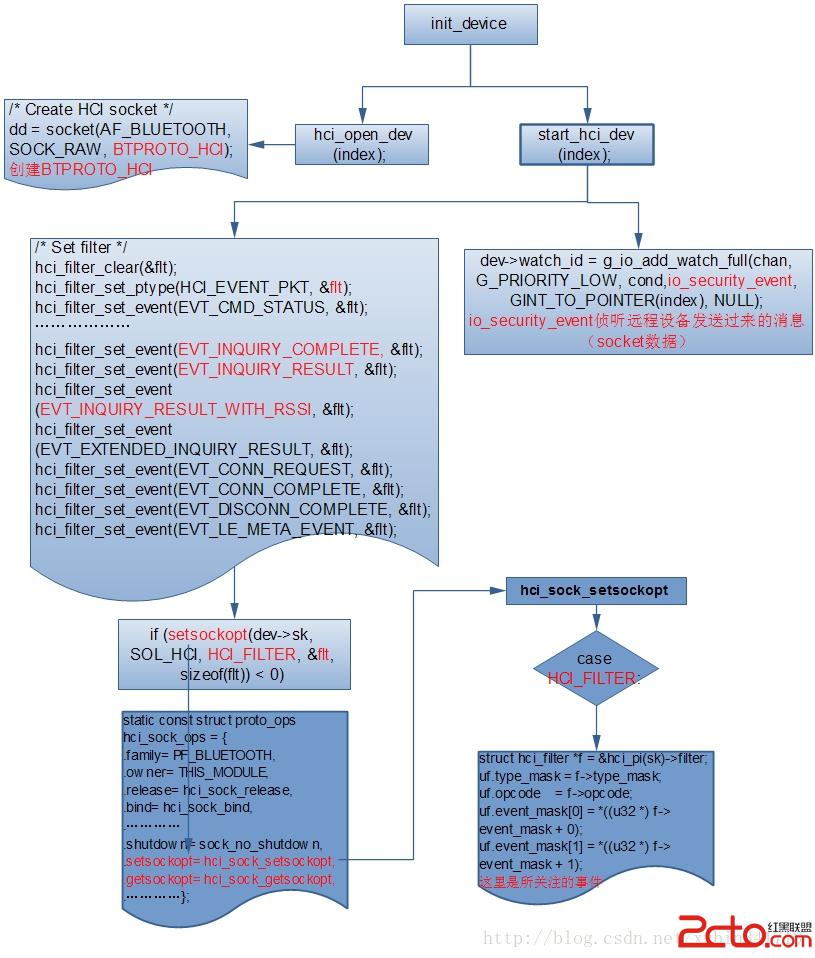
當上層調用setsockopt(sock, SOL_HCI, HCI_FILTER,&flt, sizeof(flt))時,觸發相應的內核路徑。
idh.code\kernel\net\bluetooth\hci_sock.c
static const struct proto_ops hci_sock_ops = {
	.family		= PF_BLUETOOTH,
	.owner		= THIS_MODULE,
…………
	.shutdown	= sock_no_shutdown,
	.setsockopt	= hci_sock_setsockopt,
	.getsockopt	= hci_sock_getsockopt,
	.connect	= sock_no_connect,
…………
};
idh.code\kernel\net\bluetooth\hci_sock.c
static int hci_sock_setsockopt(struct socket *sock, int level, int optname, char __user *optval, unsigned int len)
{
………………
	case HCI_FILTER:
		{
			struct hci_filter *f = &hci_pi(sk)->filter;

			uf.type_mask = f->type_mask;
			uf.opcode    = f->opcode;
			uf.event_mask[0] = *((u32 *) f->event_mask + 0);
			uf.event_mask[1] = *((u32 *) f->event_mask + 1);
		}
	………………
}
內核這部分就比較統一的數據,通過hci_send_cmd把命令發出去,HCI_FILTER這個地方的處理還沒理解,後面補充。
Writev函數通過socket把數據寫下去,經過VFS層,調用到內核空間的sendmsg函數。
(五)、EVENT返回狀態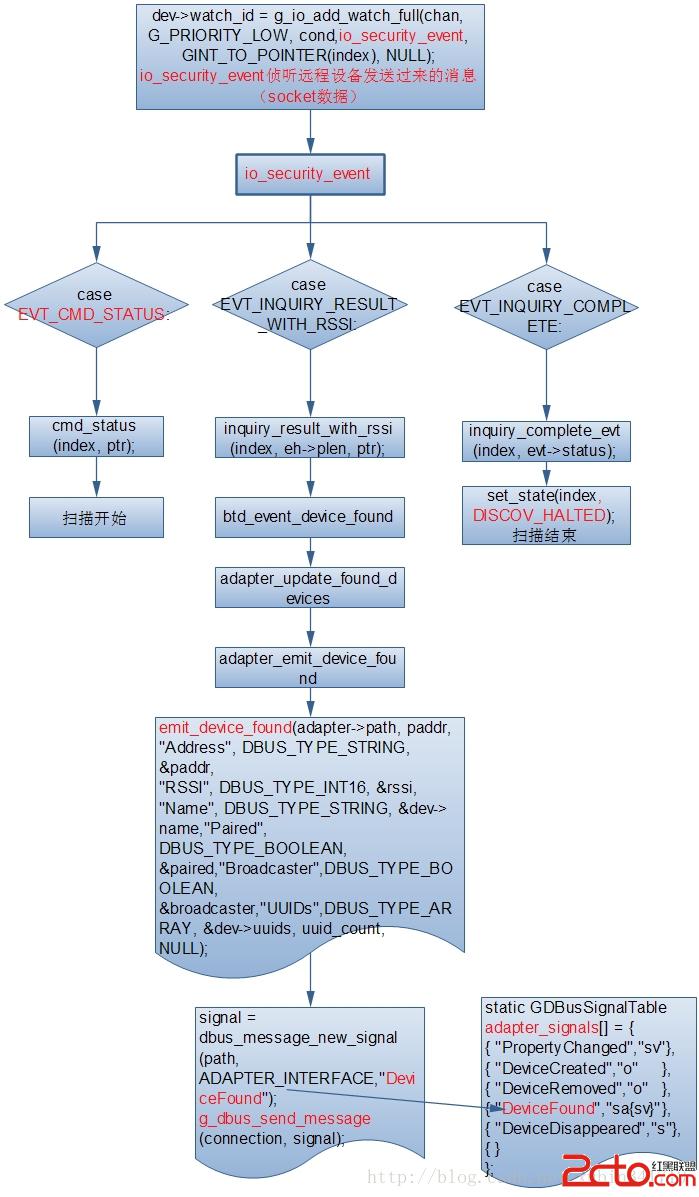
Controller收到查詢命令後,返回一個命令狀態
1、cmd_status
idh.code\external\bluetooth\bluez\plugins\hciops.c
	switch (eh->evt) {
	case EVT_CMD_STATUS:
		cmd_status(index, ptr);
		break;
static inline void cmd_status(int index, void *ptr)
{
	evt_cmd_status *evt = ptr;
	uint16_t opcode = btohs(evt->opcode);

	if (opcode == cmd_opcode_pack(OGF_LINK_CTL, OCF_INQUIRY))//如果是inquriy做特殊處理;
		cs_inquiry_evt(index, evt->status);
}
2、cs_inquiry_evt的實現 idh.code\external\bluetooth\bluez\plugins\hciops.c
static inline void cs_inquiry_evt(int index, uint8_t status)
{
	if (status) {//錯誤信息
		error("Inquiry Failed with status 0x%02x", status);
		return;
	}

	set_state(index, DISCOV_INQ);//設置狀態為INQ,向上層回復discoverying的property change
}
3、設置不同的DISCOV 狀態 idh.code\external\bluetooth\bluez\plugins\hciops.c
static void set_state(int index, int state)
{
	………………
	switch (dev->discov_state) {
	case DISCOV_HALTED://停止發現;
		if (adapter_get_state(adapter) == STATE_SUSPENDED)
			return;

		if (is_resolvname_enabled() &&
					adapter_has_discov_sessions(adapter))
			adapter_set_state(adapter, STATE_RESOLVNAME);
		else
			adapter_set_state(adapter, STATE_IDLE);
		break;
	case DISCOV_INQ:
	case DISCOV_SCAN://掃描發現;
		adapter_set_state(adapter, STATE_DISCOV);
		break;
	}
}
4、設置adapter的狀態 idh.code\external\bluetooth\bluez\src\adapter.c
idh.code\external\bluetooth\bluez\src\adapter.c
#define ADAPTER_INTERFACE	"org.bluez.Adapter"
void adapter_set_state(struct btd_adapter *adapter, int state)
{
…………
	case STATE_DISCOV:
		discov_active = TRUE;
//向上層回復discovering的property change
		emit_property_changed(connection, path,
					ADAPTER_INTERFACE, "Discovering",
					DBUS_TYPE_BOOLEAN, &discov_active);
		break;
…………
}
emit_property_changed發送PropertyChanged的消息,消息內容為Discovering。通知上層BluetoothEventLoop進行Discovering。
5、emit_property_changed發送Discovering消息的實現 idh.code\external\bluetooth\bluez\src\dbus-common.c
這部分涉及到DBUS內容
dbus_bool_t emit_property_changed(DBusConnection *conn,
					const char *path,
					const char *interface,
					const char *name,
					int type, void *value)
{
	DBusMessage *signal;
	DBusMessageIter iter;
	signal = dbus_message_new_signal(path, interface, "PropertyChanged"); // 創建消息對象並標識路徑
	if (!signal) {
		error("Unable to allocate new %s.PropertyChanged signal",
				interface);
		return FALSE;
	}
	dbus_message_iter_init_append(signal, &iter);//把信號相對應的參數壓進去
	dbus_message_iter_append_basic(&iter, DBUS_TYPE_STRING, &name);//申請一個首地址,把前面壓入的參數傳入這個首地址
append_variant(&iter, type, value);//
	return g_dbus_send_message(conn, signal);//啟動發送調用,並釋放發送相關消息信息
}
6、DBUS消息接收的實現 idh.code\frameworks\base\core\jni\android_server_BluetoothEventLoop.cpp
// Called by dbus during WaitForAndDispatchEventNative()
static DBusHandlerResult event_filter(DBusConnection *conn, DBusMessage *msg,
                                      void *data) {
…………
else if (dbus_message_is_signal(msg, "org.bluez.Adapter", "PropertyChanged")) {
        jobjectArray str_array = parse_adapter_property_change(env, msg);//(1)、對收到消息的解析
        if (str_array != NULL) {
            /* Check if bluetoothd has (re)started, if so update the path. */
            jstring property =(jstring) env->GetObjectArrayElement(str_array, 0);
            const char *c_property = env->GetStringUTFChars(property, NULL);
            if (!strncmp(c_property, "Powered", strlen("Powered"))) {
                jstring value =
                    (jstring) env->GetObjectArrayElement(str_array, 1);
                const char *c_value = env->GetStringUTFChars(value, NULL);
                if (!strncmp(c_value, "true", strlen("true")))
                    nat->adapter = get_adapter_path(nat->conn);
                env->ReleaseStringUTFChars(value, c_value);
            }
            env->ReleaseStringUTFChars(property, c_property);

            env->CallVoidMethod(nat->me,
                              method_onPropertyChanged,//(2)、
method_onPropertyChanged NATVIE函數的實現
                              str_array);
        } else LOG_AND_FREE_DBUS_ERROR_WITH_MSG(&err, msg);
        goto success;
}
(1)、對收到消息的解析 idh.code\frameworks\base\core\jni\android_bluetooth_common.cpp
jobjectArray parse_adapter_property_change(JNIEnv *env, DBusMessage *msg) {
    return parse_property_change(env, msg, (Properties *) &adapter_properties,
                    sizeof(adapter_properties) / sizeof(Properties));
}
針對org.bluez.Adapter不同的消息類型
idh.code\frameworks\base\core\jni\android_bluetooth_common.cpp
static Properties adapter_properties[] = {
    {"Address", DBUS_TYPE_STRING},
    {"Name", DBUS_TYPE_STRING},
    {"Class", DBUS_TYPE_UINT32},
    {"Powered", DBUS_TYPE_BOOLEAN},
    {"Discoverable", DBUS_TYPE_BOOLEAN},
    {"DiscoverableTimeout", DBUS_TYPE_UINT32},
    {"Pairable", DBUS_TYPE_BOOLEAN},
    {"PairableTimeout", DBUS_TYPE_UINT32},
    {"Discovering", DBUS_TYPE_BOOLEAN},
    {"Devices", DBUS_TYPE_ARRAY},
    {"UUIDs", DBUS_TYPE_ARRAY},
};
(2)、method_onPropertyChanged NATVIE函數的實現 idh.code\frameworks\base\core\jni\android_server_BluetoothEventLoop.cpp
static void classInitNative(JNIEnv* env, jclass clazz) {
    ALOGV("%s", __FUNCTION__);
#ifdef HAVE_BLUETOOTH
    method_onPropertyChanged = env->GetMethodID(clazz, "onPropertyChanged",
                                                "([Ljava/lang/String;)V");
method_onDevicePropertyChanged = env->GetMethodID(clazz,
 "onDevicePropertyChanged","(Ljava/lang/String;[Ljava/lang/String;)V");
…………
}
7、JNI調用onPropertyChanged對應JAVA的實現,在BluetoothEventLoop.java
idh.code\frameworks\base\core\java\android\server\BluetoothEventLoop.java中
   private static native void classInitNative();
/*package*/ void onPropertyChanged(String[] propValues) {
 ………………
        log("Property Changed: " + propValues[0] + " : " + propValues[1]);
        String name = propValues[0];
        if (name.equals("Name")) {//獲取藍牙名字;
   			…………
        } else if (name.equals("Pairable") || name.equals("Discoverable")) {//配對;
           ………………
        } else if (name.equals("Discovering")) {//掃描查詢;
            Intent intent;
            adapterProperties.setProperty(name, propValues[1]);
            if (propValues[1].equals("true")) {
                intent = new Intent(BluetoothAdapter.ACTION_DISCOVERY_STARTED);
            } else {
                // Stop the discovery.
                mBluetoothService.cancelDiscovery();
                intent = new Intent(BluetoothAdapter.ACTION_DISCOVERY_FINISHED);
            }
            mContext.sendBroadcast(intent, BLUETOOTH_PERM);
        } else if (name.equals("Devices") || name.equals("UUIDs")) {//Devices、UUID的獲取;
     	………………
        } else if (name.equals("Powered")) {//藍牙打開、關閉;
            mBluetoothState.sendMessage(BluetoothAdapterStateMachine.POWER_STATE_CHANGED,
                propValues[1].equals("true") ? new Boolean(true) : new Boolean(false));
        } else if (name.equals("DiscoverableTimeout")) {
            adapterProperties.setProperty(name, propValues[1]);
        }
} D BluetoothEventLoop: Property Changed: Powered : true D BluetoothEventLoop: Property Changed: Pairable : true D BluetoothEventLoop: Property Changed: Class : 5898764 D BluetoothEventLoop: Property Changed: Pairable : true D BluetoothEventLoop: Property Changed: Discoverable : false D BluetoothEventLoop: Property Changed: Discovering : true D BluetoothEventLoop: Property Changed: Discovering : false D BluetoothEventLoop: Property Changed: Devices : 1 D BluetoothEventLoop: Device property changed: 94:20:53:01:15:90 property: Connected value: true D BluetoothEventLoop: Device property changed: 94:20:53:01:15:90 property: Paired value: true D BluetoothEventLoop: Device property changed: 94:20:53:01:15:90 property: UUIDs value: 4
(2)、下面我們重點分析Discovering這部分:
idh.code\frameworks\base\core\java\android\server\BluetoothEventLoop.java
else if (name.equals("Discovering")) {
            Intent intent;
            adapterProperties.setProperty(name, propValues[1]);
            if (propValues[1].equals("true")) {//開始掃描
                intent = new Intent(BluetoothAdapter.ACTION_DISCOVERY_STARTED);//
            } else {
                // Stop the discovery. //停止掃描
                mBluetoothService.cancelDiscovery();
                intent = new Intent(BluetoothAdapter.ACTION_DISCOVERY_FINISHED);
            }
            mContext.sendBroadcast(intent, BLUETOOTH_PERM);
        }
這樣就可以通過broadcast發送ACTION_DISCOVERY_STARTED廣播,注冊的receiver來響應了。
8、ACTION_DISCOVERY_STARTED\ACTION_DISCOVERY_FINISHED的receiver分析
從代碼中我們可以看到這個action一共有兩個receiver,一個是靜態注冊的BluetoothDiscoveryReceiver,一個是動態注冊是ScanningStateChangedHandler。
(1)、BluetoothDiscoveryReceiver:這個receiver是在settings中的Androidmanifest中靜態注冊的。用途:主要用於獲取掃描開始和終止的時間。
idh.code\packages\apps\Settings\AndroidManifest.xml
1)、ACTION_DISCOVERY_STARTED、ACTION_DISCOVERY_FINISHED和AndroidManifest.xml文件的聯系
idh.code\frameworks\base\core\java\android\bluetooth\BluetoothAdapter.java
public final class BluetoothAdapter {
    private static final String TAG = "BluetoothAdapter";
private static final boolean DBG = false;
…………
    public static final String ACTION_DISCOVERY_STARTED =
            "android.bluetooth.adapter.action.DISCOVERY_STARTED";
    public static final String ACTION_DISCOVERY_FINISHED =
            "android.bluetooth.adapter.action.DISCOVERY_FINISHED";
…………
}
2)、BluetoothAdapter,藍牙適配器,直到我們建立bluetoothSocket連接之前,都要不斷操作它。
BluetoothAdapter中的動作常量
ACTION_DISCOVERY_FINISHED
已完成藍牙搜索
ACTION_DISCOVERY_STARTED
已經開始搜索藍牙設備
ACTION_LOCAL_NAME_CHANGED
更改藍牙的名字
ACTION_REQUEST_DISCOVERABLE
請求能夠被搜索
ACTION_REQUEST_ENABLE
請求啟動藍牙
ACTION_SCAN_MODE_CHANGED
掃描模式已經改變
ACTION_STATE_CHANGED
狀態已改變
ACTION_CONNECTION_STATE_CHANGED
3)、收到廣播後函數實現,開始掃描
Main log中顯示的log為DISCOVERY_STARTED
D BluetoothDiscoveryReceiver: Received:android.bluetooth.adapter.action.DISCOVERY_STARTED
HCI log 中: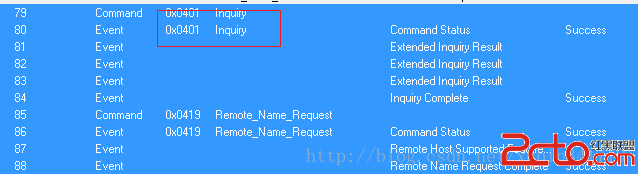
idh.code\packages\apps\Settings\src\com\android\settings\bluetooth\BluetoothDiscoveryReceiver.java這個文件中就一個函數,還是比簡單
public final class BluetoothDiscoveryReceiver extends BroadcastReceiver {
    private static final String TAG = "BluetoothDiscoveryReceiver";
    private static final boolean DEBUG = Debug.isDebug();

    @Override
    public void onReceive(Context context, Intent intent) {
        String action = intent.getAction();
        if (DEBUG) Log.d(TAG, "Received: " + action);

        if (action.equals(BluetoothAdapter.ACTION_DISCOVERY_STARTED) ||
                action.equals(BluetoothAdapter.ACTION_DISCOVERY_FINISHED)) {
//共享時間戳,掃描開始和結束的時間。
   LocalBluetoothPreferences.persistDiscoveringTimestamp(context);
        }
    }
}
ScanningStateChangedHandler的注冊及用途,要用於開始掃描,和掃描顯示界面的控制。
這個receiver是在idh.code\packages\apps\Settings\src\com\android\settings\bluetooth\BluetoothEventManager.java動態注冊的,如下:
BluetoothEventManager(LocalBluetoothAdapter adapter,
            CachedBluetoothDeviceManager deviceManager, Context context) {
mLocalAdapter = adapter;
…………
// Bluetooth on/off broadcasts
 addHandler(BluetoothAdapter.ACTION_STATE_CHANGED, new AdapterStateChangedHandler());

// Discovery broadcastsaddHandler(BluetoothAdapter.ACTION_DISCOVERY_STARTED, new ScanningStateChangedHandler(true));
        addHandler(BluetoothAdapter.ACTION_DISCOVERY_FINISHED, new ScanningStateChangedHandler(false));
…………
}
(1)、ScanningStateChangedHandler函數實現如下:idh.code\packages\apps\Settings\src\com\android\settings\bluetooth\BluetoothEventManager.java
 private class ScanningStateChangedHandler implements Handler {
        private final boolean mStarted;

        ScanningStateChangedHandler(boolean started) {
            mStarted = started;
        }
        public void onReceive(Context context, Intent intent,
                BluetoothDevice device) {
            synchronized (mCallbacks) {//1)、調用注冊的callback
中的onScanningStateChanged函數。
                for (BluetoothCallback callback : mCallbacks) {
                    callback.onScanningStateChanged(mStarted);
                }
            }
//2)、這個函數就是把上次掃描到設備、和之前的設備做相應處理;
            mDeviceManager.onScanningStateChanged(mStarted);
            LocalBluetoothPreferences.persistDiscoveringTimestamp(context);
        }
}
1)、調用注冊的callback中的callback.onScanningStateChanged(mStarted)函數。
idh.code\packages\apps\Settings\src\com\android\settings\bluetooth\DeviceListPreferenceFragment.java
    public void onScanningStateChanged(boolean started) {
        if (started == false) {//《1》、如果掃描結束;
            removeOutOfRangeDevices();
        }
        updateProgressUi(started);// 《2》、UI顯示小圓圈掃描;
}
《1》、如果掃描結束;removeOutOfRangeDevices();
idh.code\packages\apps\Settings\src\com\android\settings\bluetooth\DeviceListPreferenceFragment.java
private void removeOutOfRangeDevices() {
    Collection cachedDevices =
            mLocalManager.getCachedDeviceManager().getCachedDevicesCopy();
    for (CachedBluetoothDevice cachedDevice : cachedDevices) {
         if (cachedDevice.getBondState() == BluetoothDevice.BOND_NONE &&
             cachedDevice.isVisible() == false) {
             BluetoothDevicePreference preference = mDevicePreferenceMap.get(cachedDevice);
             if (preference != null) {
                 mDeviceListGroup.removePreference(preference);
             }
             mDevicePreferenceMap.remove(cachedDevice);
          }
     }
}
《2》、UI顯示小圓圈掃描,updateProgressUi(started);如下圖所示: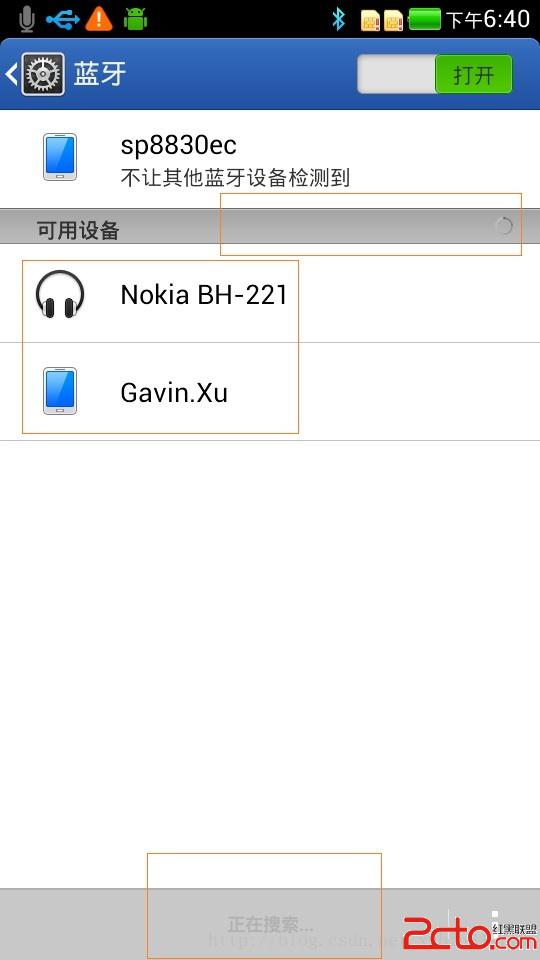
idh.code\packages\apps\Settings\src\com\android\settings\bluetooth\DeviceListPreferenceFragment.java
private void updateProgressUi(boolean start) {
    if (mDeviceListGroup instanceof ProgressCategory) {
        ((ProgressCategory) mDeviceListGroup).setProgress(start);
    }
}
2)、這部分的作用,開始掃描,不顯示列表中內容,或把之前列表中沒掃描到的設備清除
mDeviceManager.onScanningStateChanged(mStarted);
idh.code\packages\apps\Settings\src\com\android\settings\bluetooth\CachedBluetoothDevice.java
private void updateProgressUi(boolean start) {
    if (mDeviceListGroup instanceof ProgressCategory) {
        ((ProgressCategory) mDeviceListGroup).setProgress(start);
    }
}
2)、這部分的作用,開始掃描,不顯示列表中內容,或把之前列表中沒掃描到的設備清除
mDeviceManager.onScanningStateChanged(mStarted);
idh.code\packages\apps\Settings\src\com\android\settings\bluetooth\ CachedBluetoothDevice.java
    public synchronized void onScanningStateChanged(boolean started) {
        // If starting a new scan, clear old visibility
        // Iterate in reverse order since devices may be removed.
        //如果開始新的掃描,清除舊的能見設備,迭代反序因為有的設備可能被刪除
        for (int i = mCachedDevices.size() - 1; i >= 0; i--) {
            CachedBluetoothDevice cachedDevice = mCachedDevices.get(i);
            if (started) {//如果掃描開始就不顯示;
                cachedDevice.setVisible(false);
            } else {//對掃描的結果作出判斷,如果之前掃描過,這次沒有掃描到,就移除列表。
                if (cachedDevice.getBondState() == BluetoothDevice.BOND_NONE &&
                        cachedDevice.isVisible() == false) {
                    mCachedDevices.remove(cachedDevice);
                }
            }
        }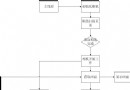
} android 實現自定義狀態欄通知(Status Notification)
在android項目的開發中,有時為了實現和用戶更好的交互,在通知欄這一小小的旮旯裡,我們通常需要將內容豐富起來,這個時候我們就需要去實現自定義的通知欄,例如下面360或
 Android網絡編程 HttpUrlConnection HttpClient AsyncTask
1,HttpUrlConnection一個UrlConnection常用來通過網絡發送和獲取數據,數據可以使任何類型任何長度,HttpUrlConnecti
 Android NDK開發的環境搭建與簡單示例
一、NDK與JNI簡介NDK全稱為native development kit本地語言(C&C++)開發包。而對應的是經常接觸的Android-SDK,(software
 Android基礎入門教程——2.4.8 ListView Item多布局的實現
Android基礎入門教程——2.4.8 ListView Item多布局的實現標簽(空格分隔): Android基礎入門教程本節引言: 本節是L