編輯:關於Android編程
在開發中UI布局是我們都會遇到的問題,隨著UI越來越多,布局的重復性、復雜度也會隨之增長。Android官方給了幾個優化的方法,但是網絡上的資料基本上都是對官方資料的翻譯,這些資料都特別的簡單,經常會出現問題而不知其所以然。這篇文章就是對這些問題的更詳細的說明,如果有什麼不對的也希望高人指出。
首先用得最多的應該是include,按照官方的意思,include就是為了解決重復定義相同布局的問題。例如你有五個界面,這五個界面的頂部都有布局一模一樣的一個返回按鈕和一個文本控件,在不使用include的情況下你在每個界面都需要重新在xml裡面寫同樣的返回按鈕和文本控件的頂部欄,這樣的重復工作會相當的惡心。使用include標簽,我們只需要把這個會被多次使用的頂部欄獨立成一個xml文件,然後在需要使用的地方通過include標簽引入即可。其實就相當於C語言、C++中的include頭文件一樣,我們把一些常用的、底層的API封裝起來,然後復用,需要的時候引入它即可,而不必每次都自己寫一遍。示例如下 :
my_title_layout.xml
include布局文件:
這樣我們就可以使用my_title_layout了。
注意事項
1、使用include最常見的問題就是findViewById查找不到目標控件,其正確的使用形式如下:
   View titleView = findViewById(R.id.my_title_ly) ;
        TextView titleTextView = (TextView)titleView.findViewById(R.id.title_tv) ;
        titleTextView.setText("new Title");
首先找到include的id, 例如這裡include設置的id為“my_title_ly”,然後再對獲取到的titleView.findViewById來查找目標布局中的子控件,例如title_tv就是my_title_layout.xml中定義的子控件。因此我們如果需要查找控件的話,可以設置include標簽的id,通過這個id獲取include對應的view以後,再通過對這個view進行findViewById才能正確查找。如果你設置了include標簽的id,然後通過被include的布局的root view的id來查找子元素的話,則會報錯,如下 : View titleView = findViewById(R.id.my_title_parent_id) ;
TextView titleTextView = (TextView)titleView.findViewById(R.id.title_tv) ;
titleTextView.setText("new Title");這樣會報空指針異常,因為titleView沒有找到,會報空指針。
那麼這是怎麼回事呢? 我們來分析它的源碼看看吧。對於布局文件的解析,最終都會調用到LayoutInflater的inflate方法,該方法最終又會調用rInflate方法,我們看看這個方法。
/**
* Recursive method used to descend down the xml hierarchy and instantiate
* views, instantiate their children, and then call onFinishInflate().
*/
void rInflate(XmlPullParser parser, View parent, final AttributeSet attrs,
boolean finishInflate) throws XmlPullParserException, IOException {
final int depth = parser.getDepth();
int type;
// 迭代xml中的所有元素,挨個解析
while (((type = parser.next()) != XmlPullParser.END_TAG ||
parser.getDepth() > depth) && type != XmlPullParser.END_DOCUMENT) {
if (type != XmlPullParser.START_TAG) {
continue;
}
final String name = parser.getName();
if (TAG_REQUEST_FOCUS.equals(name)) {
parseRequestFocus(parser, parent);
} else if (TAG_INCLUDE.equals(name)) {// 如果xml中的節點是include節點,則調用parseInclude方法
if (parser.getDepth() == 0) {
throw new InflateException(" 這個方法其實就是遍歷xml中的所有元素,然後挨個進行解析。例如解析到一個 private void parseInclude(XmlPullParser parser, View parent, AttributeSet attrs)
throws XmlPullParserException, IOException {
int type;
if (parent instanceof ViewGroup) {
final int layout = attrs.getAttributeResourceValue(null, "layout", 0);
if (layout == 0) {// include標簽中沒有設置layout屬性,會拋出異常
final String value = attrs.getAttributeValue(null, "layout");
if (value == null) {
throw new InflateException("You must specifiy a layout in the"
+ " include tag: 整個過程就是根據不同的標簽解析不同的元素,首先會解析include元素,然後再解析被include進來的布局的root view元素。在我們的例子中對應的root view就是id為my_title_parent_id的RelativeLayout,然後再解析root view下面的所有元素,這個過程是從上面注釋的2~4的過程,然後是設置布局參數。我們注意看注釋5處,這裡就解釋了為什麼include標簽和被引入的布局的根元素都設置了id的情況下,通過被引入的根元素的id來查找子控件會找不到的情況。我們看到,注釋5處的會判斷include標簽的id如果不是View.NO_ID的話會把該id設置給被引入的布局根元素的id,即此時在我們的例子中被引入的id為my_title_parent_id的根元素RelativeLayout的id被設置成了include標簽中的id,即RelativeLayout的id被動態修改成了"my_title_ly"。因此此時我們再通過“my_title_parent_id”這個id來查找根元素就會找不到了!所以結論就是: 如果include中設置了id,那麼就通過include的id來查找被include布局根元素的View;如果include中沒有設置Id, 而被include的布局的根元素設置了id,那麼通過該根元素的id來查找該view即可。拿到根元素後查找其子控件都是一樣的。
my_comment_layout.xml如下: 在運行時,我們只需要控制id為stub_import的ViewStub的可見性或者調用inflate()函數來控制是否加載這個評論列表即可。示例如下 :public class MainActivity extends Activity { public void onCreate(Bundle b){ // main.xml中包含上面的ViewStub setContentView(R.layout.main); // 方式1,獲取ViewStub, ViewStub listStub = (ViewStub) findViewById(R.id.stub_import); // 加載評論列表布局 listStub.setVisibility(View.VISIBLE); // 獲取到評論ListView,注意這裡是通過ViewStub的inflatedId來獲取 ListView commLv = findViewById(R.id.stub_comm_lv); if ( listStub.getVisibility() == View.VISIBLE ) { // 已經加載, 否則還沒有加載 } } }通過setVisibility(View.VISIBILITY)來加載評論列表,此時你要獲取到評論ListView對象的話,則需要通過findViewById來查找,而這個id並不是就是ViewStub的id。
這是為什麼呢 ?
我們先看ViewStub的部分代碼吧:@SuppressWarnings({"UnusedDeclaration"}) public ViewStub(Context context, AttributeSet attrs, int defStyle) { TypedArray a = context.obtainStyledAttributes(attrs, com.android.internal.R.styleable.ViewStub, defStyle, 0); // 獲取inflatedId屬性 mInflatedId = a.getResourceId(R.styleable.ViewStub_inflatedId, NO_ID); mLayoutResource = a.getResourceId(R.styleable.ViewStub_layout, 0); a.recycle(); a = context.obtainStyledAttributes(attrs, com.android.internal.R.styleable.View, defStyle, 0); mID = a.getResourceId(R.styleable.View_id, NO_ID); a.recycle(); initialize(context); } private void initialize(Context context) { mContext = context; setVisibility(GONE);// 設置不可教案 setWillNotDraw(true);// 設置不繪制 } @Override protected void onMeasure(int widthMeasureSpec, int heightMeasureSpec) { setMeasuredDimension(0, 0);// 寬高都為0 } @Override public void setVisibility(int visibility) { if (mInflatedViewRef != null) {// 如果已經加載過則只設置Visibility屬性 View view = mInflatedViewRef.get(); if (view != null) { view.setVisibility(visibility); } else { throw new IllegalStateException("setVisibility called on un-referenced view"); } } else {// 如果未加載,這加載目標布局 super.setVisibility(visibility); if (visibility == VISIBLE || visibility == INVISIBLE) { inflate();// 調用inflate來加載目標布局 } } } /** * Inflates the layout resource identified by {@link #getLayoutResource()} * and replaces this StubbedView in its parent by the inflated layout resource. * * @return The inflated layout resource. * */ public View inflate() { final ViewParent viewParent = getParent(); if (viewParent != null && viewParent instanceof ViewGroup) { if (mLayoutResource != 0) { final ViewGroup parent = (ViewGroup) viewParent;// 獲取ViewStub的parent view,也是目標布局根元素的parent view final LayoutInflater factory = LayoutInflater.from(mContext); final View view = factory.inflate(mLayoutResource, parent, false);// 1、加載目標布局 // 2、如果ViewStub的inflatedId不是NO_ID則把inflatedId設置為目標布局根元素的id,即評論ListView的id if (mInflatedId != NO_ID) { view.setId(mInflatedId); } final int index = parent.indexOfChild(this); parent.removeViewInLayout(this);// 3、將ViewStub自身從parent中移除 final ViewGroup.LayoutParams layoutParams = getLayoutParams(); if (layoutParams != null) { parent.addView(view, index, layoutParams);// 4、將目標布局的根元素添加到parent中,有參數 } else { parent.addView(view, index);// 4、將目標布局的根元素添加到parent中 } mInflatedViewRef = new WeakReference(view); if (mInflateListener != null) { mInflateListener.onInflate(this, view); } return view; } else { throw new IllegalArgumentException("ViewStub must have a valid layoutResource"); } } else { throw new IllegalStateException("ViewStub must have a non-null ViewGroup viewParent"); } } 可以看到,其實最終加載目標布局的還是inflate()函數,在該函數中將加載目標布局,獲取到根元素後,如果mInflatedId不為NO_ID則把mInflatedId設置為根元素的id,這也是為什麼我們在獲取評論ListView時會使用findViewById(R.id.stub_comm_lv)來獲取,其中的stub_comm_lv就是ViewStub的inflatedId。當然如果你沒有設置inflatedId的話還是可以通過評論列表的id來獲取的,例如findViewById(R.id.my_comm_lv)。然後就是ViewStub從parent中移除、把目標布局的根元素添加到parent中。最後會把目標布局的根元素返回,因此我們在調用inflate()函數時可以直接獲得根元素,省掉了findViewById的過程。
還有一種方式加載目標布局的就是直接調用ViewStub的inflate()方法,示例如下 :
public class MainActivity extends Activity { // 把commLv2設置為類的成員變量 ListView commLv2 = null; // public void onCreate(Bundle b){ // main.xml中包含上面的ViewStub setContentView(R.layout.main); // 方式二 ViewStub listStub2 = (ViewStub) findViewById(R.id.stub_import) ; // 成員變量commLv2為空則代表未加載 if ( commLv2 == null ) { // 加載評論列表布局, 並且獲取評論ListView,inflate函數直接返回ListView對象 commLv2 = (ListView)listStub2.inflate(); } else { // ViewStub已經加載 } } }
注意事項
1、判斷是否已經加載過, 如果通過setVisibility來加載,那麼通過判斷可見性即可;如果通過inflate()來加載是不可以通過判斷可見性來處理的,而需要使用方式2來進行判斷。
2、findViewById的問題,注意ViewStub中是否設置了inflatedId,如果設置了則需要通過inflatedId來查找目標布局的根元素。
Merge
首先我們看官方的說明:
The
其實就是減少在include布局文件時的層級。tag helps eliminate redundant view groups in your view hierarchy when including one layout within another. For example, if your main layout is a vertical LinearLayout in which two consecutive views can be re-used in multiple layouts, then the re-usable layout in which you place the two views requires its own root view. However, using another LinearLayout as the root for the re-usable layout would result in a vertical LinearLayout inside a vertical LinearLayout. The nested LinearLayout serves no real purpose other than to slow down your UI performance. 標簽是這幾個標簽中最讓我費解的,大家可能想不到, 標簽竟然會是一個Activity,裡面有一個LinearLayout對象。 /** * Exercisetag in XML files. */ public class Merge extends Activity { private LinearLayout mLayout; @Override protected void onCreate(Bundle icicle) { super.onCreate(icicle); mLayout = new LinearLayout(this); mLayout.setOrientation(LinearLayout.VERTICAL); LayoutInflater.from(this).inflate(R.layout.merge_tag, mLayout); setContentView(mLayout); } public ViewGroup getLayout() { return mLayout; } } 使用merge來組織子元素可以減少布局的層級。例如我們在復用一個含有多個子控件的布局時,肯定需要一個ViewGroup來管理,例如這樣 :
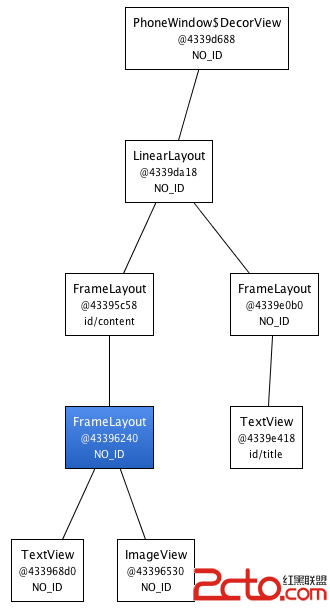
<frameLayout xmlns:android="http://schemas.android.com/apk/res/android" android:layout_width="fill_parent" android:layout_height="fill_parent">將該布局通過include引入時就會多引入了一個FrameLayout層級,此時結構如下 :</frameLayout>
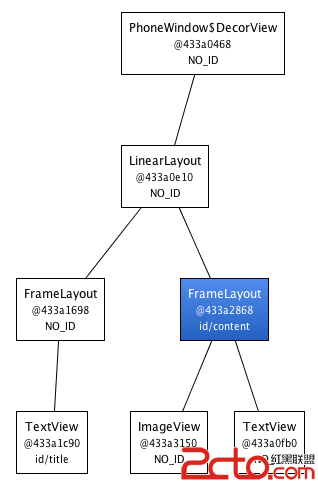
使用merge標簽就會消除上圖中藍色的FrameLayout層級。示例如下 :
效果圖如下 :
那麼它是如何實現的呢,我們還是看源碼吧。相關的源碼也是在LayoutInflater的inflate()函數中。public View inflate(XmlPullParser parser, ViewGroup root, boolean attachToRoot) { synchronized (mConstructorArgs) { final AttributeSet attrs = Xml.asAttributeSet(parser); Context lastContext = (Context)mConstructorArgs[0]; mConstructorArgs[0] = mContext; View result = root; try { // Look for the root node. int type; while ((type = parser.next()) != XmlPullParser.START_TAG && type != XmlPullParser.END_DOCUMENT) { // Empty } if (type != XmlPullParser.START_TAG) { throw new InflateException(parser.getPositionDescription() + ": No start tag found!"); } final String name = parser.getName(); // m如果是erge標簽,那麼調用rInflate進行解析 if (TAG_MERGE.equals(name)) { if (root == null || !attachToRoot) { throw new InflateException("其實就是如果是merge標簽,那麼直接將其中的子元素添加到merge標簽parent中,這樣就保證了不會引入額外的層級。can be used only with a valid " + "ViewGroup root and attachToRoot=true"); } // 解析merge標簽 rInflate(parser, root, attrs, false); } else { // 代碼省略 } } catch (XmlPullParserException e) { // 代碼省略 } return result; } } void rInflate(XmlPullParser parser, View parent, final AttributeSet attrs, boolean finishInflate) throws XmlPullParserException, IOException { final int depth = parser.getDepth(); int type; while (((type = parser.next()) != XmlPullParser.END_TAG || parser.getDepth() > depth) && type != XmlPullParser.END_DOCUMENT) { if (type != XmlPullParser.START_TAG) { continue; } final String name = parser.getName(); if (TAG_REQUEST_FOCUS.equals(name)) { parseRequestFocus(parser, parent); } else if (TAG_INCLUDE.equals(name)) { if (parser.getDepth() == 0) { throw new InflateException(" cannot be the root element"); } parseInclude(parser, parent, attrs); } else if (TAG_MERGE.equals(name)) { throw new InflateException(" must be the root element"); } else if (TAG_1995.equals(name)) { final View view = new BlinkLayout(mContext, attrs); final ViewGroup viewGroup = (ViewGroup) parent; final ViewGroup.LayoutParams params = viewGroup.generateLayoutParams(attrs); rInflate(parser, view, attrs, true); viewGroup.addView(view, params); } else { // 我們的例子會進入這裡 final View view = createViewFromTag(parent, name, attrs); // 獲取merge標簽的parent final ViewGroup viewGroup = (ViewGroup) parent; // 獲取布局參數 final ViewGroup.LayoutParams params = viewGroup.generateLayoutParams(attrs); // 遞歸解析每個子元素 rInflate(parser, view, attrs, true); // 將子元素直接添加到merge標簽的parent view中 viewGroup.addView(view, params); } } if (finishInflate) parent.onFinishInflate(); }
 EditText輔助控件—TextInputLayout
1.介紹TextInputLayout是一個用於在EditText上顯示Floating效果的輔助控件。效果圖如下:2.使用方法import android.conten
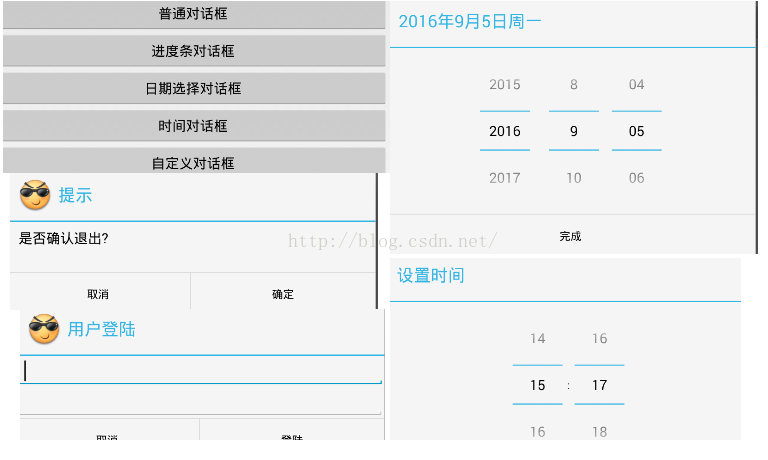 Android 對話框 Dialog使用實例講解
對話框 Dialog什麼是對話框對話框是在當前的頁面之上彈出的小窗口, 用於顯示一些重要的提示信息, 提示用戶的輸入,確認信息,或顯示某種狀態.如 : 顯示進度條對話框,
 華為麥芒5高配版怎麼樣 高配版和標配版有什麼區別
麥芒5的正面仍堅持了大黑邊的設計風格,真的很華為,那麼新款的華為麥芒5標配版和高配版有什麼區別呢?高配版如何?讓我們一起來看看吧!華為麥芒5標配版和高配版區
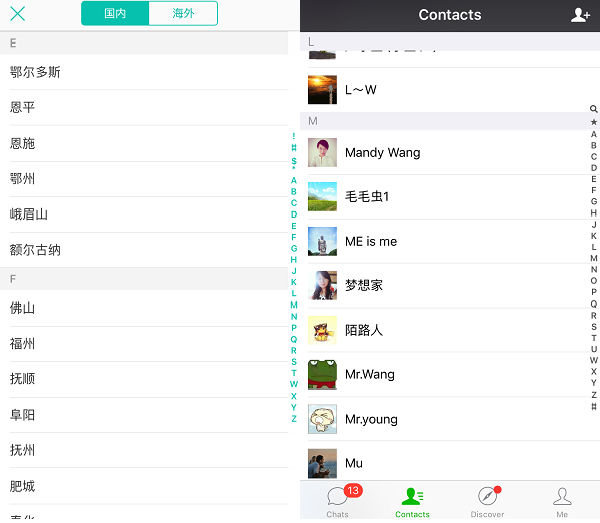 論字母導航的重要性,我們來實現一個聯系人字母導航列表吧!
說起這個字母導航,我相信大家都不陌生,不論是聯系人列表還是城市列表,基本上都是需要字母導航,那我們就有必要來研究一下這個思路的探索了,畢竟這是一個非常常用的功能,如果現