編輯:關於Android編程
左右切換圖片控件大家都用ViewPager, ViewFipper比較多吧,我之前也用ViewPager實現了,使用ViewPager實現左右循環滑動圖片,有興趣的可以去看下,今天介紹的是基於ImageSwitcher實現的左右切換圖片,先上截圖吧

好了,接下來來看代碼吧,第一張圖是一個GridView,點擊item跳轉到第二個界面,第一個界面可以忽略,主要是講解ImageSwitcher的左右卻換圖片,先看布局文件
<?xml version="1.0" encoding="UTF-8"?>
<FrameLayout xmlns:android="http://schemas.android.com/apk/res/android"
  android:layout_width="fill_parent"
  android:layout_height="fill_parent" >
  <ImageSwitcher
    android:id="@+id/imageSwitcher1"
    android:layout_width="fill_parent"
    android:layout_height="fill_parent">
  </ImageSwitcher>

  <RelativeLayout
    android:layout_width="fill_parent"
    android:layout_height="wrap_content"
    android:orientation="vertical" >
    <LinearLayout
      android:id="@+id/viewGroup"
      android:layout_width="fill_parent"
      android:layout_height="wrap_content"
      android:layout_alignParentBottom="true"
      android:layout_marginBottom="30dp"
      android:gravity="center_horizontal"
      android:orientation="horizontal" >
    </LinearLayout>
  </RelativeLayout>
</FrameLayout>
然後就是Activity代碼啦,總體來說比較簡單,代碼我添加了注釋
package com.example.photoalbum;

import android.app.Activity;
import android.os.Bundle;
import android.view.MotionEvent;
import android.view.View;
import android.view.View.OnTouchListener;
import android.view.ViewGroup;
import android.view.animation.AnimationUtils;
import android.widget.ImageSwitcher;
import android.widget.ImageView;
import android.widget.LinearLayout;
import android.widget.RelativeLayout.LayoutParams;
import android.widget.Toast;
import android.widget.ViewSwitcher.ViewFactory;

public class ShowPhotoActivity extends Activity implements ViewFactory, OnTouchListener{
  /**
   * ImagaSwitcher 的引用
   */
  private ImageSwitcher mImageSwitcher;
  /**
   * 圖片id數組
   */
  private int[] imgIds;
  /**
   * 當前選中的圖片id序號
   */
  private int currentPosition;
  /**
   * 按下點的X坐標
   */
  private float downX;
  /**
   * 裝載點點的容器
   */
  private LinearLayout linearLayout;
  /**
   * 點點數組
   */
  private ImageView[] tips;

  @Override
  protected void onCreate(Bundle savedInstanceState) {
    super.onCreate(savedInstanceState);
    setContentView(R.layout.show_photo);

    imgIds = new int[]{R.drawable.item01,R.drawable.item02,R.drawable.item03,R.drawable.item04,
        R.drawable.item05, R.drawable.item06, R.drawable.item07, R.drawable.item08,R.drawable.item09,
        R.drawable.item10, R.drawable.item11, R.drawable.item12};
    //實例化ImageSwitcher
    mImageSwitcher = (ImageSwitcher) findViewById(R.id.imageSwitcher1);
    //設置Factory
    mImageSwitcher.setFactory(this);
    //設置OnTouchListener,我們通過Touch事件來切換圖片
    mImageSwitcher.setOnTouchListener(this);

    linearLayout = (LinearLayout) findViewById(R.id.viewGroup);

    tips = new ImageView[imgIds.length];
    for(int i=0; i<imgIds.length; i++){
      ImageView mImageView = new ImageView(this);
      tips[i] = mImageView;
      LinearLayout.LayoutParams layoutParams = new LinearLayout.LayoutParams(new ViewGroup.LayoutParams(LayoutParams.WRAP_CONTENT,
          LayoutParams.WRAP_CONTENT));
      layoutParams.rightMargin = 3;
      layoutParams.leftMargin = 3;

      mImageView.setBackgroundResource(R.drawable.page_indicator_unfocused);
      linearLayout.addView(mImageView, layoutParams);
    }

    //這個我是從上一個界面傳過來的,上一個界面是一個GridView
    currentPosition = getIntent().getIntExtra("position", 0);
    mImageSwitcher.setImageResource(imgIds[currentPosition]);

    setImageBackground(currentPosition);

  }

   /**
   * 設置選中的tip的背景
   * @param selectItems
   */
  private void setImageBackground(int selectItems){
    for(int i=0; i<tips.length; i++){
      if(i == selectItems){
        tips[i].setBackgroundResource(R.drawable.page_indicator_focused);
      }else{
        tips[i].setBackgroundResource(R.drawable.page_indicator_unfocused);
      }
    }
  }

  @Override
  public View makeView() {
    final ImageView i = new ImageView(this);
    i.setBackgroundColor(0xff000000);
    i.setScaleType(ImageView.ScaleType.CENTER_CROP);
    i.setLayoutParams(new ImageSwitcher.LayoutParams(LayoutParams.FILL_PARENT, LayoutParams.FILL_PARENT));
    return i ;
  }

  @Override
  public boolean onTouch(View v, MotionEvent event) {
    switch (event.getAction()) {
    case MotionEvent.ACTION_DOWN:{
      //手指按下的X坐標
      downX = event.getX();
      break;
    }
    case MotionEvent.ACTION_UP:{
      float lastX = event.getX();
      //抬起的時候的X坐標大於按下的時候就顯示上一張圖片
      if(lastX > downX){
        if(currentPosition > 0){
          //設置動畫,這裡的動畫比較簡單,不明白的去網上看看相關內容
          mImageSwitcher.setInAnimation(AnimationUtils.loadAnimation(getApplication(), R.anim.left_in));
          mImageSwitcher.setOutAnimation(AnimationUtils.loadAnimation(getApplication(), R.anim.right_out));
          currentPosition --;
          mImageSwitcher.setImageResource(imgIds[currentPosition % imgIds.length]);
          setImageBackground(currentPosition);
        }else{
          Toast.makeText(getApplication(), "已經是第一張", Toast.LENGTH_SHORT).show();
        }
      }

      if(lastX < downX){
        if(currentPosition < imgIds.length - 1){
          mImageSwitcher.setInAnimation(AnimationUtils.loadAnimation(getApplication(), R.anim.right_in));
          mImageSwitcher.setOutAnimation(AnimationUtils.loadAnimation(getApplication(), R.anim.lift_out));
          currentPosition ++ ;
          mImageSwitcher.setImageResource(imgIds[currentPosition]);
          setImageBackground(currentPosition);
        }else{
          Toast.makeText(getApplication(), "到了最後一張", Toast.LENGTH_SHORT).show();
        }
      }
      }

      break;
    }

    return true;
  }

}
上面切換圖片主要用到的就是動畫了,用的是translate移動動畫,這裡我就不介紹了,接下來我吧動畫代碼貼出來,在res新建一個anim的目錄,如下圖
左邊進入的動畫,left_in.xml
<?xml version="1.0" encoding="UTF-8"?>
<set xmlns:android="http://schemas.android.com/apk/res/android">
  <translate
    android:fromXDelta="-100%p"
    android:toXDelta="0"
    android:duration="500"/>
</set>
左邊出去的動畫,left_out.xml
<?xml version="1.0" encoding="UTF-8"?>
<set xmlns:android="http://schemas.android.com/apk/res/android">
  <translate
    android:fromXDelta="0"
    android:toXDelta="-100%p"
    android:duration="500"/>
</set>
右邊進入的動畫,right_in.xml
<?xml version="1.0" encoding="UTF-8"?>
<set xmlns:android="http://schemas.android.com/apk/res/android">
  <translate
    android:fromXDelta="100%p"
    android:toXDelta="0"
    android:duration="500"/>
</set>
右邊出去的動畫,right_out.xml
<?xml version="1.0" encoding="UTF-8"?>
<set xmlns:android="http://schemas.android.com/apk/res/android">
  <translate
    android:fromXDelta="0"
    android:toXDelta="100%p"
    android:duration="500"/>
</set>
好了,介紹完了,代碼寫的不是很好,寫的不好的地方希望大家諒解,小編一定更加努力。
 Android Studio教程
目標:Android Studio新手–>下載安裝配置–>零基礎入門–>基本使用–>調試技能&nd
 Android adb bugreport工具分析和使用
bugreport是什麼,怎麼用?Android系統想要成為一個功能完備,生態繁榮的操作系統,那就必須提供完整的應用開發環境。而在應用開發中,app程序的調試分析是日常生
 Android 4.4 Kitkat Phone工作流程淺析(九)__狀態通知流程分析
概要 當手機Modem狀態改變後會將狀態變化信息通知到上層,通過《Android 4.4 Kitkat Phone工作流程淺析(八)__Phone狀態分析》
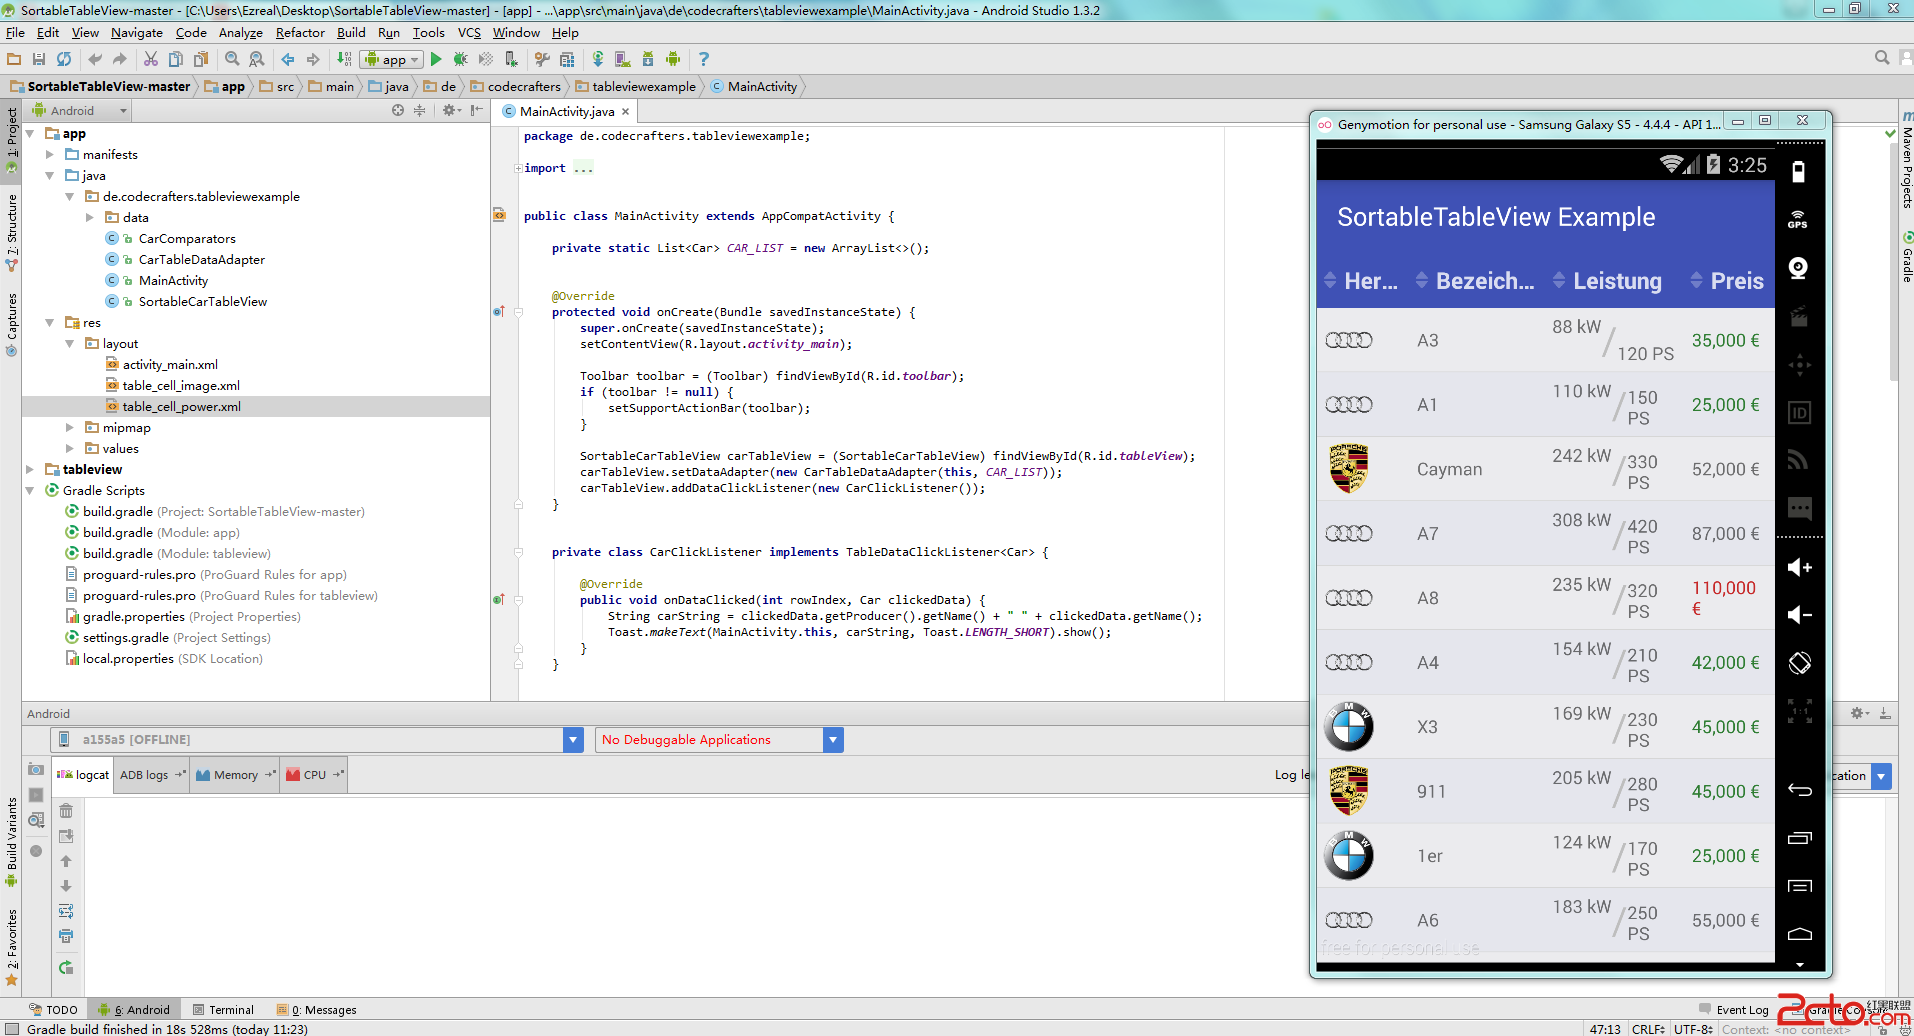 android 表單庫SortableTableView詳解,詳細講解,幫您上手就用
現在各種公司財務流程走到了手機端啊pad這一些產品上面,安卓畫類似xls的庫並不是太多(可能我見識少),看到一個Git上的庫,覺得蠻好用的,嘗試性的移植到了產