編輯:關於Android編程
Notification是顯示在手機狀態欄的通知,Notification通知是具有全局性的通知,一般通過NotificationManager來進行管理.
一般運用Notification的步驟如下:
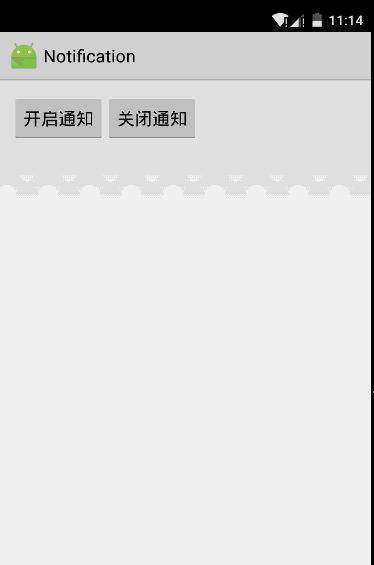
下面通過一個實例來演示上面的用法,先看一張效果圖
一.獲取系統的NotificationManager
private NotificationManager nm;

  @Override
  protected void onCreate(Bundle savedInstanceState) {
    super.onCreate(savedInstanceState);
    setContentView(R.layout.activity_main);
    //獲取系統的通知管理
    nm = (NotificationManager) getSystemService(NOTIFICATION_SERVICE);
  }
二.為主布局的兩個按鈕添加監聽事件,然後分別設置啟動通知,並設置各種屬性和取消通知
各種屬性代碼中介紹的很詳細,具體可以參考API
啟動通知
public void send(View view){
    //用於打開通知啟動另一個Activity
    Intent intent = new Intent(MainActivity.this,OtherActivity.class);
    //用於延遲啟動
    PendingIntent pi = PendingIntent.getActivity(MainActivity.this, 0, intent, 0);
    //設置通知
    Notification notify = new Notification.Builder(this)
        //設置打開該通知,通知自動消失
        .setAutoCancel(true)
        //設置顯示在狀態欄的通知提示消息
        .setTicker("新消息")
        //設置通知欄圖標
        .setSmallIcon(R.mipmap.ic_launcher)
        //設置通知內容的標題
        .setContentTitle("一條新通知")
        //設置通知內容
        .setContentText("恭喜你通知欄測試成功")
        //設置使用系統默認的聲音,默認的led燈
        .setDefaults(Notification.DEFAULT_SOUND | Notification.DEFAULT_LIGHTS)
        //ALL的話則是全部使用默認,聲音,震動,閃光燈,需要添加相應權限
//        .setDefaults(ALL)
        //或者自定義聲音
        //setSound(Uri.parse())
        //設置要啟動的程序
        .setContentIntent(pi)
        //最後用build來建立通知
        .build();
    //發送當前通知,通過NotificationManager來管理
    nm.notify(1,notify);
  }
這裡用的OtherActivity是通過通知啟動的另一個Activity,為了啟動需要在清單文件中加入此Activity,並且因為用到了閃光燈和振動器,所以也需要添加相應的權限
<activity android:name=".OtherActivity"> </activity>
  <uses-permission android:name="android.permission.FLASHLIGHT"/>
  <uses-permission android:name="android.permission.VIBRATE"/>
取消通知
//取消通知
  public void closed(View view){
    nm.cancel(1);
  }
用起來相當很方便.最後附上主界面布局
<LinearLayout xmlns:android="http://schemas.android.com/apk/res/android"
  xmlns:tools="http://schemas.android.com/tools" android:layout_width="match_parent"
  android:layout_height="match_parent" android:paddingLeft="@dimen/activity_horizontal_margin"
  android:orientation="horizontal"
  android:paddingRight="@dimen/activity_horizontal_margin"
  android:paddingTop="@dimen/activity_vertical_margin"
  android:paddingBottom="@dimen/activity_vertical_margin" tools:context=".MainActivity">


  <Button
    android:layout_width="wrap_content"
    android:layout_height="wrap_content"
    android:text="開啟通知"
    android:onClick="send"
    android:id="@+id/btnstartnotification"
     />

  <Button
    android:layout_width="wrap_content"
    android:layout_height="wrap_content"
    android:text="關閉通知"
    android:onClick="closed"
    android:id="@+id/btnstopnotification"
     />
</LinearLayout>
以上就是關於Android Notification通知的詳細內容,希望對大家的學習有所幫助。
 Android自定義ProgressDialog加載圖片
為了提高用戶體驗,我們肯定希望該Dialog能更加炫酷,讓用戶看著更舒服。那如何做呢,當然是我們自己定義一個ProgressDialog了。一、使用系統加載框mDialo
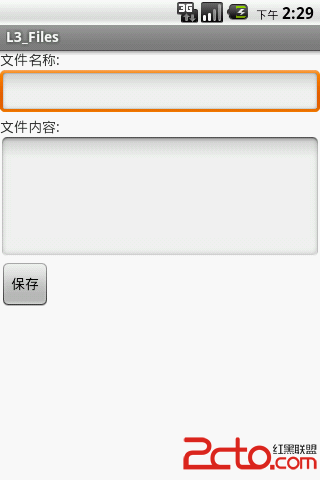 學習Android之第八個小程序文件保存(Notification、AndroidTestCase)
效果圖: .java文件有MainActivity.java、FileService.java、FileServiceTest.java, .xml文
 Andorid事件傳遞過程
一個好的應用與用戶的體驗分不開,用戶體驗好就是對事件的處理適當.要處理好Android事件處理,就必須了解Android中事件的傳遞過程.下面是我對Andorid事件的理
 Android播放視頻之VideoView
目前很多app都會有短視頻內容,這裡就來講一下android中播放視頻的幾種方式。Android播放視頻有三種方式:1,調用系統已有的播放軟件播放視頻。2,使用andro