編輯:關於Android編程
一、基本使用要點回顧
Volley框架在請求網絡圖片方面也做了很多工作,提供了好幾種方法.本文介紹使用ImageLoader來進行網絡圖片的加載.
ImageLoader的內部使用ImageRequest來實現,它的構造器可以傳入一個ImageCache緩存形參,實現了圖片緩存的功能,同時還可以過濾重復鏈接,避免重復發送請求。
下面是ImageLoader加載圖片的實現方法:
public void displayImg(View view){
 ImageView imageView = (ImageView)this.findViewById(R.id.image_view);
 RequestQueue mQueue = Volley.newRequestQueue(getApplicationContext());

 ImageLoader imageLoader = new ImageLoader(mQueue, new BitmapCache());

 ImageListener listener = ImageLoader.getImageListener(imageView,R.drawable.default_image, R.drawable.default_image);
 imageLoader.get("http://developer.android.com/images/home/aw_dac.png", listener);
 //指定圖片允許的最大寬度和高度
 //imageLoader.get("http://developer.android.com/images/home/aw_dac.png",listener, 200, 200);
}
使用ImageLoader.getImageListener()方法創建一個ImageListener實例後,在imageLoader.get()方法中加入此監聽器和圖片的url,即可加載網絡圖片.
下面是使用LruCache實現的緩存類
public class BitmapCache implements ImageCache {

 private LruCache<String, Bitmap> cache;

 public BitmapCache() {
  cache = new LruCache<String, Bitmap>(8 * 1024 * 1024) {
   @Override
   protected int sizeOf(String key, Bitmap bitmap) {
    return bitmap.getRowBytes() * bitmap.getHeight();
   }
  };
 }

 @Override
 public Bitmap getBitmap(String url) {
  return cache.get(url);
 }

 @Override
 public void putBitmap(String url, Bitmap bitmap) {
  cache.put(url, bitmap);
 }
}
最後,別忘記在AndroidManifest.xml文件中加入訪問網絡的權限
<uses-permission android:name="android.permission.INTERNET"/>
二、源碼分析
(一) 初始化Volley請求隊列
mReqQueue = Volley.newRequestQueue(mCtx);
主要就是這一行了:
#Volley

public static RequestQueue newRequestQueue(Context context) {
  return newRequestQueue(context, null);
 }

public static RequestQueue newRequestQueue(Context context, HttpStack stack)
 {
  return newRequestQueue(context, stack, -1);
 }
public static RequestQueue newRequestQueue(Context context, HttpStack stack, int maxDiskCacheBytes) {
  File cacheDir = new File(context.getCacheDir(), DEFAULT_CACHE_DIR);

  String userAgent = "volley/0";
  try {
   String packageName = context.getPackageName();
   PackageInfo info = context.getPackageManager().getPackageInfo(packageName, 0);
   userAgent = packageName + "/" + info.versionCode;
  } catch (NameNotFoundException e) {
  }

  if (stack == null) {
   if (Build.VERSION.SDK_INT >= 9) {
    stack = new HurlStack();
   } else {
    // Prior to Gingerbread, HttpUrlConnection was unreliable.
    // See: http://android-developers.blogspot.com/2011/09/androids-http-clients.html
    stack = new HttpClientStack(AndroidHttpClient.newInstance(userAgent));
   }
  }

  Network network = new BasicNetwork(stack);

  RequestQueue queue;
  if (maxDiskCacheBytes <= -1)
  {
   // No maximum size specified
   queue = new RequestQueue(new DiskBasedCache(cacheDir), network);
  }
  else
  {
   // Disk cache size specified
   queue = new RequestQueue(new DiskBasedCache(cacheDir, maxDiskCacheBytes), network);
  }

  queue.start();

  return queue;
 }
這裡主要就是初始化HttpStack,對於HttpStack在API大於等於9的時候選擇HttpUrlConnetcion,反之則選擇HttpClient,這裡我們並不關注Http相關代碼。
接下來初始化了RequestQueue,然後調用了start()方法。
接下來看RequestQueue的構造:
public RequestQueue(Cache cache, Network network) {
  this(cache, network, DEFAULT_NETWORK_THREAD_POOL_SIZE);
 }
public RequestQueue(Cache cache, Network network, int threadPoolSize) {
  this(cache, network, threadPoolSize,
    new ExecutorDelivery(new Handler(Looper.getMainLooper())));
 }
public RequestQueue(Cache cache, Network network, int threadPoolSize,
   ResponseDelivery delivery) {
  mCache = cache;
  mNetwork = network;
  mDispatchers = new NetworkDispatcher[threadPoolSize];
  mDelivery = delivery;
 }
初始化主要就是4個參數:mCache、mNetwork、mDispatchers、mDelivery。第一個是硬盤緩存;第二個主要用於Http相關操作;第三個用於轉發請求的;第四個參數用於把結果轉發到UI線程(ps:你可以看到new Handler(Looper.getMainLooper()))。
接下來看start方法
#RequestQueue
 /**
  * Starts the dispatchers in this queue.
  */
 public void start() {
  stop(); // Make sure any currently running dispatchers are stopped.
  // Create the cache dispatcher and start it.
  mCacheDispatcher = new CacheDispatcher(mCacheQueue, mNetworkQueue, mCache, mDelivery);
  mCacheDispatcher.start();

  // Create network dispatchers (and corresponding threads) up to the pool size.
  for (int i = 0; i < mDispatchers.length; i++) {
   NetworkDispatcher networkDispatcher = new NetworkDispatcher(mNetworkQueue, mNetwork,
     mCache, mDelivery);
   mDispatchers[i] = networkDispatcher;
   networkDispatcher.start();
  }
 }
首先是stop,確保轉發器退出,其實就是內部的幾個線程退出,這裡大家如果有興趣可以看眼源碼,參考下Volley中是怎麼處理線程退出的(幾個線程都是while(true){//doSomething})。
接下來初始化CacheDispatcher,然後調用start();初始化NetworkDispatcher,然後調用start();
上面的轉發器呢,都是線程,可以看到,這裡開了幾個線程在幫助我們工作,具體的源碼,我們一會在看。
好了,到這裡,就完成了Volley的初始化的相關代碼,那麼接下來看初始化ImageLoader相關源碼。
(二) 初始化ImageLoader
#VolleyHelper
mImageLoader = new ImageLoader(mReqQueue, new ImageCache()
  {
   private final LruCache<String, Bitmap> mLruCache = new LruCache<String, Bitmap>(
     (int) (Runtime.getRuntime().maxMemory() / 10))
   {
    @Override
    protected int sizeOf(String key, Bitmap value)
    {
     return value.getRowBytes() * value.getHeight();
    }
   };

   @Override
   public void putBitmap(String url, Bitmap bitmap)
   {
    mLruCache.put(url, bitmap);
   }

   @Override
   public Bitmap getBitmap(String url)
   {
    return mLruCache.get(url);
   }
  });

#ImageLoader

public ImageLoader(RequestQueue queue, ImageCache imageCache) {
  mRequestQueue = queue;
  mCache = imageCache;
 }
很簡單,就是根據我們初始化的RequestQueue和LruCache初始化了一個ImageLoader。
(三) 加載圖片
我們在加載圖片時,調用的是:
 # VolleyHelper
 getInstance().getImageLoader().get(url, new ImageLoader.ImageListener());
接下來看get方法:
#ImageLoader
 public ImageContainer get(String requestUrl, final ImageListener listener) {
  return get(requestUrl, listener, 0, 0);
 }
public ImageContainer get(String requestUrl, ImageListener imageListener,
   int maxWidth, int maxHeight) {
  return get(requestUrl, imageListener, maxWidth, maxHeight, ScaleType.CENTER_INSIDE);
 }
public ImageContainer get(String requestUrl, ImageListener imageListener,
   int maxWidth, int maxHeight, ScaleType scaleType) {

  // only fulfill requests that were initiated from the main thread.
  throwIfNotOnMainThread();

  final String cacheKey = getCacheKey(requestUrl, maxWidth, maxHeight, scaleType);

  // Try to look up the request in the cache of remote images.
  Bitmap cachedBitmap = mCache.getBitmap(cacheKey);
  if (cachedBitmap != null) {
   // Return the cached bitmap.
   ImageContainer container = new ImageContainer(cachedBitmap, requestUrl, null, null);
   imageListener.onResponse(container, true);
   return container;
  }

  // The bitmap did not exist in the cache, fetch it!
  ImageContainer imageContainer =
    new ImageContainer(null, requestUrl, cacheKey, imageListener);

  // Update the caller to let them know that they should use the default bitmap.
  imageListener.onResponse(imageContainer, true);

  // Check to see if a request is already in-flight.
  BatchedImageRequest request = mInFlightRequests.get(cacheKey);
  if (request != null) {
   // If it is, add this request to the list of listeners.
   request.addContainer(imageContainer);
   return imageContainer;
  }

  // The request is not already in flight. Send the new request to the network and
  // track it.
  Request<Bitmap> newRequest = makeImageRequest(requestUrl, maxWidth, maxHeight, scaleType,
    cacheKey);

  mRequestQueue.add(newRequest);
  mInFlightRequests.put(cacheKey,
    new BatchedImageRequest(newRequest, imageContainer));
  return imageContainer;
 }
可以看到get方法,首先通過throwIfNotOnMainThread()方法限制必須在UI線程調用;
然後根據傳入的參數計算cacheKey,獲取cache;
=>如果cache存在,直接將返回結果封裝為一個ImageContainer(cachedBitmap, requestUrl),然後直接回調imageListener.onResponse(container, true);我們就可以設置圖片了。
=>如果cache不存在,初始化一個ImageContainer(沒有bitmap),然後直接回調,imageListener.onResponse(imageContainer, true);,這裡為了讓大家在回調中判斷,然後設置默認圖片(所以,大家在自己實現listener的時候,別忘了判斷resp.getBitmap()!=null);
接下來檢查該url是否早已加入了請求對了,如果早已加入呢,則將剛初始化的ImageContainer加入BatchedImageRequest,返回結束。
如果是一個新的請求,則通過makeImageRequest創建一個新的請求,然後將這個請求分別加入mRequestQueue和mInFlightRequests,注意mInFlightRequests中會初始化一個BatchedImageRequest,存儲相同的請求隊列。
這裡注意mRequestQueue是個對象,並不是隊列數據結構,所以我們要看下add方法
#RequestQueue
public <T> Request<T> add(Request<T> request) {
  // Tag the request as belonging to this queue and add it to the set of current requests.
  request.setRequestQueue(this);
  synchronized (mCurrentRequests) {
   mCurrentRequests.add(request);
  }

  // Process requests in the order they are added.
  request.setSequence(getSequenceNumber());
  request.addMarker("add-to-queue");

  // If the request is uncacheable, skip the cache queue and go straight to the network.
  if (!request.shouldCache()) {
   mNetworkQueue.add(request);
   return request;
  }

  // Insert request into stage if there's already a request with the same cache key in flight.
  synchronized (mWaitingRequests) {
   String cacheKey = request.getCacheKey();
   if (mWaitingRequests.containsKey(cacheKey)) {
    // There is already a request in flight. Queue up.
    Queue<Request<?>> stagedRequests = mWaitingRequests.get(cacheKey);
    if (stagedRequests == null) {
     stagedRequests = new LinkedList<Request<?>>();
    }
    stagedRequests.add(request);
    mWaitingRequests.put(cacheKey, stagedRequests);
    if (VolleyLog.DEBUG) {
     VolleyLog.v("Request for cacheKey=%s is in flight, putting on hold.", cacheKey);
    }
   } else {
    // Insert 'null' queue for this cacheKey, indicating there is now a request in
    // flight.
    mWaitingRequests.put(cacheKey, null);
    mCacheQueue.add(request);
   }
   return request;
  }
 }
這裡首先將請求加入mCurrentRequests,這個mCurrentRequests保存了所有需要處理的Request,主要為了提供cancel的入口。
如果該請求不應該被緩存則直接加入mNetworkQueue,然後返回。
然後判斷該請求是否有相同的請求正在被處理,如果有則加入mWaitingRequests;如果沒有,則
加入mWaitingRequests.put(cacheKey, null)和mCacheQueue.add(request)。
ok,到這裡我們就分析完成了直觀的代碼,但是你可能會覺得,那麼到底是在哪裡觸發的網絡請求,加載圖片呢?
那麼,首先你應該知道,我們需要加載圖片的時候,會makeImageRequest然後將這個請求加入到各種隊列,主要包含mCurrentRequests、mCacheQueue。
然後,還記得我們初始化RequestQueue的時候,啟動了幾個轉發線程嗎?CacheDispatcher和NetworkDispatcher。
其實,網絡請求就是在這幾個線程中真正去加載的,我們分別看一下;
(四)CacheDispatcher
看一眼構造方法;
#CacheDispatcher
 public CacheDispatcher(
   BlockingQueue<Request<?>> cacheQueue, BlockingQueue<Request<?>> networkQueue,
   Cache cache, ResponseDelivery delivery) {
  mCacheQueue = cacheQueue;
  mNetworkQueue = networkQueue;
  mCache = cache;
  mDelivery = delivery;
 }
這是一個線程,那麼主要的代碼肯定在run裡面。
#CacheDispatcher

 @Override
 public void run() {
  if (DEBUG) VolleyLog.v("start new dispatcher");
  Process.setThreadPriority(Process.THREAD_PRIORITY_BACKGROUND);

  // Make a blocking call to initialize the cache.
  mCache.initialize();

  while (true) {
   try {
    // Get a request from the cache triage queue, blocking until
    // at least one is available.
    final Request<?> request = mCacheQueue.take();
    request.addMarker("cache-queue-take");

    // If the request has been canceled, don't bother dispatching it.
    if (request.isCanceled()) {
     request.finish("cache-discard-canceled");
     continue;
    }

    // Attempt to retrieve this item from cache.
    Cache.Entry entry = mCache.get(request.getCacheKey());
    if (entry == null) {
     request.addMarker("cache-miss");
     // Cache miss; send off to the network dispatcher.
     mNetworkQueue.put(request);
     continue;
    }

    // If it is completely expired, just send it to the network.
    if (entry.isExpired()) {
     request.addMarker("cache-hit-expired");
     request.setCacheEntry(entry);
     mNetworkQueue.put(request);
     continue;
    }

    // We have a cache hit; parse its data for delivery back to the request.
    request.addMarker("cache-hit");
    Response<?> response = request.parseNetworkResponse(
      new NetworkResponse(entry.data, entry.responseHeaders));
    request.addMarker("cache-hit-parsed");

    if (!entry.refreshNeeded()) {
     // Completely unexpired cache hit. Just deliver the response.
     mDelivery.postResponse(request, response);
    } else {
     // Soft-expired cache hit. We can deliver the cached response,
     // but we need to also send the request to the network for
     // refreshing.
     request.addMarker("cache-hit-refresh-needed");
     request.setCacheEntry(entry);

     // Mark the response as intermediate.
     response.intermediate = true;

     // Post the intermediate response back to the user and have
     // the delivery then forward the request along to the network.
     mDelivery.postResponse(request, response, new Runnable() {
      @Override
      public void run() {
       try {
        mNetworkQueue.put(request);
       } catch (InterruptedException e) {
        // Not much we can do about this.
       }
      }
     });
    }

   } catch (InterruptedException e) {
    // We may have been interrupted because it was time to quit.
    if (mQuit) {
     return;
    }
    continue;
   }
  }
 }
ok,首先要明確這個緩存指的是硬盤緩存(目錄為context.getCacheDir()/volley),內存緩存在ImageLoader那裡已經判斷過了。
可以看到這裡是個無限循環,不斷的從mCacheQueue去取出請求,如果請求已經被取消就直接結束;
接下來從緩存中獲取:
=>如果沒有取到,則加入mNetworkQueue
=>如果緩存過期,則加入mNetworkQueue
否則,就是取到了可用的緩存了;調用request.parseNetworkResponse解析從緩存中取出的data和responseHeaders;接下來判斷TTL(主要還是判斷是否過期),如果沒有過期則直接通過mDelivery.postResponse轉發,然後回調到UI線程;如果ttl不合法,回調完成後,還會將該請求加入mNetworkQueue。
好了,這裡其實就是如果拿到合法的緩存,則直接轉發到UI線程;反之,則加入到NetworkQueue.
接下來我們看NetworkDispatcher。
(五)NetworkDispatcher
與CacheDispatcher類似,依然是個線程,核心代碼依然在run中;
# NetworkDispatcher
//new NetworkDispatcher(mNetworkQueue, mNetwork,mCache, mDelivery)

public NetworkDispatcher(BlockingQueue<Request<?>> queue,
   Network network, Cache cache,
   ResponseDelivery delivery) {
  mQueue = queue;
  mNetwork = network;
  mCache = cache;
  mDelivery = delivery;
 }
@Override
 public void run() {
  Process.setThreadPriority(Process.THREAD_PRIORITY_BACKGROUND);
  while (true) {
   long startTimeMs = SystemClock.elapsedRealtime();
   Request<?> request;
   try {
    // Take a request from the queue.
    request = mQueue.take();
   } catch (InterruptedException e) {
    // We may have been interrupted because it was time to quit.
    if (mQuit) {
     return;
    }
    continue;
   }

   try {
    request.addMarker("network-queue-take");

    // If the request was cancelled already, do not perform the
    // network request.
    if (request.isCanceled()) {
     request.finish("network-discard-cancelled");
     continue;
    }

    addTrafficStatsTag(request);

    // Perform the network request.
    NetworkResponse networkResponse = mNetwork.performRequest(request);
    request.addMarker("network-http-complete");

    // If the server returned 304 AND we delivered a response already,
    // we're done -- don't deliver a second identical response.
    if (networkResponse.notModified && request.hasHadResponseDelivered()) {
     request.finish("not-modified");
     continue;
    }

    // Parse the response here on the worker thread.
    Response<?> response = request.parseNetworkResponse(networkResponse);
    request.addMarker("network-parse-complete");

    // Write to cache if applicable.
    // TODO: Only update cache metadata instead of entire record for 304s.
    if (request.shouldCache() && response.cacheEntry != null) {
     mCache.put(request.getCacheKey(), response.cacheEntry);
     request.addMarker("network-cache-written");
    }

    // Post the response back.
    request.markDelivered();
    mDelivery.postResponse(request, response);
   } catch (VolleyError volleyError) {
    volleyError.setNetworkTimeMs(SystemClock.elapsedRealtime() - startTimeMs);
    parseAndDeliverNetworkError(request, volleyError);
   } catch (Exception e) {
    VolleyLog.e(e, "Unhandled exception %s", e.toString());
    VolleyError volleyError = new VolleyError(e);
    volleyError.setNetworkTimeMs(SystemClock.elapsedRealtime() - startTimeMs);
    mDelivery.postError(request, volleyError);
   }
  }
 }
看代碼前,我們首先想一下邏輯,正常情況下我們會取出請求,讓network去請求處理我們的請求,處理完成以後呢:加入緩存,然後轉發。
那麼看下是不是:
首先取出請求;然後通過mNetwork.performRequest(request)處理我們的請求,拿到NetworkResponse;接下來,使用request去解析我們的NetworkResponse。
拿到Response以後,判斷是否應該緩存,如果需要,則緩存。
最後mDelivery.postResponse(request, response);轉發;
ok,和我們的預期差不多。
這樣的話,我們的Volley去加載圖片的核心邏輯就分析完成了,簡單總結下:
首先初始化RequestQueue,主要就是開啟幾個Dispatcher線程,線程會不斷讀取請求(使用的阻塞隊列,沒有消息則阻塞)
當我們發出請求以後,會根據url,ImageView屬性等,構造出一個cacheKey,然後首先從LruCache中獲取(這個緩存我們自己構建的,凡是實現ImageCache接口的都合法);如果沒有取到,則判斷是否存在硬盤緩存,這一步是從getCacheDir裡面獲取(默認5M);如果沒有取到,則從網絡請求;
不過,可以發現的是Volley的圖片加載,並沒有LIFO這種策略;貌似對於圖片的下載,也是完整的加到內存,然後壓縮,這麼看,對於巨圖、大文件這樣的就廢了;
看起來還是蠻簡單的,不過看完以後,對於如何更好的時候該庫以及如何去設計圖片加載庫還是有很大的幫助的;
如果有興趣,大家還可以在看源碼分析的同時,想想某些細節的實現,比如:
Dispatcher都是一些無限循環的線程,可以去看看Volley如何保證其關閉的。
對於圖片壓縮的代碼,可以在ImageRequest的parseNetworkResponse裡面去看看,是如何壓縮的。
so on…
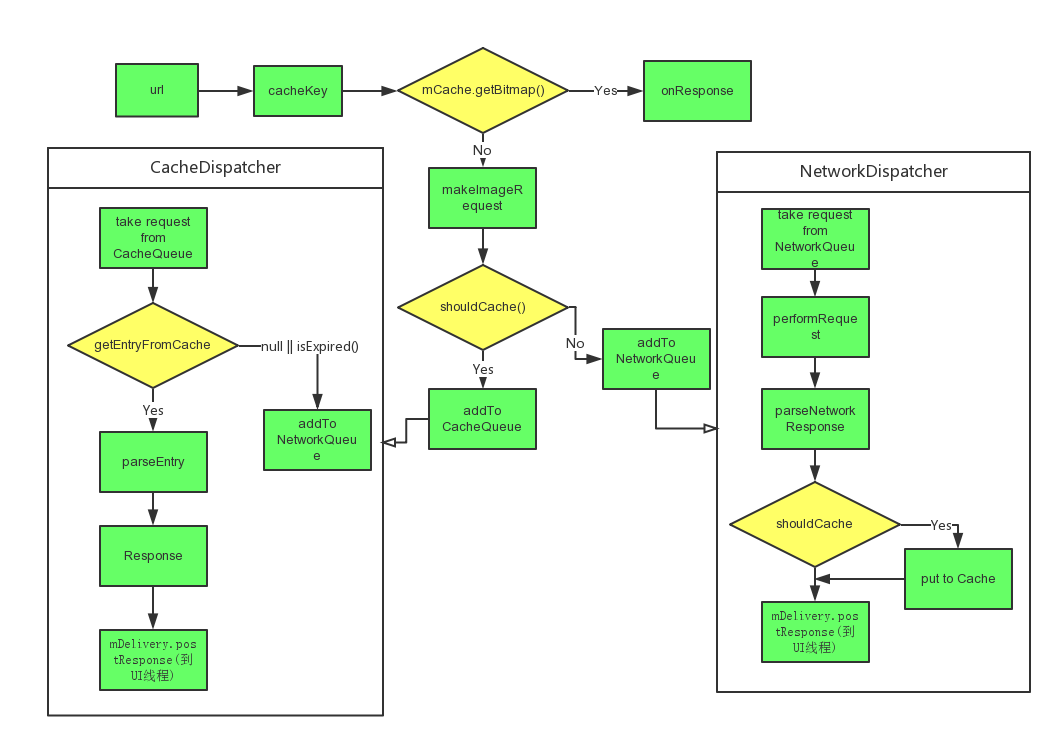
最後貼個大概的流程圖,方便記憶:
 Android合並兩個APP的具體做法(掌握)
有時候因公司需求,要求合並兩個APP 使用裡面的功能。 平台:Studio 小白鼠:二維碼掃描 和自己項目 具體步驟: /** * 1.將解壓後的android
 android中生成excel
都說程序員不爽產品經理,其實有的時候遇到一些奇葩的後台開發人員也會很不順心。最近項目有這樣一個要求,要生成一個excel然後發郵件給客戶。結果後台人員直接把這個功能扔給客
 AnimatedPathView實現自定義圖片標簽
老早用過小紅書app,對於他們客戶端筆記這塊的設計非常喜歡,恰好去年在小紅書的競爭對手公司,公司基於產品的考慮和產品的發展,也需要將app社交化,於是在社區分享這塊多多少
 Android Fragment學習
android Fragments詳解 Fragment是activity的界面中的一部分或一種行為。你可以把多個Fragment們組合到一個activity中