編輯:關於Android編程
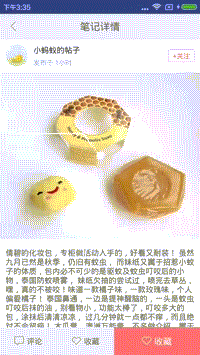
老早用過小紅書app,對於他們客戶端筆記這塊的設計非常喜歡,恰好去年在小紅書的競爭對手公司,公司基於產品的考慮和產品的發展,也需要將app社交化,於是在社區分享這塊多多少少參照了小紅書的設計,這裡面就有一個比較有意思的貼紙,標簽等設計,這裡用到了GpuImage的庫,這個demo我也將代碼開源了,有需要的去fork我的github的代碼,今天要說的是詳情頁面的AnimatedPathView實現可以動起來的標簽。(之前我們項目中由於時間問題,將這種效果用h5實現了,不過現在回React Native之後,發現實現起來更簡單了),今天要說的是用android實現這種效果。
且看個效果圖:

要實現我們這樣的效果,首先分析下,線條的繪制和中間圓圈的實現,以及文字的繪制。
對於線條的繪制我們不多說,直接canvas.DrawLine,不過這種線條是死的,不能實現運動的效果,還好Java為我們提供了另一個方法,我們可以用Path去實現,之前做騰訊手寫板的時候也是這麼做的(可以點擊鏈接查看效果,不過代碼沒辦法公開),點擊打開鏈接,通過上面說的,我們改變PathEffect的偏移量就可以改變path顯示的長度,從而實現動畫的效果。而PathEffect有很多子類,從而滿足不同的效果,這裡不再說明。
float percentage = 0.0f;
PathEffect effect = new DashPathEffect(new float[]{pathLength, pathLength}, pathLength - pathLength*percentage);
public class AnimatedPathView extends View {

    private Paint mPaint;
    private Path mPath;
    private int mStrokeColor = Color.parseColor("#ff6c6c");
    private int mStrokeWidth = 8;

    private float mProgress = 0f;
    private float mPathLength = 0f;

    private float circleX = 0f;
    private float circleY = 0f;
    private int radius = 0;
    private String pathText="化妝包...";
    private int textX,textY;

    public AnimatedPathView(Context context) {
        this(context, null);
        init();
    }

    public AnimatedPathView(Context context, AttributeSet attrs) {
        this(context, attrs, 0);
        init();
    }

    public AnimatedPathView(Context context, AttributeSet attrs, int defStyle) {
        super(context, attrs, defStyle);

        TypedArray a = context.obtainStyledAttributes(attrs, R.styleable.AnimatedPathView);
        mStrokeColor = a.getColor(R.styleable.AnimatedPathView_pathColor, Color.parseColor("#ff6c6c"));
        mStrokeWidth = a.getInteger(R.styleable.AnimatedPathView_pathWidth, 8);
        a.recycle();

        init();
    }

    private void init() {
        mPaint = new Paint();
        mPaint.setColor(mStrokeColor);
        mPaint.setStyle(Paint.Style.STROKE);
        mPaint.setStrokeWidth(mStrokeWidth);
        mPaint.setAntiAlias(true);

        setPath(new Path());
    }

    public void setPath(Path p) {
        mPath = p;
        PathMeasure measure = new PathMeasure(mPath, false);
        mPathLength = measure.getLength();
    }


    public void setPathText(String pathText,int textX,int textY ) {
        this.pathText=pathText;
        this.textX=textX;
        this.textY=textY;
    }

    public void setPath(float[]... points) {
        if (points.length == 0)
            throw new IllegalArgumentException("Cannot have zero points in the line");

        Path p = new Path();
        p.moveTo(points[0][0], points[0][1]);

        for (int i = 1; i < points.length; i++) {
            p.lineTo(points[i][0], points[i][1]);
        }
        //將第一個xy坐標點作為繪制的原點
        circleX = points[0][0] - radius / 2;
        circleY = points[0][1] - radius / 2;

        setPath(p);
    }

    public void setPercentage(float percentage) {
        if (percentage < 0.0f || percentage > 1.0f)
            throw new IllegalArgumentException("setPercentage not between 0.0f and 1.0f");

        mProgress = percentage;
        invalidate();
    }

    public void scalePathBy(float x, float y) {
        Matrix m = new Matrix();
        m.postScale(x, y);
        mPath.transform(m);
        PathMeasure measure = new PathMeasure(mPath, false);
        mPathLength = measure.getLength();
    }

    public void scaleCircleRadius(int radius) {
        this.radius = radius;
    }

    @Override
    protected void onDraw(Canvas canvas) {
        super.onDraw(canvas);
        //繪制圓形
//        drawCircle(canvas);
        //繪線條
        drawPathEffect(canvas);
        //繪制文字
        drawText(canvas);
        canvas.restore();
    }

    private void drawText(Canvas canvas) {
        mPaint.setTextSize(28);
        mPaint.setColor(Color.parseColor("#ffffff"));
        if (canvas!=null&& !TextUtils.isEmpty(pathText)){
            canvas.drawText(pathText,textX,textY,mPaint);
        }
        invalidate();
    }

    private void drawPathEffect(Canvas canvas) {
        PathEffect pathEffect = new DashPathEffect(new float[]{mPathLength, mPathLength}, (mPathLength - mPathLength * mProgress));
        mPaint.setPathEffect(pathEffect);
        mPaint.setStrokeWidth(4);
        mPaint.setColor(Color.parseColor("#ffffff"));
        canvas.save();
        canvas.translate(getPaddingLeft(), getPaddingTop());
        canvas.drawPath(mPath, mPaint);
    }

    private void drawCircle(Canvas canvas) {
        int strokenWidth = 25;

        mPaint.setStrokeWidth(strokenWidth);
        mPaint.setColor(Color.parseColor("#ffffff"));
        canvas.drawCircle(circleX, circleY, radius , mPaint);
    }

    @Override
    protected void onMeasure(int widthMeasureSpec, int heightMeasureSpec) {
        super.onMeasure(widthMeasureSpec, heightMeasureSpec);
        int widthSize = MeasureSpec.getSize(widthMeasureSpec);
        int heightSize = MeasureSpec.getSize(heightMeasureSpec);
        int widthMode = MeasureSpec.getMode(widthMeasureSpec);
        int heightMode = MeasureSpec.getMode(widthMeasureSpec);

        int measuredWidth, measuredHeight;

        if (widthMode == MeasureSpec.AT_MOST)
            throw new IllegalStateException("AnimatedPathView cannot have a WRAP_CONTENT property");
        else
            measuredWidth = widthSize;

        if (heightMode == MeasureSpec.AT_MOST)
            throw new IllegalStateException("AnimatedPathView cannot have a WRAP_CONTENT property");
        else
            measuredHeight = heightSize;

        setMeasuredDimension(measuredWidth, measuredHeight);
    }
}
這段代碼借鑒了點擊打開鏈接的部分代碼,並在此基礎上做了更多的判斷和改變,以滿足本文開頭說說的那種需要,上面的代碼只是實現了畫線條的效果,那麼如何實現中間圓圈的閃爍呢,其實也很簡單,我們可以用動畫來實現(View動畫),這裡我們大可以自己自定義一個View實現,而這個View包含了圓圈閃爍和畫線,按照上面的邏輯我們寫一個自定義的View,代碼如下:
public class PointView extends FrameLayout {

    private Context mContext;
    private List points;
    private FrameLayout layouPoints;
    private AnimatedPathView animatedPath;
    private int radius=10;
    private String text="圖文標簽 $99.00";

    public PointView(Context context) {
        this(context, null);
    }

    public PointView(Context context, AttributeSet attrs) {
        this(context, attrs, 0);
    }

    public PointView(Context context, AttributeSet attrs, int defStyleAttr) {
        super(context, attrs, defStyleAttr);
        initView(context, attrs);
    }


    private void initView(Context context, AttributeSet attrs) {
        this.mContext = context;
        View imgPointLayout = inflate(context, R.layout.layout_point, this);
        layouPoints = (FrameLayout) imgPointLayout.findViewById(R.id.layouPoints);
        animatedPath=(AnimatedPathView) imgPointLayout.findViewById(R.id.animated_path);
    }


    public void addPoints(int width, int height) {
        addPoint(width, height);
    }

    public void setPoints(List points) {
        this.points = points;
    }

    private void addPoint(int width, int height) {
        layouPoints.removeAllViews();
        for (int i = 0; i < points.size(); i++) {
            double width_scale = points.get(i).widthScale;
            double height_scale = points.get(i).heightScale;
            LinearLayout view = (LinearLayout) LayoutInflater.from(mContext).inflate(R.layout.layout_img_point, this, false);
            ImageView imageView = (ImageView) view.findViewById(R.id.imgPoint);
            imageView.setTag(i);

            AnimationDrawable animationDrawable = (AnimationDrawable) imageView.getDrawable();
            animationDrawable.start();

            LayoutParams layoutParams = (LayoutParams) view.getLayoutParams();

            layoutParams.leftMargin = (int) (width * width_scale);
            layoutParams.topMargin = (int) (height * height_scale);

//            imageView.setOnClickListener(this);

            layouPoints.addView(view, layoutParams);
        }
        initView();
        initPathAnimated();
    }

    private void initPathAnimated() {
        ViewTreeObserver observer = animatedPath.getViewTreeObserver();
        if(observer != null){
            observer.addOnGlobalLayoutListener(new ViewTreeObserver.OnGlobalLayoutListener() {
                @Override
                public void onGlobalLayout() {
                    animatedPath.getViewTreeObserver().removeGlobalOnLayoutListener(this);
                    animatedPath.scaleCircleRadius(radius);
                    animatedPath.scalePathBy(animatedPath.getWidth()/2,animatedPath.getHeight()/2);
                    float[][] points = new float[][]{
                            {animatedPath.getWidth()/2-radius/2,animatedPath.getHeight()/2-radius/2},
                            {animatedPath.getWidth()/2- UIUtils.dp2px(mContext,30), animatedPath.getHeight()/2- UIUtils.dp2px(mContext,40)},
                            {animatedPath.getWidth()/2-UIUtils.dp2px(mContext,150), animatedPath.getHeight()/2- UIUtils.dp2px(mContext,40)},
                    };
                    animatedPath.setPath(points);
//                    animatedPath.setPathText(text,animatedPath.getWidth()/2-UIUtils.dp2px(mContext,150), animatedPath.getHeight()/2- UIUtils.dp2px(mContext,50));
                }
            });
        }
    }

    private void initView() {
        animatedPath.setOnClickListener(new View.OnClickListener() {
            @Override
            public void onClick(View view) {
                ObjectAnimator anim = ObjectAnimator.ofFloat(view, "percentage", 0.0f, 1.0f);
                anim.setDuration(2000);
                anim.setInterpolator(new LinearInterpolator());
                anim.start();
            }
        });
    }

}
layou_point.xml
<framelayout android:layout_height="wrap_content" android:layout_width="match_parent" xmlns:android="http://schemas.android.com/apk/res/android">
<framelayout android:id="@+id/layouPoints" android:layout_gravity="center" android:layout_height="wrap_content" android:layout_width="match_parent">
</framelayout> </framelayout>
-
....省略n多圖片資源
-
而最後我們只需要在我們自己的MainActivity中添加簡單的代碼既可實現上面的效果:
private void initPointView() {
        List list=new ArrayList<>();
        PointScaleBean point=new PointScaleBean();
        point.widthScale = 0.36f;
        point.heightScale = 0.75f;
        list.add(point);
        pointView.setPoints(list);
        pointView.addPoints(ViewGroup.LayoutParams.MATCH_PARENT,ViewGroup.LayoutParams.MATCH_PARENT);
    }
 RecyclerView使用完全指南,是時候體驗新控件了(二)
1. 概述水平列表展示,設置LayoutManager的方向性 豎直列表展示,設置LayoutManager的方向性 自定義間隔,RecyclerView.addItem
 解決Android模擬器端口被占用問題的辦法
一、問題描述 今天在Eclipse中運行Android項目時遇到The connection to adb is down, and a severe error ha
 初探Android N 那些讓人感興趣的東西--通知的好用功能
上周寫完那篇Blog之後就一直做著被分配到的Web任務,也就沒繼續捯饬N那些事,然後今天還在看Notification這部分,然後看到了LNotification這個包,
 微信沒有聲音提示怎麼辦 微信沒有聲音是怎麼回事
比如對方發的語音消息聽不到/沒聲音。這可是十分突出的一個問題,那麼該如何解決呢?微信沒有聲音是怎麼回事?微信沒有聲音提示怎麼辦呢?微信沒有聲音怎麼辦?一起看