編輯:關於Android編程
先給大家炫下效果圖:
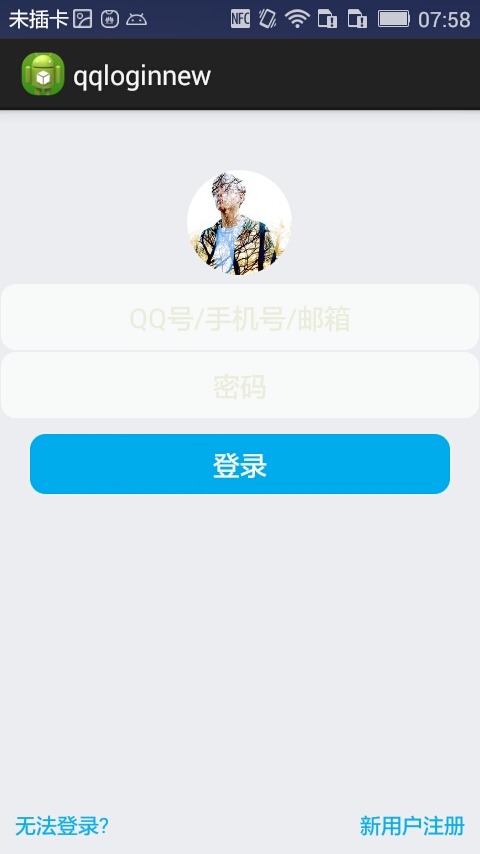
首先過程中碰到的幾個問題:
1、對 EditText 進行自定義背景
2、運行時自動 EditText 自動獲得焦點
3、在獲得焦點時即清空 hint ,而不是輸入後清空
4、清空按鈕的出現時機(在得到焦點並且有輸入內容時)
.........
--- 這些問題都有一一解決 ---
以下是代碼:
布局 fragment_main(問題2)
<!-- android:focusable="true"
  android:focusableInTouchMode="true"
  把EditText默認的行為截斷了! -->
<RelativeLayout xmlns:android="http://schemas.android.com/apk/res/android"
 xmlns:tools="http://schemas.android.com/tools"
 android:layout_width="match_parent"
 android:layout_height="match_parent"
 android:background="#ECEDF1"
 android:focusable="true"
 android:focusableInTouchMode="true"
 tools:context="com.dragon.android.qqlogin.MainActivity$PlaceholderFragment" >
 <ImageView
  android:id="@+id/imageView1"
  android:layout_width="70dp"
  android:layout_height="70dp"
  android:layout_centerHorizontal="true"
  android:layout_marginBottom="5dp"
  android:layout_marginTop="40dp"
  android:src="@drawable/a" />
 <EditText
  android:id="@+id/editText1"
  android:layout_width="match_parent"
  android:layout_height="wrap_content"
  android:layout_below="@id/imageView1"
  android:ems="10"
  android:background="@drawable/bg_edittext"
  android:inputType="textPersonName"
  android:gravity="center"
  android:textColor="#6A6A6C"
  android:hint="@string/inaccount"
  android:textColorHint="#ECEDDD">
 </EditText>
 <EditText
  android:id="@+id/editText2"
  android:layout_width="match_parent"
  android:layout_height="wrap_content"
  android:layout_below="@id/editText1"
  android:ems="10"
  android:background="@drawable/bg_edittext"
  android:inputType="textPassword"
  android:gravity="center"
  android:textColor="#6A6A6C"
  android:hint="@string/inpwd"
  android:textColorHint="#ECEDDD" >
 </EditText>
 <Button
  android:id="@+id/button1"
  android:layout_width="match_parent"
  android:layout_height="40dp"
  android:layout_below="@id/editText2"
  android:layout_marginLeft="20dp"
  android:layout_marginRight="20dp"
  android:layout_marginTop="10dp"
  android:background="@drawable/bg_button"
  android:text="@string/button"
  android:gravity="center"
  android:textColor="#F9FAFB" />
 <LinearLayout
  android:layout_width="match_parent"
  android:layout_height="wrap_content"
  android:layout_alignParentBottom="true"
  android:padding="10dp" >
  <TextView
   android:id="@+id/textView2"
   android:layout_width="wrap_content"
   android:layout_height="wrap_content"
   android:gravity="center"
   android:text="@string/faillogin"
   android:textColor="#0EB1EF" />
  <TextView
   android:id="@+id/textView3"
   android:layout_width="match_parent"
   android:layout_height="wrap_content"
   android:gravity="right"
   android:text="@string/regist"
   android:textColor="#0EB1EF" />
 </LinearLayout>
 <Button
  android:id="@+id/button2"
  android:layout_width="16dp"
  android:layout_height="16dp"
  android:layout_alignTop="@id/editText1"
  android:layout_marginTop="15dp"
  android:layout_alignParentRight="true"
  android:layout_marginRight="10dp"
  android:background="@drawable/clear"
  android:visibility="invisible" />
 <Button
  android:id="@+id/button3"
  android:layout_width="16dp"
  android:layout_height="16dp"
  android:layout_alignTop="@id/editText2"
  android:layout_marginTop="15dp"
  android:layout_alignLeft="@+id/button2"
  android:background="@drawable/clear"
  android:visibility="invisible" />
</RelativeLayout>
fragment_main
Button 和 EditText 的背景(問題1)
<?xml version="1.0" encoding="utf-8"?>
<shape xmlns:android="http://schemas.android.com/apk/res/android" >
 <stroke android:width="1px" android:color="#00ACED" />
 <solid android:color="#00ACED" />
 <corners android:radius="10dp" />
</shape>
bg_button
<?xml version="1.0" encoding="utf-8"?>
<shape xmlns:android="http://schemas.android.com/apk/res/android" >
 <stroke android:width="1px" android:color="#ECEDF1" />
 <solid android:color="#F9FAFB" />
 <corners android:radius="10dp" />
 <padding
  android:top="10dp"
  android:bottom="10dp"/>
</shape>
bg_edittext
<?xml version="1.0" encoding="utf-8"?>
<resources>
 <string name="app_name">qqloginnew</string>
 <string name="action_settings">Settings</string>
 <string name="button">登錄</string>
 <string name="faillogin">無法登錄?</string>
 <string name="regist">新用戶注冊</string>
 <string name="inaccount">QQ號/手機號/郵箱</string>
 <string name="inpwd">密碼</string>
 <string name="sucess">登錄成功</string>
</resources>
strings
MainActivity (問題3、4.....)
package com.dragon.android.qqloginnew;
import android.app.Activity;
import android.os.Bundle;
import android.text.Editable;
import android.text.TextWatcher;
import android.view.View;
import android.view.View.OnClickListener;
import android.view.View.OnFocusChangeListener;
import android.widget.Button;
import android.widget.EditText;
public class MainActivity extends Activity {
private EditText editText1;
private EditText editText2;
// private Button button;
private Button clearButton1;
private Button clearButton2;
// 得到strings中的屬性
// private String string2 = getResources().getString(R.string.inaccount);
@Override
protected void onCreate(Bundle savedInstanceState) {
super.onCreate(savedInstanceState);
setContentView(R.layout.fragment_main);
editText1 = (EditText) findViewById(R.id.editText1);
editText2 = (EditText) findViewById(R.id.editText2);
// button = (Button) findViewById(R.id.button1);
clearButton1 = (Button) findViewById(R.id.button2);
clearButton2 = (Button) findViewById(R.id.button3);
// 對EditText進行焦點變更監聽
editText1.setOnFocusChangeListener(new EditTextListener(clearButton1));
editText2.setOnFocusChangeListener(new EditTextListener(clearButton2));
// 對清空按鈕進行點擊監聽
clearButton1.setOnClickListener(new ClearButtonListener());
clearButton2.setOnClickListener(new ClearButtonListener());
// 對EditText進行編輯監聽
editText1.addTextChangedListener(new MyEditTextWatcher(editText1));
editText2.addTextChangedListener(new MyEditTextWatcher(editText2));
}
/**
* 對EditText的內容進行實時監控
*
* @author Auser
*
*/
class MyEditTextWatcher implements TextWatcher {
private CharSequence temp;
private EditText editText;
public MyEditTextWatcher(EditText editText) {
this.editText = editText;
}
@Override
// int start開始的位置, int count被改變的舊內容數, int after改變後的內容數量
public void beforeTextChanged(CharSequence s, int start, int count,
int after) {
// 這裡的s表示改變之前的內容,通常start和count組合,可以在s中讀取本次改變字段中被改變的內容。而after表示改變後新的內容的數量。
}
@Override
// int start開始的位置, int before改變前的內容數量, int count新增量
public void onTextChanged(CharSequence s, int start, int before,
int count) {
// 這裡的s表示改變之後的內容,通常start和count組合,可以在s中讀取本次改變字段中新的內容。而before表示被改變的內容的數量。
temp = s;
}
@Override
// 表示最終內容
public void afterTextChanged(Editable s) {
if (temp.length() > 0) {
// 設置清空按鈕為可見
if (editText == editText1) {
clearButton1.setVisibility(View.VISIBLE);
} else if (editText == editText2) {
clearButton2.setVisibility(View.VISIBLE);
}
} else {
// 設置清空按鈕不可見
if (editText == editText1) {
clearButton1.setVisibility(View.INVISIBLE);
} else if (editText == editText2) {
clearButton2.setVisibility(View.INVISIBLE);
}
}
}
}
/**
* 清空按鈕點擊事件
*
* @author
*
*/
class ClearButtonListener implements OnClickListener {
@Override
public void onClick(View view) {
if (view == clearButton1) {
editText1.setText("");
} else if (view == clearButton2) {
editText2.setText("");
}
}
}
/**
* 焦點變更事件
*
* @author Auser
*
*/
class EditTextListener implements OnFocusChangeListener {
private Button clear;
public EditTextListener(Button clear) {
this.clear = clear;
}
@Override
public void onFocusChange(View v, boolean hasFocus) {
EditText textView = (EditText) v;
String hint;
if (hasFocus) {
// 當獲取焦點時如果內容不為空則清空按鈕可見
if (!textView.getText().toString().equals("")) {
clear.setVisibility(View.VISIBLE);
}
// if (textView == editText2) {
// // 設置輸入格式為不可見的密碼格式
// textView.setInputType(InputType.TYPE_CLASS_TEXT
// | InputType.TYPE_TEXT_VARIATION_PASSWORD);
// }
hint = textView.getHint().toString();
// 給TextView添加額外的數據
textView.setTag(hint);
textView.setHint("");
} else {
// 當失去焦點時清空按鈕不可見
clear.setVisibility(View.INVISIBLE);
// if (textView == editText2) {
// // 設置輸入格式為可見的密碼格式
// textView.setInputType(InputType.TYPE_CLASS_TEXT
// | InputType.TYPE_TEXT_VARIATION_VISIBLE_PASSWORD);
// }
// 取出之前添加的額外數據
hint = textView.getTag().toString();
textView.setHint(hint);
}
}
}
}
下篇文章給大家介紹Android實現QQ新用戶注冊界面遇到問題及解決方法,感興趣的朋友可以參考下。
以上所述是小編給大家介紹的Android實現QQ登錄界面遇到問題及解決方法,希望對大家有所幫助,如果大家有任何疑問請給我留言,小編會及時回復大家的。在此也非常感謝大家對本站網站的支持!
 Android學習筆記-保存文件(Saving Files)
Android設備有兩種文件存儲區域:內部存儲和外部存儲 (internal and external storage)。這名字來自早期Android,那時大多數Andr
 ListView 分頁加載更新實例分享
ListView是android中最常用的控件之一。 在實際運用中往往會遇到一次性加載全部數據過多,需要分頁加載增加程序運行效率! 本demo是將更新的監聽放在listv
 App的打磨之路(上)
前言:俗話說磨刀不誤砍柴工,一個優秀的產品從一個不錯的點子直到用戶的手中,是需要一個團隊不遺余力協同合作不斷打磨出來的;同樣,一個好的App除正常的代碼編寫外,還需要經過
 Android日志收集上報功能設計與實現
幾乎所有的應用開發者都知道“用戶體驗”的重要性,要提升用戶體驗就離不開一個完備的監控和上報系統,這其中日志(包括Crash上報)是最基本的問題跟蹤和解決手段。本文接下來將